
MX300 series Quick Start Guide
Page 5
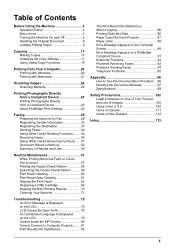
...the Destination 37 Sending Faxes 40 Using Other Useful Sending Functions.........44 Receiving Faxes 45 Using Other Useful Receiving Functions ......51 Document Stored in Memory 52 Summary of Reports and Lists 55 Routine Maintenance 57 When Printing Becomes Faint or Colors Are Incorrect 57 Printing...Appears on the Computer Screen 89 Error Message Appears on a PictBridge Compliant Device 91 Scanning Problems 92 Problems Receiving Faxes 92 Problems Sending Faxes 94 Telephone Problems 95 Appendix 96 How to Use the Documentation Provided..... 96 Reading the On-screen Manuals 97 ...
...the Destination 37 Sending Faxes 40 Using Other Useful Sending Functions.........44 Receiving Faxes 45 Using Other Useful Receiving Functions ......51 Document Stored in Memory 52 Summary of Reports and Lists 55 Routine Maintenance 57 When Printing Becomes Faint or Colors Are Incorrect 57 Printing...Appears on the Computer Screen 89 Error Message Appears on a PictBridge Compliant Device 91 Scanning Problems 92 Problems Receiving Faxes 92 Problems Sending Faxes 94 Telephone Problems 95 Appendix 96 How to Use the Documentation Provided..... 96 Reading the On-screen Manuals 97 ...
MX300 series Quick Start Guide
Page 6
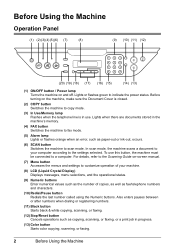
... telephone line is in use this button, the machine must be connected to a computer. Lights when there are documents stored in progress. (13) Color button Starts color copying, scanning, or faxing. 2 Before Using the Machine For details, refer to the Scanning Guide on-screen manual. (7) Menu button Accesses the menus and settings to...
... telephone line is in use this button, the machine must be connected to a computer. Lights when there are documents stored in progress. (13) Color button Starts color copying, scanning, or faxing. 2 Before Using the Machine For details, refer to the Scanning Guide on-screen manual. (7) Menu button Accesses the menus and settings to...
MX300 series Quick Start Guide
Page 7
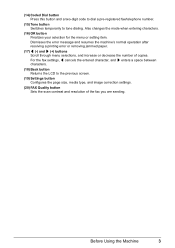
...and a two-digit code to dial a pre-registered fax/telephone number. (15) Tone button Switches temporarily to the previous screen. (19) Settings button Configures the page size, media type, and image correction settings. (20) FAX Quality button Sets the scan contrast and resolution of copies.... For the fax settings, [ cancels the entered character, and ] enters a space between characters. (18) Back button Returns the...
...and a two-digit code to dial a pre-registered fax/telephone number. (15) Tone button Switches temporarily to the previous screen. (19) Settings button Configures the page size, media type, and image correction settings. (20) FAX Quality button Sets the scan contrast and resolution of copies.... For the fax settings, [ cancels the entered character, and ] enters a space between characters. (18) Back button Returns the...
MX300 series Quick Start Guide
Page 8
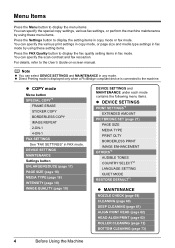
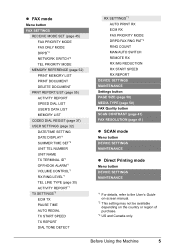
...COPY BORDERLESS COPY IMAGE REPEAT 2-ON-1 4-ON-1 FAX SETTINGS See "FAX SETTINGS" in any mode. You can specify the scan contrast and fax resolution. You can specify the various print settings in copy mode, or page size and media type settings in fax mode by using these menu items. Press the ...Settings button to display the setting items in copy mode or fax mode. Note z You can select DEVICE SETTINGS and MAINTENANCE in FAX mode. DEVICE SETTINGS MAINTENANCE Settings button ENLARGE/REDUCE (page 17) PAGE SIZE (page 18) MEDIA TYPE (page 18) INTENSITY (...
...COPY BORDERLESS COPY IMAGE REPEAT 2-ON-1 4-ON-1 FAX SETTINGS See "FAX SETTINGS" in any mode. You can specify the scan contrast and fax resolution. You can specify the various print settings in copy mode, or page size and media type settings in fax mode by using these menu items. Press the ...Settings button to display the setting items in copy mode or fax mode. Note z You can select DEVICE SETTINGS and MAINTENANCE in FAX mode. DEVICE SETTINGS MAINTENANCE Settings button ENLARGE/REDUCE (page 17) PAGE SIZE (page 18) MEDIA TYPE (page 18) INTENSITY (...
MX300 series Quick Start Guide
Page 9
...SETTINGS*1 ECM TX PAUSE TIME AUTO REDIAL TX START SPEED TX REPORT DIAL TONE DETECT RX SETTINGS*1 AUTO PRINT RX ECM RX FAX PRIORITY MODE DRPD:FAX RNG PAT*3 RING COUNT MAN/AUTO SWITCH REMOTE RX RX IMG REDUCTION RX START SPEED RX REPORT DEVICE SETTINGS MAINTENANCE Settings button ...PAGE SIZE (page 50) MEDIA TYPE (page 50) FAX Quality button SCAN CONTRAST (page 41) FAX RESOLUTION (page 41) z SCAN mode Menu button DEVICE SETTINGS MAINTENANCE z Direct Printing mode Menu button DEVICE SETTINGS MAINTENANCE *1 For ...
...SETTINGS*1 ECM TX PAUSE TIME AUTO REDIAL TX START SPEED TX REPORT DIAL TONE DETECT RX SETTINGS*1 AUTO PRINT RX ECM RX FAX PRIORITY MODE DRPD:FAX RNG PAT*3 RING COUNT MAN/AUTO SWITCH REMOTE RX RX IMG REDUCTION RX START SPEED RX REPORT DEVICE SETTINGS MAINTENANCE Settings button ...PAGE SIZE (page 50) MEDIA TYPE (page 50) FAX Quality button SCAN CONTRAST (page 41) FAX RESOLUTION (page 41) z SCAN mode Menu button DEVICE SETTINGS MAINTENANCE z Direct Printing mode Menu button DEVICE SETTINGS MAINTENANCE *1 For ...
MX300 series Quick Start Guide
Page 10
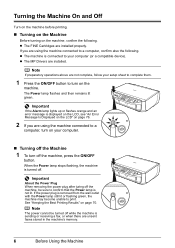
...Machine 1 To turn on your computer (or a compatible device). The Power lamp flashes and then remains lit green. z The FINE Cartridges are unsent faxes stored in the machine's memory. 6 Before Using the Machine Important About the Power Plug When removing the power plug after turing off the machine, be... with the Power lamp still lit or flashing green, the machine may become unable to confirm that the Power lamp is sending or receiving a fax, or when there are installed properly. z The machine is turned off while the machine is not lit. When the Power lamp stops flashing,...
...Machine 1 To turn on your computer (or a compatible device). The Power lamp flashes and then remains lit green. z The FINE Cartridges are unsent faxes stored in the machine's memory. 6 Before Using the Machine Important About the Power Plug When removing the power plug after turing off the machine, be... with the Power lamp still lit or flashing green, the machine may become unable to confirm that the Power lamp is sending or receiving a fax, or when there are installed properly. z The machine is turned off while the machine is not lit. When the Power lamp stops flashing,...

MX300 series Quick Start Guide
Page 11
Before Using the Machine 7 z Screen-saver Mode The LCD goes out if the machine is in Screen-saver mode, the machine turns off. When you want to restore the display. * You cannot change the wait time before the LCD goes out. Note When you press the ON/OFF button while the machine is not operated for the ON/OFF button. Perform a print operation to restore the display, perform any operation such as copying, faxing, or scanning, or press any button except for about five minutes*.
Before Using the Machine 7 z Screen-saver Mode The LCD goes out if the machine is in Screen-saver mode, the machine turns off. When you want to restore the display. * You cannot change the wait time before the LCD goes out. Note When you press the ON/OFF button while the machine is not operated for the ON/OFF button. Perform a print operation to restore the display, perform any operation such as copying, faxing, or scanning, or press any button except for about five minutes*.
MX300 series Quick Start Guide
Page 12
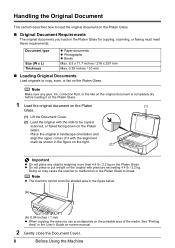
.... 8.5 x 11.7 inches / 216 x 297 mm Max. 0.39 inches / 10 mm „ Loading Original Documents Load originals to copy, scan, or fax on -screen manual. 2 Gently close the Document Cover. 8 Before Using the Machine Note z The machine cannot scan the shaded area in landscape orientation and align...original document on the Platen (1) Glass. (1) Lift the Document Cover. (2) Load the original with the side to be copied, scanned, or faxed facing down on the original with pressure exceeding 4.4 lb / 2.2 kg. Handling the Original Document This section describes how to load the original ...
.... 8.5 x 11.7 inches / 216 x 297 mm Max. 0.39 inches / 10 mm „ Loading Original Documents Load originals to copy, scan, or fax on -screen manual. 2 Gently close the Document Cover. 8 Before Using the Machine Note z The machine cannot scan the shaded area in landscape orientation and align...original document on the Platen (1) Glass. (1) Lift the Document Cover. (2) Load the original with the side to be copied, scanned, or faxed facing down on the original with pressure exceeding 4.4 lb / 2.2 kg. Handling the Original Document This section describes how to load the original ...
MX300 series Quick Start Guide
Page 16
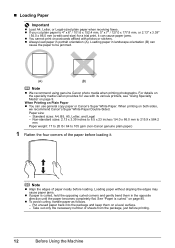
... 105 gsm (non-Canon genuine plain paper) .../ 64 to be jammed. (A) (B) Note z We recommend using genuine Canon photo media when printing photographs. Loading paper without aligning the edges may cause ... Paper size: - For details on the specialty media Canon provides for a trial print, it . See "Paper is curled,...gently bend them on both sides, we recommend Canon's Super White Paper Double-Sided. Take out only... card-size) for use general copy paper or Canon's Super White Paper. „ Loading Paper Important z Load A4, Letter, or Legal-sized plain paper ...
... 105 gsm (non-Canon genuine plain paper) .../ 64 to be jammed. (A) (B) Note z We recommend using genuine Canon photo media when printing photographs. Loading paper without aligning the edges may cause ... Paper size: - For details on the specialty media Canon provides for a trial print, it . See "Paper is curled,...gently bend them on both sides, we recommend Canon's Super White Paper Double-Sided. Take out only... card-size) for use general copy paper or Canon's Super White Paper. „ Loading Paper Important z Load A4, Letter, or Legal-sized plain paper ...

MX300 series Quick Start Guide
Page 32
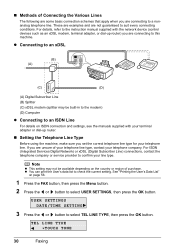
...you are able to make copies. If the power disconnects, the following will apply: z You will be able to send or receive faxes or make voice calls depends on the type of your telephone. „ Methods of connecting the machine are retained. Important If the Power...machine, you accidentally disconnect the power cord, the date/time settings as well as all documents stored in memory will not be lost. Faxing Preparing the Machine for Fax Typical examples of Connecting External Devices z Connecting to an Analog Line (A) (A) Telephone line (analog) z Connecting a Telephone or Answering ...
...you are able to make copies. If the power disconnects, the following will apply: z You will be able to send or receive faxes or make voice calls depends on the type of your telephone. „ Methods of connecting the machine are retained. Important If the Power...machine, you accidentally disconnect the power cord, the date/time settings as well as all documents stored in memory will not be lost. Faxing Preparing the Machine for Fax Typical examples of Connecting External Devices z Connecting to an Analog Line (A) (A) Telephone line (analog) z Connecting a Telephone or Answering ...

MX300 series Quick Start Guide
Page 33
Faxing 29 adapter to the B.T. adapter to connect as follows: Connect the external device line to the jack. Important Do not connect the machine and external devices in the UK If the connector of the external device cannot be connected to the jack on the machine, you will need to the same telephone line using a splitter (A). adapter, then connect the B.T. The machine may not operate properly. (A) z Connecting a Telephone or Answering Machine via a Computer (B) (A) (A) Computer (B) Telephone or Answering machine Users in parallel to purchase a B.T.
Faxing 29 adapter to the B.T. adapter to connect as follows: Connect the external device line to the jack. Important Do not connect the machine and external devices in the UK If the connector of the external device cannot be connected to the jack on the machine, you will need to the same telephone line using a splitter (A). adapter, then connect the B.T. The machine may not operate properly. (A) z Connecting a Telephone or Answering Machine via a Computer (B) (A) (A) Computer (B) Telephone or Answering machine Users in parallel to purchase a B.T.
MX300 series Quick Start Guide
Page 34
..., then press the Menu button. 2 Press the [ or ] button to check the current setting. TEL LINE TYPE TOUCH TONE 30 Faxing Note z This setting may be available depending on ISDN connection and settings, see the manuals supplied with the network device (control devices such as an ...
..., then press the Menu button. 2 Press the [ or ] button to check the current setting. TEL LINE TYPE TOUCH TONE 30 Faxing Note z This setting may be available depending on ISDN connection and settings, see the manuals supplied with the network device (control devices such as an ...
MX300 series Quick Start Guide
Page 35
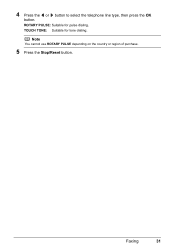
4 Press the [ or ] button to select the telephone line type, then press the OK button. Faxing 31 ROTARY PULSE: Suitable for tone dialing. TOUCH TONE: Suitable for pulse dialing. Note You cannot use ROTARY PULSE depending on the country or region of purchase. 5 Press the Stop/Reset button.
4 Press the [ or ] button to select the telephone line type, then press the OK button. Faxing 31 ROTARY PULSE: Suitable for tone dialing. TOUCH TONE: Suitable for pulse dialing. Note You cannot use ROTARY PULSE depending on the country or region of purchase. 5 Press the Stop/Reset button.
MX300 series Quick Start Guide
Page 36
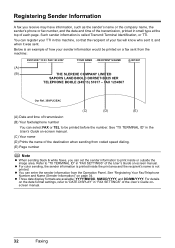
..." in this machine, so that the recipient of the User's Guide on page 34. Below is an example of the User's Guide onscreen manual. 32 Faxing z For color sending, the sender information is printed inside or outside the image area. Such sender information is not printed. You can register your...
..." in this machine, so that the recipient of the User's Guide on page 34. Below is an example of the User's Guide onscreen manual. 32 Faxing z For color sending, the sender information is printed inside or outside the image area. Such sender information is not printed. You can register your...

MX300 series Quick Start Guide
Page 37
... a space. In number mode, press the ] button once. z To enter a character that is assigned to enter a character. Follow the procedure below to the Numeric buttons. Faxing 33 z To delete a character: (1) Press the [ button. Button 1 2 3 4 5 6 7 8 9 0 # Uppercase letter mode Lowercase letter mode Number mode 1...letter mode (:A), lowercase letter mode (:a), or number mode (:1). Press the button repeatedly until the character you register names and fax/ phone numbers for Entering Numbers, Letters, and Symbols The following characters are in by the character displayed on the top right...
... a space. In number mode, press the ] button once. z To enter a character that is assigned to enter a character. Follow the procedure below to the Numeric buttons. Faxing 33 z To delete a character: (1) Press the [ button. Button 1 2 3 4 5 6 7 8 9 0 # Uppercase letter mode Lowercase letter mode Number mode 1...letter mode (:A), lowercase letter mode (:a), or number mode (:1). Press the button repeatedly until the character you register names and fax/ phone numbers for Entering Numbers, Letters, and Symbols The following characters are in by the character displayed on the top right...
MX300 series Quick Start Guide
Page 38
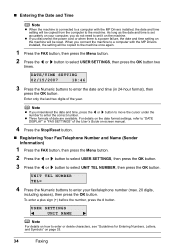
... (+) before the number, press the # button. Note z If you do not need to enter your fax/telephone number (max. 20 digits, including spaces), then press the OK button. For details on page 33. 34 Faxing USER SETTINGS UNIT NAME Note For details on your computer, you misentered the date and time... Note z When the machine is connected to a computer with the MP Drivers installed, the setting will be copied to the machine once again. 1 Press the FAX button, then press the Menu button. 2 Press the [ or ] button to the machine. z If you connect the machine to a computer with the MP Drivers ...
... (+) before the number, press the # button. Note z If you do not need to enter your fax/telephone number (max. 20 digits, including spaces), then press the OK button. For details on page 33. 34 Faxing USER SETTINGS UNIT NAME Note For details on your computer, you misentered the date and time... Note z When the machine is connected to a computer with the MP Drivers installed, the setting will be copied to the machine once again. 1 Press the FAX button, then press the Menu button. 2 Press the [ or ] button to the machine. z If you connect the machine to a computer with the MP Drivers ...
MX300 series Quick Start Guide
Page 39
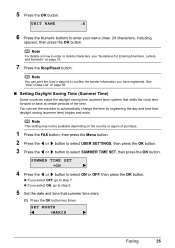
...) Some countries adopt the daylight saving time (summer time) system that shifts the clock time forward or back at certain periods of purchase. 1 Press the FAX button, then press the Menu button. 2 Press the [ or ] button to select USER SETTINGS, then press the OK button. 3 Press the [ or ] button to automatically.... (1) Press the OK button two times. Note This setting may not be available depending on page 33. 7 Press the Stop/Reset button. SET MONTH MARCH Faxing 35
...) Some countries adopt the daylight saving time (summer time) system that shifts the clock time forward or back at certain periods of purchase. 1 Press the FAX button, then press the Menu button. 2 Press the [ or ] button to select USER SETTINGS, then press the OK button. 3 Press the [ or ] button to automatically.... (1) Press the OK button two times. Note This setting may not be available depending on page 33. 7 Press the Stop/Reset button. SET MONTH MARCH Faxing 35
MX300 series Quick Start Guide
Page 40
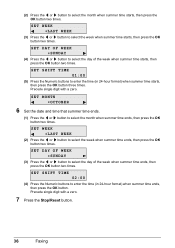
... select the week when summer time starts, then press the OK button two times. Precede single digit with a zero. 7 Press the Stop/Reset button. 36 Faxing Precede single digit with a zero. SET DAY OF WEEK SUNDAY (4) Press the [ or ] button to enter the time (in 24-hour format) when summer time...
... select the week when summer time starts, then press the OK button two times. Precede single digit with a zero. 7 Press the Stop/Reset button. 36 Faxing Precede single digit with a zero. SET DAY OF WEEK SUNDAY (4) Press the [ or ] button to enter the time (in 24-hour format) when summer time...

MX300 series Quick Start Guide
Page 41
...Registering the Destination „ Registering Coded Speed Dialing Coded speed dialing allows you need to register the recipient's fax/telephone numbers for Entering Numbers, Letters, and Symbols" on page 38. 1 Press the FAX button, then press the Menu button. 2 Press the [ or ] button to select CODED DIAL REGIST... then press the OK button. The CODED DIAL REGIST screen is displayed to dial fax/telephone numbers by simply pressing a few buttons. TEL NUMBER TEL= 4 Press the Numeric buttons to enter the fax/telephone number you want to register (max. 60 digits (40 digits for the ...
...Registering the Destination „ Registering Coded Speed Dialing Coded speed dialing allows you need to register the recipient's fax/telephone numbers for Entering Numbers, Letters, and Symbols" on page 38. 1 Press the FAX button, then press the Menu button. 2 Press the [ or ] button to select CODED DIAL REGIST... then press the OK button. The CODED DIAL REGIST screen is displayed to dial fax/telephone numbers by simply pressing a few buttons. TEL NUMBER TEL= 4 Press the Numeric buttons to enter the fax/telephone number you want to register (max. 60 digits (40 digits for the ...
MX300 series Quick Start Guide
Page 42
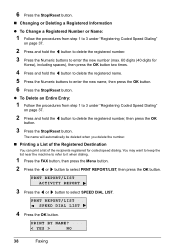
... press the OK button. 6 Press the Stop/Reset button. PRNT REPORT/LIST SPEED DIAL LIST 4 Press the OK button. PRINT BY NAME? < YES > NO 38 Faxing PRNT REPORT/LIST ACTIVITY REPORT 3 Press the [ or ] button to select PRNT REPORT/LIST, then press the OK button. 6 Press the Stop/Reset button. „... digits (40 digits for coded speed dialing. You may want to keep the list near the machine to refer to it when dialing. 1 Press the FAX button, then press the Menu button. 2 Press the [ or ] button to select SPEED DIAL LIST.
... press the OK button. 6 Press the Stop/Reset button. PRNT REPORT/LIST SPEED DIAL LIST 4 Press the OK button. PRINT BY NAME? < YES > NO 38 Faxing PRNT REPORT/LIST ACTIVITY REPORT 3 Press the [ or ] button to select PRNT REPORT/LIST, then press the OK button. 6 Press the Stop/Reset button. „... digits (40 digits for coded speed dialing. You may want to keep the list near the machine to refer to it when dialing. 1 Press the FAX button, then press the Menu button. 2 Press the [ or ] button to select SPEED DIAL LIST.


