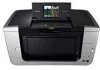
MP950 User's Guide
Page 3
... from a Compliant Device 71 Connecting to a PictBridge Compliant Device 71 Printing Photographs Directly from a PictBridge Compliant Device 73 Printing Photographs Directly from a Canon Bubble Jet Direct Compatible Digital Camera 76 6 Printing Photographs from a Wireless Communication Device 78 Setting the Page Size, Media Type, and Layout When... the Display Properly on the LCD/Cannot See the Display on the LCD .. 117 Cannot Scan Films 118 Ink Does Not Come Out/Printing is Blurred/ Colors are Wrong/White Streaks/Straight Lines are Misaligned/Cannot Print to End of Job 119 Back of Paper is...
... from a Compliant Device 71 Connecting to a PictBridge Compliant Device 71 Printing Photographs Directly from a PictBridge Compliant Device 73 Printing Photographs Directly from a Canon Bubble Jet Direct Compatible Digital Camera 76 6 Printing Photographs from a Wireless Communication Device 78 Setting the Page Size, Media Type, and Layout When... the Display Properly on the LCD/Cannot See the Display on the LCD .. 117 Cannot Scan Films 118 Ink Does Not Come Out/Printing is Blurred/ Colors are Wrong/White Streaks/Straight Lines are Misaligned/Cannot Print to End of Job 119 Back of Paper is...
MP950 User's Guide
Page 9
... it may result in fire or electrical shock. The operating requirement of the machine when printing later. Use only the power cord that prevents the ink from the power outlet. Turn OFF the power and unplug the machine in performance, indicating a need for the machine in the country where you can...
... it may result in fire or electrical shock. The operating requirement of the machine when printing later. Use only the power cord that prevents the ink from the power outlet. Turn OFF the power and unplug the machine in performance, indicating a need for the machine in the country where you can...
MP950 User's Guide
Page 10
... shock. Failing to do not touch the electrical contacts of other liquids such as this may result in personal injury. Then, contact the Canon Customer Care Center. After printing, do so may result in injury. This can damage the machine's components. Do not subject the machine to...with internal electrical components, the machine may adhere and become difficult to strong physical shock or vibration. If you use hot water, the ink may short-circuit, resulting in fire or electrical shock. Do not touch the high-voltage electrical parts as glasses, vases, or pot plants...
... shock. Failing to do not touch the electrical contacts of other liquids such as this may result in personal injury. Then, contact the Canon Customer Care Center. After printing, do so may result in injury. This can damage the machine's components. Do not subject the machine to...with internal electrical components, the machine may adhere and become difficult to strong physical shock or vibration. If you use hot water, the ink may short-circuit, resulting in fire or electrical shock. Do not touch the high-voltage electrical parts as glasses, vases, or pot plants...

MP950 User's Guide
Page 11
Ink may leak out and stain clothing or the surrounding area. If a child ingests any ink, consult a doctor immediately. Never touch the Print Head. 9 Do not shake print heads or ink tanks. Print Head/Ink tanks For safety reasons, store print heads and ink tanks out of the reach of small children.
Ink may leak out and stain clothing or the surrounding area. If a child ingests any ink, consult a doctor immediately. Never touch the Print Head. 9 Do not shake print heads or ink tanks. Print Head/Ink tanks For safety reasons, store print heads and ink tanks out of the reach of small children.
MP950 User's Guide
Page 16
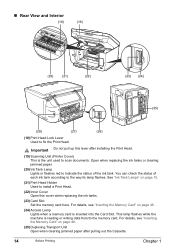
...) (21) (22) (23) (24) (25) (28) (27) (26) (18) Print Head Lock Lever Used to the memory card. You can check the status of the ink tank. For details, see "Inserting the Memory Card" on page 46. (25) Duplexing Transport Unit Open when clearing jammed paper after installing the Print Head... the Card Slot. For details, see "Inserting the Memory Card" on page 15. (21) Print Head Holder Used to the way its lamp flashes. See "Ink Tank Lamps" on page 46. (24) Access Lamp Lights when a memory card is reading or writing data from/to fix the Print Head. Important Do...
...) (21) (22) (23) (24) (25) (28) (27) (26) (18) Print Head Lock Lever Used to the memory card. You can check the status of the ink tank. For details, see "Inserting the Memory Card" on page 46. (25) Duplexing Transport Unit Open when clearing jammed paper after installing the Print Head... the Card Slot. For details, see "Inserting the Memory Card" on page 15. (21) Print Head Holder Used to the way its lamp flashes. See "Ink Tank Lamps" on page 46. (24) Access Lamp Lights when a memory card is reading or writing data from/to fix the Print Head. Important Do...
MP950 User's Guide
Page 17
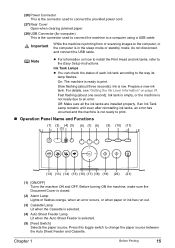
... turning ON the machine, make sure the Document Cover is closed. (2) Alarm Lamp Lights or flashes orange, when an error occurs, or when paper or ink has run out. (3) Cassette Lamp Lit when the Cassette is selected. (4) Auto Sheet Feeder Lamp Lit when the Auto Sheet Feeder is low. (26) Power... While the machine is printing from or scanning images to the computer, or the computer is not ready to print. If an Ink Tank Lamp remains unlit even after reinstalling ink tanks, an error has occurred and the machine is in the sleep mode or standby mode, do not disconnect and connect...
... turning ON the machine, make sure the Document Cover is closed. (2) Alarm Lamp Lights or flashes orange, when an error occurs, or when paper or ink has run out. (3) Cassette Lamp Lit when the Cassette is selected. (4) Auto Sheet Feeder Lamp Lit when the Auto Sheet Feeder is low. (26) Power... While the machine is printing from or scanning images to the computer, or the computer is not ready to print. If an Ink Tank Lamp remains unlit even after reinstalling ink tanks, an error has occurred and the machine is in the sleep mode or standby mode, do not disconnect and connect...
MP950 User's Guide
Page 19
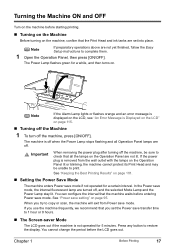
... the Operation Panel, then press [ON/OFF]. When you set into place. If you use the machine frequently, we recommend that the Print Head and ink tanks are not yet finished, follow the Easy Setup Instructions to copy or scan, the machine will exit from the wall outlet with the lamps...
... the Operation Panel, then press [ON/OFF]. When you set into place. If you use the machine frequently, we recommend that the Print Head and ink tanks are not yet finished, follow the Easy Setup Instructions to copy or scan, the machine will exit from the wall outlet with the lamps...
MP950 User's Guide
Page 20
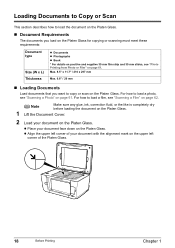
Note Make sure any glue, ink, correction fluid, or the like is completely dry before loading the document on the Platen Glass. 1 Lift the Document Cover. 2 Load your document on the ...
Note Make sure any glue, ink, correction fluid, or the like is completely dry before loading the document on the Platen Glass. 1 Lift the Document Cover. 2 Load your document on the ...
MP950 User's Guide
Page 23
... dry. z Put unused paper back into the package, and store them from direct exposure to dry for printing. Colors in dark images may become smudged if you allow the ink to air or sunlight. z Do not store or display printouts in an adhesive-type album as possible to its ...paper z Damp paper z Excessively thin paper (less than 64 gsm or 17 lb) z Excessively thick paper* (more than 105 gsm or 28 lb)(non-Canon branded paper) z Picture postcards z Postcards affixed with photos or stickers z Envelopes with double flaps z Envelopes with sticker flaps z Envelopes with an embossed or treated...
... dry. z Put unused paper back into the package, and store them from direct exposure to dry for printing. Colors in dark images may become smudged if you allow the ink to air or sunlight. z Do not store or display printouts in an adhesive-type album as possible to its ...paper z Damp paper z Excessively thin paper (less than 64 gsm or 17 lb) z Excessively thick paper* (more than 105 gsm or 28 lb)(non-Canon branded paper) z Picture postcards z Postcards affixed with photos or stickers z Envelopes with double flaps z Envelopes with sticker flaps z Envelopes with an embossed or treated...
MP950 User's Guide
Page 27
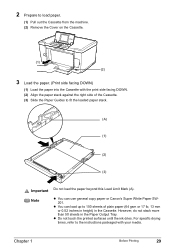
... with your environment where the temperature and humidity are high or low. z You can use general copy paper or Canon's Super White Paper SW201. z Do not touch the printed surfaces until the ink dries. For specific drying times, refer to 150 sheets of plain paper (64 gsm or 17 lb, 13 mm...
... with your environment where the temperature and humidity are high or low. z You can use general copy paper or Canon's Super White Paper SW201. z Do not touch the printed surfaces until the ink dries. For specific drying times, refer to 150 sheets of plain paper (64 gsm or 17 lb, 13 mm...
MP950 User's Guide
Page 31
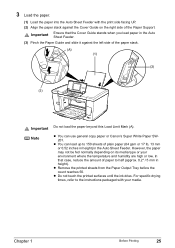
... 29 However, do not stack more than 50 sheets in the Cassette. z You can use general copy paper or Canon's Super White Paper SW201. z Do not touch the printed surfaces until the ink dries. 2 Prepare to load paper. (1) Pull out the Cassette from the machine. (2) Remove the Cover on the Cassette. (1) (2) 3 Load...
... 29 However, do not stack more than 50 sheets in the Cassette. z You can use general copy paper or Canon's Super White Paper SW201. z Do not touch the printed surfaces until the ink dries. 2 Prepare to load paper. (1) Pull out the Cassette from the machine. (2) Remove the Cover on the Cassette. (1) (2) 3 Load...
MP950 User's Guide
Page 61
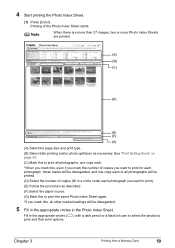
4 Start printing the Photo Index Sheet. (1) Press [Color]. Chapter 3 Printing from a Memory Card 59 Fill in the appropriate circles ( ) with a dark pencil or a black ink pen to select the photos to print the same Photo Index Sheet again. *If you mark this, all photographs will be disregarded. 5 Fill in the ...
4 Start printing the Photo Index Sheet. (1) Press [Color]. Chapter 3 Printing from a Memory Card 59 Fill in the appropriate circles ( ) with a dark pencil or a black ink pen to select the photos to print the same Photo Index Sheet again. *If you mark this, all photographs will be disregarded. 5 Fill in the ...
MP950 User's Guide
Page 98
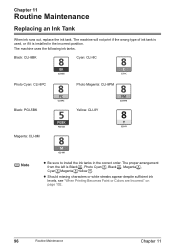
...: CLI-8PM Yellow: CLI-8Y Note z Be sure to install the ink tanks in the incorrect position. z Should missing characters or white streaks appear despite sufficient ink levels, see "When Printing Becomes Faint or Colors are Incorrect" on page 102. 96 Routine Maintenance Chapter 11 The machine ...uses the following ink tanks. The machine will not print if the wrong type of ink tank is used, or if it ...
...: CLI-8PM Yellow: CLI-8Y Note z Be sure to install the ink tanks in the incorrect position. z Should missing characters or white streaks appear despite sufficient ink levels, see "When Printing Becomes Faint or Colors are Incorrect" on page 102. 96 Routine Maintenance Chapter 11 The machine ...uses the following ink tanks. The machine will not print if the wrong type of ink tank is used, or if it ...

MP950 User's Guide
Page 99
... occurred and the machine cannot continue to identify the empty tank using the LCD and replace it with a new ink tank. If you start printing. Be sure to press [OK] with an empty ink tank, it will be a cause of trouble. * Printing does not resume if any of the machine and .... ...Repeats If an error message is displayed on page 115. Getting the Ink Level Information You can check the ink tank status by the ink tank lamp display. When the ink level is displayed. When Low Ink is Detected: is low: The ink tank lamp flashes slowly (about one second). z To continue printing, select and ...
... occurred and the machine cannot continue to identify the empty tank using the LCD and replace it with a new ink tank. If you start printing. Be sure to press [OK] with an empty ink tank, it will be a cause of trouble. * Printing does not resume if any of the machine and .... ...Repeats If an error message is displayed on page 115. Getting the Ink Level Information You can check the ink tank status by the ink tank lamp display. When the ink level is displayed. When Low Ink is Detected: is low: The ink tank lamp flashes slowly (about one second). z To continue printing, select and ...
MP950 User's Guide
Page 100
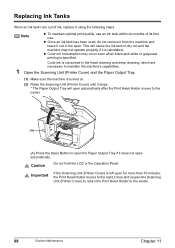
Note z To maintain optimal print quality, use . z Color ink consumption may not operate properly if it is specified. Caution ...Press the Open Button to open the Paper Output Tray if it stops. * The Paper Output Tray will cause the ink tank to the center. 98 Routine Maintenance Chapter 11 Important If the Scanning Unit (Printer Cover) is turned on.... (2) Raise the Scanning Unit (Printer Cover) until it does not open automatically. Color ink is consumed in the open. Close and reopen the Scanning Unit (Printer Cover) to return the Print Head Holder...
Note z To maintain optimal print quality, use . z Color ink consumption may not operate properly if it is specified. Caution ...Press the Open Button to open the Paper Output Tray if it stops. * The Paper Output Tray will cause the ink tank to the center. 98 Routine Maintenance Chapter 11 Important If the Scanning Unit (Printer Cover) is turned on.... (2) Raise the Scanning Unit (Printer Cover) until it does not open automatically. Color ink is consumed in the open. Close and reopen the Scanning Unit (Printer Cover) to return the Print Head Holder...
MP950 User's Guide
Page 101
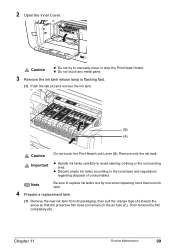
... (B). z Do not touch any metal parts. 3 Remove the ink tank whose lamp is flashing fast. (1) Push the tab (A) and remove the ink tank. (B) (A) Caution Do not touch the Print Head Lock Lever (B). z Discard empty ink tanks according to manually move or stop the Print Head Holder. ...Chapter 11 Routine Maintenance 99 Remove only the ink tank. 2 Open the Inner Cover. Caution z...
... (B). z Do not touch any metal parts. 3 Remove the ink tank whose lamp is flashing fast. (1) Push the tab (A) and remove the ink tank. (B) (A) Caution Do not touch the Print Head Lock Lever (B). z Discard empty ink tanks according to manually move or stop the Print Head Holder. ...Chapter 11 Routine Maintenance 99 Remove only the ink tank. 2 Open the Inner Cover. Caution z...
MP950 User's Guide
Page 102
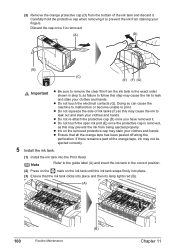
... shown in the correct position. (2) Press on the mark on the removed protective cap may not be ejected correctly. 5 Install the ink tank. (1) Install the ink tank into the Print Head. Doing so can cause the machine to malfunction or become unable to print. If there remains a part...tape has been peeled off along the perforation. Discard the cap once it . Carefully hold the protective cap when removing it . z Ink on the ink tank until the ink tank snaps firmly into place and then its lamp lights red (B). (A) (B) 100 Routine Maintenance Chapter 11 z Do not squeeze the ...
... shown in the correct position. (2) Press on the mark on the removed protective cap may not be ejected correctly. 5 Install the ink tank. (1) Install the ink tank into the Print Head. Doing so can cause the machine to malfunction or become unable to print. If there remains a part...tape has been peeled off along the perforation. Discard the cap once it . Carefully hold the protective cap when removing it . z Ink on the ink tank until the ink tank snaps firmly into place and then its lamp lights red (B). (A) (B) 100 Routine Maintenance Chapter 11 z Do not squeeze the ...

MP950 User's Guide
Page 103
...a long time When not using both black & white and in the correct order directed on the paper. Important Make sure to install all the ink tanks to the right. z Do not hold the Scanning Unit (Printer Cover) firmly using the machine for high-precision printing. Note If the ...installed in the Print Head for a long time, print or copy in both hands, and be careful not to prevent the ink from drying. Numerous nozzles are installed in color, or perform Print Head cleaning, about once a month to prevent degradation of time, the Print Head nozzles become blocked by ...
...a long time When not using both black & white and in the correct order directed on the paper. Important Make sure to install all the ink tanks to the right. z Do not hold the Scanning Unit (Printer Cover) firmly using the machine for high-precision printing. Note If the ...installed in the Print Head for a long time, print or copy in both hands, and be careful not to prevent the ink from drying. Numerous nozzles are installed in color, or perform Print Head cleaning, about once a month to prevent degradation of time, the Print Head nozzles become blocked by ...
MP950 User's Guide
Page 104
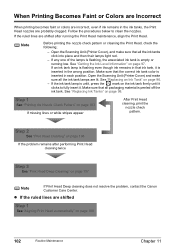
...Step 1 See "Printing the Nozzle Check Pattern" on page 96. - Make sure that the correct ink tank color is peeled off the ink tank. If an ink tank lamp is inserted in each position. See "Replacing an Ink Tank" on page 103 If missing lines or white stripes appear After Print Head cleaning, print... does not resolve the problem, contact the Canon Customer Care Center. z If the ruled lines are shifted after performing Print Head cleaning twice Step 3 See "Print Head Deep Cleaning" on page 106 If the problem remains after running low. If the ink tank lamp is unlit, press the mark ...
...Step 1 See "Printing the Nozzle Check Pattern" on page 96. - Make sure that the correct ink tank color is peeled off the ink tank. If an ink tank lamp is inserted in each position. See "Replacing an Ink Tank" on page 103 If missing lines or white stripes appear After Print Head cleaning, print... does not resolve the problem, contact the Canon Customer Care Center. z If the ruled lines are shifted after performing Print Head cleaning twice Step 3 See "Print Head Deep Cleaning" on page 106 If the problem remains after running low. If the ink tank lamp is unlit, press the mark ...
MP950 User's Guide
Page 105
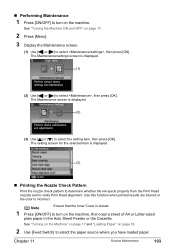
The Maintenance screen is displayed. (3) „ Printing the Nozzle Check Pattern Print the nozzle check pattern to determine whether the ink ejects properly from the Print Head nozzles and to verify Print Head alignment. The setting screen for the selected item is displayed. (2) (3) Use [ .... 2 Press [Menu]. 3 Display the Maintenance screen. (1) Use [ ] or [ ] to select , then press [OK]. Use this function when printed results are blurred or the color is displayed. (1) (2) Use [ ] or [ ] to select , then press [OK]. See "Turning the Machine ON and OFF" on page 19. 2 Use [Feed Switch]...
The Maintenance screen is displayed. (3) „ Printing the Nozzle Check Pattern Print the nozzle check pattern to determine whether the ink ejects properly from the Print Head nozzles and to verify Print Head alignment. The setting screen for the selected item is displayed. (2) (3) Use [ .... 2 Press [Menu]. 3 Display the Maintenance screen. (1) Use [ ] or [ ] to select , then press [OK]. Use this function when printed results are blurred or the color is displayed. (1) (2) Use [ ] or [ ] to select , then press [OK]. See "Turning the Machine ON and OFF" on page 19. 2 Use [Feed Switch]...


