User's Guide
Page 8
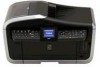
Incorrect maintenance procedures may result in burns or electrical shock. When turning OFF the power, be able to print later. Location Do not block or cover the ventilation port or any openings on a flat, stable, vibration-free surface that is not ... the machine outdoors. The machine contains high-voltage components. Then contact the Canon Customer Care Center. There are no user serviceable parts inside of the wall outlet while the Alarm Lamp is lit or flashing, the Print Head is strong enough to a heating source. If you ignore any maintenance procedure...
Incorrect maintenance procedures may result in burns or electrical shock. When turning OFF the power, be able to print later. Location Do not block or cover the ventilation port or any openings on a flat, stable, vibration-free surface that is not ... the machine outdoors. The machine contains high-voltage components. Then contact the Canon Customer Care Center. There are no user serviceable parts inside of the wall outlet while the Alarm Lamp is lit or flashing, the Print Head is strong enough to a heating source. If you ignore any maintenance procedure...

User's Guide
Page 150
... See "Print Head Cleaning" on page 151 If the problem remains after running low. When Printing Becomes Faint or Colors are Incorrect When printing becomes faint or colors are incorrect, even if ink remains in the ink tanks, the Print Head nozzles are shifted Step 1 See "Aligning Print Head automatically" ... the Print Head maintenance, align the Print Head. Make sure that all the ink tank lamps are shifted after performing Print Head cleaning twice Step 3 See "Print Head Deep Cleaning" on page 152 Note If Print Head Deep cleaning does not resolve the problem, contact the Canon Customer ...
... See "Print Head Cleaning" on page 151 If the problem remains after running low. When Printing Becomes Faint or Colors are Incorrect When printing becomes faint or colors are incorrect, even if ink remains in the ink tanks, the Print Head nozzles are shifted Step 1 See "Aligning Print Head automatically" ... the Print Head maintenance, align the Print Head. Make sure that all the ink tank lamps are shifted after performing Print Head cleaning twice Step 3 See "Print Head Deep Cleaning" on page 152 Note If Print Head Deep cleaning does not resolve the problem, contact the Canon Customer ...

User's Guide
Page 151
... are blurred or the color is displayed. (1) (2) Use [ ] or [ ] to select the setting item, then press [OK]. Note Ensure that the Inner Cover is displayed. (2) (3) Use [ ] or [ ] to select , then press [OK]. The Maintenance screen is closed. 1 Press [ON/OFF] to verify Print Head alignment. The Maintenance/settings screen is incorrect. Chapter 10 Routine...
... are blurred or the color is displayed. (1) (2) Use [ ] or [ ] to select the setting item, then press [OK]. Note Ensure that the Inner Cover is displayed. (2) (3) Use [ ] or [ ] to select , then press [OK]. The Maintenance screen is closed. 1 Press [ON/OFF] to verify Print Head alignment. The Maintenance/settings screen is incorrect. Chapter 10 Routine...

User's Guide
Page 164
... [OK]. z More than one ink tanks of the same color are as possible. See "Replacing an Ink Tank" on page 142. Canon recommends to install the Print Head. U140 U043 Possible causes are installed. The following color is installed. Install the appropriate ink tank. Using refilled ink... in a waste ink absorber placed in the machine. This may damage the Print Head. You will release the function for any machine malfunction or damage caused by this error still remains, the Print Head may not be installed properly (The lamp on the ink tank is incorrect.
... [OK]. z More than one ink tanks of the same color are as possible. See "Replacing an Ink Tank" on page 142. Canon recommends to install the Print Head. U140 U043 Possible causes are installed. The following color is installed. Install the appropriate ink tank. Using refilled ink... in a waste ink absorber placed in the machine. This may damage the Print Head. You will release the function for any machine malfunction or damage caused by this error still remains, the Print Head may not be installed properly (The lamp on the ink tank is incorrect.
User's Guide
Page 169
... not configured Make sure that the [Media Type] selected matches the paper loaded. configured. z Ink supply is closed. See "Aligning Print Head automatically" on page 152. The paper source is some foreign matter in Macintosh. 1. Press the Open Button to the [Fine] end...Auto Sheet Feeder or Cassette. On the [Main] tab, click [High] for higher print quality. 1. z If straight lines are shifted. Chapter 11 Troubleshooting 167 Cause Incorrect media type Action When printing directly from a digital camera, on the Operation Panel, confirm that the [Media Type]...
... not configured Make sure that the [Media Type] selected matches the paper loaded. configured. z Ink supply is closed. See "Aligning Print Head automatically" on page 152. The paper source is some foreign matter in Macintosh. 1. Press the Open Button to the [Fine] end...Auto Sheet Feeder or Cassette. On the [Main] tab, click [High] for higher print quality. 1. z If straight lines are shifted. Chapter 11 Troubleshooting 167 Cause Incorrect media type Action When printing directly from a digital camera, on the Operation Panel, confirm that the [Media Type]...
User's Guide
Page 170
...are printing a document with a large printing area (with small margins) or are printing multiple sets, printing may become extremely hot. Incorrect page size is deleted. Note In Windows Me or Windows 98 Select [Purge Print ... ensure that it matches the size of the paper loaded. To protect the Print Head, printing will stop to allow the ink time to have stopped depending on the [...until data is deleted. 1. The print job is processed. It may not be selected. 5. Use Canon IJ Status Monitor in Windows or Printer Setup Utility (or Print Center) in progress. Open the printer...
...are printing a document with a large printing area (with small margins) or are printing multiple sets, printing may become extremely hot. Incorrect page size is deleted. Note In Windows Me or Windows 98 Select [Purge Print ... ensure that it matches the size of the paper loaded. To protect the Print Head, printing will stop to allow the ink time to have stopped depending on the [...until data is deleted. 1. The print job is processed. It may not be selected. 5. Use Canon IJ Status Monitor in Windows or Printer Setup Utility (or Print Center) in progress. Open the printer...
User's Guide
Page 181
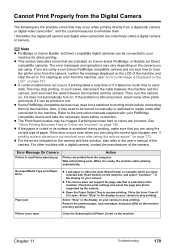
...of the machine and clear the error. Select "Stop" in either the Auto Sheet Feeder or Cassette which you are using a non-Canon PictBridge compatible camera and not sure how to send data. Printer cover open . If you are using the correct type of paper. ... in the display on your camera. Cannot Print Properly from the Digital Camera The following are the possible errors that may be clogged if printing becomes faint or colors are incorrect. or Bubble Jet Direct compatible cameras. z The Print Head nozzles may occur when printing directly from a digital still camera or digital...
...of the machine and clear the error. Select "Stop" in either the Auto Sheet Feeder or Cassette which you are using a non-Canon PictBridge compatible camera and not sure how to send data. Printer cover open . If you are using the correct type of paper. ... in the display on your camera. Cannot Print Properly from the Digital Camera The following are the possible errors that may be clogged if printing becomes faint or colors are incorrect. or Bubble Jet Direct compatible cameras. z The Print Head nozzles may occur when printing directly from a digital still camera or digital...
Service Manual
Page 10
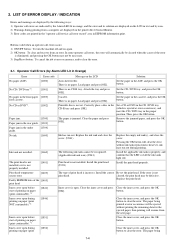
...icon) (U043) Print head is incorrect. Set the CD / DVD tray, and press the OK button. There is not properly installed. [1401] Print head temperature sensor error [1403] Faulty EEPROM data of the [1405] print head Inner cover open before start of printing on the LCD Solution... Install the applicable ink tank(s) properly, and confirm that the LED's of the error is not print head. Load paper and press [OK]. button. Replace the print head. Install the print head. (U051) Replace the empty ink tank(s), and close the cover. (U041) The following ways: ...
...icon) (U043) Print head is incorrect. Set the CD / DVD tray, and press the OK button. There is not properly installed. [1401] Print head temperature sensor error [1403] Faulty EEPROM data of the [1405] print head Inner cover open before start of printing on the LCD Solution... Install the applicable ink tank(s) properly, and confirm that the LED's of the error is not print head. Load paper and press [OK]. button. Replace the print head. Install the print head. (U051) Replace the empty ink tank(s), and close the cover. (U041) The following ways: ...
Service Manual
Page 12
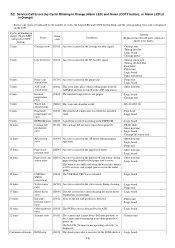
... button) Error Error code Conditions Solution (Replacement of cycles the Alarm LED and COPY button blink, and the corresponding error code is incorrect in the ASF cam sensor. - Purge unit - Platen unit - Logic board 22 times Scanner error [5010] The scanner unit ...feed cassette. - Carriage unit 7 times Waste ink [5B00] The waste ink absorber is detected. Ink absorber kit 8 times Print head [5200] The print head temperature exceeded the specified temperature rise value. Logic board - Logic board 20 times Other hardware [6500] The PCI bus error is...
... button) Error Error code Conditions Solution (Replacement of cycles the Alarm LED and COPY button blink, and the corresponding error code is incorrect in the ASF cam sensor. - Purge unit - Platen unit - Logic board 22 times Scanner error [5010] The scanner unit ...feed cassette. - Carriage unit 7 times Waste ink [5B00] The waste ink absorber is detected. Ink absorber kit 8 times Print head [5200] The print head temperature exceeded the specified temperature rise value. Logic board - Logic board 20 times Other hardware [6500] The PCI bus error is...
Service Manual
Page 18
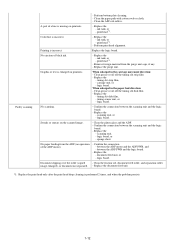
...incorrect. - Replace the - timing slit strip film, - logic board. Confirm the connection between the ADF PWB and the logic board. - scanning unit, - sponge sheet. Confirm the connection - Clean the friction tab, document feed roller, and separation roller. Color hue is enlarged on printouts. Perform print head... board. - Perform bottom plate cleaning. - print head*1. - Replace the - Replace the - logic board. Replace the document feed unit. *1: Replace the print head only after the print head deep cleaning is incorrect. Replace the - Replace the - Confirm the...
...incorrect. - Replace the - timing slit strip film, - logic board. Confirm the connection between the ADF PWB and the logic board. - scanning unit, - sponge sheet. Confirm the connection - Clean the friction tab, document feed roller, and separation roller. Color hue is enlarged on printouts. Perform print head... board. - Perform bottom plate cleaning. - print head*1. - Replace the - Replace the - logic board. Replace the document feed unit. *1: Replace the print head only after the print head deep cleaning is incorrect. Replace the - Replace the - Confirm the...


