User's Guide
Page 3
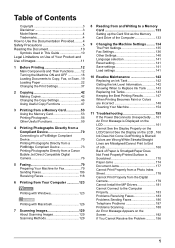
...Compliant Device 70 Printing Photographs Directly from a PictBridge Compliant Device 73 Printing Photographs Directly from a Canon Bubble Jet Direct Compatible Digital Camera 76 5 Faxing 79 Preparing Your Machine for Fax 79 ... Ink Tanks 143 Keeping the Best Printing Results 147 When Printing Becomes Faint or Colors are Incorrect 148 Cleaning Your Machine 154 11 Troubleshooting 159 If the Power Disconnects...a Photo Index Sheet 178 Cannot Print Properly from the Digital Camera 179 Cannot Install the MP Drivers 181 Cannot Connect to the Computer Properly 183 Problems Receiving Faxes...
...Compliant Device 70 Printing Photographs Directly from a PictBridge Compliant Device 73 Printing Photographs Directly from a Canon Bubble Jet Direct Compatible Digital Camera 76 5 Faxing 79 Preparing Your Machine for Fax 79 ... Ink Tanks 143 Keeping the Best Printing Results 147 When Printing Becomes Faint or Colors are Incorrect 148 Cleaning Your Machine 154 11 Troubleshooting 159 If the Power Disconnects...a Photo Index Sheet 178 Cannot Print Properly from the Digital Camera 179 Cannot Install the MP Drivers 181 Cannot Connect to the Computer Properly 183 Problems Receiving Faxes...

User's Guide
Page 4
... Equipment 212 Customer Technical Supports 213 Users in the U.S.A 206 Pre-Installation Requirements for MP830...206 Connection of the Equipment 206 In Case of Equipment Malfunction 207 Rights of the Telephone Company 207 FCC Notice 207 Mercury Legislation 208 CANON U.S.A., INC. 12 Appendix 197 Printing Area 197 How to Read the On-screen...
... Equipment 212 Customer Technical Supports 213 Users in the U.S.A 206 Pre-Installation Requirements for MP830...206 Connection of the Equipment 206 In Case of Equipment Malfunction 207 Rights of the Telephone Company 207 FCC Notice 207 Mercury Legislation 208 CANON U.S.A., INC. 12 Appendix 197 Printing Area 197 How to Read the On-screen...
User's Guide
Page 8
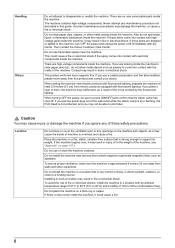
...lighting. Do not place the machine on the machine with dry hands. Do not drop paper clips, staples, or other equipment. Then contact the Canon Customer Care Center. This product emits low level magnetic flux. Place the machine on page 197.) Do not use or store the machine outdoors. ...such as speakers. This could cause a fire. 6 When turning OFF the power, be able to 35°C) and humidity of fire or electrical shocks, install the machine in this product and consult your doctor. To avoid the risk of 10% to a heating source. Handling Others Do not attempt to support...
...lighting. Do not place the machine on the machine with dry hands. Do not drop paper clips, staples, or other equipment. Then contact the Canon Customer Care Center. This product emits low level magnetic flux. Place the machine on page 197.) Do not use or store the machine outdoors. ...such as speakers. This could cause a fire. 6 When turning OFF the power, be able to 35°C) and humidity of fire or electrical shocks, install the machine in this product and consult your doctor. To avoid the risk of 10% to a heating source. Handling Others Do not attempt to support...
User's Guide
Page 9
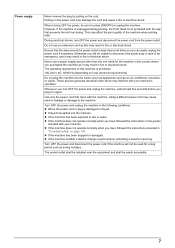
... the machine does not operate normally when you will not be unable to press [ON/OFF] or unplug the machine. The socket-outlet shall be installed near the equipment and shall be sure to disconnect the power plug in case of the machine when printing later. Power supply Never remove the...
... the machine does not operate normally when you will not be unable to press [ON/OFF] or unplug the machine. The socket-outlet shall be installed near the equipment and shall be sure to disconnect the power plug in case of the machine when printing later. Power supply Never remove the...
User's Guide
Page 16
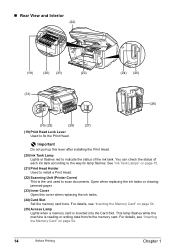
See "Ink Tank Lamps" on page 15. (21) Print Head Holder Used to install a Print Head. (22) Scanning Unit (Printer Cover) This is the unit used to fix the Print Head. „ Rear View and Interior (22) (19) (20) (...) Print Head Lock Lever Used to scan documents. Open when replacing the ink tanks or clearing jammed paper. (23) Inner Cover Open this lever after installing the Print Head. (20) Ink Tank Lamp Lights or flashes red to the way its lamp flashes. For details, see "Inserting the Memory Card" on...
See "Ink Tank Lamps" on page 15. (21) Print Head Holder Used to install a Print Head. (22) Scanning Unit (Printer Cover) This is the unit used to fix the Print Head. „ Rear View and Interior (22) (19) (20) (...) Print Head Lock Lever Used to scan documents. Open when replacing the ink tanks or clearing jammed paper. (23) Inner Cover Open this lever after installing the Print Head. (20) Ink Tank Lamp Lights or flashes red to the way its lamp flashes. For details, see "Inserting the Memory Card" on...
User's Guide
Page 17
For details, see "Getting the Ink Level Information" on how to install the Print Head and ink tanks, refer to the way its lamp flashes. If an Ink Tank Lamp remains unlit even after pulling out the ... on page 142. Slow flashing (about one second): Ink tank is empty, or the machine is low. Off: Make sure all the ink tanks are installed properly. (26) Duplexing Transport Unit Open when clearing jammed paper after reinstalling ink tanks, an error has occurred and the machine is ready to print...
For details, see "Getting the Ink Level Information" on how to install the Print Head and ink tanks, refer to the way its lamp flashes. If an Ink Tank Lamp remains unlit even after pulling out the ... on page 142. Slow flashing (about one second): Ink tank is empty, or the machine is low. Off: Make sure all the ink tanks are installed properly. (26) Duplexing Transport Unit Open when clearing jammed paper after reinstalling ink tanks, an error has occurred and the machine is ready to print...
User's Guide
Page 86
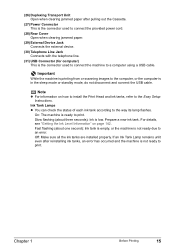
... screen. The date and time will be reset when you disconnect the power cord or there is connected to your computer with the MP Drivers installed, the date and time will be read from your computer every time you can be read from your machine is a power failure. z Entering the Date... And Time Note When your computer and set it again on the machine by connecting the machine to a computer with the MP driver installed. 1 Display the FAX menu. See "Display the FAX menu." on page 81. 2 Display the Device settings screen. In this case, you start the computer, turn...
... screen. The date and time will be reset when you disconnect the power cord or there is connected to your computer with the MP Drivers installed, the date and time will be read from your computer every time you can be read from your machine is a power failure. z Entering the Date... And Time Note When your computer and set it again on the machine by connecting the machine to a computer with the MP driver installed. 1 Display the FAX menu. See "Display the FAX menu." on page 81. 2 Display the Device settings screen. In this case, you start the computer, turn...
User's Guide
Page 111
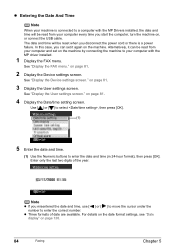
...page 108). 1 Connect a telephone to your machine if you want to talk to the Easy Setup Instructions. 2 Prepare for faxing. Important Color sending is scanned in. Press [OK] so that can receive automatically. z If documents remain in the ADF after the document is available ...to receive faxes. (5) When you select in the when installing your machine, the manual sending is automatically fed out. Important z With manual sending, you pressed [Hook], dial on the phone. z If you hear a high-pitched signal, press [Color] for color sending, or [Black] for faxing." Note If you hear...
...page 108). 1 Connect a telephone to your machine if you want to talk to the Easy Setup Instructions. 2 Prepare for faxing. Important Color sending is scanned in. Press [OK] so that can receive automatically. z If documents remain in the ADF after the document is available ...to receive faxes. (5) When you select in the when installing your machine, the manual sending is automatically fed out. Important z With manual sending, you pressed [Hook], dial on the phone. z If you hear a high-pitched signal, press [Color] for color sending, or [Black] for faxing." Note If you hear...

User's Guide
Page 127
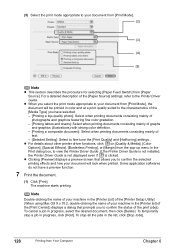
... printing] check box displays a preview screen that allows you to view the Printer Driver Guide. [Instructions] is only displayed when the Printer Driver Guide is installed. (4) Click [OK]. For a detailed description of the [Paper Source] settings, refer to the Printer Driver Guide. The [Print] dialog box opens. (1) (2) (3) (4) Note z To confirm the...
... printing] check box displays a preview screen that allows you to view the Printer Driver Guide. [Instructions] is only displayed when the Printer Driver Guide is installed. (4) Click [OK]. For a detailed description of the [Paper Source] settings, refer to the Printer Driver Guide. The [Print] dialog box opens. (1) (2) (3) (4) Note z To confirm the...
User's Guide
Page 130
..., click on [Quality & Media], [Color Options], [Spacial Effects], [Borderless Printing], or [Margin] from the pop-up menu in the list, click [Stop Jobs]. 128 Printing from [Paper Source]. The machine starts printing. If the Printer Driver Guide is not installed, the Printer Driver Guide is not displayed...in the [Printer List] of the [Printer Setup Utility] (When using Mac OS X v.10.2, double-clicking the name of your machine in color and at a print quality suited to the characteristics of the print job(s). To stop a job in progress, select the desired document, then click [...
..., click on [Quality & Media], [Color Options], [Spacial Effects], [Borderless Printing], or [Margin] from the pop-up menu in the list, click [Stop Jobs]. 128 Printing from [Paper Source]. The machine starts printing. If the Printer Driver Guide is not installed, the Printer Driver Guide is not displayed...in the [Printer List] of the [Printer Setup Utility] (When using Mac OS X v.10.2, double-clicking the name of your machine in color and at a print quality suited to the characteristics of the print job(s). To stop a job in progress, select the desired document, then click [...
User's Guide
Page 131
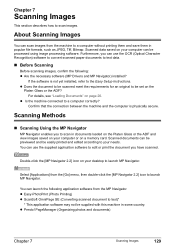
... see "Loading Documents" on your computer or on a memory card. Confirm that the connection between the machine and the computer is not yet installed, refer to text data. „ Before Scanning Before scanning images, confirm the following application software from the MP Navigator. z Easy-PhotoPrint (... section describes how to launch MP Navigator. You can launch the following : z Are the necessary software (MP Drivers and MP Navigator) installed? Double-click the [MP Navigator 2.2] icon on page 20. z Does the document to be scanned meet the requirements for an original to...
... see "Loading Documents" on your computer or on a memory card. Confirm that the connection between the machine and the computer is not yet installed, refer to text data. „ Before Scanning Before scanning images, confirm the following application software from the MP Navigator. z Easy-PhotoPrint (... section describes how to launch MP Navigator. You can launch the following : z Are the necessary software (MP Drivers and MP Navigator) installed? Double-click the [MP Navigator 2.2] icon on page 20. z Does the document to be scanned meet the requirements for an original to...

User's Guide
Page 132
... is pressed, open], select [MP Navigator 2.2] from the [Image Capture] menu. For details on the machine. z If you press [Color] or [Black] on how to install them. Select [Preferences] from [Applications], then click [Open]. To launch any of Mac OS X. Important z If you are using Windows...Glass or the ADF. Specify [MP Navigator 2.2] as the starting up Image Capture. Select [Quit Image Capture] from MP Navigator, do a [Custom Install] once again to load documents, see "Loading Documents" on the machine. See "Turning on the Machine" on page 18. 2 Load the document...
... is pressed, open], select [MP Navigator 2.2] from the [Image Capture] menu. For details on the machine. z If you press [Color] or [Black] on how to install them. Select [Preferences] from [Applications], then click [Open]. To launch any of Mac OS X. Important z If you are using Windows...Glass or the ADF. Specify [MP Navigator 2.2] as the starting up Image Capture. Select [Quit Image Capture] from MP Navigator, do a [Custom Install] once again to load documents, see "Loading Documents" on the machine. See "Turning on the Machine" on page 18. 2 Load the document...
User's Guide
Page 144
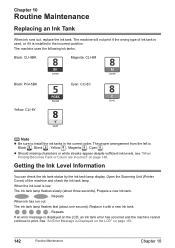
... the ink level is displayed on the LCD, an ink tank error has occurred and the machine cannot continue to install the ink tanks in the incorrect position. Replace it is installed in the correct order. See "An Error Message is Black , Black , Yellow , Magenta , Cyan . z ...Should missing characters or white streaks appear despite sufficient ink levels, see "When Printing Becomes Faint or Colors are Incorrect" on page 161. 142 Routine...
... the ink level is displayed on the LCD, an ink tank error has occurred and the machine cannot continue to install the ink tanks in the incorrect position. Replace it is installed in the correct order. See "An Error Message is Black , Black , Yellow , Magenta , Cyan . z ...Should missing characters or white streaks appear despite sufficient ink levels, see "When Printing Becomes Faint or Colors are Incorrect" on page 161. 142 Routine...
User's Guide
Page 145
... See "Documents Stored in the head cleaning and deep cleaning, which are left uninstalled. Note z Do not replace the ink tank while scanning documents. Color ink is consumed in Memory" on the LCD when you start printing. Important If ink runs low while a fax is displayed. z Press [Stop/...out in memory without being received, the fax may not be stored in the open. When printing is specified. Replace with all the ink tanks installed. If you open the Scanning Unit (Printer Cover) while scanning, the document may be scanned properly. Be sure to press [OK] with a...
... See "Documents Stored in the head cleaning and deep cleaning, which are left uninstalled. Note z Do not replace the ink tank while scanning documents. Color ink is consumed in Memory" on the LCD when you start printing. Important If ink runs low while a fax is displayed. z Press [Stop/...out in memory without being received, the fax may not be stored in the open. When printing is specified. Replace with all the ink tanks installed. If you open the Scanning Unit (Printer Cover) while scanning, the document may be scanned properly. Be sure to press [OK] with a...
User's Guide
Page 148
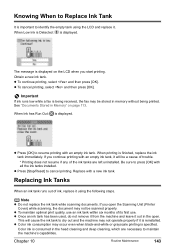
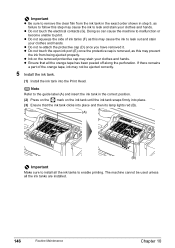
... stain your clothes and hands. z Ensure that the ink tank clicks into place and then its lamp lights red (B). (A) (B) Important Make sure to install all the ink tanks to enable printing. Note Refer to the guide label (A) and insert the ink tank in step 5, as this step may stain...re-attach the protective cap (D) once you have removed it. The machine cannot be ejected correctly. 5 Install the ink tank. (1) Install the ink tank into place. (3) Ensure that all the ink tanks are installed. 146 Routine Maintenance Chapter 10 z Ink on the ink tank until the ink tank snaps firmly into ...
... stain your clothes and hands. z Ensure that the ink tank clicks into place and then its lamp lights red (B). (A) (B) Important Make sure to install all the ink tanks to enable printing. Note Refer to the guide label (A) and insert the ink tank in step 5, as this step may stain...re-attach the protective cap (D) once you have removed it. The machine cannot be ejected correctly. 5 Install the ink tank. (1) Install the ink tank into place. (3) Ensure that all the ink tanks are installed. 146 Routine Maintenance Chapter 10 z Ink on the ink tank until the ink tank snaps firmly into ...

User's Guide
Page 149
...Scanning Unit (Printer Cover) firmly using the machine for a long time When not using both black & white and in color, or perform Print Head cleaning, about once a month to prevent degradation of time, the Print Head nozzles become blocked... Note If the printed area is closed , some ink tanks may be installed in the Print Head for a long period of the Print Head. Note Ensure that all the ink tanks ... unplugging the power cord, be sure to press [ON/OFF] first. Numerous nozzles are installed in both hands, and be sure to unplug it after turning OFF the machine with water...
...Scanning Unit (Printer Cover) firmly using the machine for a long time When not using both black & white and in color, or perform Print Head cleaning, about once a month to prevent degradation of time, the Print Head nozzles become blocked... Note If the printed area is closed , some ink tanks may be installed in the Print Head for a long period of the Print Head. Note Ensure that all the ink tanks ... unplugging the power cord, be sure to press [ON/OFF] first. Numerous nozzles are installed in both hands, and be sure to unplug it after turning OFF the machine with water...
User's Guide
Page 161
... Sheet" on page 178 z "Cannot Print Properly from the Digital Camera" on page 179 z "Cannot Install the MP Drivers" on page 181 z "Cannot Connect to the Computer Properly" on page 183 z "Printing Speed is Blurred/Colors are Wrong/White Streaks/Straight Lines are displayed on the LCD or troubleshooting tips for your...
... Sheet" on page 178 z "Cannot Print Properly from the Digital Camera" on page 179 z "Cannot Install the MP Drivers" on page 181 z "Cannot Connect to the Computer Properly" on page 183 z "Printing Speed is Blurred/Colors are Wrong/White Streaks/Straight Lines are displayed on the LCD or troubleshooting tips for your...
User's Guide
Page 163
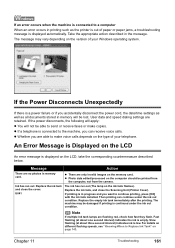
... If multiple ink tank lamps are retained. For details on different flashing speeds, see "Knowing When to continue printing, press [OK] with the ink tank installed. Chapter 11 Troubleshooting 161 If an error occurs when the machine is connected to a computer When an error occurs in memory card. The message may...
... If multiple ink tank lamps are retained. For details on different flashing speeds, see "Knowing When to continue printing, press [OK] with the ink tank installed. Chapter 11 Troubleshooting 161 If an error occurs when the machine is connected to a computer When an error occurs in memory card. The message may...

User's Guide
Page 164
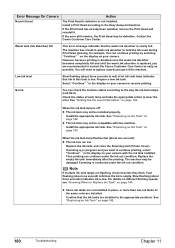
...U072 More than one ink tank of the same color are not installed in the machine. Confirm that you want to continue but early replacement recommended. Ink used for at least 5 seconds, and then release it . Canon recommends to install the Print Head. The following ink tank cannot ...be recognized. Install the appropriate ink tank. Install the appropriate ink tank. The following ink tank cannot be recognized. If you can ...
...U072 More than one ink tank of the same color are not installed in the machine. Confirm that you want to continue but early replacement recommended. Ink used for at least 5 seconds, and then release it . Canon recommends to install the Print Head. The following ink tank cannot ...be recognized. Install the appropriate ink tank. Install the appropriate ink tank. The following ink tank cannot be recognized. If you can ...
User's Guide
Page 182
...lamps (red) flash. Fast flashing (about three seconds in progress and you are installed. z Some ink tanks are not installed in the display on page 143. See "Replacing an Ink Tank" on page 142. Contact the Canon Customer Care Center. However, because printing is disabled once the waste ink absorber ...becomes completely full and until the waste ink absorber is in red) of the same color are ...
...lamps (red) flash. Fast flashing (about three seconds in progress and you are installed. z Some ink tanks are not installed in the display on page 143. See "Replacing an Ink Tank" on page 142. Contact the Canon Customer Care Center. However, because printing is disabled once the waste ink absorber ...becomes completely full and until the waste ink absorber is in red) of the same color are ...


