User's Guide
Page 8
...has shut off. Incorrect maintenance procedures may malfunction as a result of the machine, see "Appendix" on the machine with dry hands. Then contact the Canon Customer Care Center. Caution You may cause the inside the machine. Place the machine on a thick rug or carpet. To ensure proper ventilation, make... be able to a heating source. If you pull the power plug out of the wall outlet while the Alarm Lamp is lit or flashing, the Print Head is approximately 4 inches (10 cm) away from this guide. Do not install the machine in a location that is very humid or dusty, in injury...
...has shut off. Incorrect maintenance procedures may malfunction as a result of the machine, see "Appendix" on the machine with dry hands. Then contact the Canon Customer Care Center. Caution You may cause the inside the machine. Place the machine on a thick rug or carpet. To ensure proper ventilation, make... be able to a heating source. If you pull the power plug out of the wall outlet while the Alarm Lamp is lit or flashing, the Print Head is approximately 4 inches (10 cm) away from this guide. Do not install the machine in a location that is very humid or dusty, in injury...

User's Guide
Page 9
...came with the machine. Never use an extension cord as an air conditioner, television, or copier. Whenever you purchased the machine as during printing, the Print Head is as follows: 120-240 V AC, 50/60 Hz (depending on the cord. Turn OFF the power and disconnect the power ... on local electrical requirements) Do not plug the machine into the machine. These devices generate electrical noise which may affect the print quality of the machine when printing later. Using a different power cord may damage the cord and cause a fire or electrical shock. z If the machine ...
...came with the machine. Never use an extension cord as an air conditioner, television, or copier. Whenever you purchased the machine as during printing, the Print Head is as follows: 120-240 V AC, 50/60 Hz (depending on the cord. Turn OFF the power and disconnect the power ... on local electrical requirements) Do not plug the machine into the machine. These devices generate electrical noise which may affect the print quality of the machine when printing later. Using a different power cord may damage the cord and cause a fire or electrical shock. z If the machine ...
User's Guide
Page 10
... injury. When moving the machine, turn it on the Document Cover when using the Platen Glass to strong physical shock or vibration. Then, contact the Canon Customer Care Center. This can damage the machine's components. Do not turn the machine upside down hard on its side, or turn OFF the power... in burns or electrical shock. When removing paper jammed in injury. They will be careful not to do not touch the electrical contacts of the Print Head. Before moving the machine, carry the machine at both ends. Failing to get ink on your hand. Do not place heavy objects on top of...
... injury. When moving the machine, turn it on the Document Cover when using the Platen Glass to strong physical shock or vibration. Then, contact the Canon Customer Care Center. This can damage the machine's components. Do not turn the machine upside down hard on its side, or turn OFF the power... in burns or electrical shock. When removing paper jammed in injury. They will be careful not to do not touch the electrical contacts of the Print Head. Before moving the machine, carry the machine at both ends. Failing to get ink on your hand. Do not place heavy objects on top of...

User's Guide
Page 11
Do not shake print heads or ink tanks. IMPORTANT SAFETY INSTRUCTIONS When using this product to persons, including the following: 1. Avoid using your telephone equipment, basic safety precautions should always ... a gas leak in a wet basement or near a bath tub, wash bowl, kitchen sink or laundry tub, in the vicinity of small children. Never touch the Print Head. Print Head/Ink tanks For safety reasons, store print heads and ink tanks out of the reach of the leak.
Do not shake print heads or ink tanks. IMPORTANT SAFETY INSTRUCTIONS When using this product to persons, including the following: 1. Avoid using your telephone equipment, basic safety precautions should always ... a gas leak in a wet basement or near a bath tub, wash bowl, kitchen sink or laundry tub, in the vicinity of small children. Never touch the Print Head. Print Head/Ink tanks For safety reasons, store print heads and ink tanks out of the reach of the leak.
User's Guide
Page 16
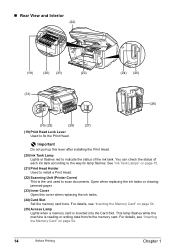
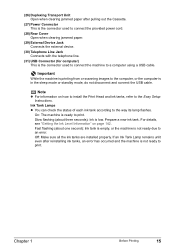
... the ink tanks. (24) Card Slot Set the memory card here. For details, see "Inserting the Memory Card" on page 15. (21) Print Head Holder Used to install a Print Head. (22) Scanning Unit (Printer Cover) This is reading or writing data from/to indicate the status of each ink tank according to the...its lamp flashes. This lamp flashes while the machine is the unit used to fix the Print Head. „ Rear View and Interior (22) (19) (20) (21) (23) (31) (24) (25) (26) (30) (29) (28) (27) (19) Print Head Lock Lever Used to scan documents. See "Ink Tank Lamps" on page 54. 14 ...
... the ink tanks. (24) Card Slot Set the memory card here. For details, see "Inserting the Memory Card" on page 15. (21) Print Head Holder Used to install a Print Head. (22) Scanning Unit (Printer Cover) This is reading or writing data from/to indicate the status of each ink tank according to the...its lamp flashes. This lamp flashes while the machine is the unit used to fix the Print Head. „ Rear View and Interior (22) (19) (20) (21) (23) (31) (24) (25) (26) (30) (29) (28) (27) (19) Print Head Lock Lever Used to scan documents. See "Ink Tank Lamps" on page 54. 14 ...
User's Guide
Page 17
...are installed properly. Ink Tank Lamps z You can check the status of each ink tank according to print. For details, see "Getting the Ink Level Information" on how to install the Print Head and ink tanks, refer to the Easy Setup Instructions. If an Ink Tank Lamp remains unlit even after... line. (31) USB Connector (for computer) This is the connector used to connect the machine to a computer using a USB cable. Chapter 1 Before Printing 15 On: The machine is ready to the way its lamp flashes. (26) Duplexing Transport Unit Open when clearing jammed paper after reinstalling ink tanks...
...are installed properly. Ink Tank Lamps z You can check the status of each ink tank according to print. For details, see "Getting the Ink Level Information" on how to install the Print Head and ink tanks, refer to the Easy Setup Instructions. If an Ink Tank Lamp remains unlit even after... line. (31) USB Connector (for computer) This is the connector used to connect the machine to a computer using a USB cable. Chapter 1 Before Printing 15 On: The machine is ready to the way its lamp flashes. (26) Duplexing Transport Unit Open when clearing jammed paper after reinstalling ink tanks...
User's Guide
Page 20
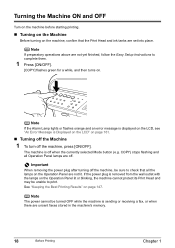
... stored in the machine's memory. 18 Before Printing Chapter 1 If the power plug is off the machine, press [ON/OFF]. The machine is removed from the wall outlet with the lamps on the Operation Panel lit or blinking, the machine cannot protect its Print Head and may be sure to check that the... Print Head and ink tanks are off. Note If the Alarm Lamp lights or flashes orange and an error message is displayed on...
... stored in the machine's memory. 18 Before Printing Chapter 1 If the power plug is off the machine, press [ON/OFF]. The machine is removed from the wall outlet with the lamps on the Operation Panel lit or blinking, the machine cannot protect its Print Head and may be sure to check that the... Print Head and ink tanks are off. Note If the Alarm Lamp lights or flashes orange and an error message is displayed on...
User's Guide
Page 73
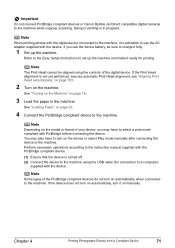
...turn it is advisable to use the device battery, be aligned using the USB cable (for printing. If the Print Head alignment is not yet performed, execute automatic Print Head alignment, see "Aligning Print Head automatically" on page 153. 2 Turn on manually. Note Depending on the device or select Play... to the machine. Important Do not connect PictBridge compliant devices or Canon Bubble Jet Direct compatible digital cameras to the machine while copying, scanning, faxing or printing is in the machine. Note When printing photos with the device. Note Some types of your device, you...
...turn it is advisable to use the device battery, be aligned using the USB cable (for printing. If the Print Head alignment is not yet performed, execute automatic Print Head alignment, see "Aligning Print Head automatically" on page 153. 2 Turn on manually. Note Depending on the device or select Play... to the machine. Important Do not connect PictBridge compliant devices or Canon Bubble Jet Direct compatible digital cameras to the machine while copying, scanning, faxing or printing is in the machine. Note When printing photos with the device. Note Some types of your device, you...
User's Guide
Page 146
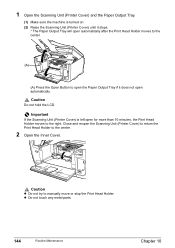
... Cover) and the Paper Output Tray. (1) Make sure the machine is left open for more than 10 minutes, the Print Head Holder moves to manually move or stop the Print Head Holder. Caution Do not hold the LCD. z Do not touch any metal parts. 144 Routine Maintenance Chapter 10 Close ...and reopen the Scanning Unit (Printer Cover) to return the Print Head Holder to open the Paper Output Tray if it stops. * The Paper Output Tray will open automatically after the Print Head Holder moves to the center. (A) (A) Press the Open Button to the center. 2 ...
... Cover) and the Paper Output Tray. (1) Make sure the machine is left open for more than 10 minutes, the Print Head Holder moves to manually move or stop the Print Head Holder. Caution Do not hold the LCD. z Do not touch any metal parts. 144 Routine Maintenance Chapter 10 Close ...and reopen the Scanning Unit (Printer Cover) to return the Print Head Holder to open the Paper Output Tray if it stops. * The Paper Output Tray will open automatically after the Print Head Holder moves to the center. (A) (A) Press the Open Button to the center. 2 ...
User's Guide
Page 147
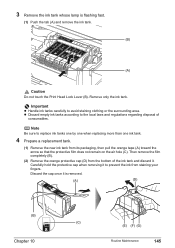
... regarding disposal of the ink tank and discard it is flashing fast. (1) Push the tab (A) and remove the ink tank. (B) (A) Caution Do not touch the Print Head Lock Lever (B). 3 Remove the ink tank whose lamp is removed. (A) (D) (B) Chapter 10 (C) (E) (F) (G) Routine Maintenance 145
... regarding disposal of the ink tank and discard it is flashing fast. (1) Push the tab (A) and remove the ink tank. (B) (A) Caution Do not touch the Print Head Lock Lever (B). 3 Remove the ink tank whose lamp is removed. (A) (D) (B) Chapter 10 (C) (E) (F) (G) Routine Maintenance 145
User's Guide
Page 148
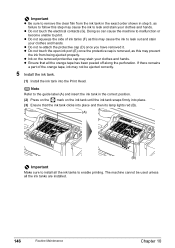
... to the guide label (A) and insert the ink tank in step 5, as this step may not be used unless all the ink tanks to enable printing. z Do not touch the open ink port (E) once the protective cap is removed, as failure to follow this may cause the ink to leak out... removed protective cap may stain your clothes and hands. Doing so can cause the machine to malfunction or become unable to print. z Ensure that the ink tank clicks into the Print Head. The machine cannot be ejected correctly. 5 Install the ink tank. (1) Install the ink tank into place and then its lamp lights...
... to the guide label (A) and insert the ink tank in step 5, as this step may not be used unless all the ink tanks to enable printing. z Do not touch the open ink port (E) once the protective cap is removed, as failure to follow this may cause the ink to leak out... removed protective cap may stain your clothes and hands. Doing so can cause the machine to malfunction or become unable to print. z Ensure that the ink tank clicks into the Print Head. The machine cannot be ejected correctly. 5 Install the ink tank. (1) Install the ink tank into place and then its lamp lights...

User's Guide
Page 149
...ink tank, the machine executes Print Head cleaning automatically. Just as the uncapped tip of a ballpoint pen or marker becomes dry and unusable if not used for high-precision printing. Note Ensure that all the ink tanks are installed in color, or perform Print Head cleaning, about once a month... to prevent degradation of time, the Print Head nozzles become blocked by the cap to prevent the ink from ...
...ink tank, the machine executes Print Head cleaning automatically. Just as the uncapped tip of a ballpoint pen or marker becomes dry and unusable if not used for high-precision printing. Note Ensure that all the ink tanks are installed in color, or perform Print Head cleaning, about once a month... to prevent degradation of time, the Print Head nozzles become blocked by the cap to prevent the ink from ...

User's Guide
Page 150
...lamp is flashing even though ink remains in that the correct ink tank color is empty or running the Print Head maintenance, align the Print Head. Step 1 See "Printing the Nozzle Check Pattern" on page 153 148 Routine Maintenance Chapter 10...Printing Becomes Faint or Colors are Incorrect When printing becomes faint or colors are incorrect, even if ink remains in the ink tanks, the Print Head nozzles are shifted after performing Print Head cleaning twice Step 3 See "Print Head Deep Cleaning" on page 152 Note If Print Head Deep cleaning does not resolve the problem, contact the Canon...
...lamp is flashing even though ink remains in that the correct ink tank color is empty or running the Print Head maintenance, align the Print Head. Step 1 See "Printing the Nozzle Check Pattern" on page 153 148 Routine Maintenance Chapter 10...Printing Becomes Faint or Colors are Incorrect When printing becomes faint or colors are incorrect, even if ink remains in the ink tanks, the Print Head nozzles are shifted after performing Print Head cleaning twice Step 3 See "Print Head Deep Cleaning" on page 152 Note If Print Head Deep cleaning does not resolve the problem, contact the Canon...

User's Guide
Page 151
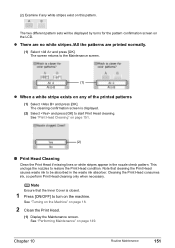
Use this function when printed results are blurred or the color is displayed. (2) (3) Use [ ] or [ ] to turn on page 18. 2 Press [Menu]. 3 Display the Maintenance screen. (1) Use [ ] or [ ] to verify Print Head alignment. The Maintenance/settings screen is displayed. (1) (2) Use [ ] or [ ] to turn on page 22....Maintenance 149 Note Ensure that the Inner Cover is displayed. (3) „ Printing the Nozzle Check Pattern Print the nozzle check pattern to determine whether the ink ejects properly from the Print Head nozzles and to select , then press [OK]. The Maintenance screen is ...
Use this function when printed results are blurred or the color is displayed. (2) (3) Use [ ] or [ ] to turn on page 18. 2 Press [Menu]. 3 Display the Maintenance screen. (1) Use [ ] or [ ] to verify Print Head alignment. The Maintenance/settings screen is displayed. (1) (2) Use [ ] or [ ] to turn on page 22....Maintenance 149 Note Ensure that the Inner Cover is displayed. (3) „ Printing the Nozzle Check Pattern Print the nozzle check pattern to determine whether the ink ejects properly from the Print Head nozzles and to select , then press [OK]. The Maintenance screen is ...
User's Guide
Page 153
...to turn on this pattern. See "Performing Maintenance" on page 151. (2) „ Print Head Cleaning Clean the Print Head if missing lines or white stripes appear in the waste ink absorber. See "Print Head Cleaning" on page 149. See "Turning on the Machine" on the LCD. (2) ... is closed. 1 Press [ON/OFF] to start Print Head cleaning. Cleaning the Print Head consumes ink, so perform Print Head cleaning only when necessary. Note Ensure that cleaning the Print Head causes waste ink to restore the Print Head condition. Chapter 10 Routine Maintenance 151 The two different ...
...to turn on this pattern. See "Performing Maintenance" on page 151. (2) „ Print Head Cleaning Clean the Print Head if missing lines or white stripes appear in the waste ink absorber. See "Print Head Cleaning" on page 149. See "Turning on the Machine" on the LCD. (2) ... is closed. 1 Press [ON/OFF] to start Print Head cleaning. Cleaning the Print Head consumes ink, so perform Print Head cleaning only when necessary. Note Ensure that cleaning the Print Head causes waste ink to restore the Print Head condition. Chapter 10 Routine Maintenance 151 The two different ...
User's Guide
Page 154
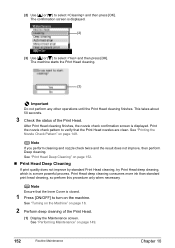
... powerful process. This takes about 50 seconds. 3 Check the status of the Print Head. (1) Display the Maintenance screen. Note Ensure that the Print Head nozzles are clean. The machine starts the Print Head cleaning. (3) Important Do not perform any other operations until the Print Head cleaning finishes. Note If you perform cleaning and nozzle check twice and the...
... powerful process. This takes about 50 seconds. 3 Check the status of the Print Head. (1) Display the Maintenance screen. Note Ensure that the Print Head nozzles are clean. The machine starts the Print Head cleaning. (3) Important Do not perform any other operations until the Print Head cleaning finishes. Note If you perform cleaning and nozzle check twice and the...

User's Guide
Page 155
... is displayed. (2) (3) Use [ ] or [ ] to align the Print Head, automatic or manual. See "Turning on the Machine" on page 149. Load paper in the Auto Sheet Feeder. Contact the Canon Customer Care Center „ Aligning Print Head automatically If the ruled lines are shifted after running the Print Head maintenance, align the Print Head. Chapter 10 Routine Maintenance 153
... is displayed. (2) (3) Use [ ] or [ ] to align the Print Head, automatic or manual. See "Turning on the Machine" on page 149. Load paper in the Auto Sheet Feeder. Contact the Canon Customer Care Center „ Aligning Print Head automatically If the ruled lines are shifted after running the Print Head maintenance, align the Print Head. Chapter 10 Routine Maintenance 153
User's Guide
Page 156
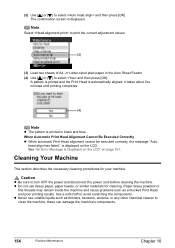
...can damage the machine's components. 154 Routine Maintenance Chapter 10 When Automatic Print Head Alignment Cannot Be Executed Correctly z When automatic Print Head alignment cannot be executed correctly, the message "Auto head align has failed." Paper tissue powders or fine threads may remain inside the... any other chemical cleaner to select and then press [OK]. A pattern is printed and the Print Head is printed in the Auto Sheet Feeder. (4) Use [ ] or [ ] to clean the machine; (2) Use [ ] or [ ] to print the current adjustment values. (2) (3) Load two sheets of A4- is displayed ...
...can damage the machine's components. 154 Routine Maintenance Chapter 10 When Automatic Print Head Alignment Cannot Be Executed Correctly z When automatic Print Head alignment cannot be executed correctly, the message "Auto head align has failed." Paper tissue powders or fine threads may remain inside the... any other chemical cleaner to select and then press [OK]. A pattern is printed and the Print Head is printed in the Auto Sheet Feeder. (4) Use [ ] or [ ] to clean the machine; (2) Use [ ] or [ ] to print the current adjustment values. (2) (3) Load two sheets of A4- is displayed ...

User's Guide
Page 164
... Inner cover is incorrect. Some ink tanks are installed in the appropriate positions. Press [OK] to install the Print Head. Canon recommends to continue printing with this machine is installed (The lamp on the ink tank is open or close it before pressing [OK]... already installed, remove the Print Head and reinstall it . U150 The remaining level of the same color are memorized. * This operation will need to continue but early replacement recommended. If you can continue printing. This may damage the Print Head. If the Print Head is almost full. Confirm that...
... Inner cover is incorrect. Some ink tanks are installed in the appropriate positions. Press [OK] to install the Print Head. Canon recommends to continue printing with this machine is installed (The lamp on the ink tank is open or close it before pressing [OK]... already installed, remove the Print Head and reinstall it . U150 The remaining level of the same color are memorized. * This operation will need to continue but early replacement recommended. If you can continue printing. This may damage the Print Head. If the Print Head is almost full. Confirm that...

User's Guide
Page 165
...a digital camera or digital video camcorder that is not supported by this does not solve the problem, contact the Canon Customer Care Center. Automatic Print Head alignment cannot be used only for twosided scanning. Redo operation The document is jammed in the ADF. When the ...in ADF and in ADF. or Letter-sized documents. If the same error occurs, contact the Canon Customer Care Center. For details on manual Print Head alignment, see "Adjusting the Print Head Manually" on the camera or select Play mode manually after checking document on ADF and pressing [...
...a digital camera or digital video camcorder that is not supported by this does not solve the problem, contact the Canon Customer Care Center. Automatic Print Head alignment cannot be used only for twosided scanning. Redo operation The document is jammed in the ADF. When the ...in ADF and in ADF. or Letter-sized documents. If the same error occurs, contact the Canon Customer Care Center. For details on manual Print Head alignment, see "Adjusting the Print Head Manually" on the camera or select Play mode manually after checking document on ADF and pressing [...


