User's Guide
Page 3
...Compliant Device 70 Connecting to a PictBridge Compliant Device 70 Printing Photographs Directly from a PictBridge Compliant Device 73 Printing Photographs Directly from a Canon Bubble Jet Direct Compatible Digital Camera 76 5 Faxing 79 Preparing Your Machine for Fax 79 Sending Faxes 106 Receiving Faxes 118 6 ... Replacing Ink Tanks 143 Keeping the Best Printing Results 147 When Printing Becomes Faint or Colors are Incorrect 148 Cleaning Your Machine 154 11 Troubleshooting 159 If the Power Disconnects Unexpectedly ..... 161 An Error Message is Displayed on the LCD 161 Cannot See ...
...Compliant Device 70 Connecting to a PictBridge Compliant Device 70 Printing Photographs Directly from a PictBridge Compliant Device 73 Printing Photographs Directly from a Canon Bubble Jet Direct Compatible Digital Camera 76 5 Faxing 79 Preparing Your Machine for Fax 79 Sending Faxes 106 Receiving Faxes 118 6 ... Replacing Ink Tanks 143 Keeping the Best Printing Results 147 When Printing Becomes Faint or Colors are Incorrect 148 Cleaning Your Machine 154 11 Troubleshooting 159 If the Power Disconnects Unexpectedly ..... 161 An Error Message is Displayed on the LCD 161 Cannot See ...
User's Guide
Page 7
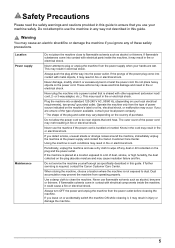
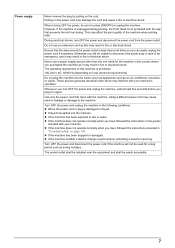
... moisture and may vary depending on your hands are wet. Periodically, unplug the machine and use the machine if the power cord is required, contact the Canon Customer Care Center. Do not service the machine yourself except as alcohol or thinners. Dust accumulation may melt resulting in ... as alcohol, benzene or thinners. These actions may result in fire or electrical shock. If the machine is placed at the power supply and contact the Canon Customer Care Center. If further servicing is bundled or knotted. Never attempt to plug or unplug the machine from operating properly....
... moisture and may vary depending on your hands are wet. Periodically, unplug the machine and use the machine if the power cord is required, contact the Canon Customer Care Center. Do not service the machine yourself except as alcohol or thinners. Dust accumulation may melt resulting in ... as alcohol, benzene or thinners. These actions may result in fire or electrical shock. If the machine is placed at the power supply and contact the Canon Customer Care Center. If further servicing is bundled or knotted. Never attempt to plug or unplug the machine from operating properly....
User's Guide
Page 8
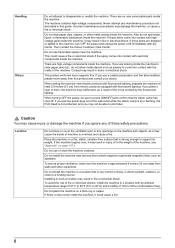
... and humidity of fire or electrical shocks, install the machine in fire or electrical shock. If these safety precautions. When turning OFF the power, be able to 90% (condensation free). Do not install the machine in this product and consult your doctor. The machine contains high-.... Also do not allow metal objects such as speakers. If you ignore any openings on the machine with fluorescent lighting. Then contact the Canon Customer Care Center. To ensure proper ventilation, make sure the machine is strong enough to a heating source. There are high-voltage components...
... and humidity of fire or electrical shocks, install the machine in fire or electrical shock. If these safety precautions. When turning OFF the power, be able to 90% (condensation free). Do not install the machine in this product and consult your doctor. The machine contains high-.... Also do not allow metal objects such as speakers. If you ignore any openings on the machine with fluorescent lighting. Then contact the Canon Customer Care Center. To ensure proper ventilation, make sure the machine is strong enough to a heating source. There are high-voltage components...
User's Guide
Page 9
... machine does not operate normally when you plug it may damage the cord and cause a fire or electrical shock. Turn OFF the power and disconnect the power cord if the machine will be used for the machine in fire or electrical shock. The operating requirement of the machine when printing .... z If liquid has spilled into the same circuit as appliances such as it in fire or electrical shock. During electrical storms, turn OFF the power and unplug the machine, wait at all times so you will not be unable to the machine. These devices generate electrical noise which may result...
... machine does not operate normally when you plug it may damage the cord and cause a fire or electrical shock. Turn OFF the power and disconnect the power cord if the machine will be used for the machine in fire or electrical shock. The operating requirement of the machine when printing .... z If liquid has spilled into the same circuit as appliances such as it in fire or electrical shock. During electrical storms, turn OFF the power and unplug the machine, wait at all times so you will not be unable to the machine. These devices generate electrical noise which may result...
User's Guide
Page 10
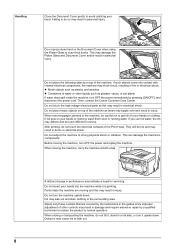
... Cover gently to get ink on your hands or clothing. If such objects come into the machine while it upside down. Then, contact the Canon Customer Care Center. When removing paper jammed in the machine, be hot and may damage the Platen Glass and Document Cover and/or result in... plants If water does spill inside the machine are covered by pressing [ON/OFF], and disconnect the power cord. After printing, do so may indicate a need for servicing. Parts inside the machine, turn OFF the power and unplug the machine. Do not press down . z Metal objects such as jewelry and watches z...
... Cover gently to get ink on your hands or clothing. If such objects come into the machine while it upside down. Then, contact the Canon Customer Care Center. When removing paper jammed in the machine, be hot and may damage the Platen Glass and Document Cover and/or result in... plants If water does spill inside the machine are covered by pressing [ON/OFF], and disconnect the power cord. After printing, do so may indicate a need for servicing. Parts inside the machine, turn OFF the power and unplug the machine. Do not press down . z Metal objects such as jewelry and watches z...
User's Guide
Page 17
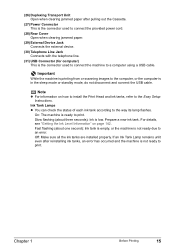
If an Ink Tank Lamp remains unlit even after pulling out the Cassette. (27) Power Connector This is the connector used to connect the provided power cord. (28) Rear Cover Open when clearing jammed paper. (29) External Device Jack Connects the external device. (30) Telephone Line Jack Connects with the telephone ...
If an Ink Tank Lamp remains unlit even after pulling out the Cassette. (27) Power Connector This is the connector used to connect the provided power cord. (28) Rear Cover Open when clearing jammed paper. (29) External Device Jack Connects the external device. (30) Telephone Line Jack Connects with the telephone ...
User's Guide
Page 18
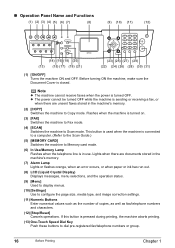
... Scan Guide.) (5) [MEMORY CARD] Switches the machine to Scan mode. Note z The machine cannot receive faxes when the power is closed. This button is used when the machine is in use. z The power cannot be turned OFF while the machine is pressed during printing, the machine aborts printing. (13) One-Touch Speed...
... Scan Guide.) (5) [MEMORY CARD] Switches the machine to Scan mode. Note z The machine cannot receive faxes when the power is closed. This button is used when the machine is in use. z The power cannot be turned OFF while the machine is pressed during printing, the machine aborts printing. (13) One-Touch Speed...
User's Guide
Page 20
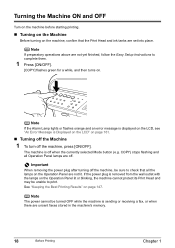
... Easy Setup Instructions to print. Note If the Alarm Lamp lights or flashes orange and an error message is displayed on . Important When removing the power plug after turning off the machine, be unable to complete them. 1 Press [ON/OFF]. [COPY] flashes green for a while, and then turns on the LCD... on the LCD" on the Operation Panel are set into place. Note If preparatory operations above are off the machine, press [ON/OFF]. If the power plug is sending or receiving a fax, or when there are unsent faxes stored in the machine's memory. 18 Before Printing Chapter 1 Note The...
... Easy Setup Instructions to print. Note If the Alarm Lamp lights or flashes orange and an error message is displayed on . Important When removing the power plug after turning off the machine, be unable to complete them. 1 Press [ON/OFF]. [COPY] flashes green for a while, and then turns on the LCD... on the LCD" on the Operation Panel are set into place. Note If preparatory operations above are off the machine, press [ON/OFF]. If the power plug is sending or receiving a fax, or when there are unsent faxes stored in the machine's memory. 18 Before Printing Chapter 1 Note The...
User's Guide
Page 21
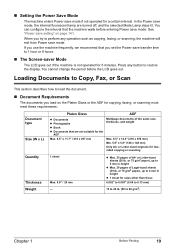
... mode if not operated for twosided copying or scanning Quantity 1 sheet Thickness Weight Max. 0.8" / 20 mm - You cannot change the period before entering Power save mode. z Max. 35 pages of the same size, thickness, and weight Max. 8.5" x 11.7" / 216 x 297 mm Max. 8.5" x 14.0" (216 x 356 mm..., faxing, or scanning, the machine will exit from Power save transfer time to 90 g/m2) Chapter 1 Before Printing 19 When you set the Power save mode. or Letter-sized originals for a certain interval. See "Power save mode, the internal fluorescent lamp are not suitable for...
... mode if not operated for twosided copying or scanning Quantity 1 sheet Thickness Weight Max. 0.8" / 20 mm - You cannot change the period before entering Power save mode. z Max. 35 pages of the same size, thickness, and weight Max. 8.5" x 11.7" / 216 x 297 mm Max. 8.5" x 14.0" (216 x 356 mm..., faxing, or scanning, the machine will exit from Power save transfer time to 90 g/m2) Chapter 1 Before Printing 19 When you set the Power save mode. or Letter-sized originals for a certain interval. See "Power save mode, the internal fluorescent lamp are not suitable for...
User's Guide
Page 86
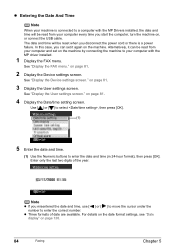
The date and time will be reset when you disconnect the power cord or there is connected to your computer with the MP driver installed. 1 Display the FAX menu. See "Display the FAX menu." Use [ ] or [ ] to .... See "Display the User settings screen." on page 81. 4 Display the Date/time setting screen. z Entering the Date And Time Note When your machine is a power failure. See "Display the Device settings screen." Alternatively, it again on , or connect the USB cable. z Three formats of the year. In this case, you...
The date and time will be reset when you disconnect the power cord or there is connected to your computer with the MP driver installed. 1 Display the FAX menu. See "Display the FAX menu." Use [ ] or [ ] to .... See "Display the User settings screen." on page 81. 4 Display the Date/time setting screen. z Entering the Date And Time Note When your machine is a power failure. See "Display the Device settings screen." Alternatively, it again on , or connect the USB cable. z Three formats of the year. In this case, you...

User's Guide
Page 115
...starts redialing, press [Stop/Reset], then follow the instructions on page 114. Send or print all the documents stored in memory you disconnect the power cord, all the documents stored in memory (Memory list) showing the transaction number (TX/RX NO.), transaction mode, recipient name, number of... and transmission time of each document. When printing or deleting documents in Memory Important If you do not wish to lose them before disconnecting the power cord. See "Display the FAX menu." z Automatic Redialing When using memory sending to send a document and the recipient's line is busy, ...
...starts redialing, press [Stop/Reset], then follow the instructions on page 114. Send or print all the documents stored in memory you disconnect the power cord, all the documents stored in memory (Memory list) showing the transaction number (TX/RX NO.), transaction mode, recipient name, number of... and transmission time of each document. When printing or deleting documents in Memory Important If you do not wish to lose them before disconnecting the power cord. See "Display the FAX menu." z Automatic Redialing When using memory sending to send a document and the recipient's line is busy, ...

User's Guide
Page 121
...Telephone Line for Fax Use Only: Select . Press [ON/OFF] to change the print settings, see "Changing the Print Settings" on how to turn the power ON. z If You Want to Receive Only Faxes Automatically with A4, letter or legal sized paper, then press [OK]. Only A4- Correct the paper ...a part of paper is displayed. z When feeding paper from the cassette. See "Continuous printing on page 26. Important The machine cannot receive faxes when the power is loaded in the Auto Sheet Feeder. Chapter 5 Faxing 119 z If the paper is set to a type other than letter-size, such as copy mode...
...Telephone Line for Fax Use Only: Select . Press [ON/OFF] to change the print settings, see "Changing the Print Settings" on how to turn the power ON. z If You Want to Receive Only Faxes Automatically with A4, letter or legal sized paper, then press [OK]. Only A4- Correct the paper ...a part of paper is displayed. z When feeding paper from the cassette. See "Continuous printing on page 26. Important The machine cannot receive faxes when the power is loaded in the Auto Sheet Feeder. Chapter 5 Faxing 119 z If the paper is set to a type other than letter-size, such as copy mode...
User's Guide
Page 143
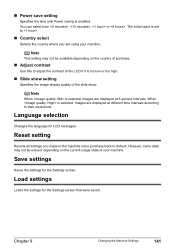
... selected, images are displayed at different time intervals according to default. Reset setting Reverts all settings you are using your machine. „ Power save setting Specifies the time until Power saving is selected, images are displayed at 5-second intervals. Note This setting may not be available depending on the current usage state...
... selected, images are displayed at different time intervals according to default. Reset setting Reverts all settings you are using your machine. „ Power save setting Specifies the time until Power saving is selected, images are displayed at 5-second intervals. Note This setting may not be available depending on the current usage state...

User's Guide
Page 149
...-precision printing. Do not perform any other operations until the Print Head cleaning finishes. Keeping the Best Printing Results z When unplugging the power cord When unplugging the power cord, be sure to unplug it after turning OFF the machine with water or sweat, ink may be careful not to prevent the... tip of a ballpoint pen or marker becomes dry and unusable if not used for a long time When not using both black & white and in color, or perform Print Head cleaning, about once a month to prevent degradation of time, the Print Head nozzles become blocked by the cap to get your...
...-precision printing. Do not perform any other operations until the Print Head cleaning finishes. Keeping the Best Printing Results z When unplugging the power cord When unplugging the power cord, be sure to unplug it after turning OFF the machine with water or sweat, ink may be careful not to prevent the... tip of a ballpoint pen or marker becomes dry and unusable if not used for a long time When not using both black & white and in color, or perform Print Head cleaning, about once a month to prevent degradation of time, the Print Head nozzles become blocked by the cap to get your...
User's Guide
Page 154
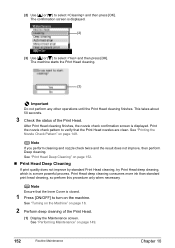
... cleaning of the Print Head. The confirmation screen is closed. 1 Press [ON/OFF] to select and then press [OK]. Print Head deep cleaning consumes more powerful process. Note Ensure that the Print Head nozzles are clean. The machine starts the Print Head cleaning. (3) Important Do not perform any other operations until...
... cleaning of the Print Head. The confirmation screen is closed. 1 Press [ON/OFF] to select and then press [OK]. Print Head deep cleaning consumes more powerful process. Note Ensure that the Print Head nozzles are clean. The machine starts the Print Head cleaning. (3) Important Do not perform any other operations until...

User's Guide
Page 155
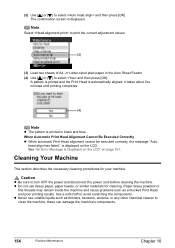
... the Inner Cover is displayed. (2) (3) Use [ ] or [ ] to turn off the machine's power for aligning the Print Head. (2) Use [ ] or [ ] to align the Print Head, automatic or manual. When one specific color only does not print, see "Replacing an Ink Tank" on page 142. (2) If the problem remains... Head alignment. (1) Display the Maintenance screen. The confirmation screen is closed. 1 Press [ON/OFF] to select and then press [OK]. Contact the Canon Customer Care Center „ Aligning Print Head automatically If the ruled lines are two ways to select and then press [OK].
... the Inner Cover is displayed. (2) (3) Use [ ] or [ ] to turn off the machine's power for aligning the Print Head. (2) Use [ ] or [ ] to align the Print Head, automatic or manual. When one specific color only does not print, see "Replacing an Ink Tank" on page 142. (2) If the problem remains... Head alignment. (1) Display the Maintenance screen. The confirmation screen is closed. 1 Press [ON/OFF] to select and then press [OK]. Contact the Canon Customer Care Center „ Aligning Print Head automatically If the ruled lines are two ways to select and then press [OK].
User's Guide
Page 156
... alignment cannot be executed correctly, the message "Auto head align has failed." See "An Error Message is displayed. Use a soft cloth to turn OFF the power and disconnect the power cord before cleaning the machine. z Never use tissue paper, paper towels, or similar materials for your machine.
... alignment cannot be executed correctly, the message "Auto head align has failed." See "An Error Message is displayed. Use a soft cloth to turn OFF the power and disconnect the power cord before cleaning the machine. z Never use tissue paper, paper towels, or similar materials for your machine.

User's Guide
Page 158
... off any paper dust from the inside of the Feeder Cover as illustrated by gray colored part. 4 After wiping, close the Feeder Cover by pushing it until it clicks into place. 5 Close the Document Tray. 6 Reconnect the power cord then turn on the machine, then remove any paper from the Auto Sheet... Cover is closed. 1 Press [ON/OFF] to select , then press [OK]. See "Turning on the Machine" on page 149. (2) Use [ ] or [ ] to turn ON the power. „ Cleaning the Roller (Roller Cleaning) Clean the paper feed rollers if paper is displayed. (2) 156 Routine Maintenance Chapter 10
... off any paper dust from the inside of the Feeder Cover as illustrated by gray colored part. 4 After wiping, close the Feeder Cover by pushing it until it clicks into place. 5 Close the Document Tray. 6 Reconnect the power cord then turn on the machine, then remove any paper from the Auto Sheet... Cover is closed. 1 Press [ON/OFF] to select , then press [OK]. See "Turning on the Machine" on page 149. (2) Use [ ] or [ ] to turn ON the power. „ Cleaning the Roller (Roller Cleaning) Clean the paper feed rollers if paper is displayed. (2) 156 Routine Maintenance Chapter 10
User's Guide
Page 161
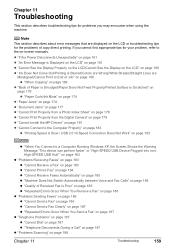
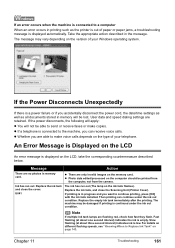
... the machine. z "If the Power Disconnects Unexpectedly" on page 161 z "An Error Message is Displayed on the LCD" on page 161 z "Cannot See the Display Properly on the LCD/Cannot See the Display on the LCD" on page 166 z "Ink Does Not Come Out/Printing is Blurred/Colors are Wrong/White Streaks...
... the machine. z "If the Power Disconnects Unexpectedly" on page 161 z "An Error Message is Displayed on the LCD" on page 161 z "Cannot See the Display Properly on the LCD/Cannot See the Display on the LCD" on page 166 z "Ink Does Not Come Out/Printing is Blurred/Colors are Wrong/White Streaks...
User's Guide
Page 163
... tank lamps are only invalid images on the ink tank flashes). Slow flashing (at about three second interval) indicates ink is low. If the power disconnects, the following will apply: z You will be damaged if printing is continued under the ink out condition. z There are flashing red,... Replace the ink tank, and close the cover. The message may be lost. If printing is in progress and you accidentally disconnect the power cord, the date/time settings as well as the printer is out of your Windows operating system. Chapter 11 Troubleshooting 161 Fast flashing (at...
... tank lamps are only invalid images on the ink tank flashes). Slow flashing (at about three second interval) indicates ink is low. If the power disconnects, the following will apply: z You will be damaged if printing is continued under the ink out condition. z There are flashing red,... Replace the ink tank, and close the cover. The message may be lost. If printing is in progress and you accidentally disconnect the power cord, the date/time settings as well as the printer is out of your Windows operating system. Chapter 11 Troubleshooting 161 Fast flashing (at...


