

MP210 series Quick Start Guide
Page 5
... Maintenance 25 List of Maintenance Codes 25 When Printing Becomes Faint or Colors Are Incorrect 26 Printing the Nozzle Check Pattern 27 Examining the Nozzle Check Pattern ...........28 Print Head Cleaning 29 Print Head Deep Cleaning 30 Aligning the Print Head 31 Replacing a FINE Cartridge 33 Keeping the Best Printing Results 39 Cleaning Your Machine 40 Troubleshooting...
... Maintenance 25 List of Maintenance Codes 25 When Printing Becomes Faint or Colors Are Incorrect 26 Printing the Nozzle Check Pattern 27 Examining the Nozzle Check Pattern ...........28 Print Head Cleaning 29 Print Head Deep Cleaning 30 Aligning the Print Head 31 Replacing a FINE Cartridge 33 Keeping the Best Printing Results 39 Cleaning Your Machine 40 Troubleshooting...
MP210 series Quick Start Guide
Page 6
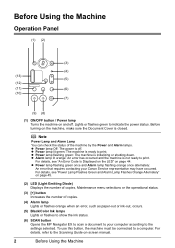
...when an error, such as paper-out or ink-out, occurs. (5) Black/Color Ink lamps Lights or flashes to show the ink status. (6) SCAN button Opens the MP Navigator... EX to scan a document to your Canon Service representative may have occurred. To use this button, the machine must be connected to... 44. z Power lamp flashing green once and Alarm lamp flashing orange once alternately: An error that requires contacting your computer according to print. Before Using the Machine Operation Panel (1) (2) (3) (4) (13) (5) (12) (11) (6) (10) (7) (9) (8) ...
...when an error, such as paper-out or ink-out, occurs. (5) Black/Color Ink lamps Lights or flashes to show the ink status. (6) SCAN button Opens the MP Navigator... EX to scan a document to your Canon Service representative may have occurred. To use this button, the machine must be connected to... 44. z Power lamp flashing green once and Alarm lamp flashing orange once alternately: An error that requires contacting your computer according to print. Before Using the Machine Operation Panel (1) (2) (3) (4) (13) (5) (12) (11) (6) (10) (7) (9) (8) ...
MP210 series Quick Start Guide
Page 7
Before Using the Machine 3 (7) Stop/Reset button Cancels operations or a print job in progress. (8) Color button* Starts color copying. Also, finalizes your selection for the menu or setting item. (9) Black button* Starts black & white copying. For information on page 16. (13... copying is enabled. (12) Paper button Switches the page size and media type for copying. * In the software applications or manuals, the Black and Color buttons are collectively called the "Start" or "OK" button. Also, finalizes your selection for the menu or setting item. (10) (Maintenance) button Accesses...
Before Using the Machine 3 (7) Stop/Reset button Cancels operations or a print job in progress. (8) Color button* Starts color copying. Also, finalizes your selection for the menu or setting item. (9) Black button* Starts black & white copying. For information on page 16. (13... copying is enabled. (12) Paper button Switches the page size and media type for copying. * In the software applications or manuals, the Black and Color buttons are collectively called the "Start" or "OK" button. Also, finalizes your selection for the menu or setting item. (10) (Maintenance) button Accesses...
MP210 series Quick Start Guide
Page 8
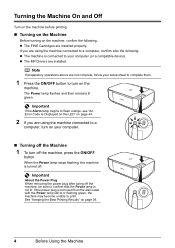
...are installed. z The machine is removed from the wall outlet with the Power lamp still lit or flashing green, the machine may become unable to print. The Power lamp flashes and then remains lit green. If the power plug is connected to turn on your setup sheet to complete them. 1 ... Note If preparatory operations above are not complete, follow your computer. „ Turning off the machine, press the ON/OFF button. See "Keeping the Best Printing Results" on page 44. 2 If you are using the machine connected to confirm that the Power lamp is turned off the machine, be sure to...
...are installed. z The machine is removed from the wall outlet with the Power lamp still lit or flashing green, the machine may become unable to print. The Power lamp flashes and then remains lit green. If the power plug is connected to turn on your setup sheet to complete them. 1 ... Note If preparatory operations above are not complete, follow your computer. „ Turning off the machine, press the ON/OFF button. See "Keeping the Best Printing Results" on page 44. 2 If you are using the machine connected to confirm that the Power lamp is turned off the machine, be sure to...
MP210 series Quick Start Guide
Page 9
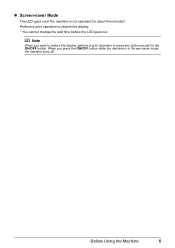
Before Using the Machine 5 z Screen-saver Mode The LED goes out if the machine is in Screen-saver mode, the machine turns off. Note When you press the ON/OFF button while the machine is not operated for the ON/OFF button. Perform a print operation to restore the display, perform a print operation or press any button except for about five minutes*. When you want to restore the display. * You cannot change the wait time before the LED goes out.
Before Using the Machine 5 z Screen-saver Mode The LED goes out if the machine is in Screen-saver mode, the machine turns off. Note When you press the ON/OFF button while the machine is not operated for the ON/OFF button. Perform a print operation to restore the display, perform a print operation or press any button except for about five minutes*. When you want to restore the display. * You cannot change the wait time before the LED goes out.
MP210 series Quick Start Guide
Page 11
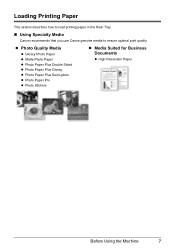
z Photo Quality Media z Glossy Photo Paper z Matte Photo Paper z Photo Paper Plus Double Sided z Photo Paper Plus Glossy z Photo Paper Plus Semi-gloss z Photo Paper Pro z Photo Stickers z Media Suited for Business Documents z High Resolution Paper Before Using the Machine 7 Loading Printing Paper This section describes how to load printing paper in the Rear Tray. „ Using Specialty Media Canon recommends that you use Canon genuine media to ensure optimal print quality.
z Photo Quality Media z Glossy Photo Paper z Matte Photo Paper z Photo Paper Plus Double Sided z Photo Paper Plus Glossy z Photo Paper Plus Semi-gloss z Photo Paper Pro z Photo Stickers z Media Suited for Business Documents z High Resolution Paper Before Using the Machine 7 Loading Printing Paper This section describes how to load printing paper in the Rear Tray. „ Using Specialty Media Canon recommends that you use Canon genuine media to ensure optimal print quality.
MP210 series Quick Start Guide
Page 12
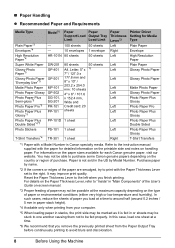
.... Purchase paper by Model Number. For details on the country or region of the paper are smudged, try to print with the Paper Thickness Lever set to purchase some Canon genuine papers depending on the Paper Thickness Lever, refer to "Inside" in or sheets may not be possible at ...a time to around half (around 0.2 inches / 5 mm in paper stack height). *4 Available only when printing from the Paper Output Tray before continuously printing to be able...
.... Purchase paper by Model Number. For details on the country or region of the paper are smudged, try to print with the Paper Thickness Lever set to purchase some Canon genuine papers depending on the Paper Thickness Lever, refer to "Inside" in or sheets may not be possible at ...a time to around half (around 0.2 inches / 5 mm in paper stack height). *4 Available only when printing from the Paper Output Tray before continuously printing to be able...

MP210 series Quick Start Guide
Page 13
... paper cut to a small size. Before Using the Machine 9 Using such paper will not only produce unsatisfactory results, but can also cause the machine to "Printing Media" in Macintosh®. z Folded, curled, or wrinkled paper z Damp paper z Paper that is too thin (weighing less than 28 lb / 105 gsm) z ... until the ink is too thick (plain paper, except for best printing results: GP-401, GP-501, GP-502, PP-101, SG-201. Additionally, when printing on A5 or smaller sized paper, do not use the following paper types for Canon genuine paper, weighing more than 17 lb / 64 gsm) z Paper that...
... paper cut to a small size. Before Using the Machine 9 Using such paper will not only produce unsatisfactory results, but can also cause the machine to "Printing Media" in Macintosh®. z Folded, curled, or wrinkled paper z Damp paper z Paper that is too thin (weighing less than 28 lb / 105 gsm) z ... until the ink is too thick (plain paper, except for best printing results: GP-401, GP-501, GP-502, PP-101, SG-201. Additionally, when printing on A5 or smaller sized paper, do not use the following paper types for Canon genuine paper, weighing more than 17 lb / 64 gsm) z Paper that...
MP210 series Quick Start Guide
Page 14
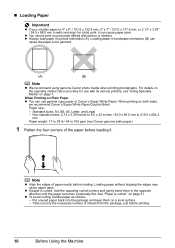
....0 mm to 215.9 x 584.2 mm Paper weight: 17 to 28 lb / 64 to 105 gsm (non-Canon genuine plain paper) 1 Flatten the four corners of the paper before printing. 10 Before Using the Machine on Plain Paper z You can use with photos or stickers. See "Paper is ... z Align the edges of sheets from the package, just before loading it can cause the paper to be jammed. (A) (B) Note z We recommend using genuine Canon photo media when printing photographs. „ Loading Paper Important z If you cut plain paper to 4" x 6" / 101.6 x 152.4 mm, 5" x 7" / 127.0 x 177.8 mm, or 2.13" x ...
....0 mm to 215.9 x 584.2 mm Paper weight: 17 to 28 lb / 64 to 105 gsm (non-Canon genuine plain paper) 1 Flatten the four corners of the paper before printing. 10 Before Using the Machine on Plain Paper z You can use with photos or stickers. See "Paper is ... z Align the edges of sheets from the package, just before loading it can cause the paper to be jammed. (A) (B) Note z We recommend using genuine Canon photo media when printing photographs. „ Loading Paper Important z If you cut plain paper to 4" x 6" / 101.6 x 152.4 mm, 5" x 7" / 127.0 x 177.8 mm, or 2.13" x ...
MP210 series Quick Start Guide
Page 15
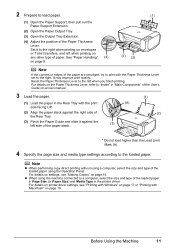
.... Set it against the right side of the Rear Tray. (3) Pinch the Paper Guide and slide it to the right when printing on envelopes or T-shirt transfers, and left when printing on page 8. (3) (2) Note If the corners or edges of paper. z When using the Operation Panel. Before Using the ...Copies" on -screen manual. 3 Load the paper. (1) Load the paper in the Rear Tray with Macintosh" on page 18. Note z When performing copy direct printing without using a computer, select the size and type of the loaded paper using the machine connected to a computer, select the size and type of the...
.... Set it against the right side of the Rear Tray. (3) Pinch the Paper Guide and slide it to the right when printing on envelopes or T-shirt transfers, and left when printing on page 8. (3) (2) Note If the corners or edges of paper. z When using the Operation Panel. Before Using the ...Copies" on -screen manual. 3 Load the paper. (1) Load the paper in the Rear Tray with Macintosh" on page 18. Note z When performing copy direct printing without using a computer, select the size and type of the loaded paper using the machine connected to a computer, select the size and type of the...
MP210 series Quick Start Guide
Page 16
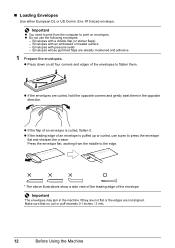
... embossed or treated surface - Make sure that no curl or puff exceeds 0.1 inches / 3 mm. 12 Before Using the Machine Important z You need to print from the middle to print on all four corners and edges of an envelope is curled, flatten it. Env. #10-sized envelope. z Do not use a pen to flatten...
... embossed or treated surface - Make sure that no curl or puff exceeds 0.1 inches / 3 mm. 12 Before Using the Machine Important z You need to print from the middle to print on all four corners and edges of an envelope is curled, flatten it. Env. #10-sized envelope. z Do not use a pen to flatten...
MP210 series Quick Start Guide
Page 17
...Note Reset the Paper Thickness Lever to the left side of the envelope. (3) (A) (A) Printing orientation (B) Make sure the flaps are folded. (3) Set the Paper Thickness Lever to 10 envelopes can be printed in Page Size. For details on the Paper Thickness Lever, refer to set the printer ... the size for envelopes. or Comm. Env. #10 in the wrong direction. Note For details on printer driver settings, see "Printing with Windows" on page 17 or "Printing with the address side facing UP and the (2) rear flaps DOWN on page 18. 2 Load the envelopes. (1) Load the envelope...
...Note Reset the Paper Thickness Lever to the left side of the envelope. (3) (A) (A) Printing orientation (B) Make sure the flaps are folded. (3) Set the Paper Thickness Lever to 10 envelopes can be printed in Page Size. For details on the Paper Thickness Lever, refer to set the printer ... the size for envelopes. or Comm. Env. #10 in the wrong direction. Note For details on printer driver settings, see "Printing with Windows" on page 17 or "Printing with the address side facing UP and the (2) rear flaps DOWN on page 18. 2 Load the envelopes. (1) Load the envelope...
MP210 series Quick Start Guide
Page 18
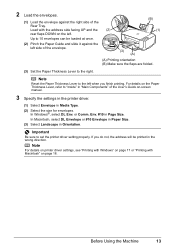
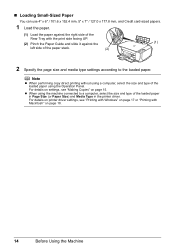
For details on printer driver settings, see "Making Copies" on page 15. z When using the Operation Panel. Note z When performing copy direct printing without using a computer, select the size and type of the loaded paper using the machine connected to the loaded paper. „ Loading Small-Sized ... loaded paper in Page Size (or Paper Size) and Media Type in the printer driver. For details on settings, see "Printing with Windows" on page 17 or "Printing with the print side facing UP. (2) Pinch the Paper Guide and slide it against the right side of the Rear Tray with Macintosh" on...
For details on printer driver settings, see "Making Copies" on page 15. z When using the Operation Panel. Note z When performing copy direct printing without using a computer, select the size and type of the loaded paper using the machine connected to the loaded paper. „ Loading Small-Sized ... loaded paper in Page Size (or Paper Size) and Media Type in the printer driver. For details on settings, see "Printing with Windows" on page 17 or "Printing with the print side facing UP. (2) Pinch the Paper Guide and slide it against the right side of the Rear Tray with Macintosh" on...

MP210 series Quick Start Guide
Page 19
... selected page size and media type. A4 or Letter Plain Paper / A4 or Letter Photo Paper / 4" x 6" Photo Paper 5 Press the Color button for color copying, or the Black button for black & white copying. Copying 15 Copying Making Copies This section describes the basic procedure to make copies. 1 ... button repeatedly to specify the page size and media type. Note By pressing the + button repeatedly, F will be displayed on the LED. See "Loading Printing Paper" on page 7. 3 Load the original on page 4. 2 Load paper. The number of copies (max. 20 copies). See "Turning the Machine On...
... selected page size and media type. A4 or Letter Plain Paper / A4 or Letter Photo Paper / 4" x 6" Photo Paper 5 Press the Color button for color copying, or the Black button for black & white copying. Copying 15 Copying Making Copies This section describes the basic procedure to make copies. 1 ... button repeatedly to specify the page size and media type. Note By pressing the + button repeatedly, F will be displayed on the LED. See "Loading Printing Paper" on page 7. 3 Load the original on page 4. 2 Load paper. The number of copies (max. 20 copies). See "Turning the Machine On...
MP210 series Quick Start Guide
Page 21
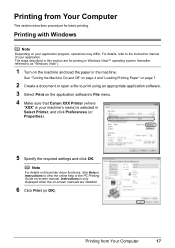
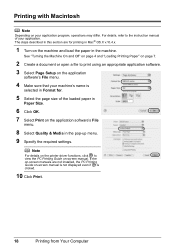
... (or Properties). 5 Specify the required settings and click OK. Printing with Windows Note Depending on -screen manual. Printing from Your Computer 17 See "Turning the Machine On and Off" on page 4 and "Loading Printing Paper" on page 7. 2 Create a document or open a file...Windows Vista"). 1 Turn on the application software's File menu. 4 Make sure that Canon XXX Printer (where "XXX" is your application. Printing from Your Computer This section describes procedure for printing in Windows Vista™ operating system (hereafter referred to the instruction manual of your ...
... (or Properties). 5 Specify the required settings and click OK. Printing with Windows Note Depending on -screen manual. Printing from Your Computer 17 See "Turning the Machine On and Off" on page 4 and "Loading Printing Paper" on page 7. 2 Create a document or open a file...Windows Vista"). 1 Turn on the application software's File menu. 4 Make sure that Canon XXX Printer (where "XXX" is your application. Printing from Your Computer This section describes procedure for printing in Windows Vista™ operating system (hereafter referred to the instruction manual of your ...
MP210 series Quick Start Guide
Page 22
... Macintosh Note Depending on your application. The steps described in this section are not installed, the PC Printing Guide on-screen manual is not displayed even if is selected in Format for printing in Mac® OS X v.10.4.x. 1 Turn on -screen manuals are for . 5 Select the page ... machine and load the paper in the pop-up menu. 9 Specify the required settings. Note For details on the printer driver functions, click to print using an appropriate application software. 3 Select Page Setup on the application software's File menu. 8 Select Quality & Media in the machine. For details...
... Macintosh Note Depending on your application. The steps described in this section are not installed, the PC Printing Guide on-screen manual is not displayed even if is selected in Format for printing in Mac® OS X v.10.4.x. 1 Turn on -screen manuals are for . 5 Select the page ... machine and load the paper in the pop-up menu. 9 Specify the required settings. Note For details on the printer driver functions, click to print using an appropriate application software. 3 Select Page Setup on the application software's File menu. 8 Select Quality & Media in the machine. For details...
MP210 series Quick Start Guide
Page 23
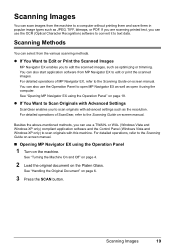
...- (Windows Vista and Windows XP only) compliant application software and the Control Panel (Windows Vista and Windows XP only) to a computer without printing them and save them in popular image types such as the resolution. See "Handling the Original Document" on the Platen Glass. Scanning Methods You... methods. Besides the above-mentioned methods, you to text data. You can use the OCR (Optical Character Recognition) software to edit or print the scanned images. You can use the Operation Panel to open it to scan originals with this machine. z If You Want to Scan...
...- (Windows Vista and Windows XP only) compliant application software and the Control Panel (Windows Vista and Windows XP only) to a computer without printing them and save them in popular image types such as the resolution. See "Handling the Original Document" on the Platen Glass. Scanning Methods You... methods. Besides the above-mentioned methods, you to text data. You can use the OCR (Optical Character Recognition) software to edit or print the scanned images. You can use the Operation Panel to open it to scan originals with this machine. z If You Want to Scan...
MP210 series Quick Start Guide
Page 24
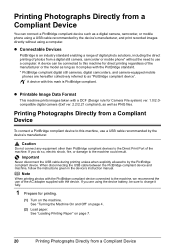
...) ver. 1.0/2.0compatible digital camera (Exif ver. 2.2/2.21 compliant), as well as "PictBridge compliant device". See "Loading Printing Paper" on page 4. (2) Load paper. Printing Photographs Directly from a Compliant Device You can be sure to charge it complies with the PictBridge standard. * PictBridge compliant... still cameras, digital camcorders, and camera-equipped mobile phones are using a USB cable recommended by the device's manufacturer, and print recorded images directly without the need to use of the AC adapter supplied with the device. Caution Do not connect any equipment...
...) ver. 1.0/2.0compatible digital camera (Exif ver. 2.2/2.21 compliant), as well as "PictBridge compliant device". See "Loading Printing Paper" on page 4. (2) Load paper. Printing Photographs Directly from a Compliant Device You can be sure to charge it complies with the PictBridge standard. * PictBridge compliant... still cameras, digital camcorders, and camera-equipped mobile phones are using a USB cable recommended by the device's manufacturer, and print recorded images directly without the need to use of the AC adapter supplied with the device. Caution Do not connect any equipment...

MP210 series Quick Start Guide
Page 25
...the device when the machine is turned off. (2) Connect the PictBridge compliant device to the machine. You may have to select a print mode compliant with PictBridge before connecting it to this machine according to instructions given in the machine. Perform necessary operations on manually. ...make settings using a USB cable recommended by the manufacturer of your device does not turn on automatically, turn on page 24. 4 Start printing from your device, you loaded in the device's instruction manual. (1) Make sure that you may also have setting menu, change the setting...
...the device when the machine is turned off. (2) Connect the PictBridge compliant device to the machine. You may have to select a print mode compliant with PictBridge before connecting it to this machine according to instructions given in the machine. Perform necessary operations on manually. ...make settings using a USB cable recommended by the manufacturer of your device does not turn on automatically, turn on page 24. 4 Start printing from your device, you loaded in the device's instruction manual. (1) Make sure that you may also have setting menu, change the setting...

MP210 series Quick Start Guide
Page 26
... this case, the settings made on the machine are given according to purchase some Canon genuine papers depending on the country or region of printing paper can be different depending on certain Canon-brand PictBridge compliant devices. *2 Plain Paper can be able to those used when... printing from a Compliant Device z Paper Size and Paper Type Settings The following description, names of ...
... this case, the settings made on the machine are given according to purchase some Canon genuine papers depending on the country or region of printing paper can be different depending on certain Canon-brand PictBridge compliant devices. *2 Plain Paper can be able to those used when... printing from a Compliant Device z Paper Size and Paper Type Settings The following description, names of ...


