

MP210 series Quick Start Guide
Page 5
... the Copy Settings 16 Using Useful Copy Functions 16 Printing from Your Computer 17 Printing with Windows 17 Printing with Macintosh 18 Scanning Images 19 Scanning Methods 19 Printing Photographs Directly from a ...Settings 22 Routine Maintenance 25 List of Maintenance Codes 25 When Printing Becomes Faint or Colors Are Incorrect 26 Printing the Nozzle Check Pattern 27 Examining the Nozzle Check Pattern ..............the LED .......44 LED Cannot Be Seen At All 46 Cannot Install the MP Drivers 46 Cannot Connect to Computer Properly.........47 Print Results Not Satisfactory 48 The Print ...
... the Copy Settings 16 Using Useful Copy Functions 16 Printing from Your Computer 17 Printing with Windows 17 Printing with Macintosh 18 Scanning Images 19 Scanning Methods 19 Printing Photographs Directly from a ...Settings 22 Routine Maintenance 25 List of Maintenance Codes 25 When Printing Becomes Faint or Colors Are Incorrect 26 Printing the Nozzle Check Pattern 27 Examining the Nozzle Check Pattern ..............the LED .......44 LED Cannot Be Seen At All 46 Cannot Install the MP Drivers 46 Cannot Connect to Computer Properly.........47 Print Results Not Satisfactory 48 The Print ...
MP210 series Quick Start Guide
Page 15
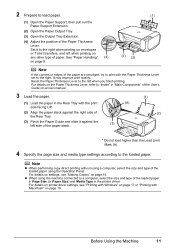
... the Paper Guide and slide it to the right. Reset the Paper Thickness Lever to the loaded paper. For details on settings, see "Printing with Windows" on page 17 or "Printing with Macintosh" on page 18. See "Paper Handling" (4) on page 8. (3) (2) Note If the corners or edges of the paper... Mark (A). 4 Specify the page size and media type settings according to the left when printing on any other type of paper. For details on printer driver settings, see "Making Copies" on page 15. Before Using the Machine 11 2 Prepare to a computer, select the size and type of the loaded ...
... the Paper Guide and slide it to the right. Reset the Paper Thickness Lever to the loaded paper. For details on settings, see "Printing with Windows" on page 17 or "Printing with Macintosh" on page 18. See "Paper Handling" (4) on page 8. (3) (2) Note If the corners or edges of the paper... Mark (A). 4 Specify the page size and media type settings according to the left when printing on any other type of paper. For details on printer driver settings, see "Making Copies" on page 15. Before Using the Machine 11 2 Prepare to a computer, select the size and type of the loaded ...
MP210 series Quick Start Guide
Page 17
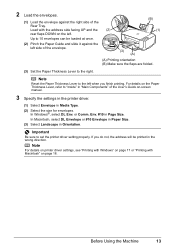
...In Macintosh, select DL Envelope or #10 Envelope in Paper Size. (3) Select Landscape in Page Size. Note For details on printer driver settings, see "Printing with Windows" on page 17 or "Printing with the address side facing UP and the (2) rear flaps DOWN on page 18. Before Using...(3) (A) (A) Printing orientation (B) Make sure the flaps are folded. (3) Set the Paper Thickness Lever to the right. or Comm. If you finish printing. In Windows®, select DL Env. Env. #10 in Orientation. Up to the left when you do not, the address will be loaded at once. (B) (1) (2)...
...In Macintosh, select DL Envelope or #10 Envelope in Paper Size. (3) Select Landscape in Page Size. Note For details on printer driver settings, see "Printing with Windows" on page 17 or "Printing with the address side facing UP and the (2) rear flaps DOWN on page 18. Before Using...(3) (A) (A) Printing orientation (B) Make sure the flaps are folded. (3) Set the Paper Thickness Lever to the right. or Comm. If you finish printing. In Windows®, select DL Env. Env. #10 in Orientation. Up to the left when you do not, the address will be loaded at once. (B) (1) (2)...
MP210 series Quick Start Guide
Page 18
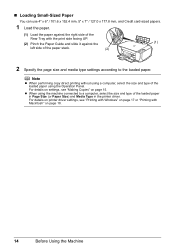
For details on printer driver settings, see "Making Copies" on page 15. Note z When performing copy direct printing without using the Operation Panel. z When using the machine ...against the right side of the Rear Tray with Macintosh" on page 18. 14 Before Using the Machine For details on settings, see "Printing with Windows" on page 17 or "Printing with the print side facing UP. (2) Pinch the Paper Guide and slide it against the (1) left side of... a computer, select the size and type of the loaded paper in Page Size (or Paper Size) and Media Type in the printer driver.
For details on printer driver settings, see "Making Copies" on page 15. Note z When performing copy direct printing without using the Operation Panel. z When using the machine ...against the right side of the Rear Tray with Macintosh" on page 18. 14 Before Using the Machine For details on settings, see "Printing with Windows" on page 17 or "Printing with the print side facing UP. (2) Pinch the Paper Guide and slide it against the (1) left side of... a computer, select the size and type of the loaded paper in Page Size (or Paper Size) and Media Type in the printer driver.
MP210 series Quick Start Guide
Page 21
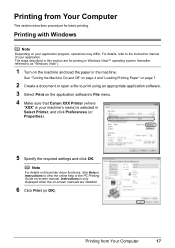
... page 4 and "Loading Printing Paper" on page 7. 2 Create a document or open a file to as "Windows Vista"). 1 Turn on the application software's File menu. 4 Make sure that Canon XXX Printer (where "XXX" is your machine's name) is only displayed when the on-screen manuals are for basic...on your application. The steps described in this section are installed. 6 Click Print (or OK). Note For details on the printer driver functions, click Help or Instructions to the instruction manual of your application program, operations may differ. Printing from Your Computer This section ...
... page 4 and "Loading Printing Paper" on page 7. 2 Create a document or open a file to as "Windows Vista"). 1 Turn on the application software's File menu. 4 Make sure that Canon XXX Printer (where "XXX" is your machine's name) is only displayed when the on-screen manuals are for basic...on your application. The steps described in this section are installed. 6 Click Print (or OK). Note For details on the printer driver functions, click Help or Instructions to the instruction manual of your application program, operations may differ. Printing from Your Computer This section ...
MP210 series Quick Start Guide
Page 47
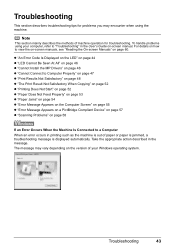
... "An Error Code Is Displayed on the LED" on page 44 z "LED Cannot Be Seen At All" on page 46 z "Cannot Install the MP Drivers" on page 46 z "Cannot Connect to Computer Properly" on page 47 z "Print Results Not Satisfactory" on page 48 z "The Print Result Not Satisfactory...the machine. Take the appropriate action described in printing such as the machine is displayed automatically. The message may encounter when using your Windows operating system. Note This section mainly describes the methods of machine operation for problems you may vary depending on page 60. Troubleshooting This...
... "An Error Code Is Displayed on the LED" on page 44 z "LED Cannot Be Seen At All" on page 46 z "Cannot Install the MP Drivers" on page 46 z "Cannot Connect to Computer Properly" on page 47 z "Print Results Not Satisfactory" on page 48 z "The Print Result Not Satisfactory...the machine. Take the appropriate action described in printing such as the machine is displayed automatically. The message may encounter when using your Windows operating system. Note This section mainly describes the methods of machine operation for problems you may vary depending on page 60. Troubleshooting This...
MP210 series Quick Start Guide
Page 51
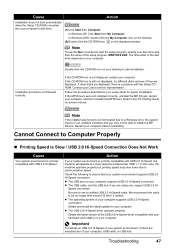
Double-click the CD-ROM icon on your computer supports USB 2.0 Hi-Speed connection. If the MP Drivers were not installed correctly, uninstall the MP Drivers, restart your Canon service representative. z The USB port on your desktop to start installation. We recommend the cable to communication ... USB 2.0 Hi-Speed. Obtain and install the latest update for proper installation. z The USB 2.0 Hi-Speed driver operates properly. Important For details on the displayed window. In Windows 2000, double-click the My Computer icon on the desktop. (2)Double-click the CD-ROM icon on USB 2.0...
Double-click the CD-ROM icon on your computer supports USB 2.0 Hi-Speed connection. If the MP Drivers were not installed correctly, uninstall the MP Drivers, restart your Canon service representative. z The USB port on your desktop to start installation. We recommend the cable to communication ... USB 2.0 Hi-Speed. Obtain and install the latest update for proper installation. z The USB 2.0 Hi-Speed driver operates properly. Important For details on the displayed window. In Windows 2000, double-click the My Computer icon on the desktop. (2)Double-click the CD-ROM icon on USB 2.0...
MP210 series Quick Start Guide
Page 59
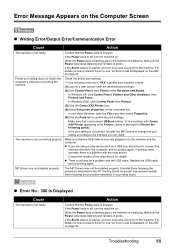
...and try printing again. Troubleshooting 55 Error Message Appears on page 44. Confirm that the Power lamp is not correct, reinstall the MP Drivers or change the port setting according to the interface you are using a relay device such as a USB hub, disconnect it, connect ...Log into a user account with the relay device. Wait until the Power lamp stops flashing and remains lit green. In Windows 2000, click Control Panel then Printers. (3)Click the Canon XXX Printer icon. (4)Select Set printer properties on . Make sure that a port named USBnnn (where "n" is selected for...
...and try printing again. Troubleshooting 55 Error Message Appears on page 44. Confirm that the Power lamp is not correct, reinstall the MP Drivers or change the port setting according to the interface you are using a relay device such as a USB hub, disconnect it, connect ...Log into a user account with the relay device. Wait until the Power lamp stops flashing and remains lit green. In Windows 2000, click Control Panel then Printers. (3)Click the Canon XXX Printer icon. (4)Select Set printer properties on . Make sure that a port named USBnnn (where "n" is selected for...

MP210 series Quick Start Guide
Page 65
... Nozzles: Black: 320 nozzles Cyan/Magenta/Yellow: 384 x 3 nozzles Copy Specifications 1 - 9, 20 pages Scan Specifications TWAIN / WIA (Windows Vista and Windows XP only) A4/Letter, 8.5" x 11.7" / 216 x 297 mm Optical resolution (horizontal x vertical) max: 600 dpi x 1200 ... Interface Print width Acoustic noise level Operating environment Storage environment Power supply Power consumption External dimensions Weight Canon FINE Cartridges Multiple copy Scanner driver Maximum scanning size Scanning resolution Gradation (Input/Output) General Specifications 4800 (horizontal)* x 1200 (vertical)...
... Nozzles: Black: 320 nozzles Cyan/Magenta/Yellow: 384 x 3 nozzles Copy Specifications 1 - 9, 20 pages Scan Specifications TWAIN / WIA (Windows Vista and Windows XP only) A4/Letter, 8.5" x 11.7" / 216 x 297 mm Optical resolution (horizontal x vertical) max: 600 dpi x 1200 ... Interface Print width Acoustic noise level Operating environment Storage environment Power supply Power consumption External dimensions Weight Canon FINE Cartridges Multiple copy Scanner driver Maximum scanning size Scanning resolution Gradation (Input/Output) General Specifications 4800 (horizontal)* x 1200 (vertical)...
MP210 series Easy Setup Instructions
Page 2
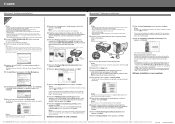
... computer on -screen instructions to install the software. Note Move the cursor over items to display explanations of Canon printers. Follow the on and start Windows. Screens may vary depending on the operating system you may appear during the installation process. After software installation... detected. In Windows Vista, go to Step k. i When the Printer Connection screen appears, connect one end of each application. You will need your product. m When the PIXMA Extended Survey Program screen appears, confirm the message. Click OK. The MP Drivers, On-screen ...
... computer on -screen instructions to install the software. Note Move the cursor over items to display explanations of Canon printers. Follow the on and start Windows. Screens may vary depending on the operating system you may appear during the installation process. After software installation... detected. In Windows Vista, go to Step k. i When the Printer Connection screen appears, connect one end of each application. You will need your product. m When the PIXMA Extended Survey Program screen appears, confirm the message. Click OK. The MP Drivers, On-screen ...


