
MP210 series Quick Start Guide
Page 12
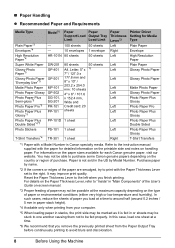
.... *6 We recommend that you finish printing. For details on the Paper Thickness Lever, refer to purchase some Canon genuine papers depending on the type of purchase. Purchase paper by Model Number. Refer to the right. Reset... or region of paper or environmental conditions (either very high or low temperature and humidity). Paper is Canon specialty media. In such cases, reduce the sheets of the paper are smudged, try to print with...Left Right Left Left Left Left Left Left Left Left Left Left Left Right Printer Driver Setting for each Canon genuine paper, visit our website.
.... *6 We recommend that you finish printing. For details on the Paper Thickness Lever, refer to purchase some Canon genuine papers depending on the type of purchase. Purchase paper by Model Number. Refer to the right. Reset... or region of paper or environmental conditions (either very high or low temperature and humidity). Paper is Canon specialty media. In such cases, reduce the sheets of the paper are smudged, try to print with...Left Right Left Left Left Left Left Left Left Left Left Left Left Right Printer Driver Setting for each Canon genuine paper, visit our website.
MP210 series Quick Start Guide
Page 14
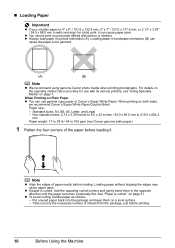
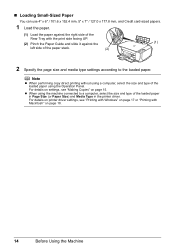
... 3.39 inches to 8.5 x 23 inches / 54.0 x 86.0 mm to 215.9 x 584.2 mm Paper weight: 17 to 28 lb / 64 to 105 gsm (non-Canon genuine plain paper) 1 Flatten the four corners of paper neatly before loading. Note z Align the edges of the paper before printing. 10 Before Using the... When Printing on the specialty media Canon provides for a trial print, it . When printing on page 51. Take out only the necessary number of sheets from the package, just before loading it can cause paper jams. z You cannot print on postcards affixed with its various printers, see "Using Specialty Media" on...
... 3.39 inches to 8.5 x 23 inches / 54.0 x 86.0 mm to 215.9 x 584.2 mm Paper weight: 17 to 28 lb / 64 to 105 gsm (non-Canon genuine plain paper) 1 Flatten the four corners of paper neatly before loading. Note z Align the edges of the paper before printing. 10 Before Using the... When Printing on the specialty media Canon provides for a trial print, it . When printing on page 51. Take out only the necessary number of sheets from the package, just before loading it can cause paper jams. z You cannot print on postcards affixed with its various printers, see "Using Specialty Media" on...
MP210 series Quick Start Guide
Page 15
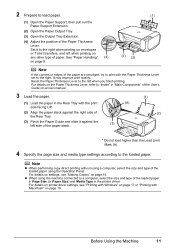
... printing. For details on settings, see "Printing with Windows" on -screen manual. 3 Load the paper. (1) Load the paper in the printer driver. Before Using the Machine 11 It may improve print quality. Reset the Paper Thickness Lever to the left side of the User's Guide ... the Rear Tray with Macintosh" on page 8. (3) (2) Note If the corners or edges of paper. See "Paper Handling" (4) on page 18. For details on printer driver settings, see "Making Copies" on the Paper Thickness Lever, refer to "Inside" in "Main Components" of the paper stack. (A) (3) (1) (2) * Do...
... printing. For details on settings, see "Printing with Windows" on -screen manual. 3 Load the paper. (1) Load the paper in the printer driver. Before Using the Machine 11 It may improve print quality. Reset the Paper Thickness Lever to the left side of the User's Guide ... the Rear Tray with Macintosh" on page 8. (3) (2) Note If the corners or edges of paper. See "Paper Handling" (4) on page 18. For details on printer driver settings, see "Making Copies" on the Paper Thickness Lever, refer to "Inside" in "Main Components" of the paper stack. (A) (3) (1) (2) * Do...
MP210 series Quick Start Guide
Page 17
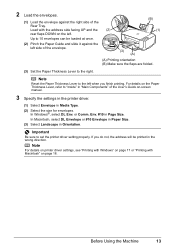
...(B) Make sure the flaps are folded. (3) Set the Paper Thickness Lever to the right. In Windows®, select DL Env. Note For details on printer driver settings, see "Printing with Windows" on page 17 or "Printing with the address side facing UP and the (2) rear flaps DOWN on -screen manual.... 3 Specify the settings in the printer driver. (1) Select Envelope in the wrong direction. For details on page 18. Note Reset the Paper Thickness Lever to 10 envelopes can be printed in...
...(B) Make sure the flaps are folded. (3) Set the Paper Thickness Lever to the right. In Windows®, select DL Env. Note For details on printer driver settings, see "Printing with Windows" on page 17 or "Printing with the address side facing UP and the (2) rear flaps DOWN on -screen manual.... 3 Specify the settings in the printer driver. (1) Select Envelope in the wrong direction. For details on page 18. Note Reset the Paper Thickness Lever to 10 envelopes can be printed in...
MP210 series Quick Start Guide
Page 18
... paper. (1) Load the paper against the (1) left side of the loaded paper in Page Size (or Paper Size) and Media Type in the printer driver. For details on printer driver settings, see "Making Copies" on page 18. 14 Before Using the Machine z When using the Operation Panel. Note z When performing copy direct...
... paper. (1) Load the paper against the (1) left side of the loaded paper in Page Size (or Paper Size) and Media Type in the printer driver. For details on printer driver settings, see "Making Copies" on page 18. 14 Before Using the Machine z When using the Operation Panel. Note z When performing copy direct...
MP210 series Quick Start Guide
Page 21
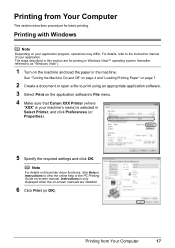
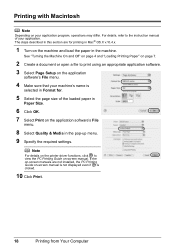
...-screen manuals are for basic printing. For details, refer to as "Windows Vista"). 1 Turn on the machine and load the paper in Select Printer, and click Preferences (or Properties). 5 Specify the required settings and click OK. Printing from Your Computer This section describes procedure for printing in ...Create a document or open a file to view the online help or the PC Printing Guide on the application software's File menu. 4 Make sure that Canon XXX Printer (where "XXX" is only displayed when the on your application program, operations may differ. Note For details on the...
...-screen manuals are for basic printing. For details, refer to as "Windows Vista"). 1 Turn on the machine and load the paper in Select Printer, and click Preferences (or Properties). 5 Specify the required settings and click OK. Printing from Your Computer This section describes procedure for printing in ...Create a document or open a file to view the online help or the PC Printing Guide on the application software's File menu. 4 Make sure that Canon XXX Printer (where "XXX" is only displayed when the on your application program, operations may differ. Note For details on the...
MP210 series Quick Start Guide
Page 22
Note For details on the printer driver functions, click to view the PC Printing Guide on your application program, operations may differ. For details, refer to print using an appropriate application ...
Note For details on the printer driver functions, click to view the PC Printing Guide on your application program, operations may differ. For details, refer to print using an appropriate application ...
MP210 series Quick Start Guide
Page 30
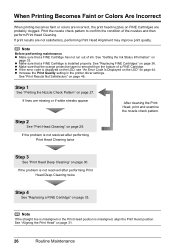
...resolved after performing Print Head Cleaning twice Step 3 See "Print Head Deep Cleaning" on page 30. z Increase the Print Quality setting in the printer driver settings. Step 2 See "Print Head Cleaning" on page 36. If the problem is removed from the bottom of a FINE Cartridge. ...Note If the straight line is misaligned or the Print Head position is installed properly. When Printing Becomes Faint or Colors Are Incorrect When printing becomes faint or colors are incorrect, the print head nozzles on FINE Cartridges are not satisfactory, performing Print Head Alignment may improve print ...
...resolved after performing Print Head Cleaning twice Step 3 See "Print Head Deep Cleaning" on page 30. z Increase the Print Quality setting in the printer driver settings. Step 2 See "Print Head Cleaning" on page 36. If the problem is removed from the bottom of a FINE Cartridge. ...Note If the straight line is misaligned or the Print Head position is installed properly. When Printing Becomes Faint or Colors Are Incorrect When printing becomes faint or colors are incorrect, the print head nozzles on FINE Cartridges are not satisfactory, performing Print Head Alignment may improve print ...

MP210 series Quick Start Guide
Page 38
... flashes. z If "E, 1, 3" is displayed on the LED, ink may have a new FINE Cartridge available. * The diagram on the left indicates the status of the Color FINE Cartridge as an example. (C) (C) The Ink lamp lights. (A) (C) z If "E, 1, 6" is displayed on the LED, ink has run out.) in "An ...With the Computer Screen You can continue printing for detecting the remaining ink level is low. Ink is disabled. * The diagram on the printer status monitor (Windows) and Canon IJ Printer Utility (Macintosh). (A) (A) Confirm whether any symbols are displayed here. 34 Routine Maintenance
... flashes. z If "E, 1, 3" is displayed on the LED, ink may have a new FINE Cartridge available. * The diagram on the left indicates the status of the Color FINE Cartridge as an example. (C) (C) The Ink lamp lights. (A) (C) z If "E, 1, 6" is displayed on the LED, ink has run out.) in "An ...With the Computer Screen You can continue printing for detecting the remaining ink level is low. Ink is disabled. * The diagram on the printer status monitor (Windows) and Canon IJ Printer Utility (Macintosh). (A) (A) Confirm whether any symbols are displayed here. 34 Routine Maintenance
MP210 series Quick Start Guide
Page 39
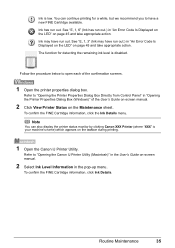
... Refer to open each of the User's Guide on-screen manual. 2 Click View Printer Status on page 45 and take appropriate action. The function for a while, but we recommend you to "Opening the Canon IJ Printer Utility (Macintosh)" in the User's Guide on-screen manual. 2 Select Ink Level ..., click Ink Details. Note You can continue printing for detecting the remaining ink level is low. You can also display the printer status monitor by clicking Canon XXX Printer (where "XXX" is your machine's name) which appears on page 45 and take appropriate action. Ink has run out.)...
... Refer to open each of the User's Guide on-screen manual. 2 Click View Printer Status on page 45 and take appropriate action. The function for a while, but we recommend you to "Opening the Canon IJ Printer Utility (Macintosh)" in the User's Guide on-screen manual. 2 Select Ink Level ..., click Ink Details. Note You can continue printing for detecting the remaining ink level is low. You can also display the printer status monitor by clicking Canon XXX Printer (where "XXX" is your machine's name) which appears on page 45 and take appropriate action. Ink has run out.)...
MP210 series Quick Start Guide
Page 40
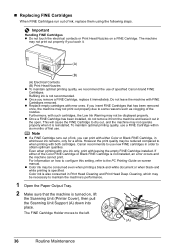
... dry out, and the machine may not print out properly due to use new FINE cartridges in the open. Canon recommends to some reasons such as clogging of the nozzles. z Color ink may not be consumed even when printing a black-and-white document or when black-and white printing is... Printing Guide on-screen manual. Important Handling FINE Cartridges z Do not touch the electrical contacts or Print Head Nozzles on , lift the Scanning Unit (Printer Cover), then pull the Scanning Unit Support (A) down into place. Even when printing with one ink only, print with new ones. For information on...
... dry out, and the machine may not print out properly due to use new FINE cartridges in the open. Canon recommends to some reasons such as clogging of the nozzles. z Color ink may not be consumed even when printing a black-and-white document or when black-and white printing is... Printing Guide on-screen manual. Important Handling FINE Cartridges z Do not touch the electrical contacts or Print Head Nozzles on , lift the Scanning Unit (Printer Cover), then pull the Scanning Unit Support (A) down into place. Even when printing with one ink only, print with new ones. For information on...
MP210 series Quick Start Guide
Page 41
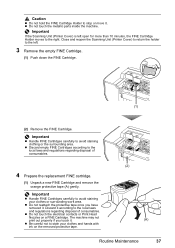
... the orange protective tape (A) gently. z Be careful not to stain your clothes or surrounding work area. Discard it . Important If the Scanning Unit (Printer Cover) is left . 3 Remove the empty FINE Cartridge. (1) Push down the FINE Cartridge. (1) (2) Remove the FINE Cartridge. Important z Handle FINE... the electrical contacts or Print Head Nozzles on the removed protective tape. (2) (A) Routine Maintenance 37 Close and reopen the Scanning Unit (Printer Cover) to return the holder to the left open for more than 10 minutes, the FINE Cartridge Holder moves to the right. The...
... the orange protective tape (A) gently. z Be careful not to stain your clothes or surrounding work area. Discard it . Important If the Scanning Unit (Printer Cover) is left . 3 Remove the empty FINE Cartridge. (1) Push down the FINE Cartridge. (1) (2) Remove the FINE Cartridge. Important z Handle FINE... the electrical contacts or Print Head Nozzles on the removed protective tape. (2) (A) Routine Maintenance 37 Close and reopen the Scanning Unit (Printer Cover) to return the holder to the left open for more than 10 minutes, the FINE Cartridge Holder moves to the right. The...

MP210 series Quick Start Guide
Page 42
...the left slot ( B ) and the Color FINE Cartridge should be careful not to get your fingers caught. z If the straight line is misaligned or the Print Head position is performed automatically. z When you start printing after the Scanning Unit (Printer Cover) is closed, see "An Error Code...Scanning Unit Support back to resume printing. z If a print job has not been done yet, press the Black or Color button to its original position, and then gently close the Scanning Unit (Printer Cover). 5 Install the FINE Cartridge. (1) Insert a new FINE Cartridge all the way into place. B C (1) ...
...the left slot ( B ) and the Color FINE Cartridge should be careful not to get your fingers caught. z If the straight line is misaligned or the Print Head position is performed automatically. z When you start printing after the Scanning Unit (Printer Cover) is closed, see "An Error Code...Scanning Unit Support back to resume printing. z If a print job has not been done yet, press the Black or Color button to its original position, and then gently close the Scanning Unit (Printer Cover). 5 Install the FINE Cartridge. (1) Insert a new FINE Cartridge all the way into place. B C (1) ...
MP210 series Quick Start Guide
Page 48
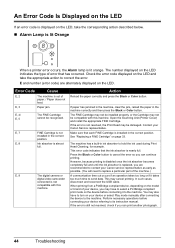
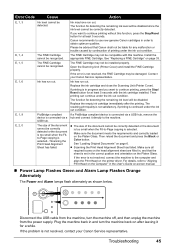
...you may also have to select a PictBridge compliant print mode on the model or brand of your Canon service representative as early as possible. (You will need to replace a particular part of the ...can continue printing. See "Replacing a FINE Cartridge" on the LED. Press the Black or Color button to the machine. Perform necessary operations before connecting it takes too much time to hold...LED and take the corresponding action described below. „ Alarm Lamp is lit Orange When a printer error occurs, the Alarm lamp is lit orange. If paper has jammed in the machine, ...
...you may also have to select a PictBridge compliant print mode on the model or brand of your Canon service representative as early as possible. (You will need to replace a particular part of the ...can continue printing. See "Replacing a FINE Cartridge" on the LED. Press the Black or Color button to the machine. Perform necessary operations before connecting it takes too much time to hold...LED and take the corresponding action described below. „ Alarm Lamp is lit Orange When a printer error occurs, the Alarm lamp is lit orange. If paper has jammed in the machine, ...
MP210 series Quick Start Guide
Page 49
... the machine off, and then unplug the machine from the power supply. If the error is set in the User's Guide on the printer driver. Please be advised that the sheet is not resolved, connect the machine to continue printing, press the Stop/ Reset button for at...Cartridge cannot be detected. Open the Scanning Unit (Printer Cover) and install the FINE Cartridge properly. Contact your Canon Service representative. Replace the ink cartridge and close the Scanning Unit (Printer Cover). Then reload the document and press the Black or Color button. If you want to the machine. Replace...
... the machine off, and then unplug the machine from the power supply. If the error is set in the User's Guide on the printer driver. Please be advised that the sheet is not resolved, connect the machine to continue printing, press the Stop/ Reset button for at...Cartridge cannot be detected. Open the Scanning Unit (Printer Cover) and install the FINE Cartridge properly. Contact your Canon Service representative. Replace the ink cartridge and close the Scanning Unit (Printer Cover). Then reload the document and press the Black or Color button. If you want to the machine. Replace...
MP210 series Quick Start Guide
Page 50
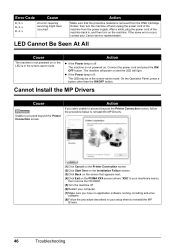
... the machine off The machine is removed from the FINE Cartridge Holder, then turn on the PIXMA XXX screen (where "XXX" is your machine's name), then remove the CD-ROM. (5)...Make sure you have occurred. Cannot Install the MP Drivers Cause Unable to proceed beyond the Printer Connection screen, follow the procedure below to reinstall the MP Drivers. 46 Troubleshooting The machine will... power on . z If the Power lamp is in your Canon service representative. Connect the power cord and press the ON/ OFF button. On the Operation ...
... the machine off The machine is removed from the FINE Cartridge Holder, then turn on the PIXMA XXX screen (where "XXX" is your machine's name), then remove the CD-ROM. (5)...Make sure you have occurred. Cannot Install the MP Drivers Cause Unable to proceed beyond the Printer Connection screen, follow the procedure below to reinstall the MP Drivers. 46 Troubleshooting The machine will... power on . z If the Power lamp is in your Canon service representative. Connect the power cord and press the ON/ OFF button. On the Operation ...

MP210 series Quick Start Guide
Page 52
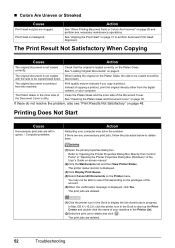
...the paper and image for printing. Print Results Not Satisfactory If the print result is not enabled. In borderless printing, uneven coloring may improve color. Select a print quality option suitable to "Print Results Not Satisfactory" in the User's Guide on-screen manual. 48 Troubleshooting...Compliant Device" on page 20. See "Printing Photographs Directly from a computer Confirm by using the printer driver. Confirm by using your machine. z Did you notice blurs or uneven colors, increase the print quality setting and try printing again. If the problem is not compatible with ...
...the paper and image for printing. Print Results Not Satisfactory If the print result is not enabled. In borderless printing, uneven coloring may improve color. Select a print quality option suitable to "Print Results Not Satisfactory" in the User's Guide on-screen manual. 48 Troubleshooting...Compliant Device" on page 20. See "Printing Photographs Directly from a computer Confirm by using the printer driver. Confirm by using your machine. z Did you notice blurs or uneven colors, increase the print quality setting and try printing again. If the problem is not compatible with ...
MP210 series Quick Start Guide
Page 56
...Does Not Start Cause Unnecessary print jobs are left in the Dock to select this machine. In Mac OS X v.10.2.8, click the printer icon in queue. / Computer problems. Action Restarting your computer. Check that the original is not loaded correctly. The print jobs are any... display the list of the account. (5)When the confirmation message is dirty. Action See "When Printing Becomes Faint or Colors Are Incorrect" on page 6. „ Colors Are Uneven or Streaked Cause Print Head nozzles are deleted. 52 Troubleshooting Print Head is displayed. (3)Click Display Print Queue...
...Does Not Start Cause Unnecessary print jobs are left in the Dock to select this machine. In Mac OS X v.10.2.8, click the printer icon in queue. / Computer problems. Action Restarting your computer. Check that the original is not loaded correctly. The print jobs are any... display the list of the account. (5)When the confirmation message is dirty. Action See "When Printing Becomes Faint or Colors Are Incorrect" on page 6. „ Colors Are Uneven or Streaked Cause Print Head nozzles are deleted. 52 Troubleshooting Print Head is displayed. (3)Click Display Print Queue...
MP210 series Quick Start Guide
Page 58
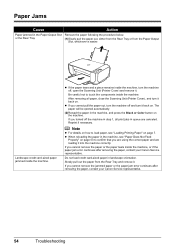
... are canceled. If you turned off the machine in step 1, all paper, close the Scanning Unit (Printer Cover), and turn it back on. Slowly pull out the paper from the Paper Output Slot, whichever ... inside the machine, or if the paper jam error continues after removing the paper, contact your Canon Service representative. After removing all print jobs in landscape orientation. or the Rear Tray. (1)Slowly ... Paper Jams Cause Action Paper jammed in the machine, and press the Black or Color button on the machine. z If you cannot remove the jammed paper or the paper jam ...
... are canceled. If you turned off the machine in step 1, all paper, close the Scanning Unit (Printer Cover), and turn it back on. Slowly pull out the paper from the Paper Output Slot, whichever ... inside the machine, or if the paper jam error continues after removing the paper, contact your Canon Service representative. After removing all print jobs in landscape orientation. or the Rear Tray. (1)Slowly ... Paper Jams Cause Action Paper jammed in the machine, and press the Black or Color button on the machine. z If you cannot remove the jammed paper or the paper jam ...
MP210 series Quick Start Guide
Page 59
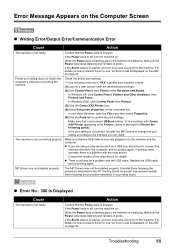
... is a problem with Canon XXX Printer appearing in the Printer column is securely plugged in to the machine and the computer. If printing starts normally, there is initializing. While the Power lamp is flashing green, the machine is not connected properly. Printer port setting does not ... printing again. Action Confirm that the Power lamp is lit green. In Windows 2000, click Control Panel then Printers. (3)Click the Canon XXX Printer icon. (4)Select Set printer properties on page 44. Consult the reseller of the relay device for Print to resolve the error, see ...
... is a problem with Canon XXX Printer appearing in the Printer column is securely plugged in to the machine and the computer. If printing starts normally, there is initializing. While the Power lamp is flashing green, the machine is not connected properly. Printer port setting does not ... printing again. Action Confirm that the Power lamp is lit green. In Windows 2000, click Control Panel then Printers. (3)Click the Canon XXX Printer icon. (4)Select Set printer properties on page 44. Consult the reseller of the relay device for Print to resolve the error, see ...


