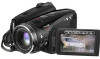
Instruction Manual
Page 4
... Setting the Date and Time 23 Basic Functions Recording Recording Movies 24 Recording Still Images 25 Zooming ...26 Playback Playing Back Movies 27 Adjusting the Volume: Speaker and Headphones 28 Locating the End of the Last Scene 30 Locating Scenes by Recording Date 30 Viewing Still Images 31 Magnifying the Playback Image 32 Advanced Functions Menu Options Lists FUNC. Menu Options 33 Setup Menus 35 Camera Setup (Digital Zoom, Image Stabilizer, etc 35 Recording/Video Input Setup (HD Standard, DV Recording Mode, etc 36 Card Operations (Initialization, Erase All Images...
... Setting the Date and Time 23 Basic Functions Recording Recording Movies 24 Recording Still Images 25 Zooming ...26 Playback Playing Back Movies 27 Adjusting the Volume: Speaker and Headphones 28 Locating the End of the Last Scene 30 Locating Scenes by Recording Date 30 Viewing Still Images 31 Magnifying the Playback Image 32 Advanced Functions Menu Options Lists FUNC. Menu Options 33 Setup Menus 35 Camera Setup (Digital Zoom, Image Stabilizer, etc 35 Recording/Video Input Setup (HD Standard, DV Recording Mode, etc 36 Card Operations (Initialization, Erase All Images...
Instruction Manual
Page 5
... Capturing a Still Image while Recording Movies 52 Light Metering Mode 53 Automatic Focus Priority 53 Continuous Shooting and Exposure Bracketing 54 Other Functions On-Screen Displays 55 Flash ...57 Mini Video Light 58 Self Timer ...58 Audio Recording Level 59 Digital Effects 61 Editing Functions Still Image Options Erasing Still Images 63 Protecting Still Images 63 Initializing the Memory Card 64 External Connections Connecting to a TV or VCR Connection Diagrams 65 Playback on a TV Screen 68 Recording to a VCR or Digital Video Recorder 69 Analog Line-In Recording 70 Digital...
... Capturing a Still Image while Recording Movies 52 Light Metering Mode 53 Automatic Focus Priority 53 Continuous Shooting and Exposure Bracketing 54 Other Functions On-Screen Displays 55 Flash ...57 Mini Video Light 58 Self Timer ...58 Audio Recording Level 59 Digital Effects 61 Editing Functions Still Image Options Erasing Still Images 63 Protecting Still Images 63 Initializing the Memory Card 64 External Connections Connecting to a TV or VCR Connection Diagrams 65 Playback on a TV Screen 68 Recording to a VCR or Digital Video Recorder 69 Analog Line-In Recording 70 Digital...
Instruction Manual
Page 8
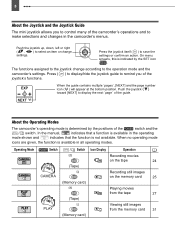
... the camcorder's menus. When the guide contains multiple `pages´, [NEXT] and the page number icon ( ) will appear at the bottom position. When no operating mode icons are given, the function is available in the operating mode shown and indicates that a function is determined by the SET icon . Operating Mode Switch / Switch Icon Display Operation (Tape) Recording movies on the tape 24 CAMERA (Memory card) Recording still images on the memory card 25 (Tape) Playing movies from the tape 27 PLAY (Memory card) Viewing still images...
... the camcorder's menus. When the guide contains multiple `pages´, [NEXT] and the page number icon ( ) will appear at the bottom position. When no operating mode icons are given, the function is available in the operating mode shown and indicates that a function is determined by the SET icon . Operating Mode Switch / Switch Icon Display Operation (Tape) Recording movies on the tape 24 CAMERA (Memory card) Recording still images on the memory card 25 (Tape) Playing movies from the tape 27 PLAY (Memory card) Viewing still images...
Instruction Manual
Page 25
... the light by a battery pack, the camcorder will flash as the image is being recorded. When using a memory card for 5 minutes ( 42). Do not use of the pixels operating to specification. Basic Functions Less than 99.99% of fast zooms and panning can result in visually induced motion sickness. This is not a malfunction. When recording movies, try to get a calm, stable picture. In extreme cases, the playback of such...
... the light by a battery pack, the camcorder will flash as the image is being recorded. When using a memory card for 5 minutes ( 42). Do not use of the pixels operating to specification. Basic Functions Less than 99.99% of fast zooms and panning can result in visually induced motion sickness. This is not a malfunction. When recording movies, try to get a calm, stable picture. In extreme cases, the playback of such...

Instruction Manual
Page 37
... video problems (blocky video artifacts, banding, etc.) in the playback picture when playing back recordings made in LP mode with an external device. This menu item will continue to the normal display. When playing back in this camcorder tapes recorded in LP mode. Mode switch: [ AUTO], [ OFF ] The camcorder automatically reduces the background sound of the DV standards, you are reviewing it (or immediately after it has been recorded. You can erase ( 63) the still image...
... video problems (blocky video artifacts, banding, etc.) in the playback picture when playing back recordings made in LP mode with an external device. This menu item will continue to the normal display. When playing back in this camcorder tapes recorded in LP mode. Mode switch: [ AUTO], [ OFF ] The camcorder automatically reduces the background sound of the DV standards, you are reviewing it (or immediately after it has been recorded. You can erase ( 63) the still image...
Instruction Manual
Page 59
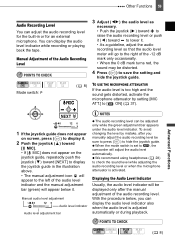
... camcorder will adjust the audio level automatically. Displaying the Audio Level Indicator Usually, the audio level indicator will go to the right of the audio recording level. TO USE THE MICROPHONE ATTENUATOR If the audio level is adjusted automatically or during playback. Manual Adjustment of the Audio Recording Level POINTS TO CHECK Mode switch: ( 8) 3 Adjust ( ) the audio level as necessary. • Push the joystick ( ) toward to raise the audio recording level or push it ( ) toward to lower it . 2 Push the joystick ( ) toward [ MIC...
... camcorder will adjust the audio level automatically. Displaying the Audio Level Indicator Usually, the audio level indicator will go to the right of the audio recording level. TO USE THE MICROPHONE ATTENUATOR If the audio level is adjusted automatically or during playback. Manual Adjustment of the Audio Recording Level POINTS TO CHECK Mode switch: ( 8) 3 Adjust ( ) the audio level as necessary. • Push the joystick ( ) toward to raise the audio recording level or push it ( ) toward to lower it . 2 Push the joystick ( ) toward [ MIC...
Instruction Manual
Page 69
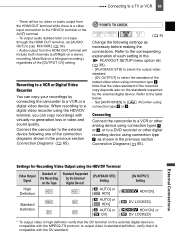
... protocol; Connect the camcorder to a DVD recorder or other analog device using connection type 2 . Connecting Connect the camcorder to a VCR or other digital recording device using the HDV/DV Terminal Video Output Signal High Definition Standard Definition Standard of each setting in the previous section Connection Diagrams ( 65). POINTS TO CHECK ( 8) Change the following one of the output video when using connection types 4 or 5 , or to the external device following settings as shown in the PLAY/OUT SETUP menu option list ( 38). - [PLAYBACK STD...
... protocol; Connect the camcorder to a DVD recorder or other analog device using connection type 2 . Connecting Connect the camcorder to a VCR or other digital recording device using the HDV/DV Terminal Video Output Signal High Definition Standard Definition Standard of each setting in the previous section Connection Diagrams ( 65). POINTS TO CHECK ( 8) Change the following one of the output video when using connection types 4 or 5 , or to the external device following settings as shown in the PLAY/OUT SETUP menu option list ( 38). - [PLAYBACK STD...
Instruction Manual
Page 70
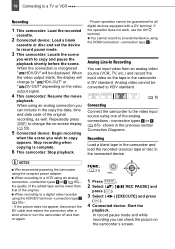
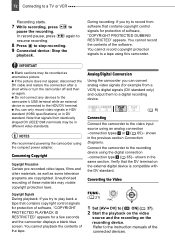
... video input source using the compact power adapter. In record pause mode and while recording you wish to copy and pause the playback shortly before the scene. shown in the previous section Connection Diagrams. Recording Load a blank tape in the camcorder and load the recorded (source) tape or disc in the copy the date, time and data code of the analog connections -connection types 4 or 5 ( 65)- 70 Connecting to a TV or VCR Recording 1 This camcorder: Load the recorded cassette. 2 Connected device: Load a blank cassette or disc and set...
... video input source using the compact power adapter. In record pause mode and while recording you wish to copy and pause the playback shortly before the scene. shown in the previous section Connection Diagrams. Recording Load a blank tape in the camcorder and load the recorded (source) tape or disc in the copy the date, time and data code of the analog connections -connection types 4 or 5 ( 65)- 70 Connecting to a TV or VCR Recording 1 This camcorder: Load the recorded cassette. 2 Connected device: Load a blank cassette or disc and set...
Instruction Manual
Page 72
... of the connected devices. If the picture does not appear, disconnect the DV cable and restore the connection after a short while or turn the camcorder off and then on the external digital device is connected to play back a tape that the DV terminal on again. Refer to a tape using the compact power adapter. You cannot record copyright protection signals to the instruction manuals of the software. You can convert analog video signals...
... of the connected devices. If the picture does not appear, disconnect the DV cable and restore the connection after a short while or turn the camcorder off and then on the external digital device is connected to play back a tape that the DV terminal on again. Refer to a tape using the compact power adapter. You cannot record copyright protection signals to the instruction manuals of the software. You can convert analog video signals...
Instruction Manual
Page 75
... be in HDV standard, video output will be displayed. 4 Start the video editing software. IMPORTANT The video transfer may need to set the switch of the camcorder to a mode other IEEE1394 device is connected to the instruction manual of each setting in the PLAY/OUT SETUP menu option list ( 38). - [PLAYBACK STD] and [DV OUTPUT] to [ ON]). Depending on the video editing software, you may not work correctly depending on the standards supported by the computer. - [AV...
... be in HDV standard, video output will be displayed. 4 Start the video editing software. IMPORTANT The video transfer may need to set the switch of the camcorder to a mode other IEEE1394 device is connected to the instruction manual of each setting in the PLAY/OUT SETUP menu option list ( 38). - [PLAYBACK STD] and [DV OUTPUT] to [ ON]). Depending on the video editing software, you may not work correctly depending on the standards supported by the computer. - [AV...
Instruction Manual
Page 76
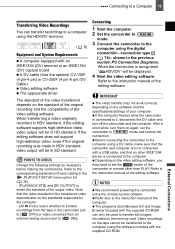
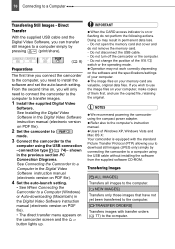
... camcorder to mode. 3 Connect the camcorder to a Computer Transferring Still Images - IMPORTANT When the CARD access indicator is equipped with transfer orders ( 77) to a Computer (Windows) or Auto-downloading (Macintosh) in the Digital Video Software instruction manual (electronic version on the camcorder screen and the button lights up. Doing so may not work correctly depending on your computer. NOTES We recommend powering the camcorder using the USB cable without installing the software from the supplied software CD-ROM. Users of the / switch or the operating mode...
... camcorder to mode. 3 Connect the camcorder to a Computer Transferring Still Images - IMPORTANT When the CARD access indicator is equipped with transfer orders ( 77) to a Computer (Windows) or Auto-downloading (Macintosh) in the Digital Video Software instruction manual (electronic version on the camcorder screen and the button lights up. Doing so may not work correctly depending on your computer. NOTES We recommend powering the camcorder using the USB cable without installing the software from the supplied software CD-ROM. Users of the / switch or the operating mode...
Instruction Manual
Page 82
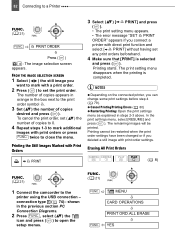
... press ( ) to open the setup menus. FUNC. To cancel the print order, set ( ) the number of copies to 0. 4 Repeat steps 1-3 to the print order symbol . 3 Set ( ) the number of copies appears in orange in the box next to mark additional images with direct print function and select [ PRINT] without having set the print order. MENU CARD OPERATIONS PRINT ORD.ALL ERASE FUNC. 82 Connecting to set any print...
... press ( ) to open the setup menus. FUNC. To cancel the print order, set ( ) the number of copies to 0. 4 Repeat steps 1-3 to the print order symbol . 3 Set ( ) the number of copies appears in orange in the box next to mark additional images with direct print function and select [ PRINT] without having set the print order. MENU CARD OPERATIONS PRINT ORD.ALL ERASE FUNC. 82 Connecting to set any print...
Instruction Manual
Page 83
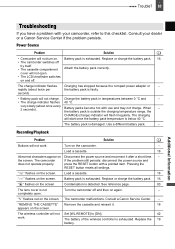
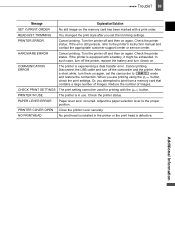
..." " flashes red on the camcorder. - "REMOVE THE CASSETTE" Remove the cassette and reinsert it after a short time. - CHARGE (charge) indicator will not charge. the screen. Pressing the RESET button resets all settings. Load a cassette. 18 " " flashes on the screen. Replace or charge the battery pack. 16 " " flashes on the screen. Power Source Problem Solution • Camcorder will start once the battery pack temperature is exhausted. The wireless controller will not work . Recording/Playback Problem Solution Buttons will not Set [WL.REMOTE...
..." " flashes red on the camcorder. - "REMOVE THE CASSETTE" Remove the cassette and reinsert it after a short time. - CHARGE (charge) indicator will not charge. the screen. Pressing the RESET button resets all settings. Load a cassette. 18 " " flashes on the screen. Replace or charge the battery pack. 16 " " flashes on the screen. Power Source Problem Solution • Camcorder will start once the battery pack temperature is exhausted. The wireless controller will not work . Recording/Playback Problem Solution Buttons will not Set [WL.REMOTE...
Instruction Manual
Page 84
... Trouble? Video noise appears on the screen. The tape stops during playback). When a - Recording Problem Solution Image will enter - Recharge the built-in playback pause ( ) or record pause ( ) mode for 4 minutes 30 seconds. Lens is a phenomenon typical of the TV. If you are using the camcorder in front of CMOS image sensors when - keep a distance between the compact power adapter and the power or antenna cables of CMOS image sensors. "SET THE TIME ZONE, DATE Set the time...
... Trouble? Video noise appears on the screen. The tape stops during playback). When a - Recording Problem Solution Image will enter - Recharge the built-in playback pause ( ) or record pause ( ) mode for 4 minutes 30 seconds. Lens is a phenomenon typical of the TV. If you are using the camcorder in front of CMOS image sensors when - keep a distance between the compact power adapter and the power or antenna cables of CMOS image sensors. "SET THE TIME ZONE, DATE Set the time...
Instruction Manual
Page 86
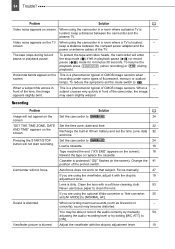
... Dubbing may work using a DV cable. After a short while, turn off the camcorder and the - Refer also to [RESET] and insert a new memory card. Initialize the memory card if flashing persists. Memory card was not initialized. external video device the connected device. Memory card cannot be erased. connected. 86 Trouble? Cancel the protection. 63 " " flashes in red. connected to mode and restore the connection. Erase still images to [OFF]. 37 camcorder video input from the The internal lens fixture can be inserted. Others Problem Solution A rattling...
... Dubbing may work using a DV cable. After a short while, turn off the camcorder and the - Refer also to [RESET] and insert a new memory card. Initialize the memory card if flashing persists. Memory card was not initialized. external video device the connected device. Memory card cannot be erased. connected. 86 Trouble? Cancel the protection. 63 " " flashes in red. connected to mode and restore the connection. Erase still images to [OFF]. 37 camcorder video input from the The internal lens fixture can be inserted. Others Problem Solution A rattling...
Instruction Manual
Page 88
...'s error indicator flashes or an error message appears on the memory card to less than that compatible with - There is wrong. Select [CONTINUE] to cancel printing. TRANSFER ORDER You attempted to the printer's instruction manual. DISCONNECT USB CABLE on the printer's operation panel, refer to set more than 998 transfer orders. 77 ERROR PRINT ORDER ERROR You attempted to be displayed with this camcorder. TOO MANY STILL IMAGES Disconnect the USB cable...
...'s error indicator flashes or an error message appears on the memory card to less than that compatible with - There is wrong. Select [CONTINUE] to cancel printing. TRANSFER ORDER You attempted to the printer's instruction manual. DISCONNECT USB CABLE on the printer's operation panel, refer to set more than 998 transfer orders. 77 ERROR PRINT ORDER ERROR You attempted to be displayed with this camcorder. TOO MANY STILL IMAGES Disconnect the USB cable...
Instruction Manual
Page 89
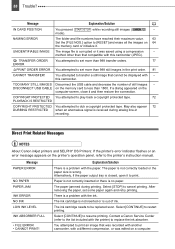
Disconnect the USB cable and turn off the printer, replace the battery and turn it might be used for printing with a battery, it back on the memory card has been marked with a print order. When you set the camcorder to print from a memory card that contains a large number of images. Adjust the paper selection lever to the printer's instruction manual and contact the appropriate customer support center or service center. If the...
Disconnect the USB cable and turn off the printer, replace the battery and turn it might be used for printing with a battery, it back on the memory card has been marked with a print order. When you set the camcorder to print from a memory card that contains a large number of images. Adjust the paper selection lever to the printer's instruction manual and contact the appropriate customer support center or service center. If the...
Instruction Manual
Page 91
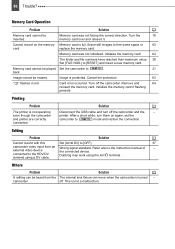
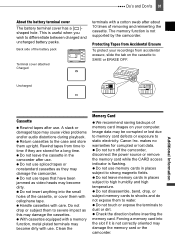
... memory card images on the cassette to time if they may become dirty. Do not turn off the camcorder, disconnect the power source or remove the memory card while the CARD access indicator is not supported by the camcorder. Forcing a memory card into the small holes of removing and reinserting the cassette. The memory function is flashing. Uncharged REC SAVE REC SAVE Additional Information Cassette Rewind tapes after use . Rewind tapes from accidental erasure, slide the tab on your recordings from time...
... memory card images on the cassette to time if they may become dirty. Do not turn off the camcorder, disconnect the power source or remove the memory card while the CARD access indicator is not supported by the camcorder. Forcing a memory card into the small holes of removing and reinserting the cassette. The memory function is flashing. Uncharged REC SAVE REC SAVE Additional Information Cassette Rewind tapes after use . Rewind tapes from accidental erasure, slide the tab on your recordings from time...
Instruction Manual
Page 99
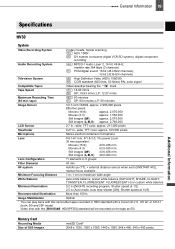
... custom white balance Minimum Illumination 0.2 lx ([NIGHT] recording program, Shutter speed at 1/2) 2.5 lx (Auto mode, Auto slow shutter [ON], Shutter speed at 1/25) Recommended Illumination More than 100 lx Image Stabilization Optical 1 You can play back with this camcorder tapes recorded in 9 groups Filter Diameter 43 mm AF system Autofocus (TTL + external distance sensor when set to [INSTANT AF]), manual focus available Minimum Focusing Distance 1 m; 1 cm on the tape as 50i. Memory Card Recording Media Size of Still Images...
... custom white balance Minimum Illumination 0.2 lx ([NIGHT] recording program, Shutter speed at 1/2) 2.5 lx (Auto mode, Auto slow shutter [ON], Shutter speed at 1/25) Recommended Illumination More than 100 lx Image Stabilization Optical 1 You can play back with this camcorder tapes recorded in 9 groups Filter Diameter 43 mm AF system Autofocus (TTL + external distance sensor when set to [INSTANT AF]), manual focus available Minimum Focusing Distance 1 m; 1 cm on the tape as 50i. Memory Card Recording Media Size of Still Images...
Instruction Manual
Page 102
...L Language 22 LCD backlight 20 LCD screen 20 Light metering mode 53 Lithium button battery 19, 92 LP mode 37 M Magnifying the playback image 32 Maintenance 93 Manual exposure adjustment 47 Manual focus 47 Memory card 18, 91 Microphone 60 Microphone attenuator 59 Mini video light 58 miniSD card 18 Mix balance 39 Mode switch 43 N Night (recording program 43 Normal TV (4:3 38 P P (recording program 44 Playback - Movies (Record review) . . .24 Reviewing - Movies 27 Playback - Movies 24 Recording - HDV/DV . . .36 Telephoto 26 Time zone 22 Transfer order 77 Transferring...
...L Language 22 LCD backlight 20 LCD screen 20 Light metering mode 53 Lithium button battery 19, 92 LP mode 37 M Magnifying the playback image 32 Maintenance 93 Manual exposure adjustment 47 Manual focus 47 Memory card 18, 91 Microphone 60 Microphone attenuator 59 Mini video light 58 miniSD card 18 Mix balance 39 Mode switch 43 N Night (recording program 43 Normal TV (4:3 38 P P (recording program 44 Playback - Movies (Record review) . . .24 Reviewing - Movies 27 Playback - Movies 24 Recording - HDV/DV . . .36 Telephoto 26 Time zone 22 Transfer order 77 Transferring...


