ZoomBrowser EX 6.5 for Windows Instruction Manual
Page 5
... Comparing Images...45 Comparing Multiple Images...45 My Camera Settings...46 Changing the Shutter Sound and Start-Up Image 46 Transferring Images...48 Transferring Images to a Camera 48 CANON iMAGE GATEWAY...49 About CANON iMAGE GATEWAY (for U.S.A. customers only 49 Registering...49 Available Services...50 Preference Settings...51 Customizing ZoomBrowser EX...51 Customizing the Task Buttons...51 Appendices...52 List of Available Functions...52 Supported Image Types...54 Uninstalling the Software...55 Memory Card Folder Structure 56 Troubleshooting...
... Comparing Images...45 Comparing Multiple Images...45 My Camera Settings...46 Changing the Shutter Sound and Start-Up Image 46 Transferring Images...48 Transferring Images to a Camera 48 CANON iMAGE GATEWAY...49 About CANON iMAGE GATEWAY (for U.S.A. customers only 49 Registering...49 Available Services...50 Preference Settings...51 Customizing ZoomBrowser EX...51 Customizing the Task Buttons...51 Appendices...52 List of Available Functions...52 Supported Image Types...54 Uninstalling the Software...55 Memory Card Folder Structure 56 Troubleshooting...
ZoomBrowser EX 6.5 for Windows Instruction Manual
Page 53
... Images Export Movies Extract frames from a movie Export Shooting Properties Export as a Screen Saver Export as a Wallpaper Backup to CD Photo Print Index Print Print Using Other Software Email Images Register/Add Product CANON iMAGE GATEWAY Top Page View Online Photo Album Upload Images Download My Camera Contents Description of the page. You can also use it as a text file. Extracts still images from movies over a specified interval and saves them as a wallpaper file...
... Images Export Movies Extract frames from a movie Export Shooting Properties Export as a Screen Saver Export as a Wallpaper Backup to CD Photo Print Index Print Print Using Other Software Email Images Register/Add Product CANON iMAGE GATEWAY Top Page View Online Photo Album Upload Images Download My Camera Contents Description of the page. You can also use it as a text file. Extracts still images from movies over a specified interval and saves them as a wallpaper file...
Digital Video Software (Macintosh) Ver.30 Instruction Manual
Page 33
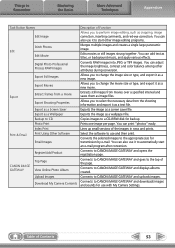
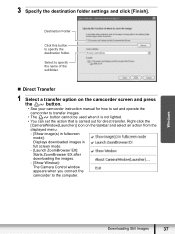
Destination Folder Click this button to transfer images. • The button cannot be used when it is not lighted. Select to specify the name of the subfolder. „ Direct Transfer 1 Select a transfer option on the camcorder screen and press the button. • See your camcorder instruction manual for how to set and operate the camcorder to specify the destination folder. Macintosh Downloading Still Images 33 3 Specify the destination folder settings and click [Finish].
Destination Folder Click this button to transfer images. • The button cannot be used when it is not lighted. Select to specify the name of the subfolder. „ Direct Transfer 1 Select a transfer option on the camcorder screen and press the button. • See your camcorder instruction manual for how to set and operate the camcorder to specify the destination folder. Macintosh Downloading Still Images 33 3 Specify the destination folder settings and click [Finish].
Digital Video Software (Windows) Ver.30 Instruction Manual
Page 20
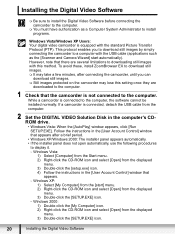
... Digital Video Software Windows 2000: 1) Double-click the [My Computer] icon. 2) Right-click the CD-ROM icon and select [Open] from the displayed menu. 3) Double-click the [setup.exe] icon. 4) Follow the instructions in the [User Account Control] window that appears after connecting the camcorder, until you to download still images by simply connecting the camcorder to a computer with this setting once they are several limitations to downloading still images with the USB cable...
... Digital Video Software Windows 2000: 1) Double-click the [My Computer] icon. 2) Right-click the CD-ROM icon and select [Open] from the displayed menu. 3) Double-click the [setup.exe] icon. 4) Follow the instructions in the [User Account Control] window that appears after connecting the camcorder, until you to download still images by simply connecting the camcorder to a computer with this setting once they are several limitations to downloading still images with the USB cable...
Digital Video Software (Windows) Ver.30 Instruction Manual
Page 37
Windows Downloading Still Images 37 3 Specify the destination folder settings and click [Finish]. Right-click the [CameraWindow(Launcher)] icon on the camcorder screen and press the button. • See your camcorder instruction manual for how to set and operate the camcorder to transfer images. • The button cannot be used when it is not lighted. • You can set the action that is carried out for direct transfer. Destination Folder Click this...
Windows Downloading Still Images 37 3 Specify the destination folder settings and click [Finish]. Right-click the [CameraWindow(Launcher)] icon on the camcorder screen and press the button. • See your camcorder instruction manual for how to set and operate the camcorder to transfer images. • The button cannot be used when it is not lighted. • You can set the action that is carried out for direct transfer. Destination Folder Click this...
Digital Video Software (Windows) Ver.30 Instruction Manual
Page 88
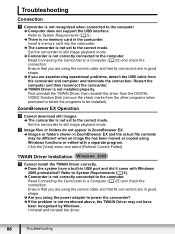
... the camcorder. Î TWAIN Driver is no memory card in the camcorder. First uninstall the TWAIN Driver, then reinstall the driver from the DIGITAL VIDEO Solution Disk (remove the check marks from the camcorder and computer and terminate the connection. Set the camcorder to a Computer ( 25) and check the connection. TWAIN Driver Installation Cannot install the TWAIN Driver correctly. Î Does the system have been recognized by Windows. Read Connecting the Camcorder to still image playback mode. Image files or...
... the camcorder. Î TWAIN Driver is no memory card in the camcorder. First uninstall the TWAIN Driver, then reinstall the driver from the DIGITAL VIDEO Solution Disk (remove the check marks from the camcorder and computer and terminate the connection. Set the camcorder to a Computer ( 25) and check the connection. TWAIN Driver Installation Cannot install the TWAIN Driver correctly. Î Does the system have been recognized by Windows. Read Connecting the Camcorder to still image playback mode. Image files or...
FS10/FS11/FS100 Instruction Manual
Page 10
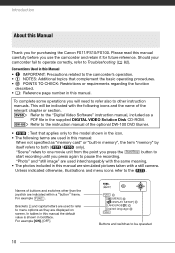
... your camcorder fail to operate correctly, refer to menu options as they are displayed on screen. Refer to the "Digital Video Software" instruction manual, included as "memory card" or "built-in this manual are indicated within a "button" frame. Brackets [ ] and capital letters are used interchangeably with the same meaning. • The photos included in the supplied DIGITAL VIDEO Solution Disk CD-ROM. Buttons and switches to other than the joystick are simulated pictures...
... your camcorder fail to operate correctly, refer to menu options as they are displayed on screen. Refer to the "Digital Video Software" instruction manual, included as "memory card" or "built-in this manual are indicated within a "button" frame. Brackets [ ] and capital letters are used interchangeably with the same meaning. • The photos included in the supplied DIGITAL VIDEO Solution Disk CD-ROM. Buttons and switches to other than the joystick are simulated pictures...
FS10/FS11/FS100 Instruction Manual
Page 16
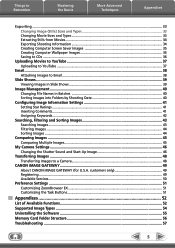
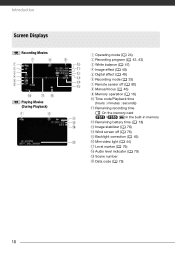
... Screen Displays Recording Movies Playing Movies (During Playback) Operating mode ( 24) Recording program ( 42, 43) White balance ( 47) Image effect ( 48) Digital effect ( 48) Recording mode ( 33) Remote sensor off ( 80) Manual focus ( 46) Memory operation ( 18) Time code/Playback time (hours : minutes : seconds) Remaining recording time On the memory card / In the built-in memory Remaining battery time ( 18) Image stabilizer ( 76) Wind screen off ( 76) Backlight correction ( 45) Mini video light ( 44) Level marker ( 79) Audio level indicator ( 79) Scene number Data code...
... Screen Displays Recording Movies Playing Movies (During Playback) Operating mode ( 24) Recording program ( 42, 43) White balance ( 47) Image effect ( 48) Digital effect ( 48) Recording mode ( 33) Remote sensor off ( 80) Manual focus ( 46) Memory operation ( 18) Time code/Playback time (hours : minutes : seconds) Remaining recording time On the memory card / In the built-in memory Remaining battery time ( 18) Image stabilizer ( 76) Wind screen off ( 76) Backlight correction ( 45) Mini video light ( 44) Level marker ( 79) Audio level indicator ( 79) Scene number Data code...
FS10/FS11/FS100 Instruction Manual
Page 25
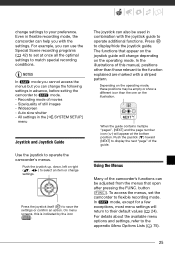
... the guide. For details about the available menu options and settings, refer to display/hide the joystick guide. Press to the appendix Menu Options Lists ( 75). 25 Recording mode of still images - Widescreen - Auto slow shutter - button ( FUNC. ). Press the joystick itself ( ) to match special recording conditions. Even in the [ SYSTEM SETUP] menu Joystick and Joystick Guide Use the joystick to display the next "page" of the camcorder's functions can help you...
... the guide. For details about the available menu options and settings, refer to display/hide the joystick guide. Press to the appendix Menu Options Lists ( 75). 25 Recording mode of still images - Widescreen - Auto slow shutter - button ( FUNC. ). Press the joystick itself ( ) to match special recording conditions. Even in the [ SYSTEM SETUP] menu Joystick and Joystick Guide Use the joystick to display the next "page" of the camcorder's functions can help you...
FS10/FS11/FS100 Instruction Manual
Page 32
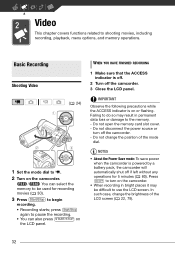
... the ACCESS indicator is powered by a battery pack, the camcorder will automatically shut off if left without any operations for recording movies ( 30). 3 Press Start/Stop to shooting movies, including recording, playback, menu options, and memory operations. Do not change the brightness of the mode dial. Do not open the memory card slot cover. - In such case, change the position of the LCD screen ( 22, 79). 32 press Start/Stop again to pause the recording. •...
... the ACCESS indicator is powered by a battery pack, the camcorder will automatically shut off if left without any operations for recording movies ( 30). 3 Press Start/Stop to shooting movies, including recording, playback, menu options, and memory operations. Do not change the brightness of the mode dial. Do not open the memory card slot cover. - In such case, change the position of the LCD screen ( 22, 79). 32 press Start/Stop again to pause the recording. •...
FS10/FS11/FS100 Instruction Manual
Page 63
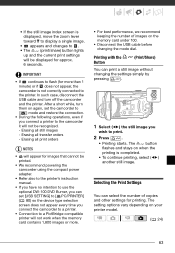
... not correctly connected to the printer. The setting options vary depending on the memory card under 100. • Disconnect the USB cable before changing the mode dial. Printing with the Button (Print/Share) You can select the number of copies and other settings for images that cannot be printed. • We recommend powering the camcorder using the compact power adapter. • Refer also to the printer's instruction manual. • If...
... not correctly connected to the printer. The setting options vary depending on the memory card under 100. • Disconnect the USB cable before changing the mode dial. Printing with the Button (Print/Share) You can select the number of copies and other settings for images that cannot be printed. • We recommend powering the camcorder using the compact power adapter. • Refer also to the printer's instruction manual. • If...

FS10/FS11/FS100 Instruction Manual
Page 72
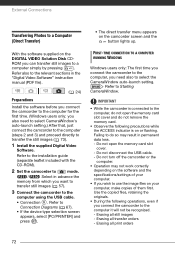
... "Digital Video Software" instruction manual (PDF file). ( 24) Preparations Install the software before you connect the camcorder to the computer for the first time. (Windows users only: you want to transfer still images ( 57). 3 Connect the camcorder to Connection Diagrams ( 67). • If the device type selection screen appears, select [PC/PRINTER] and press . • The direct transfer menu appears on the camcorder screen and the button lights up. Refer to transfer the still images ( 73). 1 Install the supplied Digital Video Software. Failing to a Computer (Direct Transfer...
... "Digital Video Software" instruction manual (PDF file). ( 24) Preparations Install the software before you connect the camcorder to the computer for the first time. (Windows users only: you want to transfer still images ( 57). 3 Connect the camcorder to Connection Diagrams ( 67). • If the device type selection screen appears, select [PC/PRINTER] and press . • The direct transfer menu appears on the camcorder screen and the button lights up. Refer to transfer the still images ( 73). 1 Install the supplied Digital Video Software. Failing to a Computer (Direct Transfer...
FS10/FS11/FS100 Instruction Manual
Page 80
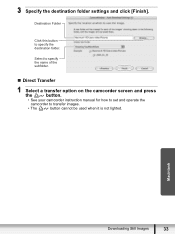
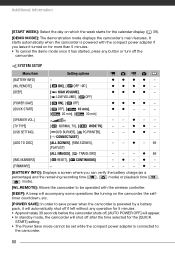
... if left without any button or turn off the camcorder. z 69 -z-z- - - -z- [BATTERY INFO]: Displays a screen where you leave it turned on for the calendar display ( 39). [DEMO MODE]: The demonstration mode displays the camcorder's main features. zzzz - zz - - - System Setup (Speaker Volume, Beep, etc.) SYSTEM SETUP Menu item [BATTERY INFO] [WL.REMOTE] [BEEP] [POWER SAVE] [QUICK START] [SPEAKER VOL.] [TV TYPE] [USB SETTING] [ADD TO DISC] [IMG NUMBERS] [FIRMWARE] Setting options - [ ON], [ OFF ] [ HIGH VOLUME], [ LOW VOLUME], [ OFF] [ ON], [ OFF] [ OFF...
... if left without any button or turn off the camcorder. z 69 -z-z- - - -z- [BATTERY INFO]: Displays a screen where you leave it turned on for the calendar display ( 39). [DEMO MODE]: The demonstration mode displays the camcorder's main features. zzzz - zz - - - System Setup (Speaker Volume, Beep, etc.) SYSTEM SETUP Menu item [BATTERY INFO] [WL.REMOTE] [BEEP] [POWER SAVE] [QUICK START] [SPEAKER VOL.] [TV TYPE] [USB SETTING] [ADD TO DISC] [IMG NUMBERS] [FIRMWARE] Setting options - [ ON], [ OFF ] [ HIGH VOLUME], [ LOW VOLUME], [ OFF] [ ON], [ OFF] [ OFF...
FS10/FS11/FS100 Instruction Manual
Page 100
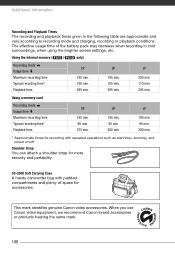
Using the internal memory ( / only) Recording mode Usage time Maximum recording time Typical recording time* Playback time XP 195 min. 100 min. 295 min. SC-2000 Soft Carrying Case A handy camcorder bag with repeated operations such as start/stop, zooming, and power on/off. This mark identifies genuine Canon video accessories. LP 200 min. 110 min. 295 min. Shoulder Strap You can attach a shoulder strap for recording with padded compartments and plenty...
Using the internal memory ( / only) Recording mode Usage time Maximum recording time Typical recording time* Playback time XP 195 min. 100 min. 295 min. SC-2000 Soft Carrying Case A handy camcorder bag with repeated operations such as start/stop, zooming, and power on/off. This mark identifies genuine Canon video accessories. LP 200 min. 110 min. 295 min. Shoulder Strap You can attach a shoulder strap for recording with padded compartments and plenty...

FS10/FS11/FS100 Instruction Manual
Page 106
... Power save 32 Print order 65 Print/share button 63, 73 Printing still images 62 Protecting still images 60 Q Quick Start function 35 R Recording Movies 32 Still images 54 Recording mode 33 Recording programs 42, 43 Recording time 33 Remote sensor 21 RESET 84 Reviewing Movies (Record review 35 Still images (Review 77 S Screen icons 16 SD/SDHC memory card 29 Searching scenes by date 39 Selecting the memory* for playback 37, 57 for recording 30 Self timer 45 Serial number 14 Setup...
... Power save 32 Print order 65 Print/share button 63, 73 Printing still images 62 Protecting still images 60 Q Quick Start function 35 R Recording Movies 32 Still images 54 Recording mode 33 Recording programs 42, 43 Recording time 33 Remote sensor 21 RESET 84 Reviewing Movies (Record review 35 Still images (Review 77 S Screen icons 16 SD/SDHC memory card 29 Searching scenes by date 39 Selecting the memory* for playback 37, 57 for recording 30 Self timer 45 Serial number 14 Setup...

FS11, FS10, and FS100 Instruction Manual
Page 16
... Screen Displays Recording Movies Playing Movies (During Playback) Operating mode ( 24) Recording program ( 42, 43) White balance ( 47) Image effect ( 48) Digital effect ( 48) Recording mode ( 33) Remote sensor off ( 80) Manual focus ( 46) Memory operation ( 18) Time code/Playback time (hours : minutes : seconds) Remaining recording time On the memory card / In the built-in memory Remaining battery time ( 18) Image stabilizer ( 76) Wind screen off ( 76) Backlight correction ( 45) Mini video light ( 44) Level marker ( 79) Audio level indicator ( 79) Scene number Data code...
... Screen Displays Recording Movies Playing Movies (During Playback) Operating mode ( 24) Recording program ( 42, 43) White balance ( 47) Image effect ( 48) Digital effect ( 48) Recording mode ( 33) Remote sensor off ( 80) Manual focus ( 46) Memory operation ( 18) Time code/Playback time (hours : minutes : seconds) Remaining recording time On the memory card / In the built-in memory Remaining battery time ( 18) Image stabilizer ( 76) Wind screen off ( 76) Backlight correction ( 45) Mini video light ( 44) Level marker ( 79) Audio level indicator ( 79) Scene number Data code...

FS11, FS10, and FS100 Instruction Manual
Page 25
... access the menus, set at the bottom position. change settings. All settings in combination with the settings. Press to save the settings or confirm an action. Auto slow shutter - The functions that open after pressing the FUNC. Using the Menus Many of the camcorder's functions can change depending on the operating mode, these positions may be empty or show a different icon than those relevant to match special recording conditions. Size/quality...
... access the menus, set at the bottom position. change settings. All settings in combination with the settings. Press to save the settings or confirm an action. Auto slow shutter - The functions that open after pressing the FUNC. Using the Menus Many of the camcorder's functions can change depending on the operating mode, these positions may be empty or show a different icon than those relevant to match special recording conditions. Size/quality...
FS11, FS10, and FS100 Instruction Manual
Page 72
... to use the image files on or flashing. FIRST-TIME CONNECTION TO A COMPUTER RUNNING WINDOWS Windows users only: The first time you connect the camcorder to the computer, you also need also to select the CameraWindow auto-launch setting. External Connections Transferring Photos to a Computer (Direct Transfer) With the software supplied on the camcorder screen and the button lights up. Erasing all transfer orders - Refer to the installation guide (separate leaflet included with the CD-ROM). 2 Set the camcorder to mode. / Select in the "Digital Video Software" instruction manual...
... to use the image files on or flashing. FIRST-TIME CONNECTION TO A COMPUTER RUNNING WINDOWS Windows users only: The first time you connect the camcorder to the computer, you also need also to select the CameraWindow auto-launch setting. External Connections Transferring Photos to a Computer (Direct Transfer) With the software supplied on the camcorder screen and the button lights up. Erasing all transfer orders - Refer to the installation guide (separate leaflet included with the CD-ROM). 2 Set the camcorder to mode. / Select in the "Digital Video Software" instruction manual...

FS11, FS10, and FS100 Instruction Manual
Page 80
...demonstration mode displays the camcorder's main features. zzzz - zz - - - It starts automatically when the camcorder is powered with the compact power adapter if you can verify the battery charge (as a percentage) and the remaining recording time ( , mode) or playback time ( , mode). [WL.REMOTE]: Allows the camcorder to the camcorder. 80 zz - - - - -z- - - - zzzz - System Setup (Speaker Volume, Beep, etc.) SYSTEM SETUP Menu item [BATTERY INFO] [WL.REMOTE] [BEEP] [POWER SAVE] [QUICK START] [SPEAKER VOL.] [TV TYPE] [USB SETTING] [ADD TO DISC] [IMG NUMBERS] [FIRMWARE] Setting...
...demonstration mode displays the camcorder's main features. zzzz - zz - - - It starts automatically when the camcorder is powered with the compact power adapter if you can verify the battery charge (as a percentage) and the remaining recording time ( , mode) or playback time ( , mode). [WL.REMOTE]: Allows the camcorder to the camcorder. 80 zz - - - - -z- - - - zzzz - System Setup (Speaker Volume, Beep, etc.) SYSTEM SETUP Menu item [BATTERY INFO] [WL.REMOTE] [BEEP] [POWER SAVE] [QUICK START] [SPEAKER VOL.] [TV TYPE] [USB SETTING] [ADD TO DISC] [IMG NUMBERS] [FIRMWARE] Setting...
FS11, FS10, and FS100 Instruction Manual
Page 106
... Power save 32 Print order 65 Print/share button 63, 73 Printing still images 62 Protecting still images 60 Q Quick Start function 35 R Recording Movies 32 Still images 54 Recording mode 33 Recording programs 42, 43 Recording time 33 Remote sensor 21 RESET 84 Reviewing Movies (Record review 35 Still images (Review 77 S Screen icons 16 SD/SDHC memory card 29 Searching scenes by date 39 Selecting the memory* for playback 37, 57 for recording 30 Self timer 45 Serial number 14 Setup...
... Power save 32 Print order 65 Print/share button 63, 73 Printing still images 62 Protecting still images 60 Q Quick Start function 35 R Recording Movies 32 Still images 54 Recording mode 33 Recording programs 42, 43 Recording time 33 Remote sensor 21 RESET 84 Reviewing Movies (Record review 35 Still images (Review 77 S Screen icons 16 SD/SDHC memory card 29 Searching scenes by date 39 Selecting the memory* for playback 37, 57 for recording 30 Self timer 45 Serial number 14 Setup...


