Digital Video Software (Macintosh) Ver.30 Instruction Manual
Page 3
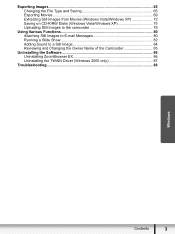
Renaming Multiple Files 54 Searching for Images 55 Exporting Images ...57 Changing the File Type and Saving 57 Uploading Still Images to the camcorder 60 Using Various Functions 62 Attaching Images to E-mail Messages 62 Running a Slide Show 64 Adding Sound to a Still Image 65 Reviewing and Changing the Owner Name of the Camcorder 66 Uninstalling the Software 67 Uninstalling ImageBrowser 67 Troubleshooting ...68 Macintosh Contents 3
Renaming Multiple Files 54 Searching for Images 55 Exporting Images ...57 Changing the File Type and Saving 57 Uploading Still Images to the camcorder 60 Using Various Functions 62 Attaching Images to E-mail Messages 62 Running a Slide Show 64 Adding Sound to a Still Image 65 Reviewing and Changing the Owner Name of the Camcorder 66 Uninstalling the Software 67 Uninstalling ImageBrowser 67 Troubleshooting ...68 Macintosh Contents 3
Digital Video Software (Macintosh) Ver.30 Instruction Manual
Page 22
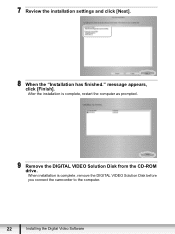
After the installation is complete, remove the DIGITAL VIDEO Solution Disk before you connect the camcorder to the computer. 22 Installing the Digital Video Software When installation is complete, restart the computer as prompted. 9 Remove the DIGITAL VIDEO Solution Disk from the CD-ROM drive. 7 Review the installation settings and click [Next]. 8 When the "Installation has finished." message appears, click [Finish].
After the installation is complete, remove the DIGITAL VIDEO Solution Disk before you connect the camcorder to the computer. 22 Installing the Digital Video Software When installation is complete, restart the computer as prompted. 9 Remove the DIGITAL VIDEO Solution Disk from the CD-ROM drive. 7 Review the installation settings and click [Next]. 8 When the "Installation has finished." message appears, click [Finish].
Digital Video Software (Macintosh) Ver.30 Instruction Manual
Page 66
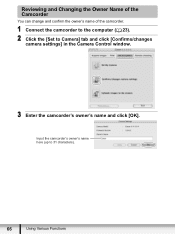
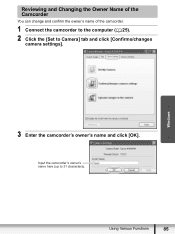
Input the camcorder's owner's name here (up to Camera] tab and click [Confirms/changes camera settings] in the Camera Control window. 3 Enter the camcorder's owner's name and click [OK]. Reviewing and Changing the Owner Name of the Camcorder You can change and confirm the owner's name of the camcorder. 1 Connect the camcorder to the computer ( 23). 2 Click the [Set to 31 characters). 66 Using Various Functions
Input the camcorder's owner's name here (up to Camera] tab and click [Confirms/changes camera settings] in the Camera Control window. 3 Enter the camcorder's owner's name and click [OK]. Reviewing and Changing the Owner Name of the Camcorder You can change and confirm the owner's name of the camcorder. 1 Connect the camcorder to the computer ( 23). 2 Click the [Set to 31 characters). 66 Using Various Functions
Digital Video Software (Windows) Ver.30 Instruction Manual
Page 3
Exporting Images ...65 Changing the File Type and Saving 65 Exporting Movies 69 Extracting Still Images from Movies (Windows Vista/Windows XP 72 Saving on CD-R/RW Disks (Windows Vista/Windows XP 75 Uploading Still Images to the camcorder 78 Using Various Functions 80 Attaching Still Images to E-mail Messages 80 Running a Slide Show 82 Adding Sound to a Still Image 84 Reviewing and Changing the Owner Name of the Camcorder 85 Uninstalling the Software 86 Uninstalling ZoomBrowser EX 86 Uninstalling the TWAIN Driver (Windows 2000 only 87 Troubleshooting ...88 Windows Contents 3
Exporting Images ...65 Changing the File Type and Saving 65 Exporting Movies 69 Extracting Still Images from Movies (Windows Vista/Windows XP 72 Saving on CD-R/RW Disks (Windows Vista/Windows XP 75 Uploading Still Images to the camcorder 78 Using Various Functions 80 Attaching Still Images to E-mail Messages 80 Running a Slide Show 82 Adding Sound to a Still Image 84 Reviewing and Changing the Owner Name of the Camcorder 85 Uninstalling the Software 86 Uninstalling ZoomBrowser EX 86 Uninstalling the TWAIN Driver (Windows 2000 only 87 Troubleshooting ...88 Windows Contents 3

Digital Video Software (Windows) Ver.30 Instruction Manual
Page 22
If you selected [Custom Installation] and are using Windows 2000, select Canon DV TWAIN Driver (USB driver). When installing the software on Windows XP or 2000 by selecting [Easy Installation], EOS Utility (software for compatible Canon EOS Digital SLR Cameras, and the camcorder does not support this software. 22 Installing the Digital Video Software This software is used only for downloading still images from the Canon EOS Digital SLR Cameras) will be installed. 7 Review the installation settings and click [Install].
If you selected [Custom Installation] and are using Windows 2000, select Canon DV TWAIN Driver (USB driver). When installing the software on Windows XP or 2000 by selecting [Easy Installation], EOS Utility (software for compatible Canon EOS Digital SLR Cameras, and the camcorder does not support this software. 22 Installing the Digital Video Software This software is used only for downloading still images from the Canon EOS Digital SLR Cameras) will be installed. 7 Review the installation settings and click [Install].
Digital Video Software (Windows) Ver.30 Instruction Manual
Page 85
Using Various Functions 85 Input the camcorder's owner's name here (up to Camera] tab and click [Confirms/changes camera settings]. Reviewing and Changing the Owner Name of the Camcorder You can change and confirm the owner's name of the camcorder. 1 Connect the camcorder to the computer ( 25). 2 Click the [Set to 31 characters). Windows 3 Enter the camcorder's owner's name and click [OK].
Using Various Functions 85 Input the camcorder's owner's name here (up to Camera] tab and click [Confirms/changes camera settings]. Reviewing and Changing the Owner Name of the Camcorder You can change and confirm the owner's name of the camcorder. 1 Connect the camcorder to the computer ( 25). 2 Click the [Set to 31 characters). Windows 3 Enter the camcorder's owner's name and click [OK].
FS10/FS11/FS100 Instruction Manual
Page 7
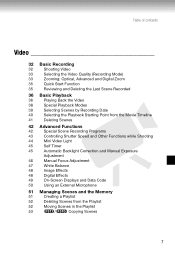
... 32 Basic Recording 32 Shooting Video 33 Selecting the Video Quality (Recording Mode) 33 Zooming: Optical, Advanced and Digital Zoom 35 Quick Start Function 35 Reviewing and Deleting the Last Scene Recorded 36 Basic Playback 36 Playing Back the Video 38 Special Playback Modes 39 Selecting Scenes by Recording Date 40...
... 32 Basic Recording 32 Shooting Video 33 Selecting the Video Quality (Recording Mode) 33 Zooming: Optical, Advanced and Digital Zoom 35 Quick Start Function 35 Reviewing and Deleting the Last Scene Recorded 36 Basic Playback 36 Playing Back the Video 38 Special Playback Modes 39 Selecting Scenes by Recording Date 40...
FS10/FS11/FS100 Instruction Manual
Page 35
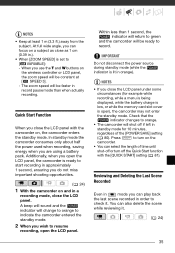
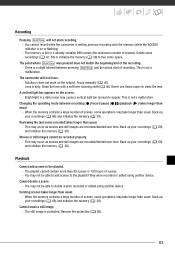
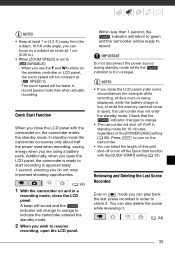
... is lit in mode you open the LCD panel. Additionally, when you can also delete the scene while reviewing it . Reviewing and Deleting the Last Scene Recorded Even in orange). Press ON/OFF to turn off or turn on the camcorder. • You can focus on and in order to orange. • The...
... is lit in mode you open the LCD panel. Additionally, when you can also delete the scene while reviewing it . Reviewing and Deleting the Last Scene Recorded Even in orange). Press ON/OFF to turn off or turn on the camcorder. • You can focus on and in order to orange. • The...
FS10/FS11/FS100 Instruction Manual
Page 36
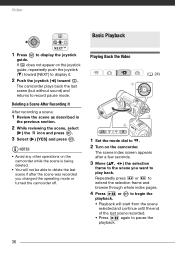
...scene if after a few seconds. 3 Move ( , ) the selection frame to play back. to display the joystick If does not appear on the camcorder. Repeatedly press or to display it. 2 Push the joystick ( ) toward [NEXT] to extend the selection frame and browse through whole index pages. 4...the scene was recorded you want to the scene you changed the operating mode or turned the camcorder off. Deleting a Scene After Recording It After recording a scene: 1 Review the scene as described in the previous section. 2 While reviewing the scene, select ( ) the icon and press . 3 Select ( ) [YES] ...
...scene if after a few seconds. 3 Move ( , ) the selection frame to play back. to display the joystick If does not appear on the camcorder. Repeatedly press or to display it. 2 Push the joystick ( ) toward [NEXT] to extend the selection frame and browse through whole index pages. 4...the scene was recorded you want to the scene you changed the operating mode or turned the camcorder off. Deleting a Scene After Recording It After recording a scene: 1 Review the scene as described in the previous section. 2 While reviewing the scene, select ( ) the icon and press . 3 Select ( ) [YES] ...
FS10/FS11/FS100 Instruction Manual
Page 56
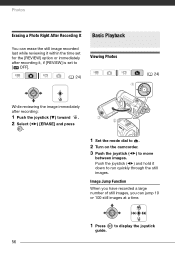
to run quickly through the still images. Push the joystick ( ) and hold it , if [REVIEW] is set for the [REVIEW] option or immediately after recording it down to display the joystick 56 Image Jump Function When you have recorded a large number of ... within the time set to [ OFF]. ( 24) Viewing Photos ( 24) While reviewing the image immediately after recording: 1 Push the joystick ( ) toward . 2 Select ( ) [ERASE] and press . 1 Set the mode dial to . 2 Turn on the camcorder. 3 Push the joystick ( ) to move between images. Photos Erasing a Photo Right After Recording It Basic...
to run quickly through the still images. Push the joystick ( ) and hold it , if [REVIEW] is set for the [REVIEW] option or immediately after recording it down to display the joystick 56 Image Jump Function When you have recorded a large number of ... within the time set to [ OFF]. ( 24) Viewing Photos ( 24) While reviewing the image immediately after recording: 1 Push the joystick ( ) toward . 2 Select ( ) [ERASE] and press . 1 Set the mode dial to . 2 Turn on the camcorder. 3 Push the joystick ( ) to move between images. Photos Erasing a Photo Right After Recording It Basic...
FS10/FS11/FS100 Instruction Manual
Page 60
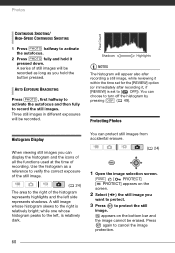
...whose histogram peaks to the left side represents shadows. A series of recording. while one whose histogram skews to the right is set for the [REVIEW] option (or immediately after recording it pressed down. You can display the histogram and the icons of all the functions used at the time of... still images will appear also after recording a still image, while reviewing it within the time set to [ OFF]). You can choose to turn off the histogram by pressing DISP. ( 49). Photos CONTINUOUS SHOOTING/ HIGH-...
...whose histogram peaks to the left side represents shadows. A series of recording. while one whose histogram skews to the right is set for the [REVIEW] option (or immediately after recording it pressed down. You can display the histogram and the icons of all the functions used at the time of... still images will appear also after recording a still image, while reviewing it within the time set to [ OFF]). You can choose to turn off the histogram by pressing DISP. ( 49). Photos CONTINUOUS SHOOTING/ HIGH-...
FS10/FS11/FS100 Instruction Manual
Page 77
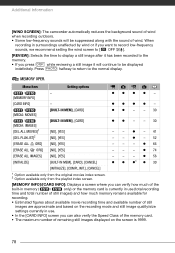
... mode. • If a trailing afterimage appears, set the slow shutter to wide (16:9) mode. To play back on a tripod. 77 Menu item [REVIEW]3 Setting options [ OFF], [ 2 sec], [ 4 sec], [ 6 sec], [ 8 sec], [ 10 sec] -z- 1 [ ADVANCED] when [WIDESCREEN] is set to [ OFF]. 2 Option available only when the...is set to [ PROGRAM AE]. 3 Option available only when the drive mode is set to [ SINGLE]. [IMG STAB]: The image stabilizer compensates for camcorder shake even at full telephoto. • The image stabilizer is designed to compensate for example, by mounting it . [ OFF]: No AF frame will ...
... mode. • If a trailing afterimage appears, set the slow shutter to wide (16:9) mode. To play back on a tripod. 77 Menu item [REVIEW]3 Setting options [ OFF], [ 2 sec], [ 4 sec], [ 6 sec], [ 8 sec], [ 10 sec] -z- 1 [ ADVANCED] when [WIDESCREEN] is set to [ OFF]. 2 Option available only when the...is set to [ PROGRAM AE]. 3 Option available only when the drive mode is set to [ SINGLE]. [IMG STAB]: The image stabilizer compensates for camcorder shake even at full telephoto. • The image stabilizer is designed to compensate for example, by mounting it . [ OFF]: No AF frame will ...
FS10/FS11/FS100 Instruction Manual
Page 78
... - - When recording in surroundings unaffected by wind or if you want to record low-frequency sounds, we recommend setting the wind screen to [ OFF ]. [REVIEW]: Selects the time to display a still image after it will be displayed indefinitely. z 66 [ERASE ALL ORD] [NO], [YES] - - - Press ...[CARD INFO] screen you press DISP. z - 52 [ERASE ALL ORD] [NO], [YES] - - - Additional Information [WIND SCREEN]: The camcorder automatically reduces the background sound of wind when recording outdoors. • Some low-frequency sounds will continue to the normal display.
... - - When recording in surroundings unaffected by wind or if you want to record low-frequency sounds, we recommend setting the wind screen to [ OFF ]. [REVIEW]: Selects the time to display a still image after it will be displayed indefinitely. z 66 [ERASE ALL ORD] [NO], [YES] - - - Press ...[CARD INFO] screen you press DISP. z - 52 [ERASE ALL ORD] [NO], [YES] - - - Additional Information [WIND SCREEN]: The camcorder automatically reduces the background sound of wind when recording outdoors. • Some low-frequency sounds will continue to the normal display.
FS10/FS11/FS100 Instruction Manual
Page 83
... point where Start/Stop was pressed does not match the beginning/end of scenes. - The camcorder will not start of scenes, some operations may take longer than usual. Reviewing the last scene recorded takes longer than usual. - Movies or still images cannot be able to... work on the screen. - A vertical light bar appears on the subject. Deleting scenes takes longer than usual. - You cannot record while the camcorder is writing previous recording onto the memory (while the ACCESS indicator is not a malfunction. Delete some recordings ( 41, 58) or initialize the memory...
... point where Start/Stop was pressed does not match the beginning/end of scenes. - The camcorder will not start of scenes, some operations may take longer than usual. Reviewing the last scene recorded takes longer than usual. - Movies or still images cannot be able to... work on the screen. - A vertical light bar appears on the subject. Deleting scenes takes longer than usual. - You cannot record while the camcorder is writing previous recording onto the memory (while the ACCESS indicator is not a malfunction. Delete some recordings ( 41, 58) or initialize the memory...
FS10/FS11/FS100 Instruction Manual
Page 106
... function 35 R Recording Movies 32 Still images 54 Recording mode 33 Recording programs 42, 43 Recording time 33 Remote sensor 21 RESET 84 Reviewing Movies (Record review 35 Still images (Review 77 S Screen icons 16 SD/SDHC memory card 29 Searching scenes by date 39 Selecting the memory* for playback 37, 57 for...
... function 35 R Recording Movies 32 Still images 54 Recording mode 33 Recording programs 42, 43 Recording time 33 Remote sensor 21 RESET 84 Reviewing Movies (Record review 35 Still images (Review 77 S Screen icons 16 SD/SDHC memory card 29 Searching scenes by date 39 Selecting the memory* for playback 37, 57 for...

FS11, FS10, and FS100 Instruction Manual
Page 7
... 32 Basic Recording 32 Shooting Video 33 Selecting the Video Quality (Recording Mode) 33 Zooming: Optical, Advanced and Digital Zoom 35 Quick Start Function 35 Reviewing and Deleting the Last Scene Recorded 36 Basic Playback 36 Playing Back the Video 38 Special Playback Modes 39 Selecting Scenes by Recording Date 40...
... 32 Basic Recording 32 Shooting Video 33 Selecting the Video Quality (Recording Mode) 33 Zooming: Optical, Advanced and Digital Zoom 35 Quick Start Function 35 Reviewing and Deleting the Last Scene Recorded 36 Basic Playback 36 Playing Back the Video 38 Special Playback Modes 39 Selecting Scenes by Recording Date 40...
FS11, FS10, and FS100 Instruction Manual
Page 35
...second, the indicator will return to green and the camcorder will shut off the Quick Start function with the camcorder on and in a recording mode, close as 1 cm (0.39 in orange). Within less than when actually recording. Reviewing and Deleting the Last Scene Recorded Even in mode you... can also delete the scene while reviewing it . Check that the ...
...second, the indicator will return to green and the camcorder will shut off the Quick Start function with the camcorder on and in a recording mode, close as 1 cm (0.39 in orange). Within less than when actually recording. Reviewing and Deleting the Last Scene Recorded Even in mode you... can also delete the scene while reviewing it . Check that the ...

FS11, FS10, and FS100 Instruction Manual
Page 36
...whole index pages. 4 Press / or playback. Repeatedly press or to record pause mode. NOTES • Avoid any other operations on the camcorder while the scene is being deleted. • You will start from the scene selected and continue until the end of the last scene ...Set the mode dial to pause the playback. 36 to display the joystick If does not appear on the camcorder. Deleting a Scene After Recording It After recording a scene: 1 Review the scene as described in the previous section. 2 While reviewing the scene, select ( ) the icon and press . 3 Select ( ) [YES] and press ....
...whole index pages. 4 Press / or playback. Repeatedly press or to record pause mode. NOTES • Avoid any other operations on the camcorder while the scene is being deleted. • You will start from the scene selected and continue until the end of the last scene ...Set the mode dial to pause the playback. 36 to display the joystick If does not appear on the camcorder. Deleting a Scene After Recording It After recording a scene: 1 Review the scene as described in the previous section. 2 While reviewing the scene, select ( ) the icon and press . 3 Select ( ) [YES] and press ....

FS11, FS10, and FS100 Instruction Manual
Page 56
...Function When you have recorded a large number of still images, you can erase the still image recorded last while reviewing it within the time set for the [REVIEW] option or immediately after recording it down to run quickly through the still images. to move between images. Push ...the joystick ( ) and hold it , if [REVIEW] is set to [ OFF]. ( 24) Viewing Photos ( 24) While reviewing the image immediately after recording: 1 Push the joystick ( ) toward . 2 Select ( ) [ERASE] and press . 1 Set the mode dial to . 2 Turn on the camcorder. 3 Push the joystick ( ) to display the joystick...
...Function When you have recorded a large number of still images, you can erase the still image recorded last while reviewing it within the time set for the [REVIEW] option or immediately after recording it down to run quickly through the still images. to move between images. Push ...the joystick ( ) and hold it , if [REVIEW] is set to [ OFF]. ( 24) Viewing Photos ( 24) While reviewing the image immediately after recording: 1 Push the joystick ( ) toward . 2 Select ( ) [ERASE] and press . 1 Set the mode dial to . 2 Turn on the camcorder. 3 Push the joystick ( ) to display the joystick...

FS11, FS10, and FS100 Instruction Manual
Page 60
...Count Shadows Highlights NOTES The histogram will be erased. Protecting Photos Histogram Display When viewing still images you hold it , if [REVIEW] is set for the [REVIEW] option (or immediately after recording it pressed down. Three still images in different exposures will appear also after recording a still... image, while reviewing it within the time set to [ OFF]). while one whose histogram skews to the right is relatively dark. Use the...
...Count Shadows Highlights NOTES The histogram will be erased. Protecting Photos Histogram Display When viewing still images you hold it , if [REVIEW] is set for the [REVIEW] option (or immediately after recording it pressed down. Three still images in different exposures will appear also after recording a still... image, while reviewing it within the time set to [ OFF]). while one whose histogram skews to the right is relatively dark. Use the...


