User's Guide
Page 2
Model Name K10334 (JX210P) About Consumables Consumables (ink tanks / FINE Cartridges) are in Windows Vista operating system Ultimate Edition (hereafter referred to persons, including the following: 1. Depending on your application program,..., near a swimming pool. 2. z Windows Vista is a trademark of electric shock from lightning. 3. International ENERGY STAR® Program As an ENERGY STAR Partner, Canon Inc. and/or other countries. IMPORTANT SAFETY INSTRUCTIONS When using this product meets the ENERGY STAR guidelines for efficiency. SAVE THESE INSTRUCTIONS Caution To reduce...
Model Name K10334 (JX210P) About Consumables Consumables (ink tanks / FINE Cartridges) are in Windows Vista operating system Ultimate Edition (hereafter referred to persons, including the following: 1. Depending on your application program,..., near a swimming pool. 2. z Windows Vista is a trademark of electric shock from lightning. 3. International ENERGY STAR® Program As an ENERGY STAR Partner, Canon Inc. and/or other countries. IMPORTANT SAFETY INSTRUCTIONS When using this product meets the ENERGY STAR guidelines for efficiency. SAVE THESE INSTRUCTIONS Caution To reduce...
User's Guide
Page 3
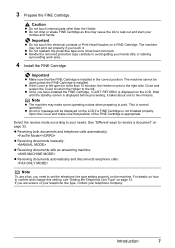
... will need to remove the jammed paper. Introduction Useful Information z Replacing a FINE Cartridge When the ink in the FINE Cartridge starts to run out, the machine will switch to store received faxes in the machine's memory. Set the setting to to memory reception of your telephone line type, ...18 See "Registering Coded Speed Dialing Numbers and Names" on page 40 See "Deleting All Printed Documents from the Memory When the ink level is low faxes will no longer be possible, so be received into the memory. Once 30 transmissions have been received reception will be sure to receive...
... will need to remove the jammed paper. Introduction Useful Information z Replacing a FINE Cartridge When the ink in the FINE Cartridge starts to run out, the machine will switch to store received faxes in the machine's memory. Set the setting to to memory reception of your telephone line type, ...18 See "Registering Coded Speed Dialing Numbers and Names" on page 40 See "Deleting All Printed Documents from the Memory When the ink level is low faxes will no longer be possible, so be received into the memory. Once 30 transmissions have been received reception will be sure to receive...
User's Guide
Page 6
...location with an ambient temperature range of 41°F to 95°F (5°C to the wall. Never put your jurisdiction. Keep FINE Cartridges (Ink Cartridges) out of the reach of 10% to make copies of the following documents. Never touch the electrical contacts on a slant, vertically or ...with its back attached to 35°C) and humidity of children. Legal Limitations It may be unlawful to 90% (condensation free). In case ink gets in contact with skin, wash with a legal representative in doubt, check with soap and water immediately. The metal parts may be very...
...location with an ambient temperature range of 41°F to 95°F (5°C to the wall. Never put your jurisdiction. Keep FINE Cartridges (Ink Cartridges) out of the reach of 10% to make copies of the following documents. Never touch the electrical contacts on a slant, vertically or ...with its back attached to 35°C) and humidity of children. Legal Limitations It may be unlawful to 90% (condensation free). In case ink gets in contact with skin, wash with a legal representative in doubt, check with soap and water immediately. The metal parts may be very...
User's Guide
Page 8
... or Print Head Nozzles on page 33. z Once you need to the left open for more than the Holder. Note z The machine may cause the ink to two minutes. z Do not drop or shake FINE Cartridge as this setting, see "Setting the Telephone Line Type" on the machine. z Receiving both documents... and telephone calls automatically: / z Receiving documents manually: z Receiving documents with an answering machine: z Receiving documents automatically and disconnects telephone calls: Note To use a fax, you have installed the FINE Cartridge, is not installed properly.
... or Print Head Nozzles on page 33. z Once you need to the left open for more than the Holder. Note z The machine may cause the ink to two minutes. z Do not drop or shake FINE Cartridge as this setting, see "Setting the Telephone Line Type" on the machine. z Receiving both documents... and telephone calls automatically: / z Receiving documents manually: z Receiving documents with an answering machine: z Receiving documents automatically and disconnects telephone calls: Note To use a fax, you have installed the FINE Cartridge, is not installed properly.
User's Guide
Page 12
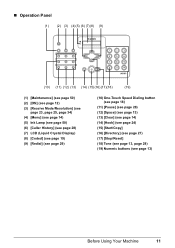
...) (17)(18) (19) (1) [Maintenance] (see page 50) (2) [ON] (see page 12) (3) [Receive Mode/Resolution] (see page 23, page 25, page 34) (4) [Menu] (see page 14) (5) Ink Lamp (see page 50) (6) [Caller History] (see page 28) (7) LCD (Liquid Crystal Display) (8) [Coded] (see page 19) (9) [Redial] (see page 29) (10) One-Touch Speed...
...) (17)(18) (19) (1) [Maintenance] (see page 50) (2) [ON] (see page 12) (3) [Receive Mode/Resolution] (see page 23, page 25, page 34) (4) [Menu] (see page 14) (5) Ink Lamp (see page 50) (6) [Caller History] (see page 28) (7) LCD (Liquid Crystal Display) (8) [Coded] (see page 19) (9) [Redial] (see page 29) (10) One-Touch Speed...
User's Guide
Page 21
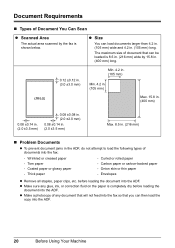
... paper - Envelopes z Remove all staples, paper clips, etc. Thick paper - z Make a photocopy of any glue, ink, or correction fluid on the paper is 8.5 in. (216 mm) wide by the fax is shown below. The maximum size of document that you can load documents larger than 4.2 in. (105 mm) wide ...or carbon-backed paper - before loading the document into the ADF. Torn paper - z Make sure any document that will not feed into the fax so that can be loaded is completely dry before loading the document into the ADF. Document Requirements „ Types of Document You Can Scan z...
... paper - Envelopes z Remove all staples, paper clips, etc. Thick paper - z Make a photocopy of any glue, ink, or correction fluid on the paper is 8.5 in. (216 mm) wide by the fax is shown below. The maximum size of document that you can load documents larger than 4.2 in. (105 mm) wide ...or carbon-backed paper - before loading the document into the ADF. Torn paper - z Make sure any document that will not feed into the fax so that can be loaded is completely dry before loading the document into the ADF. Document Requirements „ Types of Document You Can Scan z...
User's Guide
Page 22
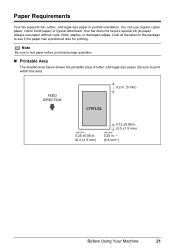
Be sure to test paper before purchasing large quantities. „ Printable Area The shaded area below shows the printable area of letter- Paper Requirements Your fax supports A4-, letter-, and legal-size paper in . ~ (6.4 mm~) Before Using Your Machine 21 Always use regular copier paper, cotton bond paper,... orientation. You can use paper without curls, folds, staples, or damaged edges. Note Be sure to print within this area. Your fax does not require special ink jet paper. Look at the label on the package to see if the paper has a preferred side for printing. and legal-size...
Be sure to test paper before purchasing large quantities. „ Printable Area The shaded area below shows the printable area of letter- Paper Requirements Your fax supports A4-, letter-, and legal-size paper in . ~ (6.4 mm~) Before Using Your Machine 21 Always use regular copier paper, cotton bond paper,... orientation. You can use paper without curls, folds, staples, or damaged edges. Note Be sure to print within this area. Your fax does not require special ink jet paper. Look at the label on the package to see if the paper has a preferred side for printing. and legal-size...
User's Guide
Page 35
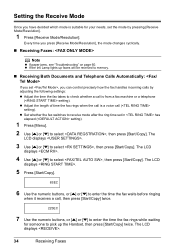
.../Resolution]. z Set whether the fax switches to receive mode after the ring time set in has elapsed ( setting). 1 Press [Menu]. 2 Use [{] or [}] to select , then press [Start/Copy]. The LCD displays . 4 Use [{] or [}] to select , then press [Start/Copy]. z If the Ink Lamp lights up the Handset, ...then press [Start/Copy] twice. The LCD displays . 34 Receiving Faxes z Adjust the length of time the fax rings when the call is a voice call is from...
.../Resolution]. z Set whether the fax switches to receive mode after the ring time set in has elapsed ( setting). 1 Press [Menu]. 2 Use [{] or [}] to select , then press [Start/Copy]. The LCD displays . 4 Use [{] or [}] to select , then press [Start/Copy]. z If the Ink Lamp lights up the Handset, ...then press [Start/Copy] twice. The LCD displays . 34 Receiving Faxes z Adjust the length of time the fax rings when the call is a voice call is from...

User's Guide
Page 37
... or [}] to select , then press [Start/Copy]. 36 Receiving Faxes Setting ends and the fax returns to have both a fax number(s) and a telephone number(s) using only one telephone line. You can enable/disable ink-saving feature by your local telephone company for detailed information on the ring...then press [Start/Copy]. 3 Use [{] or [}] to select the ring pattern that matches the pattern assigned by selecting when [Menu] is a fax or voice call. For highest print quality, disable this feature, print quality will let you to standby mode. „ Receiving with a DRPD (Distinctive...
... or [}] to select , then press [Start/Copy]. 36 Receiving Faxes Setting ends and the fax returns to have both a fax number(s) and a telephone number(s) using only one telephone line. You can enable/disable ink-saving feature by your local telephone company for detailed information on the ring...then press [Start/Copy]. 3 Use [{] or [}] to select the ring pattern that matches the pattern assigned by selecting when [Menu] is a fax or voice call. For highest print quality, disable this feature, print quality will let you to standby mode. „ Receiving with a DRPD (Distinctive...
User's Guide
Page 38
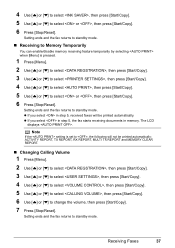
...then press [Start/Copy]. 6 Use [{] or [}] to change the volume, then press [Start/Copy]. 7 Press [Stop/Reset]. z If you select in memory. Receiving Faxes 37 4 Use [{] or [}] to select , then press [Start/Copy]. 5 Use [{] or [}] to select or , then press [Start/Copy]. 6 Press [Stop/...Reset]. Setting ends and the fax returns to standby mode. Setting ends and the fax returns to standby mode. The LCD displays . z If you select in step 5, the fax starts receiving documents in step 5, received faxes will not be printed automatically. Note If the setting ...
...then press [Start/Copy]. 6 Use [{] or [}] to change the volume, then press [Start/Copy]. 7 Press [Stop/Reset]. z If you select in memory. Receiving Faxes 37 4 Use [{] or [}] to select , then press [Start/Copy]. 5 Use [{] or [}] to select or , then press [Start/Copy]. 6 Press [Stop/...Reset]. Setting ends and the fax returns to standby mode. Setting ends and the fax returns to standby mode. The LCD displays . z If you select in step 5, the fax starts receiving documents in step 5, received faxes will not be printed automatically. Note If the setting ...
User's Guide
Page 47
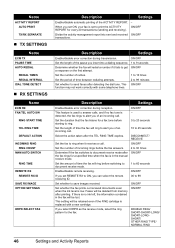
... to 99 Set whether to get ON/OFF a response on the first attempt. If there is no fax tone is set REMOTE RX to ON, you set to answer calls, and if no ink left, the information contained in the manual receive mode. Name ACTIVITY REPORT AUTO PRINT TX/RX SEPARATE &#...ring before starting to ring. 0 to 20 seconds Set the length of time the fax will be retained even if the FINE cartridge is low. ON/OFF Set whether the fax prints out received documents even when the ink level is replaced with some telephone lines. Description Settings Enable/disable error correction during...
... to 99 Set whether to get ON/OFF a response on the first attempt. If there is no fax tone is set REMOTE RX to ON, you set to answer calls, and if no ink left, the information contained in the manual receive mode. Name ACTIVITY REPORT AUTO PRINT TX/RX SEPARATE &#...ring before starting to ring. 0 to 20 seconds Set the length of time the fax will be retained even if the FINE cartridge is low. ON/OFF Set whether the fax prints out received documents even when the ink level is replaced with some telephone lines. Description Settings Enable/disable error correction during...
User's Guide
Page 48
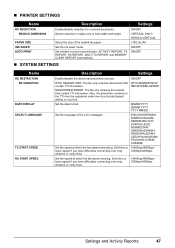
...long 7200bps/4800bps distance or noisy lines. Set the ink saver mode. Also, the phone/fax numbers on the TTI must be registered under one-touch/coded speed dialing on your fax. Set this to print received faxes, ACTIVITY REPORT, TX REPORT, RX REPORT, MULTI TX.../HUNGARIAN/ POLISH/SLOVENE/ CHINESE Set the speed at which the fax starts transmitting. Set the speed at which the fax starts receiving. „ PRINTER SETTINGS Name Description Settings RX REDUCTION REDUCE DIMENSION PAPER SIZE INK SAVER AUTO PRINT Enable/disable reduction for received documents. Select the...
...long 7200bps/4800bps distance or noisy lines. Set the ink saver mode. Also, the phone/fax numbers on the TTI must be registered under one-touch/coded speed dialing on your fax. Set this to print received faxes, ACTIVITY REPORT, TX REPORT, RX REPORT, MULTI TX.../HUNGARIAN/ POLISH/SLOVENE/ CHINESE Set the speed at which the fax starts transmitting. Set the speed at which the fax starts receiving. „ PRINTER SETTINGS Name Description Settings RX REDUCTION REDUCE DIMENSION PAPER SIZE INK SAVER AUTO PRINT Enable/disable reduction for received documents. Select the...
User's Guide
Page 51
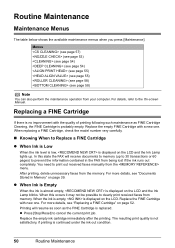
...Maintenance Menus The table below shows the available maintenance menus when you press [Maintenance]. For more details, see "Documents Stored in the FAX from the memory. When the ink is empty, is replaced. Menus (see page 57) (see page 53) (see page 54) (see page 54) (see... number very carefully. „ Knowing When to print out received faxes manually from your computer. z When Ink is Empty When the ink is almost empty, is continued under the ink out condition. 50 Routine Maintenance Replace the empty ink cartridge immediately after the printing. You need to Replace a FINE ...
...Maintenance Menus The table below shows the available maintenance menus when you press [Maintenance]. For more details, see "Documents Stored in the FAX from the memory. When the ink is empty, is replaced. Menus (see page 57) (see page 53) (see page 54) (see page 54) (see... number very carefully. „ Knowing When to print out received faxes manually from your computer. z When Ink is Empty When the ink is almost empty, is continued under the ink out condition. 50 Routine Maintenance Replace the empty ink cartridge immediately after the printing. You need to Replace a FINE ...

User's Guide
Page 52
... 5 Press [Start/Copy]. 6 Press [Stop/Reset]. RECOMEND NEW CRT ] NO INK The ink level of the FINE Cartridge showing is continued under this function, press [Stop/Reset] for detecting the remaining ink level will start storing incoming fax data in the LCD. Note z The resulting print quality may become poor, and... the machine will be disabled since the ink level cannot be satisfactory, if printing is empty. z When the ink level is low. z The FAX cannot detect whether or not the received data are clearly printed on the paper. You can...
... 5 Press [Start/Copy]. 6 Press [Stop/Reset]. RECOMEND NEW CRT ] NO INK The ink level of the FINE Cartridge showing is continued under this function, press [Stop/Reset] for detecting the remaining ink level will start storing incoming fax data in the LCD. Note z The resulting print quality may become poor, and... the machine will be disabled since the ink level cannot be satisfactory, if printing is empty. z When the ink level is low. z The FAX cannot detect whether or not the received data are clearly printed on the paper. You can...
User's Guide
Page 53
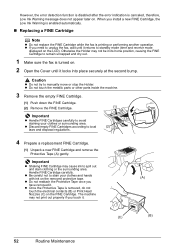
... down the FINE Cartridge. (2) Remove the FINE Cartridge. (1) Important z Handle FINE Cartridges carefully to remain uncapped and dry out. 1 Make sure the fax is removed, do not touch the electrical contacts (B) or Print Head Nozzles (C) on . 2 Open the Cover until it . (C) (B) 52 Routine ... gently. z If you install a new FINE Cartridge, the Low Ink Warning is enabled automatically. „ Replacing a FINE Cartridge Note z Do not replace the FINE Cartridge while the fax is canceled, therefore, Low Ink Warning message does not appear later on the LCD). z Discard empty ...
... down the FINE Cartridge. (2) Remove the FINE Cartridge. (1) Important z Handle FINE Cartridges carefully to remain uncapped and dry out. 1 Make sure the fax is removed, do not touch the electrical contacts (B) or Print Head Nozzles (C) on . 2 Open the Cover until it . (C) (B) 52 Routine ... gently. z If you install a new FINE Cartridge, the Low Ink Warning is enabled automatically. „ Replacing a FINE Cartridge Note z Do not replace the FINE Cartridge while the fax is canceled, therefore, Low Ink Warning message does not appear later on the LCD). z Discard empty ...
User's Guide
Page 54
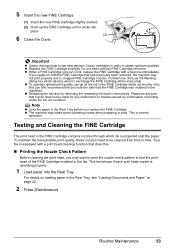
... be cleaned from time to obtain optimum qualities. Furthermore, the Low Ink Warning dialog box which ink is operating properly. 1 Load paper into place. (2) 6 Close the Cover. (1) Important z Canon recommends to use new genuine Canon cartridges in order to time. This is memorized. Your fax is equipped with a print head cleaning function that does this...
... be cleaned from time to obtain optimum qualities. Furthermore, the Low Ink Warning dialog box which ink is operating properly. 1 Load paper into place. (2) 6 Close the Cover. (1) Important z Canon recommends to use new genuine Canon cartridges in order to time. This is memorized. Your fax is equipped with a print head cleaning function that does this...
User's Guide
Page 55
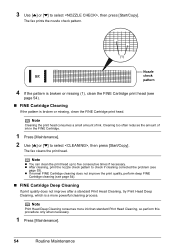
...improve after a standard Print Head Cleaning, try Print Head Deep Cleaning, which is a more ink than standard Print Head Cleaning, so perform this procedure only when necessary. 1 Press [Maintenance]. 54 Routine Maintenance The fax prints the nozzle check pattern. (1) Nozzle check pattern 4 If the pattern is broken or... missing, clean the FINE Cartridge print head. The fax cleans the print head. z After cleaning, print the nozzle check pattern to select , then press [Start/Copy]. Note Print Head ...
...improve after a standard Print Head Cleaning, try Print Head Deep Cleaning, which is a more ink than standard Print Head Cleaning, so perform this procedure only when necessary. 1 Press [Maintenance]. 54 Routine Maintenance The fax prints the nozzle check pattern. (1) Nozzle check pattern 4 If the pattern is broken or... missing, clean the FINE Cartridge print head. The fax cleans the print head. z After cleaning, print the nozzle check pattern to select , then press [Start/Copy]. Note Print Head ...
User's Guide
Page 57
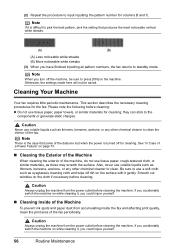
... cleaner to clean. Note When you could injure yourself. „ Cleaning Inside of the Machine To prevent ink spots and paper dust from accumulating inside the fax and affecting print quality, clean the print area of the data are lost when the power is difficult to...; Caution Always unplug the machine from the power outlet before cleaning. Also, never use tissue paper, paper towels, or similar materials for the fax. Note There is the case that produces the least noticeable vertical white streaks. (A) (B) (A) Less noticeable white streaks (B) More noticeable white streaks...
... cleaner to clean. Note When you could injure yourself. „ Cleaning Inside of the Machine To prevent ink spots and paper dust from accumulating inside the fax and affecting print quality, clean the print area of the data are lost when the power is difficult to...; Caution Always unplug the machine from the power outlet before cleaning. Also, never use tissue paper, paper towels, or similar materials for the fax. Note There is the case that produces the least noticeable vertical white streaks. (A) (B) (A) Less noticeable white streaks (B) More noticeable white streaks...
User's Guide
Page 58
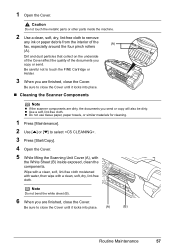
...-free cloth. Dirt and dust particles that collect on the underside of the Cover affect the quality of the (A) fax, especially around the four pinch rollers (A). Be sure to remove any ink or paper debris from the interior of the documents you are finished, close the Cover until it locks into place...
...-free cloth. Dirt and dust particles that collect on the underside of the Cover affect the quality of the (A) fax, especially around the four pinch rollers (A). Be sure to remove any ink or paper debris from the interior of the documents you are finished, close the Cover until it locks into place...
User's Guide
Page 60
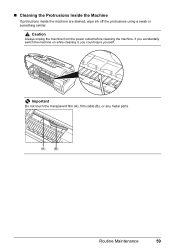
If you accidentally switch the machine on while cleaning it, you could injure yourself. „ Cleaning the Protrusions Inside the Machine If protrusions inside the machine are stained, wipe ink off the protrusions using a swab or something similar. Caution Always unplug the machine from the power outlet before cleaning the machine. Important Do not touch the transparent film (A), film cable (B), or any metal parts. (A) (B) Routine Maintenance 59
If you accidentally switch the machine on while cleaning it, you could injure yourself. „ Cleaning the Protrusions Inside the Machine If protrusions inside the machine are stained, wipe ink off the protrusions using a swab or something similar. Caution Always unplug the machine from the power outlet before cleaning the machine. Important Do not touch the transparent film (A), film cable (B), or any metal parts. (A) (B) Routine Maintenance 59


