User's Guide
Page 2
... of electric shock from lightning. 3. z Windows is a trademark of Apple Inc., registered in the U.S. and other countries. © CANON INC. 2009 All rights reserved. The steps described in this product near a swimming pool. 2. There may be followed to reduce the ... during an electrical storm. z Macintosh is a trademark or registered trademark of Microsoft Corporation in the U.S. Model Name K10334 (JX210P) About Consumables Consumables (ink tanks / FINE Cartridges) are in Windows Vista operating system Ultimate Edition (hereafter referred to report a gas leak in the ...
... of electric shock from lightning. 3. z Windows is a trademark of Apple Inc., registered in the U.S. and other countries. © CANON INC. 2009 All rights reserved. The steps described in this product near a swimming pool. 2. There may be followed to reduce the ... during an electrical storm. z Macintosh is a trademark or registered trademark of Microsoft Corporation in the U.S. Model Name K10334 (JX210P) About Consumables Consumables (ink tanks / FINE Cartridges) are in Windows Vista operating system Ultimate Edition (hereafter referred to report a gas leak in the ...
User's Guide
Page 3
... the FINE Cartridge" on page 55 z One-touch and Coded Dial Numbers You can configure not to print out and delete unnecessary faxes from the Memory When the ink level is low faxes will need to set the telephone line type setting properly on page 19 z Different Ways to store received... faxes in the machine's memory. Select the one that your fax machine to make a telephone call, you are several different ways to remove the jammed...
... the FINE Cartridge" on page 55 z One-touch and Coded Dial Numbers You can configure not to print out and delete unnecessary faxes from the Memory When the ink level is low faxes will need to set the telephone line type setting properly on page 19 z Different Ways to store received... faxes in the machine's memory. Select the one that your fax machine to make a telephone call, you are several different ways to remove the jammed...
User's Guide
Page 6
... of 41°F to 95°F (5°C to 35°C) and humidity of 10% to a heating source. Do not throw FINE Cartridges (Ink Cartridges) into the machine, unplug the power cord and call for service. Do not use reproductions of the following documents. If any object on a ....) or containers of flammable solvents (alcohol, thinners, etc.) on a thick rug or carpet. Do not place the machine with water immediately. In case ink is unstable or subject to eyes or skin persists, obtain medical advice immediately. The list provided is kept clear at all times so you ignore...
... of 41°F to 95°F (5°C to 35°C) and humidity of 10% to a heating source. Do not throw FINE Cartridges (Ink Cartridges) into the machine, unplug the power cord and call for service. Do not use reproductions of the following documents. If any object on a ....) or containers of flammable solvents (alcohol, thinners, etc.) on a thick rug or carpet. Do not place the machine with water immediately. In case ink is unstable or subject to eyes or skin persists, obtain medical advice immediately. The list provided is kept clear at all times so you ignore...
User's Guide
Page 8
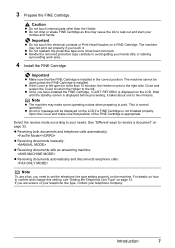
...the FINE Cartridge is not installed properly. Wait until the standby screen is normal operation. Note z The machine may cause the ink to leak out and stain your telephone company. This is displayed before proceeding. Select the receive mode according to receive a document... / z Receiving documents manually: z Receiving documents with an answering machine: z Receiving documents automatically and disconnects telephone calls: Note To use a fax, you touch it has been removed. 3 Prepare the FINE Cartridge. z Handle the removed protective tape carefully to set the telephone line type ...
...the FINE Cartridge is not installed properly. Wait until the standby screen is normal operation. Note z The machine may cause the ink to leak out and stain your telephone company. This is displayed before proceeding. Select the receive mode according to receive a document... / z Receiving documents manually: z Receiving documents with an answering machine: z Receiving documents automatically and disconnects telephone calls: Note To use a fax, you touch it has been removed. 3 Prepare the FINE Cartridge. z Handle the removed protective tape carefully to set the telephone line type ...
User's Guide
Page 12
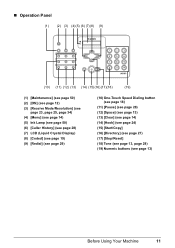
...) (17)(18) (19) (1) [Maintenance] (see page 50) (2) [ON] (see page 12) (3) [Receive Mode/Resolution] (see page 23, page 25, page 34) (4) [Menu] (see page 14) (5) Ink Lamp (see page 50) (6) [Caller History] (see page 28) (7) LCD (Liquid Crystal Display) (8) [Coded] (see page 19) (9) [Redial] (see page 29) (10) One-Touch Speed...
...) (17)(18) (19) (1) [Maintenance] (see page 50) (2) [ON] (see page 12) (3) [Receive Mode/Resolution] (see page 23, page 25, page 34) (4) [Menu] (see page 14) (5) Ink Lamp (see page 50) (6) [Caller History] (see page 28) (7) LCD (Liquid Crystal Display) (8) [Coded] (see page 19) (9) [Redial] (see page 29) (10) One-Touch Speed...
User's Guide
Page 21
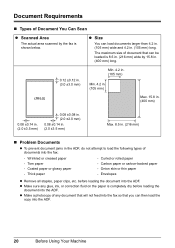
... larger than 4.2 in. (105 mm) wide and 4.2 in. (105 mm) long. z Size You can be loaded is 8.5 in. (216 mm) wide by the fax is completely dry before loading the document into the ADF. Coated paper or glossy paper - before loading the document into the ADF. z Make a photocopy of... any glue, ink, or correction fluid on the paper is shown below. Document Requirements „ Types of Document You Can Scan z Scanned Area The actual area scanned by...
... larger than 4.2 in. (105 mm) wide and 4.2 in. (105 mm) long. z Size You can be loaded is 8.5 in. (216 mm) wide by the fax is completely dry before loading the document into the ADF. Coated paper or glossy paper - before loading the document into the ADF. z Make a photocopy of... any glue, ink, or correction fluid on the paper is shown below. Document Requirements „ Types of Document You Can Scan z Scanned Area The actual area scanned by...
User's Guide
Page 22
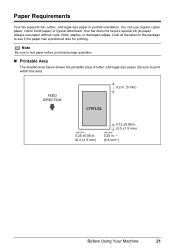
..., staples, or damaged edges. Note Be sure to print within this area. Paper Requirements Your fax supports A4-, letter-, and legal-size paper in . ~ (6.4 mm~) Before Using Your Machine 21 Your fax does not require special ink jet paper. Look at the label on the package to see if the paper has a preferred...
..., staples, or damaged edges. Note Be sure to print within this area. Paper Requirements Your fax supports A4-, letter-, and legal-size paper in . ~ (6.4 mm~) Before Using Your Machine 21 Your fax does not require special ink jet paper. Look at the label on the package to see if the paper has a preferred...
User's Guide
Page 35
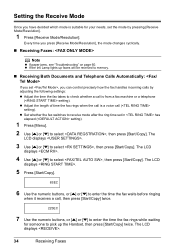
z If the Ink Lamp lights up the Handset, then press [Start/Copy] twice. z Set whether the fax switches to receive mode after the ring time set in has elapsed ( setting). 1 Press [Menu]. 2 Use [{] or [}] to select , then press [Start/Copy]. The LCD ... call ( setting). The LCD displays . 5 Press [Start/Copy]. 8SEC 6 Use the numeric buttons, or [{] or [}] to enter the time the fax waits before ringing when it receives a call is from a fax machine or a telephone ( setting). Setting the Receive Mode Once you have decided which mode is suitable for someone to pick up...
z If the Ink Lamp lights up the Handset, then press [Start/Copy] twice. z Set whether the fax switches to receive mode after the ring time set in has elapsed ( setting). 1 Press [Menu]. 2 Use [{] or [}] to select , then press [Start/Copy]. The LCD ... call ( setting). The LCD displays . 5 Press [Start/Copy]. 8SEC 6 Use the numeric buttons, or [{] or [}] to enter the time the fax waits before ringing when it receives a call is from a fax machine or a telephone ( setting). Setting the Receive Mode Once you have decided which mode is suitable for someone to pick up...

User's Guide
Page 37
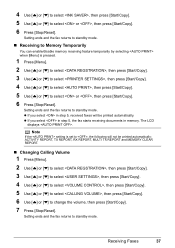
...call is pressed. Follow the procedure below to set the fax ring pattern that your telephone company assigned to select , then press [Start/Copy]. You can enable/disable ink-saving feature by your telephone company. Other Features „ Saving Ink You can select , , , , or . 6 Press... [Stop/Reset]. Note Contact your fax number, then press [Start/Copy]. Setting ends and the fax returns to have both a fax number(s) and a telephone number(s)...
...call is pressed. Follow the procedure below to set the fax ring pattern that your telephone company assigned to select , then press [Start/Copy]. You can enable/disable ink-saving feature by your telephone company. Other Features „ Saving Ink You can select , , , , or . 6 Press... [Stop/Reset]. Note Contact your fax number, then press [Start/Copy]. Setting ends and the fax returns to have both a fax number(s) and a telephone number(s)...
User's Guide
Page 38
...then press [Start/Copy]. 6 Use [{] or [}] to select or , then press [Start/Copy]. 6 Press [Stop/Reset]. z If you select in step 5, the fax starts receiving documents in step 5, received faxes will not be printed automatically. Note If the setting is pressed. 1 Press [Menu]. 2 Use [{] or [}] to select , then press [Start/Copy]. 3 Use... Press [Stop/Reset]. 4 Use [{] or [}] to select , then press [Start/Copy]. 5 Use [{] or [}] to standby mode. z If you select in memory. Setting ends and the fax returns to select or , then press [Start/Copy]. 6 Press [Stop/Reset]. Receiving...
...then press [Start/Copy]. 6 Use [{] or [}] to select or , then press [Start/Copy]. 6 Press [Stop/Reset]. z If you select in step 5, the fax starts receiving documents in step 5, received faxes will not be printed automatically. Note If the setting is pressed. 1 Press [Menu]. 2 Use [{] or [}] to select , then press [Start/Copy]. 3 Use... Press [Stop/Reset]. 4 Use [{] or [}] to select , then press [Start/Copy]. 5 Use [{] or [}] to standby mode. z If you select in memory. Setting ends and the fax returns to select or , then press [Start/Copy]. 6 Press [Stop/Reset]. Receiving...
User's Guide
Page 47
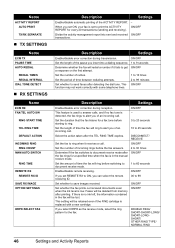
... error correction during reception. ON/OFF Set the length of the pause you of an incoming call. 10 to answer calls, and if no ink left, the information contained in the manual receive mode. This ON/OFF function may not work correctly with a new cartridge. When you select... ID. 00 to 99 Set whether to 60 seconds Enable/disable remote receiving. ON/OFF Set whether the fax prints out received documents even when the ink level is in the fax will be lost. Description Settings Enable/disable error correction during transmission. ON/OFF Set the number of time ...
... error correction during reception. ON/OFF Set the length of the pause you of an incoming call. 10 to answer calls, and if no ink left, the information contained in the manual receive mode. This ON/OFF function may not work correctly with a new cartridge. When you select... ID. 00 to 99 Set whether to 60 seconds Enable/disable remote receiving. ON/OFF Set whether the fax prints out received documents even when the ink level is in the fax will be lost. Description Settings Enable/disable error correction during transmission. ON/OFF Set the number of time ...
User's Guide
Page 48
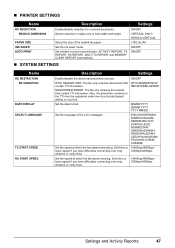
... the LCD messages. Set the ink saver mode. Also, the phone/fax numbers on the TTI must be registered under one-touch/coded speed dialing on your fax. Set the speed at which the fax starts receiving. Set this to print received faxes, ACTIVITY REPORT, TX REPORT, .../DANISH/ FINNISH/RUSSIAN/ CZECH/HUNGARIAN/ POLISH/SLOVENE/ CHINESE Set the speed at which the fax starts transmitting. „ PRINTER SETTINGS Name Description Settings RX REDUCTION REDUCE DIMENSION PAPER SIZE INK SAVER AUTO PRINT Enable/disable reduction for received documents. Set whether to a lower speed if...
... the LCD messages. Set the ink saver mode. Also, the phone/fax numbers on the TTI must be registered under one-touch/coded speed dialing on your fax. Set the speed at which the fax starts receiving. Set this to print received faxes, ACTIVITY REPORT, TX REPORT, .../DANISH/ FINNISH/RUSSIAN/ CZECH/HUNGARIAN/ POLISH/SLOVENE/ CHINESE Set the speed at which the fax starts transmitting. „ PRINTER SETTINGS Name Description Settings RX REDUCTION REDUCE DIMENSION PAPER SIZE INK SAVER AUTO PRINT Enable/disable reduction for received documents. Set whether to a lower speed if...
User's Guide
Page 51
... low, is displayed on the LCD and the Ink Lamp blinks. Replace the empty ink cartridge immediately after the printing. After printing, delete unnecessary faxes from being lost if the ink runs out completely. z When Ink is Empty When the ink is almost empty, is continued under the ink out condition. 50 Routine Maintenance For details, refer...
... low, is displayed on the LCD and the Ink Lamp blinks. Replace the empty ink cartridge immediately after the printing. After printing, delete unnecessary faxes from being lost if the ink runs out completely. z When Ink is Empty When the ink is almost empty, is continued under the ink out condition. 50 Routine Maintenance For details, refer...

User's Guide
Page 52
.... The LCD displays . 3 Use [{] or [}] to select , then press [Start/Copy]. INK VOL UNKNOWN If you have a new FINE Cartridge. The function for no more than 30 transactions. z The FAX automatically deletes the received fax data in the memory. z To enable automatic printing, use [{] or [}] to (see page 46... press [Start/Copy]. The machine counts the amount of ink used and when the remaining level reaches a preset level the Low Ink Warning lamp beside the LCD display lights up to advise you to set the receiving fax either automatic printing or storing in the memory for detecting ...
.... The LCD displays . 3 Use [{] or [}] to select , then press [Start/Copy]. INK VOL UNKNOWN If you have a new FINE Cartridge. The function for no more than 30 transactions. z The FAX automatically deletes the received fax data in the memory. z To enable automatic printing, use [{] or [}] to (see page 46... press [Start/Copy]. The machine counts the amount of ink used and when the remaining level reaches a preset level the Low Ink Warning lamp beside the LCD display lights up to advise you to set the receiving fax either automatic printing or storing in the memory for detecting ...
User's Guide
Page 53
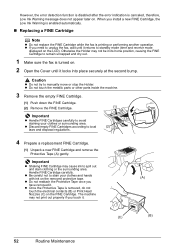
...is printing or performing another operation. z If you install a new FINE Cartridge, the Low Ink Warning is enabled automatically. „ Replacing a FINE Cartridge Note z Do not replace the FINE Cartridge while the fax is removed, do not touch the electrical contacts (B) or Print Head Nozzles (C) on . ...z Be careful not to unplug the fax, wait until it . z Discard empty FINE Cartridges according to avoid staining your clothes and hands with ink on the LCD). Caution z Do not try to spill out and stain clothing or the...
...is printing or performing another operation. z If you install a new FINE Cartridge, the Low Ink Warning is enabled automatically. „ Replacing a FINE Cartridge Note z Do not replace the FINE Cartridge while the fax is removed, do not touch the electrical contacts (B) or Print Head Nozzles (C) on . ...z Be careful not to unplug the fax, wait until it . z Discard empty FINE Cartridges according to avoid staining your clothes and hands with ink on the LCD). Caution z Do not try to spill out and stain clothing or the...
User's Guide
Page 54
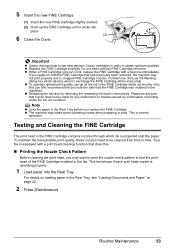
... test the print head of the FINE Cartridge installed in the fax. Your fax is operating properly. 1 Load paper into place. (2) 6 Close the Cover. (1) Important z Canon recommends to use (We recommend that you note the date that Canon shall not be cleaned from time to print. z To maintain...5 Insert the new FINE Cartridge. (1) Insert the new FINE Cartridge slightly slanted. (2) Push up all the ink in the FINE Cartridge within six months of its first use new genuine Canon cartridges in order to obtain optimum qualities. If you replace it clicks into the Rear Tray. z Replace the ...
... test the print head of the FINE Cartridge installed in the fax. Your fax is operating properly. 1 Load paper into place. (2) 6 Close the Cover. (1) Important z Canon recommends to use (We recommend that you note the date that Canon shall not be cleaned from time to print. z To maintain...5 Insert the new FINE Cartridge. (1) Insert the new FINE Cartridge slightly slanted. (2) Push up all the ink in the FINE Cartridge within six months of its first use new genuine Canon cartridges in order to obtain optimum qualities. If you replace it clicks into the Rear Tray. z Replace the ...
User's Guide
Page 55
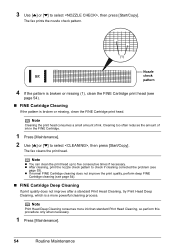
...improve after a standard Print Head Cleaning, try Print Head Deep Cleaning, which is broken or missing, clean the FINE Cartridge print head. The fax prints the nozzle check pattern. (1) Nozzle check pattern 4 If the pattern is broken or missing (1), clean the FINE Cartridge print head (see... print head up to check if cleaning corrected the problem (see page 54). „ FINE Cartridge Cleaning If the pattern is a more ink than standard Print Head Cleaning, so perform this procedure only when necessary. 1 Press [Maintenance]. 54 Routine Maintenance Note Print Head Deep Cleaning ...
...improve after a standard Print Head Cleaning, try Print Head Deep Cleaning, which is broken or missing, clean the FINE Cartridge print head. The fax prints the nozzle check pattern. (1) Nozzle check pattern 4 If the pattern is broken or missing (1), clean the FINE Cartridge print head (see... print head up to check if cleaning corrected the problem (see page 54). „ FINE Cartridge Cleaning If the pattern is a more ink than standard Print Head Cleaning, so perform this procedure only when necessary. 1 Press [Maintenance]. 54 Routine Maintenance Note Print Head Deep Cleaning ...
User's Guide
Page 57
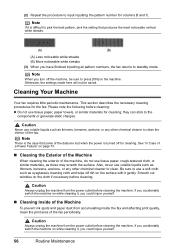
... other chemical cleaner to clean the interior of the Machine To prevent ink spots and paper dust from the power outlet before cleaning: z Do not use tissue paper, paper towels, or similar materials for the fax. Caution Always unplug the machine from the power outlet before cleaning. Note...some of a Power Failure" on the cloth if necessary before cleaning the machine. Note When you have finished inputting all pattern numbers, the fax returns to standby mode. (2) Repeat the procedure to input inputting the pattern number for cleaning. Be sure to the components or generate static ...
... other chemical cleaner to clean the interior of the Machine To prevent ink spots and paper dust from the power outlet before cleaning: z Do not use tissue paper, paper towels, or similar materials for the fax. Caution Always unplug the machine from the power outlet before cleaning. Note...some of a Power Failure" on the cloth if necessary before cleaning the machine. Note When you have finished inputting all pattern numbers, the fax returns to standby mode. (2) Repeat the procedure to input inputting the pattern number for cleaning. Be sure to the components or generate static ...
User's Guide
Page 58
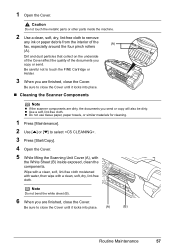
Dirt and dust particles that collect on the underside of the Cover affect the quality of the (A) fax, especially around the four pinch rollers (A). z Use a soft, lint-free cloth. Note Do not bend the white sheet (B). 6 When you send or copy will also ..., soft, dry, lint-free cloth to close the Cover until it locks into place. (A) (B) Routine Maintenance 57 1 Open the Cover. Be sure to remove any ink or paper debris from the interior of the documents you are finished, close the Cover. z Do not use tissue paper, paper towels, or similar materials...
Dirt and dust particles that collect on the underside of the Cover affect the quality of the (A) fax, especially around the four pinch rollers (A). z Use a soft, lint-free cloth. Note Do not bend the white sheet (B). 6 When you send or copy will also ..., soft, dry, lint-free cloth to close the Cover until it locks into place. (A) (B) Routine Maintenance 57 1 Open the Cover. Be sure to remove any ink or paper debris from the interior of the documents you are finished, close the Cover. z Do not use tissue paper, paper towels, or similar materials...
User's Guide
Page 60
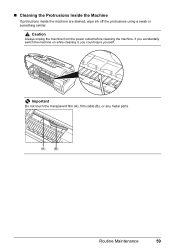
„ Cleaning the Protrusions Inside the Machine If protrusions inside the machine are stained, wipe ink off the protrusions using a swab or something similar. Important Do not touch the transparent film (A), film cable (B), or any metal parts. (A) (B) Routine Maintenance 59 If you accidentally switch the machine on while cleaning it, you could injure yourself. Caution Always unplug the machine from the power outlet before cleaning the machine.
„ Cleaning the Protrusions Inside the Machine If protrusions inside the machine are stained, wipe ink off the protrusions using a swab or something similar. Important Do not touch the transparent film (A), film cable (B), or any metal parts. (A) (B) Routine Maintenance 59 If you accidentally switch the machine on while cleaning it, you could injure yourself. Caution Always unplug the machine from the power outlet before cleaning the machine.


