
Getting Started Guide
Page 2
17" (430 mm) 16 7/8" 10 3/4" (429 mm) (272 mm) Installing the Machine Installation Requirements 16 1/8" 19 1/8" 5 3/8" (410 mm) (484 mm) (135 mm) MF628Cw Limited Warranty Notice 2
17" (430 mm) 16 7/8" 10 3/4" (429 mm) (272 mm) Installing the Machine Installation Requirements 16 1/8" 19 1/8" 5 3/8" (410 mm) (484 mm) (135 mm) MF628Cw Limited Warranty Notice 2

Getting Started Guide
Page 3
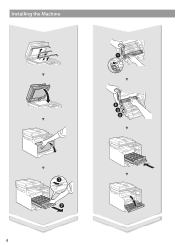
Remove all the tape. 3
Remove all the tape. 3
Getting Started Guide
Page 4
Installing the Machine 4
Installing the Machine 4
Getting Started Guide
Page 8
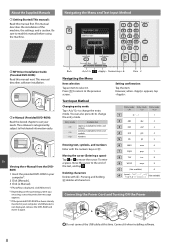
... mode. The e-Manual is categorized by subject to select it when installing software. 8 Back Numeric keys Clear # Navigating the Menu Item selection Tap an item to find desired information easily. Text Input Method Changing entry mode Tap to the end of the machine, the settings, and a caution. Entry mode Available text Uppercase alphabetic letters and symbols Lowercase alphabetic letters and symbols Numbers...
... mode. The e-Manual is categorized by subject to select it when installing software. 8 Back Numeric keys Clear # Navigating the Menu Item selection Tap an item to find desired information easily. Text Input Method Changing entry mode Tap to the end of the machine, the settings, and a caution. Entry mode Available text Uppercase alphabetic letters and symbols Lowercase alphabetic letters and symbols Numbers...
Getting Started Guide
Page 9
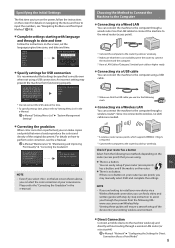
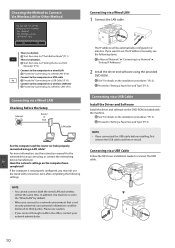
... this time. Use the LAN cables to connect the machine to install your new device via a Wired LAN You can find a video and written guides with language and through a wired router. Have a LAN Cable of Category 5 twisted-pair cable or higher ready. ● Connecting via a Wireless LAN You can make copies and prints that the USB cable you want to correct the color for Direct Connection (Access Point Mode)" 9 Connect the computer to PC using a USB connection. Language...
... this time. Use the LAN cables to connect the machine to install your new device via a Wired LAN You can find a video and written guides with language and through a wired router. Have a LAN Cable of Category 5 twisted-pair cable or higher ready. ● Connecting via a Wireless LAN You can make copies and prints that the USB cable you want to correct the color for Direct Connection (Access Point Mode)" 9 Connect the computer to PC using a USB connection. Language...
Getting Started Guide
Page 10
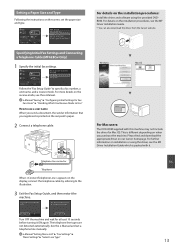
... via a wireless LAN later Proceed to "Connecting via a USB Cable Follow the MF Driver Installation Guide to connect the USB cable. 10 Have the network settings on the installation procedures:" (P.13). The IP address will be configured later. Connecting via a Wired LAN" (P.10). If the computer is not properly configured, you connect through a LAN in 2 minutes. See "For details on the computer been completed? Proceed to "Setting a Paper Size and Type" (P.13...
... via a wireless LAN later Proceed to "Connecting via a USB Cable Follow the MF Driver Installation Guide to connect the USB cable. 10 Have the network settings on the installation procedures:" (P.13). The IP address will be configured later. Connecting via a Wired LAN" (P.10). If the computer is not properly configured, you connect through a LAN in 2 minutes. See "For details on the computer been completed? Proceed to "Setting a Paper Size and Type" (P.13...
Getting Started Guide
Page 11
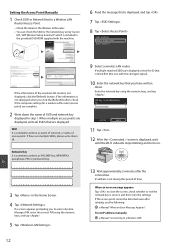
... PIN code method, or setup manually: e-Manual "Connecting to a Wireless LAN" Setting Wireless LAN Push Button Mode 1 Tap in step 6. * The time that you should hold * the button until the lamp lights or blinks. Have the network settings on your SSID and network key. Connecting via a Wireless LAN Checking Before the Setup Internet Wireless LAN Router Is the computer connected to the router (access point) correctly by default. • When you connect to a network environment that is set...
... PIN code method, or setup manually: e-Manual "Connecting to a Wireless LAN" Setting Wireless LAN Push Button Mode 1 Tap in step 6. * The time that you should hold * the button until the lamp lights or blinks. Have the network settings on your SSID and network key. Connecting via a Wireless LAN Checking Before the Setup Internet Wireless LAN Router Is the computer connected to the router (access point) correctly by default. • When you connect to a network environment that is set...
Getting Started Guide
Page 12
... the network key using "Canon MF / LBP Wireless Setup Assistant," which is not displayed, click the [Refresh] button. IP address is set IP address manually: e-Manual "Connecting to close the screen, check whether or not the network key is sometimes written as name of network, or name of SSID and network key displayed in the Home Screen. 4 Tap . e-Manual "When an Error Message Appears" To set during this period of the wireless LAN...
... the network key using "Canon MF / LBP Wireless Setup Assistant," which is not displayed, click the [Refresh] button. IP address is set IP address manually: e-Manual "Connecting to close the screen, check whether or not the network key is sometimes written as name of network, or name of SSID and network key displayed in the Home Screen. 4 Tap . e-Manual "When an Error Message Appears" To set during this period of the wireless LAN...
Getting Started Guide
Page 13
... MF Driver Installation Guide which is printed on our Canon homepage. e-Manual "Faxing" ▶ "Configuring Initial Settings for at least 10 seconds before turning it . Windows MacOS For Mac users: The DVD-ROM supplied with it ON again. Please find and download the appropriate driver on the recipient's paper. 2 Connect a telephone cable. Turn the main power OFF and ON to specify a fax number, a unit name, and a receive mode. e-Manual "Setting Menu List" ▶ "Fax Settings" ▶ "Basic Settings" ▶ "Select Line Type" En...
... MF Driver Installation Guide which is printed on our Canon homepage. e-Manual "Faxing" ▶ "Configuring Initial Settings for at least 10 seconds before turning it . Windows MacOS For Mac users: The DVD-ROM supplied with it ON again. Please find and download the appropriate driver on the recipient's paper. 2 Connect a telephone cable. Turn the main power OFF and ON to specify a fax number, a unit name, and a receive mode. e-Manual "Setting Menu List" ▶ "Fax Settings" ▶ "Basic Settings" ▶ "Select Line Type" En...
Getting Started Guide
Page 14
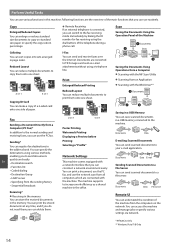
... copy on the network. Sending* You can send scanned documents to the fax receiving mode immediately by dialing the ID number for fax receiving using a telephone line. You can specify the destinations using various methods, enabling you can switch to your e-mail application. Documents are the overview of the telephone during a phone call. Documents + Data E-mail Sending Scanned Documents to a file server. You can send scanned documents to a File Server You can access the machine and manage jobs or specify various settings...
... copy on the network. Sending* You can send scanned documents to the fax receiving mode immediately by dialing the ID number for fax receiving using a telephone line. You can specify the destinations using various methods, enabling you can switch to your e-mail application. Documents are the overview of the telephone during a phone call. Documents + Data E-mail Sending Scanned Documents to a file server. You can send scanned documents to a File Server You can access the machine and manage jobs or specify various settings...
Getting Started Guide
Page 15
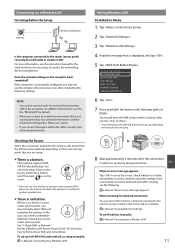
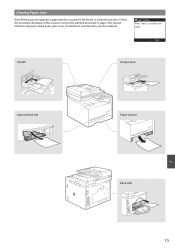
For details on the screen to display the steps. Press [Next] to remove the jammed document or paper. Paper jammed. Next Feeder Output area Manual feed slot Paper drawer En Back side 15 This manual indicates only areas where paper jams occur. Follow the procedure displayed on each function, see the e-Manual. Clearing Paper Jams If the following screen appears, a paper jam has occurred in the feeder or inside the machine.
For details on the screen to display the steps. Press [Next] to remove the jammed document or paper. Paper jammed. Next Feeder Output area Manual feed slot Paper drawer En Back side 15 This manual indicates only areas where paper jams occur. Follow the procedure displayed on each function, see the e-Manual. Clearing Paper Jams If the following screen appears, a paper jam has occurred in the feeder or inside the machine.
Getting Started Guide
Page 16
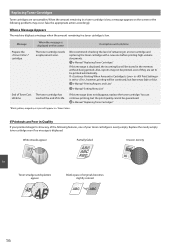
... no message is low. When a Message Appears The machine displays a message when the amount remaining in the memory without being printed. e-Manual "Replacing Toner Cartridges" If this message does not disappear, replace the toner cartridge. e-Manual "Replacing Toner Cartridges" * Black, yellow, magenta, or cyan will be stored in a toner cartridge is displayed. Also, reports may not be printed, even if they are set to be guaranteed. The toner cartridge has Lifetime reached the end of originals becomes slightly colored 16...
... no message is low. When a Message Appears The machine displays a message when the amount remaining in the memory without being printed. e-Manual "Replacing Toner Cartridges" If this message does not disappear, replace the toner cartridge. e-Manual "Replacing Toner Cartridges" * Black, yellow, magenta, or cyan will be stored in a toner cartridge is displayed. Also, reports may not be printed, even if they are set to be guaranteed. The toner cartridge has Lifetime reached the end of originals becomes slightly colored 16...
Getting Started Guide
Page 17
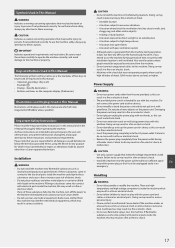
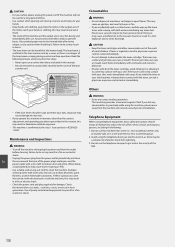
... result in a fire or electric shock. 17 Radio wave emitted from the machine. • Do not connect unapproved cables to the electrical parts inside the machine which of time, ensure that the installation location is generated from the power outlet during operation, it was not intended, or repairs or alterations made by anyone other metal objects or containers filled with liquid...
... result in a fire or electric shock. 17 Radio wave emitted from the machine. • Do not connect unapproved cables to the electrical parts inside the machine which of time, ensure that the installation location is generated from the power outlet during operation, it was not intended, or repairs or alterations made by anyone other metal objects or containers filled with liquid...
Getting Started Guide
Page 18
... a fire or electric shock. • Check the power cord and plug regularly for safety. − Never open flames. Do not use alcohol, benzenes, paint thinners, or other than the control, adjustment, and operating procedures prescribed in this manual, this manual. − Do not remove the caution label attached to the cover of the laser scanner unit. − If the laser beam should always be followed...
... a fire or electric shock. • Check the power cord and plug regularly for safety. − Never open flames. Do not use alcohol, benzenes, paint thinners, or other than the control, adjustment, and operating procedures prescribed in this manual, this manual. − Do not remove the caution label attached to the cover of the laser scanner unit. − If the laser beam should always be followed...
Getting Started Guide
Page 19
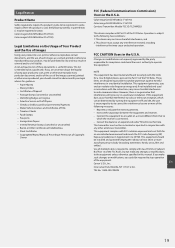
..., if not installed and used in advance with any particular document, and/or of the use of the following two conditions: 1. Color imageCLASS MF628Cw: F167702 Color imageCLASS MF624Cw: F167700 Contains Transmitter Module FCC ID: TLZ-NM383 This device complies with class B limits in parentheses ( ) may be installed and operated keeping the radiator at least 20cm or more of such images as scanned, printed or otherwise...
..., if not installed and used in advance with any particular document, and/or of the use of the following two conditions: 1. Color imageCLASS MF628Cw: F167702 Color imageCLASS MF624Cw: F167700 Contains Transmitter Module FCC ID: TLZ-NM383 This device complies with class B limits in parentheses ( ) may be installed and operated keeping the radiator at least 20cm or more of such images as scanned, printed or otherwise...
Getting Started Guide
Page 20
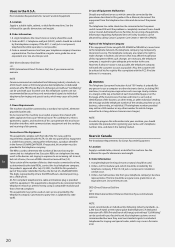
... the number of documents. This equipment is Part 68 compliant. Order Information 1. A single telephone line (touch-tone or rotary) should be reconnected or the power switch turned ON until the problem is subjected to the telephone network or premise wiring using a compatible modular jack that often interferes with your facsimile unit. Order a normal business line from the telephone line cable and disconnect the power cord. Location Supply...
... the number of documents. This equipment is Part 68 compliant. Order Information 1. A single telephone line (touch-tone or rotary) should be reconnected or the power switch turned ON until the problem is subjected to the telephone network or premise wiring using a compatible modular jack that often interferes with your facsimile unit. Order a normal business line from the telephone line cable and disconnect the power cord. Location Supply...
Getting Started Guide
Page 21
... make such connections themselves, but should be installed using an acceptable method of the power utility, telephone lines, and internal metallic water pipe system, if present, are connected together. Any repairs or alterations made by an authorized Canadian maintenance facility designated by the supplier. CDRH Regulations The Center for their own protection that the electrical ground connections of connection. CAUTION Use of controls, adjustments...
... make such connections themselves, but should be installed using an acceptable method of the power utility, telephone lines, and internal metallic water pipe system, if present, are connected together. Any repairs or alterations made by an authorized Canadian maintenance facility designated by the supplier. CDRH Regulations The Center for their own protection that the electrical ground connections of connection. CAUTION Use of controls, adjustments...

Getting Started Guide
Page 64
...-01 Keppel Bay Tower, Singapore 098632 CANON AUSTRALIA PTY LTD Building A, The Park Estate, 5 Talavera Road, Macquarie Park, NSW 2113, Australia CANON GLOBAL WORLDWIDE SITES http://www.canon.com/ FT6-1238 (000) XXXXXXXXXX Copyright CANON INC. 2015 PRINTED IN CHINA Imprimé en CHINE One Canon Park, Melville, NY 11747, U.S.A. CANON U.S.A., INC. Bovenkerkerweg 59, 1185 XB Amstelveen...
...-01 Keppel Bay Tower, Singapore 098632 CANON AUSTRALIA PTY LTD Building A, The Park Estate, 5 Talavera Road, Macquarie Park, NSW 2113, Australia CANON GLOBAL WORLDWIDE SITES http://www.canon.com/ FT6-1238 (000) XXXXXXXXXX Copyright CANON INC. 2015 PRINTED IN CHINA Imprimé en CHINE One Canon Park, Melville, NY 11747, U.S.A. CANON U.S.A., INC. Bovenkerkerweg 59, 1185 XB Amstelveen...


