
Quick Start Guide Instructions
Page 2
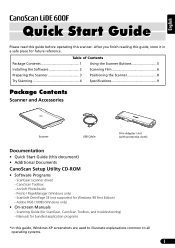
... all operating systems. 1 Adobe RGB (1998) (Windows only) • On-screen Manuals - English Quick Start Guide Please read this guide before operating this document) • Additional Documents CanoScan Setup Utility CD-ROM • Software Programs - Table of Contents Package Contents 1 Using the Scanner Buttons 5 Installing the Software 2 Scanning Film 6 Preparing the Scanner 3 Positioning the Scanner 8 Try Scanning 4 Specifications 9 Package Contents Scanner and Accessories Scanner USB Cable Film Adapter Unit (with protective cloth) Documentation • Quick Start Guide...
... all operating systems. 1 Adobe RGB (1998) (Windows only) • On-screen Manuals - English Quick Start Guide Please read this guide before operating this document) • Additional Documents CanoScan Setup Utility CD-ROM • Software Programs - Table of Contents Package Contents 1 Using the Scanner Buttons 5 Installing the Software 2 Scanning Film 6 Preparing the Scanner 3 Positioning the Scanner 8 Try Scanning 4 Specifications 9 Package Contents Scanner and Accessories Scanner USB Cable Film Adapter Unit (with protective cloth) Documentation • Quick Start Guide...
Quick Start Guide Instructions
Page 3
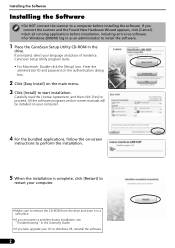
... Windows XP, reinstall the software. 2 Enter the administrator ID and password on the authentication dialog box. 2 Click [Easy Install] on -screen instructions to perform the installation. 5 When the installation is complete, click [Restart] to restart your computer. • Make sure to remove the CD-ROM from the drive and store it in a safe place. • If you encounter a problem during installation, see "Troubleshooting" in the Scanning Guide...
... Windows XP, reinstall the software. 2 Enter the administrator ID and password on the authentication dialog box. 2 Click [Easy Install] on -screen instructions to perform the installation. 5 When the installation is complete, click [Restart] to restart your computer. • Make sure to remove the CD-ROM from the drive and store it in a safe place. • If you encounter a problem during installation, see "Troubleshooting" in the Scanning Guide...
Quick Start Guide Instructions
Page 4
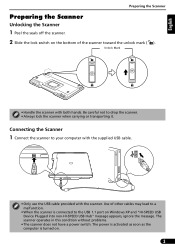
...; When the scanner is turned on Windows XP and "HI-SPEED USB Device Plugged into non-HI-SPEED USB Hub" message appears, ignore the message. Connecting the Scanner 1 Connect the scanner to your computer with the supplied USB cable. • Only use the USB cable provided with both hands. Use of the scanner toward the unlock mark ( ). The scanner operates in this condition without problems. • The scanner does not have a power switch. The power is activated...
...; When the scanner is turned on Windows XP and "HI-SPEED USB Device Plugged into non-HI-SPEED USB Hub" message appears, ignore the message. Connecting the Scanner 1 Connect the scanner to your computer with the supplied USB cable. • Only use the USB cable provided with both hands. Use of the scanner toward the unlock mark ( ). The scanner operates in this condition without problems. • The scanner does not have a power switch. The power is activated...
Quick Start Guide Instructions
Page 5
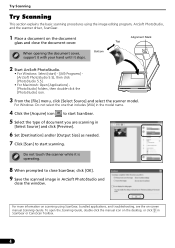
...] folders, then double-click the [PhotoStudio] icon. 3 From the [File] menu, click [Select Source] and select the scanner model. For more information on scanning using the image editing program, ArcSoft PhotoStudio, and the scanner driver, ScanGear. 1 Place a document on -screen manual Scanning Guide. Bottom 2 Start ArcSoft PhotoStudio. • For Windows: Select [start ScanGear. 5 Select the type of document you are scanning in [Select Source] and click [Preview]. 6 Set [Destination] and/or [Output Size] as needed...
...] folders, then double-click the [PhotoStudio] icon. 3 From the [File] menu, click [Select Source] and select the scanner model. For more information on scanning using the image editing program, ArcSoft PhotoStudio, and the scanner driver, ScanGear. 1 Place a document on -screen manual Scanning Guide. Bottom 2 Start ArcSoft PhotoStudio. • For Windows: Select [start ScanGear. 5 Select the type of document you are scanning in [Select Source] and click [Preview]. 6 Set [Destination] and/or [Output Size] as needed...
Quick Start Guide Instructions
Page 6
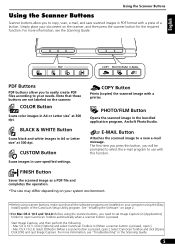
... Scans color images in [Applications] folder) to set Image Capture (in A4 or Letter size* at 300 dpi. PHOTO/FILM Button Opens the scanned image in user-specified settings. Click [OK] and quit Image Capture. COPY Button Prints (copies) the scanned image with this button, you need to open CanoScan Toolbox automatically when a scanner button is pressed. FINISH Button Saves the scanned image as a PDF file and completes the operation. *The size may differ depending on your system environment. • Before using scanner buttons, make sure that these buttons are installed...
... Scans color images in [Applications] folder) to set Image Capture (in A4 or Letter size* at 300 dpi. PHOTO/FILM Button Opens the scanned image in user-specified settings. Click [OK] and quit Image Capture. COPY Button Prints (copies) the scanned image with this button, you need to open CanoScan Toolbox automatically when a scanner button is pressed. FINISH Button Saves the scanned image as a PDF file and completes the operation. *The size may differ depending on your system environment. • Before using scanner buttons, make sure that these buttons are installed...
Quick Start Guide Instructions
Page 7
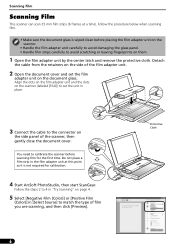
... the film adapter unit. 2 Open the document cover and set the unit in place. 3 Connect the cable to 4 in "Try Scanning" on the document glass. You need to calibrate the scanner before placing the film adapter unit on the scanner. • Handle the film adapter unit carefully to avoid damaging the glass panel. • Handle film strips carefully to match the type of the scanner, then gently close the document cover. Follow the procedure below when scanning film. • Make sure the document glass...
... the film adapter unit. 2 Open the document cover and set the unit in place. 3 Connect the cable to 4 in "Try Scanning" on the document glass. You need to calibrate the scanner before placing the film adapter unit on the scanner. • Handle the film adapter unit carefully to avoid damaging the glass panel. • Handle film strips carefully to match the type of the scanner, then gently close the document cover. Follow the procedure below when scanning film. • Make sure the document glass...
Quick Start Guide Instructions
Page 8
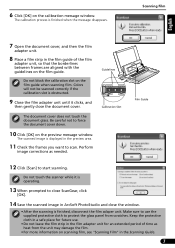
... scan. Make sure to protect the glass panel from the unit may damage the film. • For more information on scanning film, see "Scanning Film" in the film guide of time as needed. Be careful not to start scanning. The scanned image is finished when the message disappears. Guidelines Calibration Slot Film Guide 12 Click [Scan] to force the document cover down. 10 Click [OK] on the film guide. Do not block the calibration slot on the calibration message window...
... scan. Make sure to protect the glass panel from the unit may damage the film. • For more information on scanning film, see "Scanning Film" in the film guide of time as needed. Be careful not to start scanning. The scanned image is finished when the message disappears. Guidelines Calibration Slot Film Guide 12 Click [Scan] to force the document cover down. 10 Click [OK] on the film guide. Do not block the calibration slot on the calibration message window...
Quick Start Guide Instructions
Page 9
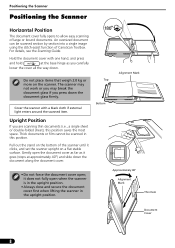
... documents (i.e., a single sheet or double-folded sheet), this position. For details, see the Scanning Guide. Cover the scanner with one hand, and press and hold at approximately 40q) and slide down the document glass firmly. Thick documents or film cannot be scanned section by section into a single image using the stitch-assist function of large or bound documents. Top Bottom Alignment Mark • Do not force the document cover open...
... documents (i.e., a single sheet or double-folded sheet), this position. For details, see the Scanning Guide. Cover the scanner with one hand, and press and hold at approximately 40q) and slide down the document glass firmly. Thick documents or film cannot be scanned section by section into a single image using the stitch-assist function of large or bound documents. Top Bottom Alignment Mark • Do not force the document cover open...
Quick Start Guide Instructions
Page 10
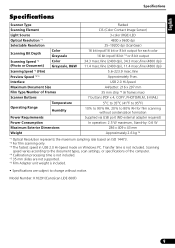
....9 msec./line Approximately 9 sec. Model Number: K10291(CanoScan LiDE 600F) 9 Scanning speed varies according to the document types, scan settings, or specifications of Frames A4/Letter: 216 x 297 mm 35 mm strip *5 (6 frames max) Scanner Buttons Operating Range Temperature Humidity 7 buttons (PDF x 4, COPY, PHOTO/FILM, E-MAIL) 5qC to 35qC (41qF to 95qF) 10% to 90% RH, 20% to change without condensation formation Power Requirements Supplied via USB port (NO external adapter required) Power Consumption In operation...
....9 msec./line Approximately 9 sec. Model Number: K10291(CanoScan LiDE 600F) 9 Scanning speed varies according to the document types, scan settings, or specifications of Frames A4/Letter: 216 x 297 mm 35 mm strip *5 (6 frames max) Scanner Buttons Operating Range Temperature Humidity 7 buttons (PDF x 4, COPY, PHOTO/FILM, E-MAIL) 5qC to 35qC (41qF to 95qF) 10% to 90% RH, 20% to change without condensation formation Power Requirements Supplied via USB port (NO external adapter required) Power Consumption In operation...
Quick Start Guide Instructions
Page 11
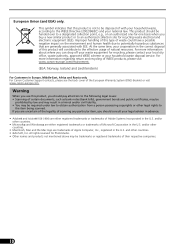
... service. Warning When you use this type of waste could have a possible negative impact on an authorized one-for-one basis when you buy a new similar product or to the following legal issues: • Scanning of scanning any particular item, you should be disposed of Microsoft Corporation in the U.S. and other countries. • Microsoft® and Windows...
... service. Warning When you use this type of waste could have a possible negative impact on an authorized one-for-one basis when you buy a new similar product or to the following legal issues: • Scanning of scanning any particular item, you should be disposed of Microsoft Corporation in the U.S. and other countries. • Microsoft® and Windows...
Quick Start Guide Instructions
Page 72
... for a Class B digital device, pursuant to stop operation of the FCC Rules. This equipment generates, uses and can be required to Part 15 of the equipment. However, there is required to radio communications. Do not make any interference received, including interference that may cause harmful interference to comply with the instructions, may cause undesired operation. If such changes or modifications...
... for a Class B digital device, pursuant to stop operation of the FCC Rules. This equipment generates, uses and can be required to Part 15 of the equipment. However, there is required to radio communications. Do not make any interference received, including interference that may cause harmful interference to comply with the instructions, may cause undesired operation. If such changes or modifications...

Quick Start Guide Instructions
Page 73
QT5-0603-V02 ©CANON INC. 2007 PRINTED IN VIETNAM IMPRIME AU VIETNAM
QT5-0603-V02 ©CANON INC. 2007 PRINTED IN VIETNAM IMPRIME AU VIETNAM


