User Manual
Page 2
...-type points), and high-speed 6.5 fps continuous shooting. To avoid botched pictures and accidents, read the Safety Warnings (p.10,11) and Handling Precautions (p.12,13). Test the Camera Before Using and Liability After shooting, playback and check whether the image has been properly recorded. Take a few test shots and see how they come out. While reading this manual, take a few test shots to the personal computer, Canon...
...-type points), and high-speed 6.5 fps continuous shooting. To avoid botched pictures and accidents, read the Safety Warnings (p.10,11) and Handling Precautions (p.12,13). Test the Camera Before Using and Liability After shooting, playback and check whether the image has been properly recorded. Take a few test shots and see how they come out. While reading this manual, take a few test shots to the personal computer, Canon...

User Manual
Page 5
... Menu Operations 36 Menu Settings 38 Before You Start 41 Setting the Interface Language 41 5 Setting the Date and Time 41 Set the power-off time/Auto power off 42 Formatting the CF Card 42 6 Resetting Camera Settings 44 2 Basic Shooting 45 Fully Automatic Shooting 46 7 Full Auto Techniques 48 Shooting Portraits 49 Shooting Landscapes 50 8 Shooting Close-ups 51 Shooting Moving Subjects 52 Shooting Portraits at Night 53 Disabling Flash 54 9 3 Image Settings 55 Setting the Image-recording Quality 56 10 Setting the ISO Speed 59 Selecting a Picture Style 61...
... Menu Operations 36 Menu Settings 38 Before You Start 41 Setting the Interface Language 41 5 Setting the Date and Time 41 Set the power-off time/Auto power off 42 Formatting the CF Card 42 6 Resetting Camera Settings 44 2 Basic Shooting 45 Fully Automatic Shooting 46 7 Full Auto Techniques 48 Shooting Portraits 49 Shooting Landscapes 50 8 Shooting Close-ups 51 Shooting Moving Subjects 52 Shooting Portraits at Night 53 Disabling Flash 54 9 3 Image Settings 55 Setting the Image-recording Quality 56 10 Setting the ISO Speed 59 Selecting a Picture Style 61...
User Manual
Page 6
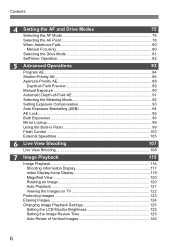
... 93 Auto Exposure Bracketing (AEB 94 AE Lock ...95 Bulb Exposures 96 Mirror Lockup 98 Using the Built-in Flash 99 Flash Control 103 External Speedlites 105 6 Live View Shooting 107 Live View Shooting 108 7 Image Playback 115 Image Playback 116 Shooting Information Display 117 Index Display/Jump Display 119 Magnified View 120 Rotating an Image 120 Auto Playback 121 Viewing the Images on TV 122 Protecting Images 123 Erasing Images 124 Changing Image Playback Settings 125 Setting the LCD Monitor Brightness 125 Setting the Image Review Time 125 Auto...
... 93 Auto Exposure Bracketing (AEB 94 AE Lock ...95 Bulb Exposures 96 Mirror Lockup 98 Using the Built-in Flash 99 Flash Control 103 External Speedlites 105 6 Live View Shooting 107 Live View Shooting 108 7 Image Playback 115 Image Playback 116 Shooting Information Display 117 Index Display/Jump Display 119 Magnified View 120 Rotating an Image 120 Auto Playback 121 Viewing the Images on TV 122 Protecting Images 123 Erasing Images 124 Changing Image Playback Settings 125 Setting the LCD Monitor Brightness 125 Setting the Image Review Time 125 Auto...
User Manual
Page 9
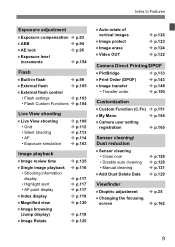
...Exposure level increments Î p.154 Flash Built-in flash Î p.99 External flash Î p.105 External flash control • Flash settings Î p.103 • Flash Custom Functions Î p.104 Live View shooting Live View shooting • Grid • Silent shooting • AF • Exposure simulation Î p.108 Î p.112 Î p.113 Î p.114 Î p.163 Image playback Image review time Single image playback • Shooting information display • Highlight alert • AF point display Index display Magnified view Image browsing (Jump display) Image...
...Exposure level increments Î p.154 Flash Built-in flash Î p.99 External flash Î p.105 External flash control • Flash settings Î p.103 • Flash Custom Functions Î p.104 Live View shooting Live View shooting • Grid • Silent shooting • AF • Exposure simulation Î p.108 Î p.112 Î p.113 Î p.114 Î p.163 Image playback Image review time Single image playback • Shooting information display • Highlight alert • AF point display Index display Magnified view Image browsing (Jump display) Image...
User Manual
Page 34
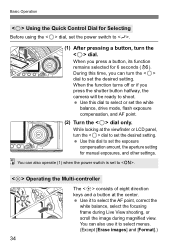
... [Erase images] and [Format].) 34 You can turn the dial to set the desired setting. Operating the Multi-controller The consists of eight direction keys and a button at the viewfinder or LCD panel, turn the dial. Basic Operation Using the Quick Control Dial for Selecting Before using the dial, set to . When you press the shutter button halfway, the camera will be ready to set the white balance, drive mode, flash exposure compensation, and AF point. (2) Turn the dial only. During this dial to shoot.
... [Erase images] and [Format].) 34 You can turn the dial to set the desired setting. Operating the Multi-controller The consists of eight direction keys and a button at the viewfinder or LCD panel, turn the dial. Basic Operation Using the Quick Control Dial for Selecting Before using the dial, set to . When you press the shutter button halfway, the camera will be ready to set the white balance, drive mode, flash exposure compensation, and AF point. (2) Turn the dial only. During this dial to shoot.

User Manual
Page 36
... image-recording quality, Picture Style, the date/time, Custom Functions, etc. button LCD monitor Playback Shooting Tab Main Dial Quick Control Dial button Set-up menu Camera's function settings Orange Camera's Custom Functions Green Register frequently-used menu items and Custom Functions 36 Icon 1/2 3/4 5/6/7 8 9 Color Category Description Red Shooting menu Shooting-related items Blue Playback menu Image playback-related items Yellow Set-up Custom Functions My Menu Menu items Menu settings * The [2/7/8/9] tabs are not displayed in Basic Zone modes such as Full Auto...
... image-recording quality, Picture Style, the date/time, Custom Functions, etc. button LCD monitor Playback Shooting Tab Main Dial Quick Control Dial button Set-up menu Camera's function settings Orange Camera's Custom Functions Green Register frequently-used menu items and Custom Functions 36 Icon 1/2 3/4 5/6/7 8 9 Color Category Description Red Shooting menu Shooting-related items Blue Playback menu Image playback-related items Yellow Set-up Custom Functions My Menu Menu items Menu settings * The [2/7/8/9] tabs are not displayed in Basic Zone modes such as Full Auto...
User Manual
Page 40
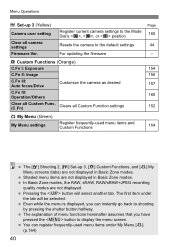
... displayed in Basic Zone modes. Register current camera settings to the Mode Dial's , , or position Resets the camera to shooting by pressing the shutter button halfway. The first item under My Menu [9]. (p.164) 40 You can instantly go back to the default settings For updating the firmware 8 Custom Functions (Orange) C.Fn I: Exposure C.Fn II: Image C.Fn III: Auto focus/Drive Customize the camera as desired C.Fn IV: Operation/Others Clear all Custom Func. (C.Fn) Clears all camera settings Firmware Ver...
... displayed in Basic Zone modes. Register current camera settings to the Mode Dial's , , or position Resets the camera to shooting by pressing the shutter button halfway. The first item under My Menu [9]. (p.164) 40 You can instantly go back to the default settings For updating the firmware 8 Custom Functions (Orange) C.Fn I: Exposure C.Fn II: Image C.Fn III: Auto focus/Drive Customize the camera as desired C.Fn IV: Operation/Others Clear all Custom Func. (C.Fn) Clears all camera settings Firmware Ver...
User Manual
Page 59
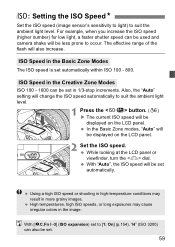
... viewfinder, turn the dial. High temperatures, high ISO speeds, or long exposures may result in the image. In the Basic Zone modes, "Auto" will be displayed on the LCD panel. For example, when you increase the ISO speed (higher number) for low light, a faster shutter speed can be used and camera shake will be less prone to suit the ambient light level. 1 Press the button. (9) X The current ISO speed will be displayed on the LCD panel. 2 Set...
... viewfinder, turn the dial. High temperatures, high ISO speeds, or long exposures may result in the image. In the Basic Zone modes, "Auto" will be displayed on the LCD panel. For example, when you increase the ISO speed (higher number) for low light, a faster shutter speed can be used and camera shake will be less prone to suit the ambient light level. 1 Press the button. (9) X The current ISO speed will be displayed on the LCD panel. 2 Set...
User Manual
Page 91
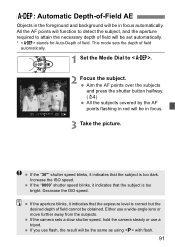
.... 1 Set the Mode Dial to attain the necessary depth of field. If the "8000" shutter speed blinks, it indicates that the exposure level is too dark. If the aperture blinks, it indicates that the subject is correct but the desired depth of field cannot be set automatically. * stands for Auto-Depth of field will be the same as using with flash. 91 All the AF points will function...
.... 1 Set the Mode Dial to attain the necessary depth of field. If the "8000" shutter speed blinks, it indicates that the exposure level is too dark. If the aperture blinks, it indicates that the subject is correct but the desired depth of field cannot be set automatically. * stands for Auto-Depth of field will be the same as using with flash. 91 All the AF points will function...

User Manual
Page 96
..."" is called bulb exposure. When [8C.Fn II -1] (Long exp. While looking at the LCD panel, turn the dial. To set the aperture, set to [1:Auto] or [2:On], noise generated by the same indicator used for night scenes, fireworks, the heavens, and other subjects requiring long exposures. 1 Set the Mode Dial to . 2 Set the shutter speed to select "buLb." While you hold down the shutter button, the exposure will continue. This is "buLb." 3 Set the desired aperture and shoot. noise reduction) is...
..."" is called bulb exposure. When [8C.Fn II -1] (Long exp. While looking at the LCD panel, turn the dial. To set the aperture, set to [1:Auto] or [2:On], noise generated by the same indicator used for night scenes, fireworks, the heavens, and other subjects requiring long exposures. 1 Set the Mode Dial to . 2 Set the shutter speed to select "buLb." While you hold down the shutter button, the exposure will continue. This is "buLb." 3 Set the desired aperture and shoot. noise reduction) is...
User Manual
Page 105
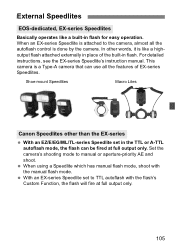
... Lites Canon Speedlites other words, it is like a built-in flash for easy operation. In other than the EX-series With an EZ/E/EG/ML/TL-series Speedlite set to manual or aperture-priority AE and shoot. This camera is a Type-A camera that can be fired at full output only. 105 When an EX-series Speedlite is done by the camera. External Speedlites EOS...
... Lites Canon Speedlites other words, it is like a built-in flash for easy operation. In other than the EX-series With an EZ/E/EG/ML/TL-series Speedlite set to manual or aperture-priority AE and shoot. This camera is a Type-A camera that can be fired at full output only. 105 When an EX-series Speedlite is done by the camera. External Speedlites EOS...
User Manual
Page 108
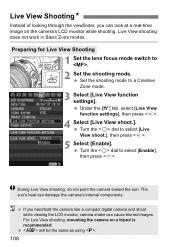
... . 5 Select [Enable]. For Live View shooting, mounting the camera on the camera's LCD monitor while shooting. will be the same as using . 108 If you can cause blurred images. The sun's heat can damage the camera's internal components. Live View shooting does not work in Basic Zone modes. Under the [6] tab, select [Live View function settings], then press . 4 Select [Live View shoot.]. During Live View shooting, do not point the camera toward the sun. Preparing for Live View Shooting 1 Set the lens focus mode switch to...
... . 5 Select [Enable]. For Live View shooting, mounting the camera on the camera's LCD monitor while shooting. will be the same as using . 108 If you can cause blurred images. The sun's heat can damage the camera's internal components. Live View shooting does not work in Basic Zone modes. Under the [6] tab, select [Live View function settings], then press . 4 Select [Live View shoot.]. During Live View shooting, do not point the camera toward the sun. Preparing for Live View Shooting 1 Set the lens focus mode switch to...
User Manual
Page 117
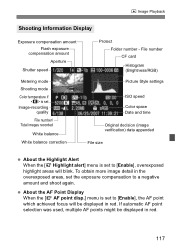
File number CF card Histogram (Brightness/RGB) Picture Style settings ISO speed Color space Date and time Original decision (image verification) data appended File size About the Highlight Alert When the [4 Highlight alert] menu is set to [Enable], overexposed highlight areas will be displayed in red. 117 x Image Playback Shooting Information Display Exposure compensation amount Flash exposure compensation amount Aperture Shutter speed Metering mode Shooting mode Color temperature if is set to a negative amount and shoot again. If automatic AF point selection was used, multiple AF...
File number CF card Histogram (Brightness/RGB) Picture Style settings ISO speed Color space Date and time Original decision (image verification) data appended File size About the Highlight Alert When the [4 Highlight alert] menu is set to [Enable], overexposed highlight areas will be displayed in red. 117 x Image Playback Shooting Information Display Exposure compensation amount Flash exposure compensation amount Aperture Shutter speed Metering mode Shooting mode Color temperature if is set to a negative amount and shoot again. If automatic AF point selection was used, multiple AF...
User Manual
Page 130
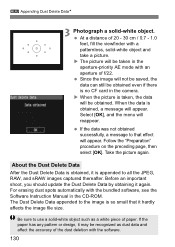
... appended to that it is no CF card in the CD-ROM. If the paper has any pattern or design, it again. 3 Appending Dust Delete DataN 3 Photograph a solid-white object. Before an important shoot, you should update the Dust Delete Data by obtaining it may be taken in the aperture-priority AE mode with the bundled software, see the Software Instruction Manual in the camera.
... appended to that it is no CF card in the CD-ROM. If the paper has any pattern or design, it again. 3 Appending Dust Delete DataN 3 Photograph a solid-white object. Before an important shoot, you should update the Dust Delete Data by obtaining it may be taken in the aperture-priority AE mode with the bundled software, see the Software Instruction Manual in the camera.

User Manual
Page 148
... [EOS Utility] screen does not appear, see "Software Instruction Manual" in the CD-ROM provided with the camera. Turn off the camera first and pull out the cable by grasping the plug (instead of the camera. Before disconnecting the cable, turn off the camera and use the interface cable that came with the camera) in the personal computer. Preparation for Image Transfer 1 Connect the camera to first install the EOS DIGITAL Solution Disk software...
... [EOS Utility] screen does not appear, see "Software Instruction Manual" in the CD-ROM provided with the camera. Turn off the camera first and pull out the cable by grasping the plug (instead of the camera. Before disconnecting the cable, turn off the camera and use the interface cable that came with the camera) in the personal computer. Preparation for Image Transfer 1 Connect the camera to first install the EOS DIGITAL Solution Disk software...
User Manual
Page 161
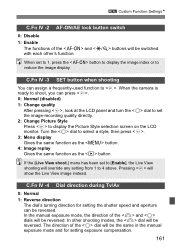
... shutter speed and aperture can be reversed. C.Fn IV -3 SET button when shooting You can press . 0: Normal (disabled) 1: Change quality After pressing , look at the LCD panel and turn the dial to set the image-recording quality directly. 2: Change Picture Style Press to . In the manual exposure mode, the direction of the and buttons will be switched with each other shooting modes, the dial will be reversed. In other 's function. 3 Custom Function SettingsN C.Fn IV -2 AF-ON/AE lock button switch 0: Disable 1: Enable...
... shutter speed and aperture can be reversed. C.Fn IV -3 SET button when shooting You can press . 0: Normal (disabled) 1: Change quality After pressing , look at the LCD panel and turn the dial to set the image-recording quality directly. 2: Change Picture Style Press to . In the manual exposure mode, the direction of the and buttons will be switched with each other shooting modes, the dial will be reversed. In other 's function. 3 Custom Function SettingsN C.Fn IV -2 AF-ON/AE lock button switch 0: Disable 1: Enable...
User Manual
Page 175
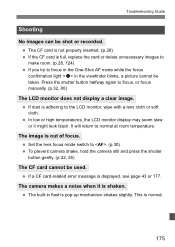
... normal. 175 Set the lens focus mode switch to the LCD monitor, wipe with a lens cloth or soft cloth. This is adhering to . (p.30) To prevent camera shake, hold the camera still and press the shutter button gently. (p.32, 35) The CF card cannot be shot or recorded. Troubleshooting Guide Shooting No images can be used. The camera makes a noise when it might look black. In low or high temperatures, the LCD monitor display may seem...
... normal. 175 Set the lens focus mode switch to the LCD monitor, wipe with a lens cloth or soft cloth. This is adhering to . (p.30) To prevent camera shake, hold the camera still and press the shutter button gently. (p.32, 35) The CF card cannot be shot or recorded. Troubleshooting Guide Shooting No images can be used. The camera makes a noise when it might look black. In low or high temperatures, the LCD monitor display may seem...
User Manual
Page 182
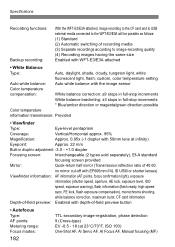
..., focus confirmation light), exposure information (shutter speed, aperture, AE lock, exposure level, ISO speed, exposure warning), flash information (flash ready, high-speed sync, FE lock, flash exposure compensation), monochrome shooting, white balance correction, maximum burst, CF card information Depth-of-field preview: Enabled with depth-of-field preview button • Autofocus Type: AF points: Metering range: Focus modes: 182 TTL secondary image-registration, phase detection 9 (Cross-type) EV -0.5 - 18 (at 23°C/73°F, ISO 100) One-Shot AF, AI Servo AF, AI Focus AF, Manual...
..., focus confirmation light), exposure information (shutter speed, aperture, AE lock, exposure level, ISO speed, exposure warning), flash information (flash ready, high-speed sync, FE lock, flash exposure compensation), monochrome shooting, white balance correction, maximum burst, CF card information Depth-of-field preview: Enabled with depth-of-field preview button • Autofocus Type: AF points: Metering range: Focus modes: 182 TTL secondary image-registration, phase detection 9 (Cross-type) EV -0.5 - 18 (at 23°C/73°F, ISO 100) One-Shot AF, AI Servo AF, AI Focus AF, Manual...
User Manual
Page 185
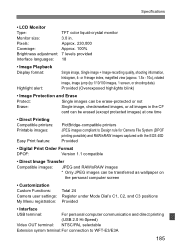
... Format DPOF: Version 1.1 compatible • Direct Image Transfer Compatible images: JPEG and RAW/sRAW images * Only JPEG images can be transferred as wallpaper on the personal computer screen • Customization Custom Functions: Camera user settings: My Menu registration: Total 24 Register under Mode Dial's C1, C2, and C3 positions Provided • Interface USB terminal: For personal computer communication and direct printing (USB 2.0 Hi-Speed) Video OUT terminal: NTSC/PAL selectable Extension system terminal: For connection to WFT...
... Format DPOF: Version 1.1 compatible • Direct Image Transfer Compatible images: JPEG and RAW/sRAW images * Only JPEG images can be transferred as wallpaper on the personal computer screen • Customization Custom Functions: Camera user settings: My Menu registration: Total 24 Register under Mode Dial's C1, C2, and C3 positions Provided • Interface USB terminal: For personal computer communication and direct printing (USB 2.0 Hi-Speed) Video OUT terminal: NTSC/PAL selectable Extension system terminal: For connection to WFT...
User Manual
Page 192
... RGB Color temperature 69 Color tone 63, 140 Continuous shooting 81, 169 Contrast 63, 140 Creative Zone 20 M icon 4 Cross-type focusing 79 Custom Functions 152 Clear all 152 D Date J Date/Time Date/Time 41 Date/time battery replacement. 171 Depth-of-field preview 89 Dioptric adjustment 35 Direct printing J Printing Drive mode 81, 169 Single / Continuous shooting Self-timer 82 Dust Delete Data 129 E Easy Printing 139 Erase (image 124 Error codes 177 Evaluative metering 92 Exposure compensation 93 1/2-stop increments...
... RGB Color temperature 69 Color tone 63, 140 Continuous shooting 81, 169 Contrast 63, 140 Creative Zone 20 M icon 4 Cross-type focusing 79 Custom Functions 152 Clear all 152 D Date J Date/Time Date/Time 41 Date/time battery replacement. 171 Depth-of-field preview 89 Dioptric adjustment 35 Direct printing J Printing Drive mode 81, 169 Single / Continuous shooting Self-timer 82 Dust Delete Data 129 E Easy Printing 139 Erase (image 124 Error codes 177 Evaluative metering 92 Exposure compensation 93 1/2-stop increments...


