User Manual
Page 9
Index to Features Exposure adjustment Exposure compensation Î p.93 AEB Î p.94 AE lock Î p.95 Exposure level increments Î p.154 Flash Built-in flash Î p.99 External flash Î p.105 External flash control • Flash settings ... • Transfer order Î p.143 Î p.148 Î p.150 Customization Custom Function (C.Fn) Î p.151 My Menu Î p.164 Camera user setting registration Î p.165 Sensor cleaning/ Dust reduction Sensor cleaning • Clean now • Disable auto cleaning • Manual cleaning Add Dust Delete...
Index to Features Exposure adjustment Exposure compensation Î p.93 AEB Î p.94 AE lock Î p.95 Exposure level increments Î p.154 Flash Built-in flash Î p.99 External flash Î p.105 External flash control • Flash settings ... • Transfer order Î p.143 Î p.148 Î p.150 Customization Custom Function (C.Fn) Î p.151 My Menu Î p.164 Camera user setting registration Î p.165 Sensor cleaning/ Dust reduction Sensor cleaning • Clean now • Disable auto cleaning • Manual cleaning Add Dust Delete...
User Manual
Page 18
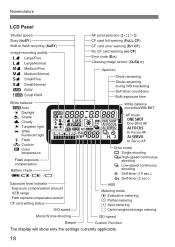
...R Cloudy Y Tungsten light U White fluorescent light I Flash O Custom P Color temperature Flash exposure compensation Battery check z xbn Exposure level indicator Exposure compensation amount AEB range Flash exposure compensation amount CF card writing status ISO speed AF point selection CF card full warning (FuLL... Focus AF Z AI Servo AF Drive mode u Single shooting o High-speed continuous shooting i Low-speed continuous shooting j Self-timer (10 sec.) l Self-timer (2 sec.) AEB Metering mode q Evaluative metering w Partial metering r Spot metering e Center-weighted average metering Monochrome...
...R Cloudy Y Tungsten light U White fluorescent light I Flash O Custom P Color temperature Flash exposure compensation Battery check z xbn Exposure level indicator Exposure compensation amount AEB range Flash exposure compensation amount CF card writing status ISO speed AF point selection CF card full warning (FuLL... Focus AF Z AI Servo AF Drive mode u Single shooting o High-speed continuous shooting i Low-speed continuous shooting j Self-timer (10 sec.) l Self-timer (2 sec.) AEB Metering mode q Evaluative metering w Partial metering r Spot metering e Center-weighted average metering Monochrome...

User Manual
Page 19
... FE lock (FEL) Busy (buSY) Built-in flash recycling (D buSY) Focus confirmation light Max. Burst White balance correction WB-BKT ISO speed Monochrome shooting Exposure level indicator Exposure compensation amount Flash exposure compensation amount AEB range Red-eye reduction lamp-on indicator CF card full warning (FuLL CF) CF card error...
... FE lock (FEL) Busy (buSY) Built-in flash recycling (D buSY) Focus confirmation light Max. Burst White balance correction WB-BKT ISO speed Monochrome shooting Exposure level indicator Exposure compensation amount Flash exposure compensation amount AEB range Red-eye reduction lamp-on indicator CF card full warning (FuLL CF) CF card error...
User Manual
Page 24
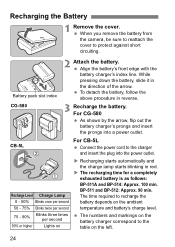
...time for a completely exhausted battery is as follows: BP-511A and BP-514: Approx. 100 min. The time required to protect against short circuiting. Recharge Level Charge Lamp 0 - 50% Blinks once per second 50 - 75% Blinks twice per second 75 - 90% Blinks three times per second 90% or ...higher Lights on the ambient temperature and battery's charge level. Align the battery's front edge with the battery charger's index line. Recharging the Battery 1 Remove the cover. When you remove the battery from the...
...time for a completely exhausted battery is as follows: BP-511A and BP-514: Approx. 100 min. The time required to protect against short circuiting. Recharge Level Charge Lamp 0 - 50% Blinks once per second 50 - 75% Blinks twice per second 75 - 90% Blinks three times per second 90% or ...higher Lights on the ambient temperature and battery's charge level. Align the battery's front edge with the battery charger's index line. Recharging the Battery 1 Remove the cover. When you remove the battery from the...

User Manual
Page 26
Installing and Removing the Battery Installing the Battery Load a fully charged BP-511A battery pack into the camera. 1 Open the battery compartment cover. b : Battery will be recharged. 26 Slide the lever as shown by the arrow and open the cover. 2 Insert the battery. ...Point the battery contacts downward. Battery Pack BP-514, BP-511, or BP-512 can also be exhausted soon. Checking the Battery Level When the power switch is low. n : Battery must be indicated in place. 3 Close the cover. Insert the battery until it locks in one of four...
Installing and Removing the Battery Installing the Battery Load a fully charged BP-511A battery pack into the camera. 1 Open the battery compartment cover. b : Battery will be recharged. 26 Slide the lever as shown by the arrow and open the cover. 2 Insert the battery. ...Point the battery contacts downward. Battery Pack BP-514, BP-511, or BP-512 can also be exhausted soon. Checking the Battery Level When the power switch is low. n : Battery must be indicated in place. 3 Close the cover. Insert the battery until it locks in one of four...
User Manual
Page 39
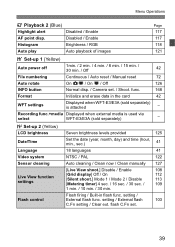
...numbering Continuous / Auto reset / Manual reset 72 Auto rotate On zD / On D / Off 126 INFO button Normal disp. / Camera set . 39 Recording func.+media Displayed when external media is attached - setting / External flash func. flash C.Fn set . / Shoot...2 (Yellow) LCD brightness Date/Time Language Video system Sensor cleaning Live View function settings Flash control Seven brightness levels provided 125 Set the date (year, month, day) and time (hour, min., sec.) 41 18 languages... 2 / Disable 113 [Metering timer] 4 sec. / 16 sec. / 30 sec. / 109 1 min. / 10 min. / 30 min.
...numbering Continuous / Auto reset / Manual reset 72 Auto rotate On zD / On D / Off 126 INFO button Normal disp. / Camera set . 39 Recording func.+media Displayed when external media is attached - setting / External flash func. flash C.Fn set . / Shoot...2 (Yellow) LCD brightness Date/Time Language Video system Sensor cleaning Live View function settings Flash control Seven brightness levels provided 125 Set the date (year, month, day) and time (hour, min., sec.) 41 18 languages... 2 / Disable 113 [Metering timer] 4 sec. / 16 sec. / 30 sec. / 109 1 min. / 10 min. / 30 min.
User Manual
Page 59
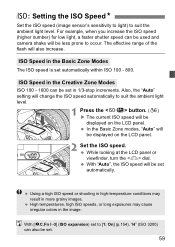
...-3] (ISO expansion) set to occur. For example, when you increase the ISO speed (higher number) for low light, a faster shutter speed can be used and camera shake will be less prone to [1: On] (p.154), "H" (ISO 3200) can be set in 1/3-stop increments. ISO Speed in more grainy images. In the ...ISO 100 - 1600 can also be set . 59 Also, the "Auto" setting will change the ISO speed automatically to suit the ambient light level. Using a high ISO speed or shooting in high-temperature conditions may cause irregular colors in the Basic Zone Modes The ISO speed is set automatically...
...-3] (ISO expansion) set to occur. For example, when you increase the ISO speed (higher number) for low light, a faster shutter speed can be used and camera shake will be less prone to [1: On] (p.154), "H" (ISO 3200) can be set in 1/3-stop increments. ISO Speed in more grainy images. In the ...ISO 100 - 1600 can also be set . 59 Also, the "Auto" setting will change the ISO speed automatically to suit the ambient light level. Using a high ISO speed or shooting in high-temperature conditions may cause irregular colors in the Basic Zone Modes The ISO speed is set automatically...
User Manual
Page 70
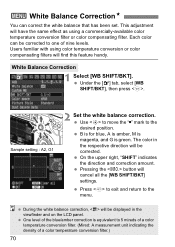
... using a commercially-available color temperature conversion filter or color compensating filter. Under the [2] tab, select [WB SHIFT/BKT], then press . One level of the blue/amber correction is green. Press to exit and return to one of a color temperature conversion filter.) 70 B is for blue...Use to move the " " mark to 5 mireds of a color temperature conversion filter. (Mired: A measurement unit indicating the density of nine levels. On the upper right, "SHIFT" indicates the direction and correction amount. 3 White Balance CorrectionN You can be corrected to the menu. During ...
... using a commercially-available color temperature conversion filter or color compensating filter. Under the [2] tab, select [WB SHIFT/BKT], then press . One level of the blue/amber correction is green. Press to exit and return to one of a color temperature conversion filter.) 70 B is for blue...Use to move the " " mark to 5 mireds of a color temperature conversion filter. (Mired: A measurement unit indicating the density of nine levels. On the upper right, "SHIFT" indicates the direction and correction amount. 3 White Balance CorrectionN You can be corrected to the menu. During ...

User Manual
Page 71
B/A bias ±3 levels Set the white balance bracketing amount. Amber (A) bias, or 1. Standard white balance, 2. Green (G) bias...the button will blink on the screen will be recorded simultaneously. You can be bracketed in single-level increments. Bracketing Sequence The images will change to one-third the normal number. This is possible up to ±...;3 levels in the following sequence: 1. Press to exit and return to the left sets the M/G bracketing. If ...
B/A bias ±3 levels Set the white balance bracketing amount. Amber (A) bias, or 1. Standard white balance, 2. Green (G) bias...the button will blink on the screen will be recorded simultaneously. You can be bracketed in single-level increments. Bracketing Sequence The images will change to one-third the normal number. This is possible up to ±...;3 levels in the following sequence: 1. Press to exit and return to the left sets the M/G bracketing. If ...
User Manual
Page 81
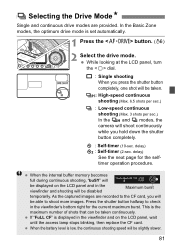
... button completely. This is low, the continuous shooting speed will be able to shoot more images. When the battery level is the maximum number of shots that can be taken. j : Self-timer (10-sec. As the captured images are provided. o: High-speed continuous shooting (Max. 6.5 shots per sec.) i... : Low-speed continuous shooting (Max. 3 shots per sec.) In the o and i modes, the camera will be displayed on the LCD panel, wait until the...
... button completely. This is low, the continuous shooting speed will be able to shoot more images. When the battery level is the maximum number of shots that can be taken. j : Self-timer (10-sec. As the captured images are provided. o: High-speed continuous shooting (Max. 6.5 shots per sec.) i... : Low-speed continuous shooting (Max. 3 shots per sec.) In the o and i modes, the camera will be displayed on the LCD panel, wait until the...
User Manual
Page 90
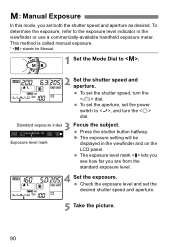
.... Press the shutter button halfway. This method is called manual exposure. * stands for Manual. 1 Set the Mode Dial to the exposure level indicator in the viewfinder and on the LCD panel. To set the power switch to , and turn the dial. a: Manual Exposure In this... mode, you are from the standard exposure level. 4 Set the exposure. Check the exposure level and set both the shutter speed and aperture as desired. Exposure level mark X The exposure setting will be displayed in the viewfinder or use a commercially-available...
.... Press the shutter button halfway. This method is called manual exposure. * stands for Manual. 1 Set the Mode Dial to the exposure level indicator in the viewfinder and on the LCD panel. To set the power switch to , and turn the dial. a: Manual Exposure In this... mode, you are from the standard exposure level. 4 Set the exposure. Check the exposure level and set both the shutter speed and aperture as desired. Exposure level mark X The exposure setting will be displayed in the viewfinder or use a commercially-available...
User Manual
Page 91
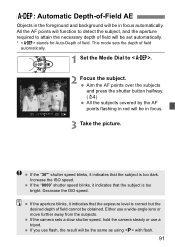
... subject. Increase the ISO speed. If the "8000" shutter speed blinks, it indicates that the subject is too dark. If the camera sets a slow shutter speed, hold the camera steady or use a wide-angle lens or move further away from the subjects. Aim the AF points over the subjects and press... automatically. Either use a tripod. If you use flash, the result will be obtained. If the "30"" shutter speed blinks, it indicates that the exposure level is too bright. If the aperture blinks, it indicates that the subject is correct but the desired depth of field cannot be the same as...
... subject. Increase the ISO speed. If the "8000" shutter speed blinks, it indicates that the subject is too dark. If the camera sets a slow shutter speed, hold the camera steady or use a wide-angle lens or move further away from the subjects. Aim the AF points over the subjects and press... automatically. Either use a tripod. If you use flash, the result will be obtained. If the "30"" shutter speed blinks, it indicates that the exposure level is too bright. If the aperture blinks, it indicates that the subject is correct but the desired depth of field cannot be the same as...
User Manual
Page 93
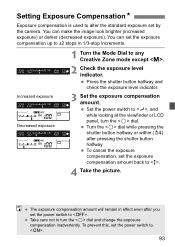
... turn the dial and change the exposure compensation inadvertently. Take care not to . Press the shutter button halfway and check the exposure level indicator. 3 Set the exposure compensation amount. You can make the image look brighter (increased exposure) or darker (decreased exposure). The... compensation is used to any Creative Zone mode except . 2 Check the exposure level indicator. Turn the dial while pressing the shutter button halfway or within (0) after you set by the camera. Increased exposure Decreased exposure 1 Turn the Mode Dial to alter the standard exposure...
... turn the dial and change the exposure compensation inadvertently. Take care not to . Press the shutter button halfway and check the exposure level indicator. 3 Set the exposure compensation amount. You can make the image look brighter (increased exposure) or darker (decreased exposure). The... compensation is used to any Creative Zone mode except . 2 Check the exposure level indicator. Turn the dial while pressing the shutter button halfway or within (0) after you set by the camera. Increased exposure Decreased exposure 1 Turn the Mode Dial to alter the standard exposure...
User Manual
Page 94
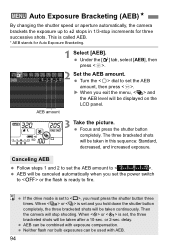
... taken in 1/3-stop shooting. delay. The three bracketed shots will be displayed on the LCD panel. Then the camera will be used with exposure compensation. X When you exit the menu, and the AEB level will be combined with AEB. 94 AEB will be canceled automatically when you set the power switch to... or the flash is set the AEB amount, then press . AEB can be taken after a 10-sec. If the drive mode is ready to ±...
... taken in 1/3-stop shooting. delay. The three bracketed shots will be displayed on the LCD panel. Then the camera will be used with exposure compensation. X When you exit the menu, and the AEB level will be combined with AEB. 94 AEB will be canceled automatically when you set the power switch to... or the flash is set the AEB amount, then press . AEB can be taken after a 10-sec. If the drive mode is ready to ±...
User Manual
Page 99
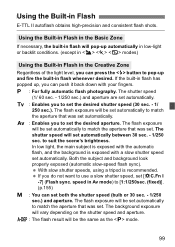
... sec. - 1/250 sec.) and aperture. If the built-in flash has popped up and fire the built-in the Creative Zone Regardless of the light level, you can push it back down with a slow shutter speed set automatically. speed in Flash E-TTL II autoflash obtains high-precision and consistent flash shots.
... sec. - 1/250 sec.) and aperture. If the built-in flash has popped up and fire the built-in the Creative Zone Regardless of the light level, you can push it back down with a slow shutter speed set automatically. speed in Flash E-TTL II autoflash obtains high-precision and consistent flash shots.
User Manual
Page 112
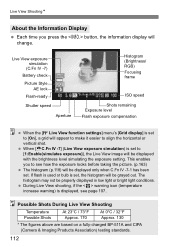
...-7) Battery check Picture Style AE lock Flash-ready Shutter speed Aperture Histogram (Brightness/ RGB) Focusing frame ISO speed Shots remaining Exposure level Flash exposure compensation When the [6 Live View function settings] menu's [Grid display] is set . Live View ShootingN About the Information...°F Approx. 170 At 0°C / 32°F Approx. 130 * The figures above are based on a fully-charged BP-511A and CIPA (Camera & Imaging Products Association) testing standards. 112 During Live View shooting, if the < > warning icon (temperature increase warning) is set to [On], ...
...-7) Battery check Picture Style AE lock Flash-ready Shutter speed Aperture Histogram (Brightness/ RGB) Focusing frame ISO speed Shots remaining Exposure level Flash exposure compensation When the [6 Live View function settings] menu's [Grid display] is set . Live View ShootingN About the Information...°F Approx. 170 At 0°C / 32°F Approx. 130 * The figures above are based on a fully-charged BP-511A and CIPA (Camera & Imaging Products Association) testing standards. 112 During Live View shooting, if the < > warning icon (temperature increase warning) is set to [On], ...

User Manual
Page 118
...on the right, the color will be reproduced. And the RGB histogram display is a graph showing the Sample Histograms distribution of each brightness level. The display can be lost . And if there are too many pixels on the left, the respective color information will be too ... are toward the left , the shadow detail will be lost . x Image Playback About the Histogram The brightness histogram display shows the exposure level distribution, overall brightness, and gradation. And the more pixels there are too many pixels on the right), while the vertical axis indicates how...
...on the right, the color will be reproduced. And the RGB histogram display is a graph showing the Sample Histograms distribution of each brightness level. The display can be lost . And if there are too many pixels on the left, the respective color information will be too ... are toward the left , the shadow detail will be lost . x Image Playback About the Histogram The brightness histogram display shows the exposure level distribution, overall brightness, and gradation. And the more pixels there are too many pixels on the right), while the vertical axis indicates how...
User Manual
Page 138
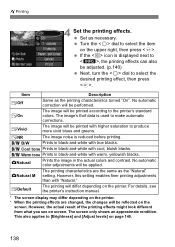
... the item on the printer. * When the printing effects are the same as the printing characteristics turned "On". Turn the dial to [Brightness] and [Adjust levels] on screen. For details, see on page 140. 138 Set as necessary.
... the item on the printer. * When the printing effects are the same as the printing characteristics turned "On". Turn the dial to [Brightness] and [Adjust levels] on screen. For details, see on page 140. 138 Set as necessary.
User Manual
Page 140
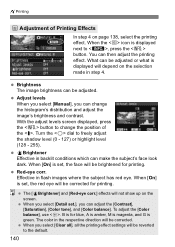
...will be corrected. Brightness The image brightness can make the subject's face look dark. Red-eye corr. The color in step 4. Adjust levels When you select [Manual], you can be adjusted or what is displayed will depend on the selection made in the respective direction will ... next to the default. 140 When [On] is set , the red eye will be corrected for printing. With the adjust levels screen displayed, press the button to freely adjust the shadow level (0 - 127) or highlight level (128 - 255). When [On] is set , the face will be brightened for printing.
...will be corrected. Brightness The image brightness can make the subject's face look dark. Red-eye corr. The color in step 4. Adjust levels When you select [Manual], you can be adjusted or what is displayed will depend on the selection made in the respective direction will ... next to the default. 140 When [On] is set , the red eye will be corrected for printing. With the adjust levels screen displayed, press the button to freely adjust the shadow level (0 - 127) or highlight level (128 - 255). When [On] is set , the face will be brightened for printing.
User Manual
Page 142
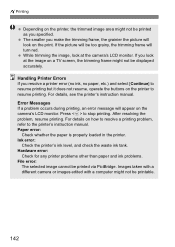
... monitor. After resolving the problem, resume printing. Ink error: Check the printer's ink level, and check the waste ink tank. Images taken with a different camera or images edited with a computer might not be too grainy, the trimming frame will be printable. 142 If the picture will turn ... Errors If you specified. Paper error: Check whether the paper is properly loaded in the printer. While trimming the image, look at the camera's LCD monitor. Hardware error: Check for any printer problems other than paper and ink problems. File error: The selected image cannot be printed...
... monitor. After resolving the problem, resume printing. Ink error: Check the printer's ink level, and check the waste ink tank. Images taken with a different camera or images edited with a computer might not be too grainy, the trimming frame will be printable. 142 If the picture will turn ... Errors If you specified. Paper error: Check whether the paper is properly loaded in the printer. While trimming the image, look at the camera's LCD monitor. Hardware error: Check for any printer problems other than paper and ink problems. File error: The selected image cannot be printed...