
User Manual
Page 5
...Removing the Battery 26 3 Installing and Removing the CF Card 28 Mounting and Detaching a Lens 30 Basic Operation 32 4 Menu Operations 36 Menu Settings 38 Before You Start 41 Setting the Interface...41 Set the power-off time/Auto power off 42 Formatting the CF Card 42 6 Resetting Camera Settings 44 2 Basic Shooting 45 Fully Automatic Shooting 46 7 Full Auto Techniques 48 Shooting ...Night 53 Disabling Flash 54 9 3 Image Settings 55 Setting the Image-recording Quality 56 10 Setting the ISO Speed 59 Selecting a Picture Style 61 Customizing the Picture Style 63 11...
...Removing the Battery 26 3 Installing and Removing the CF Card 28 Mounting and Detaching a Lens 30 Basic Operation 32 4 Menu Operations 36 Menu Settings 38 Before You Start 41 Setting the Interface...41 Set the power-off time/Auto power off 42 Formatting the CF Card 42 6 Resetting Camera Settings 44 2 Basic Shooting 45 Fully Automatic Shooting 46 7 Full Auto Techniques 48 Shooting ...Night 53 Disabling Flash 54 9 3 Image Settings 55 Setting the Image-recording Quality 56 10 Setting the ISO Speed 59 Selecting a Picture Style 61 Customizing the Picture Style 63 11...
User Manual
Page 14
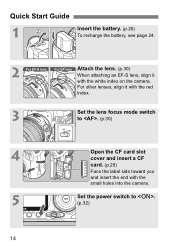
For other lenses, align it with the small holes into the camera. 5 Set the power switch to . (p.30) 4 Open the CF card slot cover and insert a CF card. (p.28) Face the label side toward you and insert the end with the white index on the camera. Quick Start Guide 1 Insert the battery. (p.26) To recharge the battery, see page 24. 2 FoČčrôEĚFϨ-Sϯlζens For EF lens Attach the lens. (p.30) When attaching an EF-S lens, align it with the red index. 3 Set the lens focus mode switch to . (p.32) 14
For other lenses, align it with the small holes into the camera. 5 Set the power switch to . (p.30) 4 Open the CF card slot cover and insert a CF card. (p.28) Face the label side toward you and insert the end with the white index on the camera. Quick Start Guide 1 Insert the battery. (p.26) To recharge the battery, see page 24. 2 FoČčrôEĚFϨ-Sϯlζens For EF lens Attach the lens. (p.30) When attaching an EF-S lens, align it with the red index. 3 Set the lens focus mode switch to . (p.32) 14
User Manual
Page 16
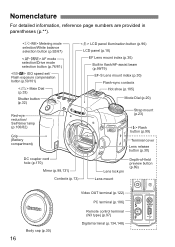
... LCD panel illumination button (p.96) LCD panel (p.18) EF Lens mount index (p.30) Built-in parentheses (p.**). Nomenclature For detailed information, reference page numbers are provided in flash/AF-assist...EF-S Lens mount index (p.30) Flash-sync contacts Hot shoe (p.105) Mode Dial (p.20) Strap mount (p.23) Flash button (p.99) Terminal cover Lens release button (p.30) DC coupler cord hole (p....170) Mirror (p.98,131) Contacts (p.13) Lens lock pin Depth-of-field preview button (p.89) Lens mount Body cap (p.30) 16 Video OUT terminal ...
... LCD panel illumination button (p.96) LCD panel (p.18) EF Lens mount index (p.30) Built-in parentheses (p.**). Nomenclature For detailed information, reference page numbers are provided in flash/AF-assist...EF-S Lens mount index (p.30) Flash-sync contacts Hot shoe (p.105) Mode Dial (p.20) Strap mount (p.23) Flash button (p.99) Terminal cover Lens release button (p.30) DC coupler cord hole (p....170) Mirror (p.98,131) Contacts (p.13) Lens lock pin Depth-of-field preview button (p.89) Lens mount Body cap (p.30) 16 Video OUT terminal ...
User Manual
Page 21
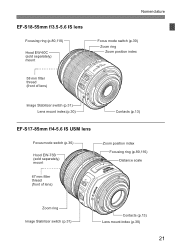
EF-S18-55mm f/3.5-5.6 IS lens Focusing ring (p.80,110) Hood EW-60C (sold separately) mount Nomenclature Focus mode switch (p.30) Zoom ring Zoom position index 58 mm filter thread (front of lens) Image Stabilizer switch (p.31)ç Lens mount index (p.30) Contacts (p.13) EF-S17-85mm f/4-5.6 IS USM lens Focus mode switch (p.30) Hood EW-73B (sold separately) mount 67 mm filter thread (front of lens) Zoom position index Focusing ring (p.80,110) Distance scale Zoom ring ç Image Stabilizer switch (p.31)ç Contacts (p.13) Lens mount index (p.30) 21
EF-S18-55mm f/3.5-5.6 IS lens Focusing ring (p.80,110) Hood EW-60C (sold separately) mount Nomenclature Focus mode switch (p.30) Zoom ring Zoom position index 58 mm filter thread (front of lens) Image Stabilizer switch (p.31)ç Lens mount index (p.30) Contacts (p.13) EF-S17-85mm f/4-5.6 IS USM lens Focus mode switch (p.30) Hood EW-73B (sold separately) mount 67 mm filter thread (front of lens) Zoom position index Focusing ring (p.80,110) Distance scale Zoom ring ç Image Stabilizer switch (p.31)ç Contacts (p.13) Lens mount index (p.30) 21
User Manual
Page 25
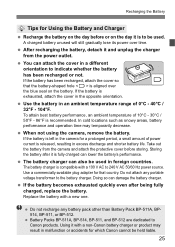
...it is fully charged can damage the battery charger. Replace the battery with a non-Canon battery charger or product may temporarily decrease. Using it and unplug the charger from the camera and attach the protective cover before or on the day it is to indicate whether...battery performance, an ambient temperature of power current is aligned over time. Use a commercially-available plug adapter for a prolonged period, a small amount of 10°C - 30°C / 50°F - 86°F is compatible with a 100 V AC to the battery charger. Doing so can lower the battery's performance...
...it is fully charged can damage the battery charger. Replace the battery with a non-Canon battery charger or product may temporarily decrease. Using it and unplug the charger from the camera and attach the protective cover before or on the day it is to indicate whether...battery performance, an ambient temperature of power current is aligned over time. Use a commercially-available plug adapter for a prolonged period, a small amount of 10°C - 30°C / 50°F - 86°F is compatible with a 100 V AC to the battery charger. Doing so can lower the battery's performance...
User Manual
Page 30
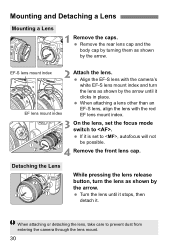
... and Detaching a Lens Mounting a Lens 1 Remove the caps. When attaching a lens other than an EF lens mount index EF-S lens, align the lens with the camera's white EF-S lens mount index and turn the lens as shown by the arrow. Detaching the Lens While pressing the lens release button, turn the... shown by the arrow. Align the EF-S lens with the red EF lens mount index. 3 On the lens, set to prevent dust from entering the camera through the lens mount. 30 If it clicks in place. EF-S lens mount index 2 Attach the lens.
... and Detaching a Lens Mounting a Lens 1 Remove the caps. When attaching a lens other than an EF lens mount index EF-S lens, align the lens with the camera's white EF-S lens mount index and turn the lens as shown by the arrow. Detaching the Lens While pressing the lens release button, turn the... shown by the arrow. Align the EF-S lens with the red EF lens mount index. 3 On the lens, set to prevent dust from entering the camera through the lens mount. 30 If it clicks in place. EF-S lens mount index 2 Attach the lens.
User Manual
Page 39
... Enable 108 [Grid display] Off / On 112 [Silent shoot.] Mode 1 / Mode 2 / Disable 113 [Metering timer] 4 sec. / 16 sec. / 30 sec. / 109 1 min. / 10 min. / 30 min. Flash firing / Built-in the card 42 WFT settings Displayed when WFT-E3/E3A (sold separately) - 6 Set-up 1 (Yellow) Auto power off... 1min. / 2 min. / 4 min. / 8 min. / 15 min. / 30 min. / Off 42 File numbering Continuous / Auto reset / Manual reset 72 Auto rotate On zD / On D / Off 126 INFO button Normal disp. / Camera set . 39
... Enable 108 [Grid display] Off / On 112 [Silent shoot.] Mode 1 / Mode 2 / Disable 113 [Metering timer] 4 sec. / 16 sec. / 30 sec. / 109 1 min. / 10 min. / 30 min. Flash firing / Built-in the card 42 WFT settings Displayed when WFT-E3/E3A (sold separately) - 6 Set-up 1 (Yellow) Auto power off... 1min. / 2 min. / 4 min. / 8 min. / 15 min. / 30 min. / Off 42 File numbering Continuous / Auto reset / Manual reset 72 Auto rotate On zD / On D / Off 126 INFO button Normal disp. / Camera set . 39
User Manual
Page 42
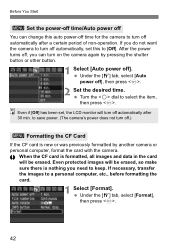
... off You can turn off automatically, set , the LCD monitor will be erased, so make sure there is nothing you need to save power. (The camera's power does not turn off.) 3 Formatting the CF Card If the CF card is formatted, all images and data in the card will turn off... automatically after 30 min. Under the [5] tab, select [Format], then press . 42 Under the [5] tab, select [Auto power off], then press . 2 Set the desired time. Turn the dial...
... off You can turn off automatically, set , the LCD monitor will be erased, so make sure there is nothing you need to save power. (The camera's power does not turn off.) 3 Formatting the CF Card If the CF card is formatted, all images and data in the card will turn off... automatically after 30 min. Under the [5] tab, select [Format], then press . 42 Under the [5] tab, select [Auto power off], then press . 2 Set the desired time. Turn the dial...

User Manual
Page 85
.... Program Shift is canceled automatically after the picture is taken. If "8000" shutter speed and the minimum aperture blink, it indicates underexposure. d: Program AE If "30"" shutter speed and the maximum aperture blink, it indicates overexposure. Lower the ISO speed or use flash. Program Shift cannot be used with flash. 85...
.... Program Shift is canceled automatically after the picture is taken. If "8000" shutter speed and the minimum aperture blink, it indicates underexposure. d: Program AE If "30"" shutter speed and the maximum aperture blink, it indicates overexposure. Lower the ISO speed or use flash. Program Shift cannot be used with flash. 85...

User Manual
Page 89
... field (range of the foreground and background fall within acceptable focus. However, the viewfinder will differ depending on the lens. f: Aperture-Priority AE If the "30"" shutter speed blinks, it indicates overexposure. If the "8000" shutter speed blinks, it indicates underexposure. Turn the dial to set a smaller aperture (larger f/ number) until...
... field (range of the foreground and background fall within acceptable focus. However, the viewfinder will differ depending on the lens. f: Aperture-Priority AE If the "30"" shutter speed blinks, it indicates overexposure. If the "8000" shutter speed blinks, it indicates underexposure. Turn the dial to set a smaller aperture (larger f/ number) until...
User Manual
Page 91
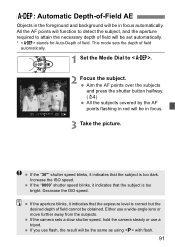
... a slow shutter speed, hold the camera steady or use flash, the result will be set automatically. * stands for Auto-Depth of field automatically. 1 Set the Mode Dial to attain the necessary ... detect the subject, and the aperture required to . 2 Focus the subject. Either use a wide-angle lens or move further away from the subjects. If the "30"" shutter speed blinks, it indicates that the subject is too bright. Decrease the ISO speed. Aim the AF points over the subjects and press the...
... a slow shutter speed, hold the camera steady or use flash, the result will be set automatically. * stands for Auto-Depth of field automatically. 1 Set the Mode Dial to attain the necessary ... detect the subject, and the aperture required to . 2 Focus the subject. Either use a wide-angle lens or move further away from the subjects. If the "30"" shutter speed blinks, it indicates that the subject is too bright. Decrease the ISO speed. Aim the AF points over the subjects and press the...

User Manual
Page 96
....) will turn on the LCD panel by the bulb exposure can be indicated on or off the LCD panel illumination. 96 The next setting after "30"" is recommended. To set the aperture, set , the shutter stays open while you let go of the shutter button. Since bulb exposures have more noise...
....) will turn on the LCD panel by the bulb exposure can be indicated on or off the LCD panel illumination. 96 The next setting after "30"" is recommended. To set the aperture, set , the shutter stays open while you let go of the shutter button. Since bulb exposures have more noise...
User Manual
Page 98
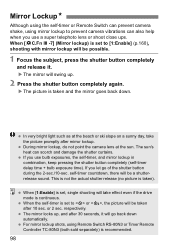
.... 98 When [8C.Fn III -7] (Mirror lockup) is taken and the mirror goes back down automatically. X The mirror will swing up , and after 30 seconds, it . In very bright light such as at the sun. The sun's heat can also help when you use bulb exposures, the self-timer...a shutterrelease sound. self-timer countdown, there will take the picture promptly after 10 sec. or 2 sec. X The picture is set to prevent camera vibrations can scorch and damage the shutter curtains. During mirror lockup, do not point the camera lens at the beach or ski slope on a sunny day, take effect ...
.... 98 When [8C.Fn III -7] (Mirror lockup) is taken and the mirror goes back down automatically. X The mirror will swing up , and after 30 seconds, it . In very bright light such as at the sun. The sun's heat can also help when you use bulb exposures, the self-timer...a shutterrelease sound. self-timer countdown, there will take the picture promptly after 10 sec. or 2 sec. X The picture is set to prevent camera vibrations can scorch and damage the shutter curtains. During mirror lockup, do not point the camera lens at the beach or ski slope on a sunny day, take effect ...
User Manual
Page 99
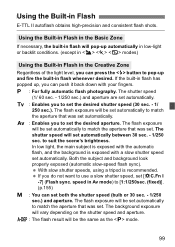
...precision and consistent flash shots. The shutter speed will be set automatically to match the aperture that was set both the shutter speed (bulb or 30 sec. - 1/250 sec.) and aperture. In low light, the main subject is exposed with a slow shutter speed set automatically. The ... the subject and background look properly exposed (automatic slow-speed flash sync). s : Enables you to use a slow shutter speed, set automatically between 30 sec. - 1/250 sec. If you do not want to set the desired aperture. The flash exposure will be set automatically to set the desired...
...precision and consistent flash shots. The shutter speed will be set automatically to match the aperture that was set both the shutter speed (bulb or 30 sec. - 1/250 sec.) and aperture. In low light, the main subject is exposed with a slow shutter speed set automatically. The ... the subject and background look properly exposed (automatic slow-speed flash sync). s : Enables you to use a slow shutter speed, set automatically between 30 sec. - 1/250 sec. If you do not want to set the desired aperture. The flash exposure will be set automatically to set the desired...
User Manual
Page 100
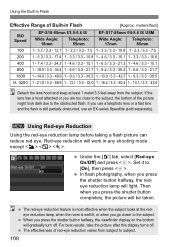
... Angle: 18mm Telephoto: 55mm Wide Angle: 17mm Telephoto: 85mm 1 - 3.7 / 3.3 - 12.1 1 - 2.3 / 3.3 - 7.5 1 - 3.3 / 3.3 - 10.8 1 - 2.3 / 3.3 - 7.5 200 1 - 5.3 / 3.3 - 17.4 1 - 3.3 / 3.3 - 10.8 1 - 4.6 / 3.3 - 15.1 1 - 3.3 / 3.3 - 10.8 400 1 - 7.4 / 3.3 - 24.3 1 - 4.6 / 3.3 - 15.1 1 - 6.5 / 3.3 - 21.3 1 - 4.6 / 3.3 - 15.1 800 1 - 10.5 / 3.3 - 34.4 1 - 6.6 / 3.3 - 21.7 1 - 9.2 / 3.3 - 30.2 1 - 6.6 / 3.3 - 21.7 1600 1 - 14.9 / 3.3 - 48.9 1 - 9.3 / 3.3 - 30.5 1 - 13.0 / 3.3 - 42.7 1 - 9.3 / 3.3 - 30.5 H: 3200 1 - 21.0 / 3.3 - 68.9 1 - 13.1 / 3.3 - 43.0 1 - 18.4 / 3.3 - 60.4 1 - 13.1 / 3.3 - 43...
... Angle: 18mm Telephoto: 55mm Wide Angle: 17mm Telephoto: 85mm 1 - 3.7 / 3.3 - 12.1 1 - 2.3 / 3.3 - 7.5 1 - 3.3 / 3.3 - 10.8 1 - 2.3 / 3.3 - 7.5 200 1 - 5.3 / 3.3 - 17.4 1 - 3.3 / 3.3 - 10.8 1 - 4.6 / 3.3 - 15.1 1 - 3.3 / 3.3 - 10.8 400 1 - 7.4 / 3.3 - 24.3 1 - 4.6 / 3.3 - 15.1 1 - 6.5 / 3.3 - 21.3 1 - 4.6 / 3.3 - 15.1 800 1 - 10.5 / 3.3 - 34.4 1 - 6.6 / 3.3 - 21.7 1 - 9.2 / 3.3 - 30.2 1 - 6.6 / 3.3 - 21.7 1600 1 - 14.9 / 3.3 - 48.9 1 - 9.3 / 3.3 - 30.5 1 - 13.0 / 3.3 - 42.7 1 - 9.3 / 3.3 - 30.5 H: 3200 1 - 21.0 / 3.3 - 68.9 1 - 13.1 / 3.3 - 43.0 1 - 18.4 / 3.3 - 60.4 1 - 13.1 / 3.3 - 43...
User Manual
Page 130
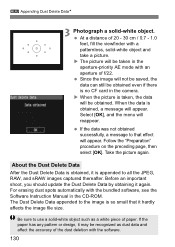
...a distance of f/22. Follow the "Preparation" procedure on the preceding page, then select [OK]. For erasing dust spots automatically with an aperture of 20 - 30 cm / 0.7 - 1.0 feet, fill the viewfinder with the software. 130 Select [OK], and the menu will be obtained. If the data was not obtained.... Since the image will be taken in the aperture-priority AE mode with the bundled software, see the Software Instruction Manual in the camera. When the data is so small that effect will appear. About the Dust Delete Data After the Dust Delete Data is obtained, it...
...a distance of f/22. Follow the "Preparation" procedure on the preceding page, then select [OK]. For erasing dust spots automatically with an aperture of 20 - 30 cm / 0.7 - 1.0 feet, fill the viewfinder with the software. 130 Select [OK], and the menu will be obtained. If the data was not obtained.... Since the image will be taken in the aperture-priority AE mode with the bundled software, see the Software Instruction Manual in the camera. When the data is so small that effect will appear. About the Dust Delete Data After the Dust Delete Data is obtained, it...
User Manual
Page 175
...'s pop-up mechanism shakes slightly. If a CF card-related error message is normal. 175 The camera makes a noise when it might look black. Set the lens focus mode switch to . (p.30) To prevent camera shake, hold the camera still and press the shutter button gently. (p.32, 35) The CF card cannot be shot or...
...'s pop-up mechanism shakes slightly. If a CF card-related error message is normal. 175 The camera makes a noise when it might look black. Set the lens focus mode switch to . (p.30) To prevent camera shake, hold the camera still and press the shutter button gently. (p.32, 35) The CF card cannot be shot or...
User Manual
Page 183
.... 4.0 m/13.1 ft. at periphery • Exposure Control Metering modes: 35-zone TTL full-aperture metering • Evaluative metering (linkable to 30 sec. (1/3- at center, approx. 3.5 m/11.5 ft. Soft-touch electromagnetic release 10-sec. or 1/2-stop increments), bulb, Xsync at 23°C/73°F with AEB) AEB: ±2 stops in 1/3- Specifications AF point...
.... 4.0 m/13.1 ft. at periphery • Exposure Control Metering modes: 35-zone TTL full-aperture metering • Evaluative metering (linkable to 30 sec. (1/3- at center, approx. 3.5 m/11.5 ft. Soft-touch electromagnetic release 10-sec. or 1/2-stop increments), bulb, Xsync at 23°C/73°F with AEB) AEB: ±2 stops in 1/3- Specifications AF point...
User Manual
Page 186
... 800 At 0°C / 32°F 950 700 * The above figures apply with a fully-charged Battery Pack BP-511A * The figures above are based on CIPA (Camera & Imaging Products Association) testing standards Auto Provided. Weight: Approx. 740 g / 26.1 oz. (body only) • Operation Environment Working temperature range: 0°C - 40°C / 32°... Pack BP-511A, BP-514, BP-511, or BP-512 Recharging time: BP-511A, BP-514: Approx. 100 min. Power turns off after 1, 2, 4, 8, 15, or 30 min. BP-511, BP-512: Approx. 90 min.
... 800 At 0°C / 32°F 950 700 * The above figures apply with a fully-charged Battery Pack BP-511A * The figures above are based on CIPA (Camera & Imaging Products Association) testing standards Auto Provided. Weight: Approx. 740 g / 26.1 oz. (body only) • Operation Environment Working temperature range: 0°C - 40°C / 32°... Pack BP-511A, BP-514, BP-511, or BP-512 Recharging time: BP-511A, BP-514: Approx. 100 min. Power turns off after 1, 2, 4, 8, 15, or 30 min. BP-511, BP-512: Approx. 90 min.
User Manual
Page 187
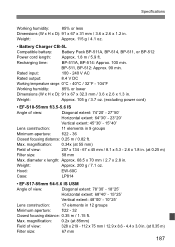
...58 mm Max. magnification: 0.34x (at 55 mm) Field of view: Diagonal extent: 74°20' - 27°50' Horizontal extent: 64°30' - 23°20' Vertical extent: 45°30' - 15°40' Lens construction: 11 elements in . (at 85mm) Field of view: Diagonal extent: 78°...;30' - 18°25' Horizontal extent: 68°40' - 15°25' Vertical extent: 48°00' - 10°25' Lens construction: 17 elements in . diameter x length: Approx. 68.5 x 70 mm / 2.7 x 2.8 in . Hood...
...58 mm Max. magnification: 0.34x (at 55 mm) Field of view: Diagonal extent: 74°20' - 27°50' Horizontal extent: 64°30' - 23°20' Vertical extent: 45°30' - 15°40' Lens construction: 11 elements in . (at 85mm) Field of view: Diagonal extent: 78°...;30' - 18°25' Horizontal extent: 68°40' - 15°25' Vertical extent: 48°00' - 10°25' Lens construction: 17 elements in . diameter x length: Approx. 68.5 x 70 mm / 2.7 x 2.8 in . Hood...