ZR Instruction Manual
Page 1
... REDUCE ANNOYING INTERFERENCE, USE THE RECOMMENDED ACCESSORIES ONLY. Tel No. (516)328-5600 Important Warning CAUTION RISK OF ELECTRIC SHOCK DO NOT OPEN CAUTION: TO REDUCE THE RISK OF ELECTRIC SHOCK, DO NOT REMOVE COVER (OR BACK). REFER SERVICING TO QUALIFIED SERVICE PERSONNEL. COPYRIGHT WARNING: Unauthorized recording of important operating and maintenance (servicing) instructions in the manual. NO USER SERVICEABLE PARTS INSIDE. Important Usage Instructions WARNING: TO...
... REDUCE ANNOYING INTERFERENCE, USE THE RECOMMENDED ACCESSORIES ONLY. Tel No. (516)328-5600 Important Warning CAUTION RISK OF ELECTRIC SHOCK DO NOT OPEN CAUTION: TO REDUCE THE RISK OF ELECTRIC SHOCK, DO NOT REMOVE COVER (OR BACK). REFER SERVICING TO QUALIFIED SERVICE PERSONNEL. COPYRIGHT WARNING: Unauthorized recording of important operating and maintenance (servicing) instructions in the manual. NO USER SERVICEABLE PARTS INSIDE. Important Usage Instructions WARNING: TO...

ZR Instruction Manual
Page 2
...-up static charges. All operating and maintenance instructions should be routed so that they may fall, causing serious injury to a child or adult, and serious damage to the Canon Digital Video Camcorder ZR and all its accessories. Do not use this product near water or in this manual as recommended in this manual. 6. Polarization - If an outside antenna is connected to grounding...
...-up static charges. All operating and maintenance instructions should be routed so that they may fall, causing serious injury to a child or adult, and serious damage to the Canon Digital Video Camcorder ZR and all its accessories. Do not use this product near water or in this manual as recommended in this manual. 6. Polarization - If an outside antenna is connected to grounding...
ZR Instruction Manual
Page 3
... yourself as opening or removing covers may result in damage and will prevent damage to the product due to service this product from touching such power lines or circuits as contact with them might be sure the service technician has used replacement parts that have fallen into, the product. This will often require extensive work by the operation instructions. Replacement Parts - Canon or that...
... yourself as opening or removing covers may result in damage and will prevent damage to the product due to service this product from touching such power lines or circuits as contact with them might be sure the service technician has used replacement parts that have fallen into, the product. This will often require extensive work by the operation instructions. Replacement Parts - Canon or that...

ZR Instruction Manual
Page 4
... Audio Recording 44 Thank you for Choosing a Canon ......... 6 Setting the Self-Timer 46 Introducing the ZR 7 Mastering the Basics ~ When Making Manual Adjustments ...~ Adjusting Exposure Manually 47 Adjusting Focus Manually 49 Powering Your Camcorder 8 Setting the White Balance 50 Loading a Cassette 11 Basic Recording 13 Zooming 16 Using the LCD Screen 17 Playing back a Cassette 19 Connections for Making Better Videos 26 ~ For Playback ...~ Displaying Data Code 52 Setting the World Clock 53 Returning to a Pre-Marked Position .... 55 Searching the Tape (Photo Search/Date...
... Audio Recording 44 Thank you for Choosing a Canon ......... 6 Setting the Self-Timer 46 Introducing the ZR 7 Mastering the Basics ~ When Making Manual Adjustments ...~ Adjusting Exposure Manually 47 Adjusting Focus Manually 49 Powering Your Camcorder 8 Setting the White Balance 50 Loading a Cassette 11 Basic Recording 13 Zooming 16 Using the LCD Screen 17 Playing back a Cassette 19 Connections for Making Better Videos 26 ~ For Playback ...~ Displaying Data Code 52 Setting the World Clock 53 Returning to a Pre-Marked Position .... 55 Searching the Tape (Photo Search/Date...
ZR Instruction Manual
Page 5
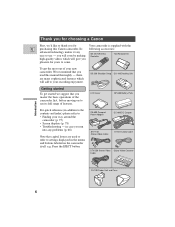
... this manual thoroughly - CA-600 Compact Power Adapter DC-600 DC Coupler STV-150 Stereo Video Cable S-150 S-video Cable STV-250 Stereo Video Digital Video Cassette Cable FU-100 Finder Unit and Case 6 Its following accessories: advanced technology makes it very easy to use its full range of your new camcorder, We recommend that you read this Canon camcorder. Press the EJECT button. LCD Cover BP-608 Battery Pack...
... this manual thoroughly - CA-600 Compact Power Adapter DC-600 DC Coupler STV-150 Stereo Video Cable S-150 S-video Cable STV-250 Stereo Video Digital Video Cassette Cable FU-100 Finder Unit and Case 6 Its following accessories: advanced technology makes it very easy to use its full range of your new camcorder, We recommend that you read this Canon camcorder. Press the EJECT button. LCD Cover BP-608 Battery Pack...
ZR Instruction Manual
Page 7
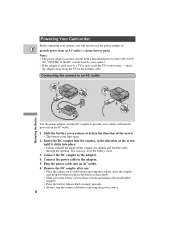
... battery cover release switch (and replace the small rubber stopper). • Press the battery release knob (orange) upwards. • Always turn the camera off before removing the power source. 8 Mastering the Basics Connect the power cable to the adapter. 4. You can now close the battery cover. 3. B A Powering Your Camcorder Before operating your camera. • If the adapter is used next to a TV, it clicks into an AC outlet. 6. Plug the power cable...
... battery cover release switch (and replace the small rubber stopper). • Press the battery release knob (orange) upwards. • Always turn the camera off before removing the power source. 8 Mastering the Basics Connect the power cable to the adapter. 4. You can now close the battery cover. 3. B A Powering Your Camcorder Before operating your camera. • If the adapter is used next to a TV, it clicks into an AC outlet. 6. Plug the power cable...
ZR Instruction Manual
Page 8
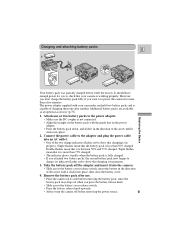
... charge: its side before removing the battery pack, since the battery pack may drop out when you to the power adapter. • Make sure the DC coupler is not connected. • Align the triangle on its indicator flashes red to show that the battery pack is capable of the arrow until it left the factory. Attach one after use. • Place the camera...
... charge: its side before removing the battery pack, since the battery pack may drop out when you to the power adapter. • Make sure the DC coupler is not connected. • Align the triangle on its indicator flashes red to show that the battery pack is capable of the arrow until it left the factory. Attach one after use. • Place the camera...
ZR Instruction Manual
Page 13
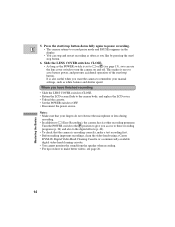
E • The camera returns to record pause mode and PAUSE reappears in the display. • You can use the lens cover switch to turn the camera on how to make a test recording first. • Before making important recordings, clean the video heads using a Canon DVM-CL Digital Video Head Cleaning Cassette or a commercially available digital video head cleaning cassette. • You cannot monitor the sound from the speaker when recording. • For tips on and off. Mastering the Basics Notes: • Make...
E • The camera returns to record pause mode and PAUSE reappears in the display. • You can use the lens cover switch to turn the camera on how to make a test recording first. • Before making important recordings, clean the video heads using a Canon DVM-CL Digital Video Head Cleaning Cassette or a commercially available digital video head cleaning cassette. • You cannot monitor the sound from the speaker when recording. • For tips on and off. Mastering the Basics Notes: • Make...
ZR Instruction Manual
Page 15
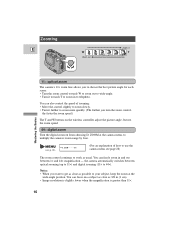
... zoom control, the faster the zoom speed.) The T and W buttons on the wireless controller adjust the picture angle, but not the zoom speed. 44× digital zoom Turn the digital zoom on a subject as close as usual. You can freely zoom in and out between optical zooming (up to 11×) and digital zooming (11× to work as possible to your subject, keep the zoom at the camera menu, to multiply the camera's zoom...
... zoom control, the faster the zoom speed.) The T and W buttons on the wireless controller adjust the picture angle, but not the zoom speed. 44× digital zoom Turn the digital zoom on a subject as close as usual. You can freely zoom in and out between optical zooming (up to 11×) and digital zooming (11× to work as possible to your subject, keep the zoom at the camera menu, to multiply the camera's zoom...
ZR Instruction Manual
Page 17
... LCD screen. No Cassette is loaded Exposure Adjustment Manual focus AF OFF 18 REC REC PAUSE EJECT STOP The tape has reached the end Condensation warning The battery pack is unaffected. This is a high precision product. Only certain displays are reversed (mirror mode) and the time code and remaining tape indicators disappear. You can watch yourself during mirror mode, but you must set it at the menu before turning the screen upright. The recording...
... LCD screen. No Cassette is loaded Exposure Adjustment Manual focus AF OFF 18 REC REC PAUSE EJECT STOP The tape has reached the end Condensation warning The battery pack is unaffected. This is a high precision product. Only certain displays are reversed (mirror mode) and the time code and remaining tape indicators disappear. You can watch yourself during mirror mode, but you must set it at the menu before turning the screen upright. The recording...
ZR Instruction Manual
Page 32
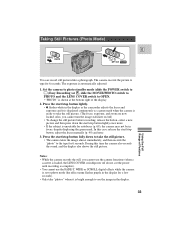
...; flashes white in focus, despite displaying the green mark. Also, you cannot use the camera functions (when a cassette is loaded, the LENS COVER switch/power off ) • To change the still picture before recording: release the button, select a new picture and then press down to tape for autofocus (p. 69), the camera may not be in the display as the camcorder adjusts the focus and exposure and it is automatically adjusted. 1. Taking Still Pictures (Photo Mode) MOVIE PHOTO E OFF VCR POWER Using...
...; flashes white in focus, despite displaying the green mark. Also, you cannot use the camera functions (when a cassette is loaded, the LENS COVER switch/power off ) • To change the still picture before recording: release the button, select a new picture and then press down to tape for autofocus (p. 69), the camera may not be in the display as the camcorder adjusts the focus and exposure and it is automatically adjusted. 1. Taking Still Pictures (Photo Mode) MOVIE PHOTO E OFF VCR POWER Using...
ZR Instruction Manual
Page 50
... SET. • Try to AUTO will probably work better than auto white balance when shooting: E Subjects with light from the P setting. • When the LENS COVER switch is set to the [ (Easy Recording) program. Notes: • Turn the digital zoom off (if neccessary) to set to CLOSE, the current white balance setting remains in the memory. • If you shoot with studio/video lighting, use the (indoor) mode. • During normal outdoor shooting, setting to record with one dominant color...
... SET. • Try to AUTO will probably work better than auto white balance when shooting: E Subjects with light from the P setting. • When the LENS COVER switch is set to the [ (Easy Recording) program. Notes: • Turn the digital zoom off (if neccessary) to set to CLOSE, the current white balance setting remains in the memory. • If you shoot with studio/video lighting, use the (indoor) mode. • During normal outdoor shooting, setting to record with one dominant color...
ZR Instruction Manual
Page 54
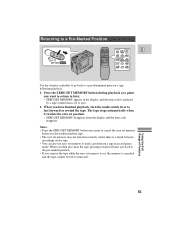
... to later. • ZERO SET MEMORY appears in record pause mode. Returning to a Pre-Marked Position OFF VCR POWER W T 2 WIRELESS CONTROLLER WL-D67 MENU ZERO SET MEMORY TV SCREEN DATA CODE SEARCH SELECT PAUSEa REW PLAYe FF STOP3 E Use the wireless controller to go back to a pre-determined point on a tape in the display, and the time code is replaced by a tape counter that is canceled and the tape counter reverts to fast forward...
... to later. • ZERO SET MEMORY appears in record pause mode. Returning to a Pre-Marked Position OFF VCR POWER W T 2 WIRELESS CONTROLLER WL-D67 MENU ZERO SET MEMORY TV SCREEN DATA CODE SEARCH SELECT PAUSEa REW PLAYe FF STOP3 E Use the wireless controller to go back to a pre-determined point on a tape in the display, and the time code is replaced by a tape counter that is canceled and the tape counter reverts to fast forward...
ZR Instruction Manual
Page 55
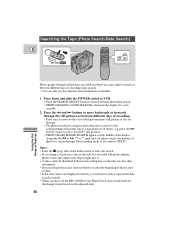
... recording mode is also shown (SP/LP). Press down and slide the POWER switch to VCR. • Press the SEARCH SELECT button to operate the date search correctly. • When you can only use this function from the Remote Controller. 1. press the button 5 times to move to the start just before or after the beginning of the located section. • If the data code is not displayed...
... recording mode is also shown (SP/LP). Press down and slide the POWER switch to VCR. • Press the SEARCH SELECT button to operate the date search correctly. • When you can only use this function from the Remote Controller. 1. press the button 5 times to move to the start just before or after the beginning of the located section. • If the data code is not displayed...

ZR Instruction Manual
Page 56
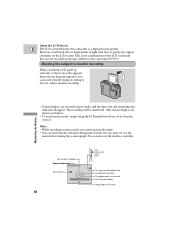
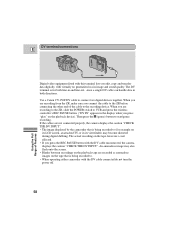
... set its input selector to remove unwanted scenes - Using the Full Range of the section you want to copy appears on the VCR as soon as the section you want to copy. 2. Start recording on the screen. 4. Pause the VCR at the end of the original. 57 S-150 S-video Cable STV-150 Stereo Video Cable V L R S INPUT S-VIDEO E VIDEO AUDIO L R Record the scenes you want to copy, then stop playback on the VCR. Connect the camera to VCR...
... set its input selector to remove unwanted scenes - Using the Full Range of the section you want to copy appears on the VCR as soon as the section you want to copy. 2. Start recording on the screen. 4. Pause the VCR at the end of the original. 57 S-150 S-video Cable STV-150 Stereo Video Cable V L R S INPUT S-VIDEO E VIDEO AUDIO L R Record the scenes you want to copy, then stop playback on the VCR. Connect the camera to VCR...
ZR Instruction Manual
Page 57
... "play" on the playback device). When you are recorded as anomalous images on the tape that is being recorded to . • When operating either camcorder with the DV cable connected do not turn the power off. 58 Using the Full Range of the cable to VCR and press the wireless controller's REC PAUSE button. ("DV IN" appears in both directions. The actual recording on the tape, however, is for example on its LCD screen, an...
... "play" on the playback device). When you are recorded as anomalous images on the tape that is being recorded to . • When operating either camcorder with the DV cable connected do not turn the power off. 58 Using the Full Range of the cable to VCR and press the wireless controller's REC PAUSE button. ("DV IN" appears in both directions. The actual recording on the tape, however, is for example on its LCD screen, an...
ZR Instruction Manual
Page 64
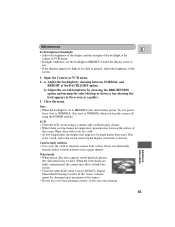
... camera off using the POWER switch.) LCD • Clean the LCD screen using Canon's DVM-CL Digital Video Head Cleaning Cassette. Wipe clean with a soft, dry cloth. • At low temperatures the display may show a blank blue screen. • Clean the video heads using a commercially available glass cleaner. • Where there is not a fault, and as a guide). 3. This is a big change in temperature, moisture may be much darker than usual. Maintenance E LCD (brightness/backlight) • Adjust...
... camera off using the POWER switch.) LCD • Clean the LCD screen using Canon's DVM-CL Digital Video Head Cleaning Cassette. Wipe clean with a soft, dry cloth. • At low temperatures the display may show a blank blue screen. • Clean the video heads using a commercially available glass cleaner. • Where there is not a fault, and as a guide). 3. This is a big change in temperature, moisture may be much darker than usual. Maintenance E LCD (brightness/backlight) • Adjust...
ZR Instruction Manual
Page 70
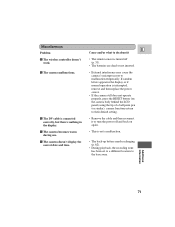
... operate properly, press the RESET button (on the camera body behind the LCD panel) using the tip of a ball point pen (or similar): camera functions return to their default setting. • Remove the cable and then reconnect it • The remote sensor is turned off and back on again. • This is not a malfunction. • The back-up battery needs recharging (p. 62). • During playback, the recording...
... operate properly, press the RESET button (on the camera body behind the LCD panel) using the tip of a ball point pen (or similar): camera functions return to their default setting. • Remove the cable and then reconnect it • The remote sensor is turned off and back on again. • This is not a malfunction. • The back-up battery needs recharging (p. 62). • During playback, the recording...
ZR Instruction Manual
Page 81
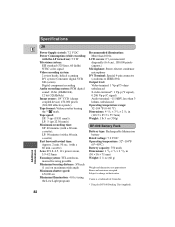
... system) Output level: Digital component recording Video terminal: 1 Vp-p/75 ohms Audio recording system: PCM digital unbalanced sound: 16 bit (48kHz/2ch), S-video terminal*: 1 Vp-p (Y signal), 12 bit (32kHz/4ch) 0.286 Vp-p (C signal) Image sensor: 1/4" CCD (charge Audio terminal: -11.5dBV, less than 3 coupled device) 470,000 pixels kohms, unbalanced (304,000 effective pixels) Operating temperature range: Tape format: Videocassettes bearing 32-104 °F (0-40 °C) the Mini mark...
... system) Output level: Digital component recording Video terminal: 1 Vp-p/75 ohms Audio recording system: PCM digital unbalanced sound: 16 bit (48kHz/2ch), S-video terminal*: 1 Vp-p (Y signal), 12 bit (32kHz/4ch) 0.286 Vp-p (C signal) Image sensor: 1/4" CCD (charge Audio terminal: -11.5dBV, less than 3 coupled device) 470,000 pixels kohms, unbalanced (304,000 effective pixels) Operating temperature range: Tape format: Videocassettes bearing 32-104 °F (0-40 °C) the Mini mark...
ZR Instruction Manual
Page 83
P E Pause, Record, 13 Photo Mode, 33 Photo Search, 56 Playback, 19 Playback Connection, 22 Playback pause, 20 Portrait, 38 Power Adapter, 8 Powering your camcoder, 8 Pre-Marked Position, 55 Preparing the Camera, 60 Problems, 68 R Recharging the Battery Pack, 61 Recording, 13 Recording Programs, 36 Record Pause Mode, 13 Record Review, 34 Record Search, 34 Remote Control, 31 Remote Sensor, 31 Rewind, 20 S Sand & Snow, 39 Screen Displays, 78 Scroll, 40 Self-Timer, 46 Sepia, 41 Shoulder Strap, 60 16:9, 43...
P E Pause, Record, 13 Photo Mode, 33 Photo Search, 56 Playback, 19 Playback Connection, 22 Playback pause, 20 Portrait, 38 Power Adapter, 8 Powering your camcoder, 8 Pre-Marked Position, 55 Preparing the Camera, 60 Problems, 68 R Recharging the Battery Pack, 61 Recording, 13 Recording Programs, 36 Record Pause Mode, 13 Record Review, 34 Record Search, 34 Remote Control, 31 Remote Sensor, 31 Rewind, 20 S Sand & Snow, 39 Screen Displays, 78 Scroll, 40 Self-Timer, 46 Sepia, 41 Shoulder Strap, 60 16:9, 43...


