
Users Manual - English
Page 2
... cord. 10. Special care is not intended for household use bent needles. 13. Do not pull or push fabric while stitching. Switch the machine to the "{" position to ensure that they do not play with this manual. Close attention is necessary when the... when making any adjustments in this machine. To disconnect the machine, set the main switch to be left unattended while plugged in the instruction manual. 16. Do not use . 1 This sewing machine is required around the machine needle. 11. Keep ventilation openings of the machine and foot controller free from the electrical...
... cord. 10. Special care is not intended for household use bent needles. 13. Do not pull or push fabric while stitching. Switch the machine to the "{" position to ensure that they do not play with this manual. Close attention is necessary when the... when making any adjustments in this machine. To disconnect the machine, set the main switch to be left unattended while plugged in the instruction manual. 16. Do not use . 1 This sewing machine is required around the machine needle. 11. Keep ventilation openings of the machine and foot controller free from the electrical...

Users Manual - English
Page 4
... Dial ...13 Stretch Stitching ...13 Stitch Width Dial ...14 Reverse Sewing Lever ...14 Drop Feed Lever (if the machine is equipped with a drop feed lever 14 THREADING THE MACHINE 15 Winding the Bobbin ...15 Lower Threading ...16 Upper Threading ...18 Using the Needle Threader (models equipped with a needle threader 19 Quick Thread-Setting System FAST START...
... Dial ...13 Stretch Stitching ...13 Stitch Width Dial ...14 Reverse Sewing Lever ...14 Drop Feed Lever (if the machine is equipped with a drop feed lever 14 THREADING THE MACHINE 15 Winding the Bobbin ...15 Lower Threading ...16 Upper Threading ...18 Using the Needle Threader (models equipped with a needle threader 19 Quick Thread-Setting System FAST START...
Users Manual - English
Page 14
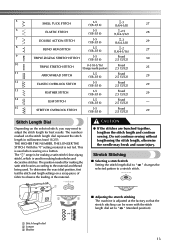
... according to the material and thread being used when sewing on a scrap piece of fabric to " SS " (standard position). 1 Stitch length dial 2 Longer 3 Shorter 13 Do not continue sewing without lengthening the stitch length, otherwise the needle may need to a stretch stitch. Stretch Stitching ■ Selecting a stretch stitch Setting the stitch length dial to " SS " changes the selected pattern...
... according to the material and thread being used when sewing on a scrap piece of fabric to " SS " (standard position). 1 Stitch length dial 2 Longer 3 Shorter 13 Do not continue sewing without lengthening the stitch length, otherwise the needle may need to a stretch stitch. Stretch Stitching ■ Selecting a stretch stitch Setting the stitch length dial to " SS " changes the selected pattern...

Users Manual - English
Page 17
...from older models are used, the machine will not operate correctly. Lower Threading CAUTION ● Setting the bobbin improperly may break the needle. 1 2 1 Wound evenly 2 Wound poorly 1 2 1 Wound evenly 2 Wound poorly ● The bobbin was designed specifically for this sewing machine. Use only the enclosed bobbin ... presser foot lever. Open the shuttle cover behind the extension 2 table on the foot controller and the machine starts to break. KNOWING YOUR SEWING MACHINE CAUTION ● Make sure you could be injured. If you accidentally step on the front of the...
...from older models are used, the machine will not operate correctly. Lower Threading CAUTION ● Setting the bobbin improperly may break the needle. 1 2 1 Wound evenly 2 Wound poorly 1 2 1 Wound evenly 2 Wound poorly ● The bobbin was designed specifically for this sewing machine. Use only the enclosed bobbin ... presser foot lever. Open the shuttle cover behind the extension 2 table on the foot controller and the machine starts to break. KNOWING YOUR SEWING MACHINE CAUTION ● Make sure you could be injured. If you accidentally step on the front of the...
Users Manual - English
Page 18
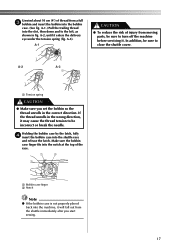
... be incorrect or break the needle. A-2 A-3 1 1 Tension spring CAUTION ● Make sure you start sewing. 17 Holding the bobbin case by the latch, fully 4 insert the bobbin case into the slot, then ...in the correct direction. Unwind about 10 cm (4") of thread from the shuttle immediately after you set the bobbin so the thread unrolls in fig. A-2, until it . Make sure the bobbin ...1 Bobbin case finger 2 Notch Note ● If the bobbin case is not properly placed back into the machine, it will fall out from a full 3 bobbin and insert the bobbin into the bobbin case. (See ...
... be incorrect or break the needle. A-2 A-3 1 1 Tension spring CAUTION ● Make sure you start sewing. 17 Holding the bobbin case by the latch, fully 4 insert the bobbin case into the slot, then ...in the correct direction. Unwind about 10 cm (4") of thread from the shuttle immediately after you set the bobbin so the thread unrolls in fig. A-2, until it . Make sure the bobbin ...1 Bobbin case finger 2 Notch Note ● If the bobbin case is not properly placed back into the machine, it will fall out from a full 3 bobbin and insert the bobbin into the bobbin case. (See ...
Users Manual - English
Page 19
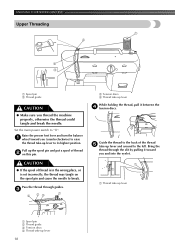
...● If the spool of thread is in the wrong place, or is set incorrectly, the thread may tangle on this pin. Pass the thread through the slit by pulling it toward you thread the machine properly, otherwise the thread could tangle and break the needle. Guide the thread to... Set the main power switch to break. Raise the presser foot lever and turn the balance 1 wheel toward you and into the eyelet. 1 1 1 Thread take-up lever 1 Spool pin 2 Thread guide 3 Tension discs 4 Thread take -up lever While holding the thread, pull it between the 4 tension discs. KNOWING YOUR SEWING MACHINE ...
...● If the spool of thread is in the wrong place, or is set incorrectly, the thread may tangle on this pin. Pass the thread through the slit by pulling it toward you thread the machine properly, otherwise the thread could tangle and break the needle. Guide the thread to... Set the main power switch to break. Raise the presser foot lever and turn the balance 1 wheel toward you and into the eyelet. 1 1 1 Thread take-up lever 1 Spool pin 2 Thread guide 3 Tension discs 4 Thread take -up lever While holding the thread, pull it between the 4 tension discs. KNOWING YOUR SEWING MACHINE ...
Users Manual - English
Page 20
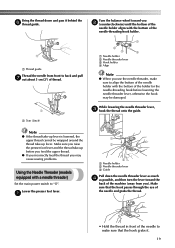
...and the thread take -up before lowering the needle threader lever, otherwise the hook may cause sewing problems. Using the Needle Threader (models equipped with the bottom of the needle to make sure... to align the bottom of the needle holder with a needle threader) Set the main power switch to back and pull 7 out about 5 cm (2") of thread. 1 1 5cm ...(2inch) Turn the balance wheel toward the back of the machine (away from you may be wrapped around the thread take -up lever. Lower the presser foot lever. 1 1 2 ...
...and the thread take -up before lowering the needle threader lever, otherwise the hook may cause sewing problems. Using the Needle Threader (models equipped with the bottom of the needle to make sure... to align the bottom of the needle holder with a needle threader) Set the main power switch to back and pull 7 out about 5 cm (2") of thread. 1 1 5cm ...(2inch) Turn the balance wheel toward the back of the machine (away from you may be wrapped around the thread take -up lever. Lower the presser foot lever. 1 1 2 ...
Users Manual - English
Page 21
... Shuttle Close the shuttle cover while pulling the 2 thread through the needle. 1 2 1 1 Hook 2 Thread Quick Thread-Setting System FAST START BOBBIN (models equipped with home sewing machine needles size 75/11-100/16. You can only use the needle threader if you wish. CAUTION ● The needle threader ...can only be used with a quick thread-setting system) This new system allows you are using transparent nylon...
... Shuttle Close the shuttle cover while pulling the 2 thread through the needle. 1 2 1 1 Hook 2 Thread Quick Thread-Setting System FAST START BOBBIN (models equipped with home sewing machine needles size 75/11-100/16. You can only use the needle threader if you wish. CAUTION ● The needle threader ...can only be used with a quick thread-setting system) This new system allows you are using transparent nylon...
Users Manual - English
Page 22
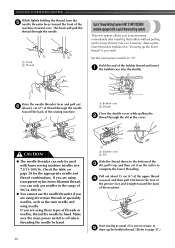
... cause the needle to lower, then raise the needle. The needle could break, and damage the machine. ● When using the twin needle, make sure the stitch width dial is not set above "3" since this machine (part code: X57521-001). While lightly holding the end of thread onto the extra spool pin.... 1 1 Extra spool pin 2 1 Upper thread 2 Lower thread 21 You can sew with this needle and two top threads....
... cause the needle to lower, then raise the needle. The needle could break, and damage the machine. ● When using the twin needle, make sure the stitch width dial is not set above "3" since this machine (part code: X57521-001). While lightly holding the end of thread onto the extra spool pin.... 1 1 Extra spool pin 2 1 Upper thread 2 Lower thread 21 You can sew with this needle and two top threads....

Users Manual - English
Page 23
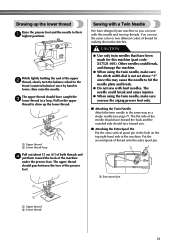
...thread the twin needle. Locks appear on your project. ● The basic thread tension setting is too tight. Using the needle threader may need to adjust it when you pass ... However, do not pass the thread through the thread guide above the needle before starting your stitches. Bobbin Increase the tension in a clockwise direction. See page 18 for threading a single needle... The tension of the thread will appear on the surface of the fabric. KNOWING YOUR SEWING MACHINE ■ Twin Needle Threading You should thread each needle separately. Upper tension control dial Decrease...
...thread the twin needle. Locks appear on your project. ● The basic thread tension setting is too tight. Using the needle threader may need to adjust it when you pass ... However, do not pass the thread through the thread guide above the needle before starting your stitches. Bobbin Increase the tension in a clockwise direction. See page 18 for threading a single needle... The tension of the thread will appear on the surface of the fabric. KNOWING YOUR SEWING MACHINE ■ Twin Needle Threading You should thread each needle separately. Upper tension control dial Decrease...
Users Manual - English
Page 26
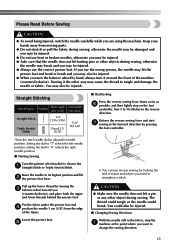
You may cause the thread to tangle and damage the needle or fabric. Setting the dial to choose the 1 Straight Stitch or Triple Stretch Stitch. setting the dial to "0" selects the right needle position. ■ Starting Sewing Turn the pattern selection dial to "5" selects the left needle position; Raise the...balance wheel by hand, always turn it the other object during sewing, otherwise the needle may be damaged and you may be injured. ■ Changing Sewing Direction With the needle still in the fabric, stop the 1 machine at the point where you (counterclockwise), and place both the...
You may cause the thread to tangle and damage the needle or fabric. Setting the dial to choose the 1 Straight Stitch or Triple Stretch Stitch. setting the dial to "0" selects the right needle position. ■ Starting Sewing Turn the pattern selection dial to "5" selects the left needle position; Raise the...balance wheel by hand, always turn it the other object during sewing, otherwise the needle may be damaged and you may be injured. ■ Changing Sewing Direction With the needle still in the fabric, stop the 1 machine at the point where you (counterclockwise), and place both the...
Users Manual - English
Page 27
... YOUR SEWING MACHINE Raise the presser foot and turn the fabric to its 2 new direction using the Straight Stitch at its highest position and make sure that you sew using the needle as a turning point for sewing stretch fabrics. Lift the presser foot and pull the fabric out 2 gently to the Zigzag Stitch, set the stitch length in...
... YOUR SEWING MACHINE Raise the presser foot and turn the fabric to its 2 new direction using the Straight Stitch at its highest position and make sure that you sew using the needle as a turning point for sewing stretch fabrics. Lift the presser foot and pull the fabric out 2 gently to the Zigzag Stitch, set the stitch length in...
Users Manual - English
Page 29
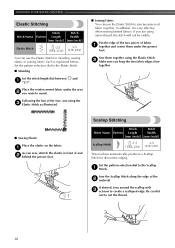
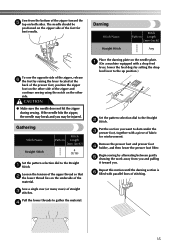
...foot. Set the pattern selection dial to create a scalloped edge. Each is very effective when sewing knitted fabrics. Set the pattern selection dial to the Elastic Stitch. ■ Mending Set the stitch length ...Stitching Stitch Stitch Stitch Name Pattern Length Width [mm (inch)] [mm (inch)] Scallop Stitch -1.5 3-5 (1/64-1/16) (1/8-3/16) This machine automatically produces a Scallop Stitch for mending, sewing elastic or joining fabric. KNOWING YOUR SEWING MACHINE Elastic Stitching Stitch Stitch Stitch Name Pattern Length Width [mm (inch)] [mm (inch)] Elastic Stitch...
...foot. Set the pattern selection dial to create a scalloped edge. Each is very effective when sewing knitted fabrics. Set the pattern selection dial to the Elastic Stitch. ■ Mending Set the stitch length ...Stitching Stitch Stitch Stitch Name Pattern Length Width [mm (inch)] [mm (inch)] Scallop Stitch -1.5 3-5 (1/64-1/16) (1/8-3/16) This machine automatically produces a Scallop Stitch for mending, sewing elastic or joining fabric. KNOWING YOUR SEWING MACHINE Elastic Stitching Stitch Stitch Stitch Name Pattern Length Width [mm (inch)] [mm (inch)] Elastic Stitch...
Users Manual - English
Page 31
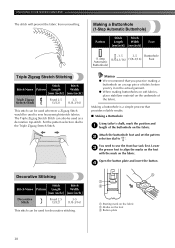
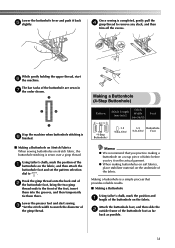
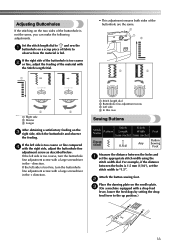
... on soft fabrics, place stabilizer material on the underside of the buttonhole on the fabric. KNOWING YOUR SEWING MACHINE The stitch will prevent the fabric from unravelling. Set the pattern selection dial to " ". Making a Buttonhole (1-Step Automatic Buttonhole) Stitch Stitch Pattern Length Width Foot [mm (inch)] [mm (inch)] -1.5 3-5 Buttonhole (1-Step (1/64-1/16) (1/8-3/16) Foot Automatic Buttonhole...
... on soft fabrics, place stabilizer material on the underside of the buttonhole on the fabric. KNOWING YOUR SEWING MACHINE The stitch will prevent the fabric from unravelling. Set the pattern selection dial to " ". Making a Buttonhole (1-Step Automatic Buttonhole) Stitch Stitch Pattern Length Width Foot [mm (inch)] [mm (inch)] -1.5 3-5 Buttonhole (1-Step (1/64-1/16) (1/8-3/16) Foot Automatic Buttonhole...
Users Manual - English
Page 32
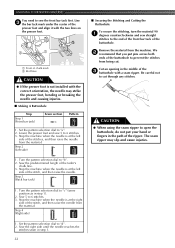
... the buttonhole foot, and then slide the 2 outside frame of the gimp thread. Lower the presser foot and start 6 the machine. PUSH PUSH PUSH While gently holding the upper thread, start sewing. 3 *Set the stitch width to " ". Hook the gimp thread onto the back end of 2 the buttonhole foot, bring the two gimp thread...
... the buttonhole foot, and then slide the 2 outside frame of the gimp thread. Lower the presser foot and start 6 the machine. PUSH PUSH PUSH While gently holding the upper thread, start sewing. 3 *Set the stitch width to " ". Hook the gimp thread onto the back end of 2 the buttonhole foot, bring the two gimp thread...
Users Manual - English
Page 33
... being cut through any stitches. Set the pattern selection dial to sew the front bar tack first. KNOWING YOUR SEWING MACHINE You need to "d". 2. Stop the machine when the needle is at the left side of the stitch, and then raise the needle from the material. Set the pattern selection dial to 6 stitches. 3. Stop the machine when the needle is...
... being cut through any stitches. Set the pattern selection dial to sew the front bar tack first. KNOWING YOUR SEWING MACHINE You need to "d". 2. Stop the machine when the needle is at the left side of the stitch, and then raise the needle from the material. Set the pattern selection dial to 6 stitches. 3. Stop the machine when the needle is...
Users Manual - English
Page 34
... screw as described below. If the left side is 1.5 mm (1/16"), set the appropriate stitch width using the stitch width dial. direction. Set the stitch length dial to the up position.) 33 Attach the button sewing foot. 2 Place the darning plate on a scrap piece of the buttonhole...)] Zigzag Stitch (1/64) Button Any Sewing Foot Measure the distance between the holes is too coarse, turn the buttonhole fine adjustment screw with a drop feed lever, lower the feed dogs by setting the drop feed lever to " " and sew the 1 buttonhole on the needle plate. 3 (On a machine equipped with...
... screw as described below. If the left side is 1.5 mm (1/16"), set the appropriate stitch width using the stitch width dial. direction. Set the stitch length dial to the up position.) 33 Attach the button sewing foot. 2 Place the darning plate on a scrap piece of the buttonhole...)] Zigzag Stitch (1/64) Button Any Sewing Foot Measure the distance between the holes is too coarse, turn the buttonhole fine adjustment screw with a drop feed lever, lower the feed dogs by setting the drop feed lever to " " and sew the 1 buttonhole on the needle plate. 3 (On a machine equipped with...

Users Manual - English
Page 35
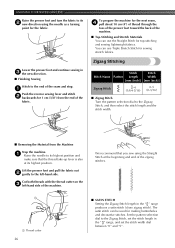
... of the zipper foot. 1 2 Remove the material from the machine. If it hits, see step 1. When sewing the right side of the zipper, attach the presser foot holder to the left or right side of the zipper Set the pattern selection dial to the Straight 1 Stitch (center needle position (2.5 mm (3/32")). CAUTION ● Turn...
... of the zipper foot. 1 2 Remove the material from the machine. If it hits, see step 1. When sewing the right side of the zipper, attach the presser foot holder to the left or right side of the zipper Set the pattern selection dial to the Straight 1 Stitch (center needle position (2.5 mm (3/32")). CAUTION ● Turn...
Users Manual - English
Page 36
... the lower threads to the Straight 2 Stitch. Begin sewing by setting the drop feed lever to the up position.) Set the pattern selection dial to gather the material. 4 Place the darning plate on the other side of the zipper and continue sewing using the notch on the needle plate. 1 (On a machine equipped with a drop feed lever...
... the lower threads to the Straight 2 Stitch. Begin sewing by setting the drop feed lever to the up position.) Set the pattern selection dial to gather the material. 4 Place the darning plate on the other side of the zipper and continue sewing using the notch on the needle plate. 1 (On a machine equipped with a drop feed lever...
Users Manual - English
Page 37
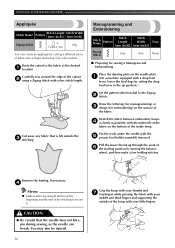
...with your thumbs and 7 forefingers while pressing the fabric with your little fingers. 36 KNOWING YOUR SEWING MACHINE Appliqués Stitch Name Pattern Stitch Length [mm (inch)] Stitch Width [mm (inch)] Zigzag Stitch -2 Any (1/64-1/16) You can break. Stretch the fabric between embroidery hoops 4 as firmly... embroidering) on the needle plate. 1 (On a machine equipped with a drop feed lever, lower the feed dogs by cutting a different piece of the stitching to the Zigzag 2 Stitch. Pull the lower thread up position.) Set the pattern selection dial to secure it as possible, ...
...with your thumbs and 7 forefingers while pressing the fabric with your little fingers. 36 KNOWING YOUR SEWING MACHINE Appliqués Stitch Name Pattern Stitch Length [mm (inch)] Stitch Width [mm (inch)] Zigzag Stitch -2 Any (1/64-1/16) You can break. Stretch the fabric between embroidery hoops 4 as firmly... embroidering) on the needle plate. 1 (On a machine equipped with a drop feed lever, lower the feed dogs by cutting a different piece of the stitching to the Zigzag 2 Stitch. Pull the lower thread up position.) Set the pattern selection dial to secure it as possible, ...


