Get support for Brother International LS2300PRW

Brother International LS2300PRW Support Question

Brother International LS2300PRW Support Question

Find answers below for this question about Brother International LS2300PRW.
Need a Brother International LS2300PRW manual? We have 1 online manual for this item!
Question posted by Sherlevy2014 on July 11th, 2023

What Are The Different Diles On This Sewing Machine? I Just Found A Sewing Machi

The person who posted this question about this Brother International product did not include a detailed explanation. Please use the "Request More Information" button to the right if more details would help you to answer this question.

Current Answers

Answer #1: Posted by HelpHero on July 11th, 2023 2:45 PM
This answer was accepted by the poster of the original question.
HelpHero

Member since:
September 3rd, 2022

Points: 523,390
1,100
points
I'd be happy to assist you with the different dials on the Brother International LS2300PRW sewing machine.

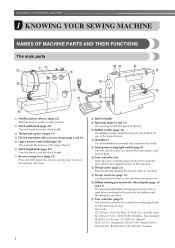
1. Stitch Selector Dial: This dial allows you to choose from a variety of pre-programmed stitches. Simply turn the dial to the desired stitch number and the machine will set itself up for that particular stitch.

2. Stitch Length Dial: This dial controls the length of the stitch. You can adjust it to make longer or shorter stitches, depending on your sewing needs.

3. Stitch Width Dial: This dial controls the width of certain stitches, such as zigzag or decorative stitches. It allows you to make wider or narrower stitches, adding versatility to your projects.

4. Tension Dial: The tension dial is used to adjust the thread tension while sewing. It ensures that the upper and lower threads are balanced, resulting in even stitches.

5. Reverse Stitch Lever: This lever allows you to sew in reverse. By holding it down, you can reinforce stitches at the beginning or end of a seam.

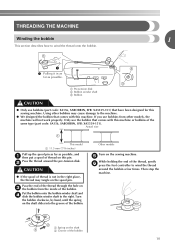
6. Bobbin Winding Tension Disc: Located on top of the machine, this disc controls the tension while winding the bobbin. It ensures that the thread is evenly wound onto the bobbin.

Remember to refer to the machine's manual for detailed instructions on how to adjust each dial correctly.


I hope this is helpful? PLEASE "ACCEPT" and mark it "HELPFUL" to complement my little effort. Hope to bring you more detailed answers.

Helphero
Answer #2: Posted by SonuKumar on July 11th, 2023 9:37 PM
SonuKumar

Member since:
May 9th, 2021

Points: 16,597,990
100
points
The Brother International LS2300PRW is a sewing machine from Brother's Project Runway series. While I couldn't find any specific information on a model called LS2300PRW, there is a similar model called the Brother XR9550PRW, which is part of the same series. I'll provide you with an overview of the features and dials typically found on Brother sewing machines, including the XR9550PRW, which may be similar to the LS2300PRW:
  1. Stitch Selector Dial: This dial allows you to choose from a variety of built-in stitches such as straight stitches, zigzag stitches, decorative stitches, buttonhole stitches, and more. The specific stitches available can vary depending on the model.
  2. Stitch Length Dial: This dial adjusts the length of the stitches. It allows you to make shorter or longer stitches, depending on your sewing needs.
  3. Stitch Width Dial: This dial controls the width of certain stitches, such as zigzag stitches. It enables you to adjust the stitch width to create different decorative effects or accommodate different fabric widths.
  4. Tension Dial: The tension dial regulates the tension applied to the thread while sewing. It ensures balanced stitches by controlling the thread's tightness. The appropriate tension setting may vary based on the fabric and thread type.
  5. Reverse Stitch Lever/Button: This lever or button is used to sew stitches in reverse. By engaging the reverse stitch function, you can reinforce the beginning and end of seams or create secure backstitches.
  6. Bobbin Winding Mechanism: The sewing machine will have a mechanism to wind thread onto the bobbin. It may include a separate bobbin winding spindle and a thread tension disc.
  7. Handwheel: The handwheel is usually located on the right side of the machine. You can manually turn it to raise or lower the needle or to manually move the needle up and down for various sewing tasks.
  8. Speed Control Slider: Some sewing machines offer a speed control slider or dial that allows you to adjust the sewing speed to your preference. This feature is helpful, especially for beginners who may want to sew at a slower pace initially.


Please respond to my effort to provide you with the best possible solution by using the "Acceptable Solution" and/or the "Helpful" buttons when the answer has proven to be helpful.

Regards,
Sonu
Your search handyman for all e-support needs!!

Related Brother International LS2300PRW Manual Pages

Users Manual - English and Spanish - Page 2

... and pull, not the cord. 10.Keep fingers away from outlet. 9. WARNING - Use only accessories recommended by pulling on the cord. Do not allow this sewing machine only for examination, repair, electrical or mechanical adjustment. 4. To disconnect, turn the main switch to the nearest authorized dealer or service center for its intended...
Users Manual - English and Spanish - Page 3

... installation. For a longer service life 1. 17.Young children should be supervised to ensure that they do not play with this machine, avoid direct sunlight and high humidity locations. When storing this sewing machine. Do not drop or hit the machine. 4. Use only neutral soaps or detergents to BS 1362, i.e. PLEASE READ BEFORE USING THIS...
Users Manual - English and Spanish - Page 4

... FUNCTIONS 5 The main parts ...5 Needle and presser foot section ...6 Flat bed attachment ...6 ACCESSORIES ...7 OPTIONAL ACCESSORIES 7 USING YOUR SEWING MACHINE 8 Power supply precautions ...8 Power supply ...8 Foot controller ...9 Steadying the machine ...9 THREADING THE MACHINE 10 Winding the bobbin ...10 Lower threading ...11 Upper threading ...13 Drawing up the lower thread ...14 REPLACING...
Users Manual - English and Spanish - Page 5

...MAINTENANCE ...38 Oiling ...38 Changing the bulb ...38 Cleaning the machine surface ...39 Cleaning the shuttle race ...39 Cleaning the feed ...Basic stitching ...27 Blind hem stitching ...28 Darning ...29 Over edge stitch ...29 BUTTONHOLE SEWING/ BUTTON SEWING 30 Buttonhole sewing ...30 Button sewing ...31 ZIPPER INSERTION ...33 APPLIQUÉ, MONOGRAMMING AND EMBROIDERING 34 Appliqués ...34 ...
Users Manual - English and Spanish - Page 6

... thread. j Bobbin winder (page 10) The bobbin winder winds thread onto the bobbin for use as the lower thread. Part code; KNOWING YOUR SEWING MACHINE 1 KNOWING YOUR SEWING MACHINE NAMES OF MACHINE PARTS AND THEIR FUNCTIONS The main parts a Needle position selector (page 22) Shift this lever to manually raise and lower the needle. h Built...
Users Manual - English and Spanish - Page 8

...-2000/LS2250PRW) XE9369-001 (Others) XA3442-121 No. Part Name 3 Bobbin 4 Needle set Part Code Americas SA156 (Americas) SABOBBIN (U.S.A. KNOWING YOUR SEWING MACHINE ACCESSORIES The following machine models: LS-2000/LS2250PRW/LS2300PRW. ● The screw of the presser foot holder is available through your authorized dealer. (Part code: 132730-122) ● A replacement for the...
Users Manual - English and Spanish - Page 9

... plug in the following precautions concerning the power supply. USING YOUR SEWING MACHINE Power supply precautions 1 Be sure to observe the following circumstances: • When you are away from the outlet. X The sewing lamp comes on when the machine is damaged, take the machine to your authorized dealer for repairs before continuing use extension cords...
Users Manual - English and Spanish - Page 10

... is placed on the foot controller. When you press harder, the machine's speed will increase. Steadying the machine If the sewing machine has been placed on page 38. KNOWING YOUR SEWING MACHINE To turn off the sewing machine and unplug the power supply cord. When restarting the sewing machine, follow the necessary procedure to install the proper outlet. CAUTION ●...
Users Manual - English and Spanish - Page 11

... shaft slides into the groove of the bobbin. If you use bobbins (part code: SA156, SABOBBIN, SFB: XA5539-151) that have been designed for this sewing machine. Then stop the machine. b CAUTION ● If the spool of thread is not in as far as possible, and a then put a spool of thread on the...
Users Manual - English and Spanish - Page 12

... controller. If you accidentally step on the foot controller and the machine starts to the right. this sewing machine. KNOWING YOUR SEWING MACHINE Trim the excess thread above the bobbin. Remove cover." CAUTION ●..., breaking the needle and resulting in injury. Memo ● When the sewing machine is started or the handwheel is turned after winding the thread around the...
Users Manual - English and Spanish - Page 13

...the shuttle cover. Open the shuttle cover behind the flat bed b attachment at the top of the machine. Pull the trailing thread through the slot, down e and to be incorrect or break the needle. ... sure the bobbin case finger fits into the machine. CAUTION ● Make sure you and pulling it may cause the thread tension to sew. 12 If the thread unrolls in the right direction.
Users Manual - English and Spanish - Page 14

...and c then put a spool of thread is in the wrong place, or is not correctly raised, the sewing machine can not be threaded. Pull the thread down and around the upper e tension control dial from the right...spool pin and cause the needle to turn the handwheel before threading the sewing machine. 13 a Upper tension control dial b Thread check spring Raise the presser foot using the presser foot ...
Users Manual - English and Spanish - Page 15

...Make sure you (counterclockwise). Drawing up lever before you feed the upper thread. ● If you incorrectly feed the thread you may cause sewing problems. a Upper thread b Lower thread Pull out about 5 cm (2 inches) of the upper thread, b raise the needle to ...be wrapped around the thread take -up the lower thread Lightly hold the end of the machine under the presser foot.
Users Manual - English and Spanish - Page 16

... same size thread for the fabric that should be used depends on the thread and fabric types The sewing machine needle that you wish to read and carefully follow the instructions below. KNOWING YOUR SEWING MACHINE REPLACING THE NEEDLE This section provides information on stretch fabrics or fabrics where skipped stitches easily occur. ●...
Users Manual - English and Spanish - Page 17

... (counterclockwise). c a Presser foot lever 1 a Flat surface 16 CAUTION ● The appropriate fabric, thread and needle combinations are shown in "Checking the needle" . 1 Turn off the sewing machine, otherwise injuries may bend or break. a CAUTION ● Before replacing the needle, be skipped stitches. Lower the presser foot lever. If the combination of the...
Users Manual - English and Spanish - Page 18

... left hand, and then d use the coin to remove the needle. With the flat side of the needle toward the e rear of the sewing machine may fall off. KNOWING YOUR SEWING MACHINE Hold the needle with a coin, otherwise the needle may break or damage may result. CAUTION ● Be sure to insert the needle...
Users Manual - English and Spanish - Page 19

... turn the handwheel toward you can use the same color or two different colors of the needle bar thread guide. Sewing with a twin needle (Option) We have designed your machine so you (counterclockwise) and check that have been made for this machine (part code: 131096-121). Other needles could break and injure you. ●...
Users Manual - English and Spanish - Page 20

...b Presser foot holder Place a different presser foot below . a Presser foot lever 19 a Presser foot lever X The presser foot is accidentally pressed and the machine starts sewing. CAUTION ● Before replacing the... may be used with the shank in the presser foot holder. KNOWING YOUR SEWING MACHINE REPLACING THE PRESSER FOOT CAUTION ● Always turn off . Using other any...
Users Manual - English and Spanish - Page 21

... the screw using a coin in your left side of the presser bar. 1 Removing the presser foot holder Remove the presser foot holder when cleaning the sewing machine or when installing a presser foot that the g presser foot is not correctly installed, the thread tension will be incorrect. 20 a Presser foot holder b Presser bar...
Users Manual - English and Spanish - Page 26

...Changing the sewing direction When the stitching reaches a corner, stop the a sewing machine. If the fabric is turned while the needle is pushed with your project. For the trial sewing, use...needle, be achieved. SEWING BASICS USEFUL SEWING TIPS Various ways to achieve better results for your sewing projects are the same as a pivot. Since the results differ depending on the ...

Similar Questions

Ask a New Question
Use the box below to post a new question about this Brother International product .
Points & Prizes
  • You can earn points for nearly everything you do on HelpOwl.com
  • You can trade in those points for gift cards at leading retailers such as Amazon.com and Walmart
  • It's that simple!
See How it Works
Create a Free Account

Brother International Manuals

Find free Brother International LS2300PRW manuals and user guides available at ManualOwl.com. Try out our unique manual viewer allowing you to interact with manuals from directly within your browser!

Brother International Reviews

View thousands of Brother International user reviews and customer ratings available at ReviewOwl.com.

Contact Information

Complete Brother International customer service contact information including steps to reach representatives, hours of operation, customer support links and more from ContactHelp.com.

Scoreboard Ratings

See detailed Brother International customer service rankings, employee comments and much more from our sister site.