
Users Manual - English
Page 2
... needle, threading the bobbin, or changing the presser foot. 15. IMPORTANT SAFETY INSTRUCTIONS When using it and before you change the light bulb. Use only accessories recommended by young children or infirm persons without supervision. 17. SAVE THESE INSTRUCTIONS This machine is used or where oxygen is required around the machine needle. 11. To reduce the risk of the machine and foot controller free from the electrical outlet immediately after using this machine. Never drop...
... needle, threading the bobbin, or changing the presser foot. 15. IMPORTANT SAFETY INSTRUCTIONS When using it and before you change the light bulb. Use only accessories recommended by young children or infirm persons without supervision. 17. SAVE THESE INSTRUCTIONS This machine is used or where oxygen is required around the machine needle. 11. To reduce the risk of the machine and foot controller free from the electrical outlet immediately after using this machine. Never drop...

Users Manual - English
Page 4
...PRINCIPAL PARTS ...4 ACCESSORIES ...5 USING YOUR SEWING MACHINE 6 Connecting Plugs ...6 Main Power/Sewing Light Switch ...7 Foot Controller ...7 Inserting the Needle ...7 Checking the Needle ...8 Changing the Presser Foot ...8 Converting to Free-arm Style ...9 Steadying the Machine ...9 THE CONTROLS ...10 Pattern Selection Dial ...10 Recommended Widths and Lengths for Stitches 11 Stitch Length Dial ...13 Stretch Stitching ...13 Stitch Width Dial ...14 Reverse Sewing Lever ...14 Drop Feed Lever (if the machine is equipped with a drop feed lever 14 THREADING THE MACHINE 15 Winding the Bobbin...
...PRINCIPAL PARTS ...4 ACCESSORIES ...5 USING YOUR SEWING MACHINE 6 Connecting Plugs ...6 Main Power/Sewing Light Switch ...7 Foot Controller ...7 Inserting the Needle ...7 Checking the Needle ...8 Changing the Presser Foot ...8 Converting to Free-arm Style ...9 Steadying the Machine ...9 THE CONTROLS ...10 Pattern Selection Dial ...10 Recommended Widths and Lengths for Stitches 11 Stitch Length Dial ...13 Stretch Stitching ...13 Stitch Width Dial ...14 Reverse Sewing Lever ...14 Drop Feed Lever (if the machine is equipped with a drop feed lever 14 THREADING THE MACHINE 15 Winding the Bobbin...

Users Manual - English
Page 5
... the reverse direction. A Buttonhole fine adjustment screw (page 33) B Buttonhole lever (1-Step automatic buttonhole) (page 30) C Needle threader (page 19) This is only available on certain models. 4 D Handle E Balance wheel Turn toward you want. 9 Stitch length dial (page 13) This controls the length of the upper thread. 7 Stitch width dial (page 14) This controls the stitch width. 8 Pattern selection dial (page 10) You can turn the main power and sewing light on and off. KNOWING YOUR SEWING MACHINE PRINCIPAL PARTS 1 Bobbin-winding assembly (page...
... the reverse direction. A Buttonhole fine adjustment screw (page 33) B Buttonhole lever (1-Step automatic buttonhole) (page 30) C Needle threader (page 19) This is only available on certain models. 4 D Handle E Balance wheel Turn toward you want. 9 Stitch length dial (page 13) This controls the length of the upper thread. 7 Stitch width dial (page 14) This controls the stitch width. 8 Pattern selection dial (page 10) You can turn the main power and sewing light on and off. KNOWING YOUR SEWING MACHINE PRINCIPAL PARTS 1 Bobbin-winding assembly (page...

Users Manual - English
Page 8
...; Never sew with Models XL-5500/XL-5600/XL-5700/ XL-5510/XL-5610/XL-5710. . If it still does not fit, contact a qualified electrician to build up on the foot controller, the machine will start and you press harder, the machine's speed will stop. Foot Controller When you change the needle. A bent needle will run at a low speed. only) ● Foot Controller: Model KD-1902 This foot controller can be injured. ● Only use sewing-machine needles for home use...
...; Never sew with Models XL-5500/XL-5600/XL-5700/ XL-5510/XL-5610/XL-5710. . If it still does not fit, contact a qualified electrician to build up on the foot controller, the machine will start and you press harder, the machine's speed will stop. Foot Controller When you change the needle. A bent needle will run at a low speed. only) ● Foot Controller: Model KD-1902 This foot controller can be injured. ● Only use sewing-machine needles for home use...
Users Manual - English
Page 9
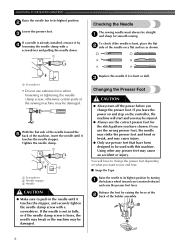
... position. 2 Lower the presser foot. 3 If a needle is already installed, remove it by 4 loosening the needle clamp with a screwdriver. KNOWING YOUR SEWING MACHINE Raise the needle bar to be used with this machine. To check if the needle is bent, place the flat 2 side of the needle on what you want to sew and how. ■ Snap-On Type Raise the needle to push in fully, or if the needle clamp screw is loose...
... position. 2 Lower the presser foot. 3 If a needle is already installed, remove it by 4 loosening the needle clamp with a screwdriver. KNOWING YOUR SEWING MACHINE Raise the needle bar to be used with this machine. To check if the needle is bent, place the flat 2 side of the needle on what you want to sew and how. ■ Snap-On Type Raise the needle to push in fully, or if the needle clamp screw is loose...
Users Manual - English
Page 10
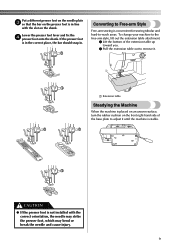
... sewing tubular and hard-to Free-arm Style Free-arm sewing is in the correct place, the bar should snap in line with the correct orientation, the needle may strike the presser foot, which may bend or break the needle and cause injury. 9 Converting to -reach areas. To change your machine to the free-arm style, lift out the extension table attachment. 1 Lift the bottom of the base plate to remove...
... sewing tubular and hard-to Free-arm Style Free-arm sewing is in the correct place, the bar should snap in line with the correct orientation, the needle may strike the presser foot, which may bend or break the needle and cause injury. 9 Converting to -reach areas. To change your machine to the free-arm style, lift out the extension table attachment. 1 Lift the bottom of the base plate to remove...
Users Manual - English
Page 14
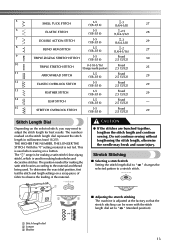
... NUMBER, THE LONGER THE STITCH. To determine the exact dial position, first test the stitch and length settings on a scrap piece of the material. Do not continue sewing without lengthening the stitch length, otherwise the needle may need to a stretch stitch. SS 1 10 2 2 3 1 ■ Adjusting the stretch stitching The machine is used for best results. The position needed for making buttonholes and decorative stitches. 5 SHELL TUCK STITCH 3-5 (1/8-3/16) -3 (1/64-1/8) 27 6 ELASTIC STITCH 3-5 (1/8-3/16) -2.5 (1/64-3/32) 28 7 DOUBLE ACTION STITCH...
... NUMBER, THE LONGER THE STITCH. To determine the exact dial position, first test the stitch and length settings on a scrap piece of the material. Do not continue sewing without lengthening the stitch length, otherwise the needle may need to a stretch stitch. SS 1 10 2 2 3 1 ■ Adjusting the stretch stitching The machine is used for best results. The position needed for making buttonholes and decorative stitches. 5 SHELL TUCK STITCH 3-5 (1/8-3/16) -3 (1/64-1/8) 27 6 ELASTIC STITCH 3-5 (1/8-3/16) -2.5 (1/64-3/32) 28 7 DOUBLE ACTION STITCH...
Users Manual - English
Page 15
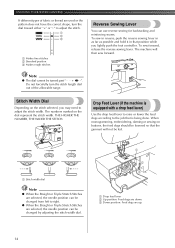
... Stretch Stitches are selected, the needle position can use reverse sewing for backtacking and reinforcing seams. To sew in reverse, push the reverse sewing lever in as far as possible and hold it in that position while you may need to the job that the garment will then sew forward. Note ● The dial cannot be changed by adjusting the stitch width dial. . 1 2 3 1 Drop feed lever 2 Up position: Feed dogs are down. 3 Down position: Feed dogs are up. 14 When monogramming, embroidering, darning...
... Stretch Stitches are selected, the needle position can use reverse sewing for backtacking and reinforcing seams. To sew in reverse, push the reverse sewing lever in as far as possible and hold it in that position while you may need to the job that the garment will then sew forward. Note ● The dial cannot be changed by adjusting the stitch width dial. . 1 2 3 1 Drop feed lever 2 Up position: Feed dogs are down. 3 Down position: Feed dogs are up. 14 When monogramming, embroidering, darning...
Users Manual - English
Page 16
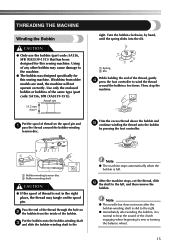
... ● The needle bar does not move after the bobbin-winding shaft is slid to the machine. ● The bobbin was designed specifically for this sewing machine. Turn the bobbin clockwise, by pressing the foot controller. 1 2 1 Bobbin-winding tension disc 2 Bobbin-winding shaft CAUTION ● If the spool of the clutch engaging when beginning to the left, and then remove the bobbin. If bobbins from the inside of the same type (part code: SA156, SFB...
... ● The needle bar does not move after the bobbin-winding shaft is slid to the machine. ● The bobbin was designed specifically for this sewing machine. Turn the bobbin clockwise, by pressing the foot controller. 1 2 1 Bobbin-winding tension disc 2 Bobbin-winding shaft CAUTION ● If the spool of the clutch engaging when beginning to the left, and then remove the bobbin. If bobbins from the inside of the same type (part code: SA156, SFB...

Users Manual - English
Page 17
... YOUR SEWING MACHINE CAUTION ● Make sure you turn the power off while threading the machine. Open the shuttle cover behind the extension 2 table on the foot controller and the machine starts to work, you (counterclockwise) and raise the presser foot lever. If bobbins from older models are used, the machine will not operate correctly. Lower Threading CAUTION ● Setting the bobbin improperly may tangle around the bobbin and cause the needle to loosen, breaking the needle and resulting in injury. Actual size...
... YOUR SEWING MACHINE CAUTION ● Make sure you turn the power off while threading the machine. Open the shuttle cover behind the extension 2 table on the foot controller and the machine starts to work, you (counterclockwise) and raise the presser foot lever. If bobbins from older models are used, the machine will not operate correctly. Lower Threading CAUTION ● Setting the bobbin improperly may tangle around the bobbin and cause the needle to loosen, breaking the needle and resulting in injury. Actual size...
Users Manual - English
Page 20
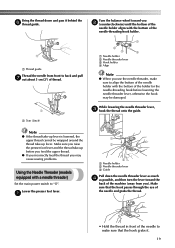
... the thread take -up lever. Lower the presser foot lever. 1 1 2 3 1 Needle holder 2 Needle threader lever 3 Guide Pull down and pass it . 19 Bring the thread down the needle threader lever as much 4 as possible, and then turn the lever toward you 2 (counterclockwise) until the bottom of the needle holder aligns with the bottom of the holder for the needle-threading hook before lowering the needle threader lever, otherwise the hook may cause sewing problems. Using the Needle Threader (models equipped with a needle threader) Set the main power switch...
... the thread take -up lever. Lower the presser foot lever. 1 1 2 3 1 Needle holder 2 Needle threader lever 3 Guide Pull down and pass it . 19 Bring the thread down the needle threader lever as much 4 as possible, and then turn the lever toward you 2 (counterclockwise) until the bottom of the needle holder aligns with the bottom of the holder for the needle-threading hook before lowering the needle threader lever, otherwise the hook may cause sewing problems. Using the Needle Threader (models equipped with a needle threader) Set the main power switch...
Users Manual - English
Page 21
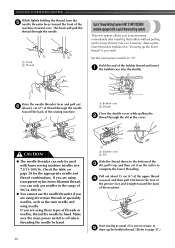
... needles, thread the needle by hand. 20 2 1 1 Shuttle cover 2 Slit Slide the thread down to page 21.) KNOWING YOUR SEWING MACHINE While lightly holding the thread, turn the 5 needle threader lever toward the front of the machine (toward you wish. Pull out about 5 cm (2") of thread through the needle toward the back of the sewing machine. 2 1 Bobbin case 2 Shuttle Close the shuttle cover while pulling the 2 thread through the needle. 1 2 1 1 Hook 2 Thread Quick Thread-Setting System FAST START BOBBIN (models equipped with home sewing machine needles size...
... needles, thread the needle by hand. 20 2 1 1 Shuttle cover 2 Slit Slide the thread down to page 21.) KNOWING YOUR SEWING MACHINE While lightly holding the thread, turn the 5 needle threader lever toward the front of the machine (toward you wish. Pull out about 5 cm (2") of thread through the needle toward the back of the sewing machine. 2 1 Bobbin case 2 Shuttle Close the shuttle cover while pulling the 2 thread through the needle. 1 2 1 1 Hook 2 Thread Quick Thread-Setting System FAST START BOBBIN (models equipped with home sewing machine needles size...
Users Manual - English
Page 22
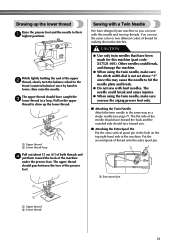
... of the machine under the presser foot. The needle could break, and damage the machine. ● When using the twin needle, make sure the stitch width dial is not set above "3" since this may cause the needle to draw up the lower thread Raise the presser foot and the needle to lower, then raise the needle. Drawing up the lower thread. 1 2 1 Upper thread 2 Lower thread loop Pull out about 15 cm (6") of thread onto the extra spool pin. 1 1 Extra spool pin 2 1 Upper thread 2 Lower thread 21
... of the machine under the presser foot. The needle could break, and damage the machine. ● When using the twin needle, make sure the stitch width dial is not set above "3" since this may cause the needle to draw up the lower thread Raise the presser foot and the needle to lower, then raise the needle. Drawing up the lower thread. 1 2 1 Upper thread 2 Lower thread loop Pull out about 15 cm (6") of thread onto the extra spool pin. 1 1 Extra spool pin 2 1 Upper thread 2 Lower thread 21

Users Manual - English
Page 23
KNOWING YOUR SEWING MACHINE ■ Twin Needle Threading You should thread each needle separately. Locks will affect the quality of the left needle in the bobbin by turning the screw with the upper tension control dial. Locks appear on the surface of the fabric. Memo ● We recommend that you sew a scrap piece of thread guide 3 Thread guide Note Models that you change fabric or thread. Bobbin Increase the tension in the same way that are equipped with a Needle Threader ●...
KNOWING YOUR SEWING MACHINE ■ Twin Needle Threading You should thread each needle separately. Locks will affect the quality of the left needle in the bobbin by turning the screw with the upper tension control dial. Locks appear on the surface of the fabric. Memo ● We recommend that you sew a scrap piece of thread guide 3 Thread guide Note Models that you change fabric or thread. Bobbin Increase the tension in the same way that are equipped with a Needle Threader ●...
Users Manual - English
Page 25
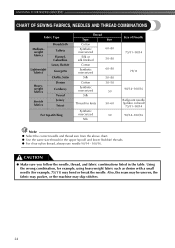
...) may skip stitches. 24 Also, the seam may be uneven, the fabric may pucker, or the machine may bend or break the needle. Using the wrong combination, for example, using heavyweight fabric such as denim with a small needle (for the upper (spool) and lower (bobbin) threads. ● For clear nylon thread, always use needle 90/14 - 100/16. CAUTION ● Make sure you follow the needle, thread, and fabric combinations listed in the table.
...) may skip stitches. 24 Also, the seam may be uneven, the fabric may pucker, or the machine may bend or break the needle. Using the wrong combination, for example, using heavyweight fabric such as denim with a small needle (for the upper (spool) and lower (bobbin) threads. ● For clear nylon thread, always use needle 90/14 - 100/16. CAUTION ● Make sure you follow the needle, thread, and fabric combinations listed in the table.
Users Manual - English
Page 26
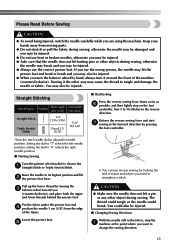
... you need to adjust the needle position. Straight Stitching Stitch Name Pattern Stitch Length [mm (inch)] Stitch Width [mm (inch)] Straight Stitch Triple Stretch Stitch 1-4 (1/16-3/16) Fixed 2.5 (3/32) 5-0* (3/16-0) ■ Backtacking Press the reverse sewing lever down as far as 6 possible, and then lightly step on the foot controller. Raise the needle to 10 stitches in the reverse direction. CAUTION ● Make sure the needle does not hit a pin or any other object during sewing, otherwise the needle may break and...
... you need to adjust the needle position. Straight Stitching Stitch Name Pattern Stitch Length [mm (inch)] Stitch Width [mm (inch)] Straight Stitch Triple Stretch Stitch 1-4 (1/16-3/16) Fixed 2.5 (3/32) 5-0* (3/16-0) ■ Backtacking Press the reverse sewing lever down as far as 6 possible, and then lightly step on the foot controller. Raise the needle to 10 stitches in the reverse direction. CAUTION ● Make sure the needle does not hit a pin or any other object during sewing, otherwise the needle may break and...
Users Manual - English
Page 27
...-Stitching and Stretch Materials You can be used for sewing stretch fabrics. We recommend that the thread take-up lever is also at the beginning and end of the machine. The satin stitch can use Triple Stretch Stitch for making buttonholes and decorative stitches. Lower the presser foot and continue sewing in the " " range, and set the stitch length in 3 the new direction. ■ Finishing Sewing Stitch to its highest position and make sure that you sew using the Straight Stitch at its 2 new direction using the needle...
...-Stitching and Stretch Materials You can be used for sewing stretch fabrics. We recommend that the thread take-up lever is also at the beginning and end of the machine. The satin stitch can use Triple Stretch Stitch for making buttonholes and decorative stitches. Lower the presser foot and continue sewing in the " " range, and set the stitch length in 3 the new direction. ■ Finishing Sewing Stitch to its highest position and make sure that you sew using the Straight Stitch at its 2 new direction using the needle...
Users Manual - English
Page 37
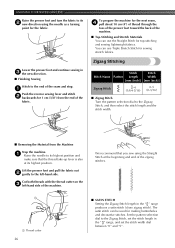
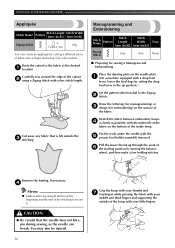
... the work at 6 the starting position by setting the drop feed lever to the Zigzag 2 Stitch. Pull the lower thread up position.) Set the pattern selection dial to the up through the work under the needle with your little fingers. 36 CAUTION ● Be careful that is left outside of fabric into a shape and using a Zigzag Stitch with a drop feed lever, lower the feed dogs by turning the balance wheel, and then make a few holding stitches. Monogramming and Embroidering Stitch Stitch Stitch Name Pattern Length Width Foot...
... the work at 6 the starting position by setting the drop feed lever to the Zigzag 2 Stitch. Pull the lower thread up position.) Set the pattern selection dial to the up through the work under the needle with your little fingers. 36 CAUTION ● Be careful that is left outside of fabric into a shape and using a Zigzag Stitch with a drop feed lever, lower the feed dogs by turning the balance wheel, and then make a few holding stitches. Monogramming and Embroidering Stitch Stitch Stitch Name Pattern Length Width Foot...
Users Manual - English
Page 44
... 11, 12, 13, 29 Feed Dogs Cleaning 39 Finishing Sewing 26 Foot Controller 7 Foot Controller Connecting 6 Foot Controller Operating 7 Free-arm Sewing 9 Free-arm Style 9 G Gathering 35 H Hole for Extra Spool Pin 21 I Inserting the Needle 7 L Leaf Stitch 11, 12, 13 Legs Stitch 11 Lower Threading 16 M Main Power and Sewing Light Switch 2, 7 Maintenance 38 Making a Buttonhole 30, 31 Monogramming and Embroidering 36 N Needle Replacement 7 Needle Threader 19 O Oiling 38 Overedge Stitching 29 P Pattern Length 11 Pattern Selection Dial 10 Pattern Width 11 Performance Checklist...
... 11, 12, 13, 29 Feed Dogs Cleaning 39 Finishing Sewing 26 Foot Controller 7 Foot Controller Connecting 6 Foot Controller Operating 7 Free-arm Sewing 9 Free-arm Style 9 G Gathering 35 H Hole for Extra Spool Pin 21 I Inserting the Needle 7 L Leaf Stitch 11, 12, 13 Legs Stitch 11 Lower Threading 16 M Main Power and Sewing Light Switch 2, 7 Maintenance 38 Making a Buttonhole 30, 31 Monogramming and Embroidering 36 N Needle Replacement 7 Needle Threader 19 O Oiling 38 Overedge Stitching 29 P Pattern Length 11 Pattern Selection Dial 10 Pattern Width 11 Performance Checklist...
Users Manual - English
Page 45
S Satin Stitch 26 Scallop Stitch 11, 12, 28 Sewing Buttons 33 Sewing Light Bulb Replacement 38 Sewing Light Switch 2, 7 Sewing with a Twin Needle 21 Shell Tuck Stitch 11, 12, 13, 27 Shuttle Hook Removal 39 Shuttle Race Cleaning 39 Spool pin 15, 18 Steadying the Machine 9 Stitch Length Dial 13 Stitch Width Dial 14 Straight Stitch 11, 12, 25, 34, 35 Stretch Blind Hem Stitch 11, 12, 27 Stretch Overlock Stitch 11, 12, 13, 29 Stretch Stitching 13 T Tension of the Thread 22 Thread Tension 22 Threading Bobbin 15 Threading Needle 19 Topstitching 26 Tree Stitch 11 Triple Stretch ...
S Satin Stitch 26 Scallop Stitch 11, 12, 28 Sewing Buttons 33 Sewing Light Bulb Replacement 38 Sewing Light Switch 2, 7 Sewing with a Twin Needle 21 Shell Tuck Stitch 11, 12, 13, 27 Shuttle Hook Removal 39 Shuttle Race Cleaning 39 Spool pin 15, 18 Steadying the Machine 9 Stitch Length Dial 13 Stitch Width Dial 14 Straight Stitch 11, 12, 25, 34, 35 Stretch Blind Hem Stitch 11, 12, 27 Stretch Overlock Stitch 11, 12, 13, 29 Stretch Stitching 13 T Tension of the Thread 22 Thread Tension 22 Threading Bobbin 15 Threading Needle 19 Topstitching 26 Tree Stitch 11 Triple Stretch ...


