
Users Manual - English
Page 2
... in the needle area, such as described in this machine. Never operate the machine with the same type and rated 15 watts. Do not pull or push fabric while stitching. Always unplug the machine from the electrical outlet when removing covers, lubricating, or...SAVE THESE INSTRUCTIONS This machine is not intended for household use . The machine should always be left unattended while plugged in the instruction manual. 16. Use this machine, basic safety precautions, including the following, should never be taken: Read all moving parts. This sewing machine is intended for ...
... in the needle area, such as described in this machine. Never operate the machine with the same type and rated 15 watts. Do not pull or push fabric while stitching. Always unplug the machine from the electrical outlet when removing covers, lubricating, or...SAVE THESE INSTRUCTIONS This machine is not intended for household use . The machine should always be left unattended while plugged in the instruction manual. 16. Use this machine, basic safety precautions, including the following, should never be taken: Read all moving parts. This sewing machine is intended for ...

Users Manual - English
Page 4
.../SEWING LIGHT SWITCH 2 CONTENTS ...3 PRINCIPAL PARTS ...4 ACCESSORIES ...5 USING YOUR SEWING MACHINE 6 Connecting Plugs ...6 Main Power/Sewing Light Switch ...7 Foot Controller ...7 Inserting the Needle ...7 Checking the Needle ...8 Changing the Presser Foot ...8 Converting to Free-arm Style ...9 Steadying the Machine ...9 THE CONTROLS ...10 Pattern Selection Dial ...10 Recommended Widths and Lengths for Stitches 11 Stitch Length Dial ...13 Stretch Stitching ...13 Stitch...
.../SEWING LIGHT SWITCH 2 CONTENTS ...3 PRINCIPAL PARTS ...4 ACCESSORIES ...5 USING YOUR SEWING MACHINE 6 Connecting Plugs ...6 Main Power/Sewing Light Switch ...7 Foot Controller ...7 Inserting the Needle ...7 Checking the Needle ...8 Changing the Presser Foot ...8 Converting to Free-arm Style ...9 Steadying the Machine ...9 THE CONTROLS ...10 Pattern Selection Dial ...10 Recommended Widths and Lengths for Stitches 11 Stitch Length Dial ...13 Stretch Stitching ...13 Stitch...

Users Manual - English
Page 5
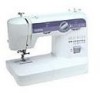
... 8) This raises and lowers the presser foot. J Zigzag presser foot KNOWING YOUR SEWING MACHINE PRINCIPAL PARTS 1 Bobbin-winding assembly (page 15) This winds the thread onto the bobbin, which you use this to stitch in the foot controller plug and connect the machine to the power supply. I Foot controller (page 7) You can turn this in...
... 8) This raises and lowers the presser foot. J Zigzag presser foot KNOWING YOUR SEWING MACHINE PRINCIPAL PARTS 1 Bobbin-winding assembly (page 15) This winds the thread onto the bobbin, which you use this to stitch in the foot controller plug and connect the machine to the power supply. I Foot controller (page 7) You can turn this in...
Users Manual - English
Page 6
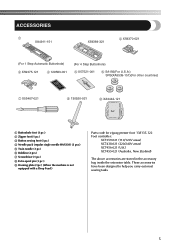
...001 6 SA156(For U.S.A.) SFB(XA5539-151)(For other countries) 7 X55467-021 8 130920-021 9 XA3442-121 1 Buttonhole foot (1 pc.) 2 Zipper foot (1 pc.) 3 Button sewing foot (1 pc.) 4 Needle pack (regular single needle HAX130) (3 pcs.) 5 Twin needle (1 pc.) 6 Bobbins (3 pcs.) 7 Screwdriver (1 pc.) 8 Extra spool pin (1 ...pc.) 9 Darning plate (1pc.) (When the machine is not equipped with a Drop Feed.) Parts code for zigzag presser foot: 138135-122 Foot controller: XC7359-021 (110/120V areas) XC7438-021 (220/240V areas) XC7456-021 ...
...001 6 SA156(For U.S.A.) SFB(XA5539-151)(For other countries) 7 X55467-021 8 130920-021 9 XA3442-121 1 Buttonhole foot (1 pc.) 2 Zipper foot (1 pc.) 3 Button sewing foot (1 pc.) 4 Needle pack (regular single needle HAX130) (3 pcs.) 5 Twin needle (1 pc.) 6 Bobbins (3 pcs.) 7 Screwdriver (1 pc.) 8 Extra spool pin (1 ...pc.) 9 Darning plate (1pc.) (When the machine is not equipped with a Drop Feed.) Parts code for zigzag presser foot: 138135-122 Foot controller: XC7359-021 (110/120V areas) XC7438-021 (220/240V areas) XC7456-021 ...
Users Manual - English
Page 9
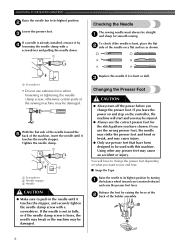
... straight 1 and sharp for the stitch pattern you use the wrong presser foot, the needle may strike the presser foot and bend or break, and may cause injury. ● Only use extreme force when loosening or tightening the needle clamp screw, otherwise certain parts of the sewing machine may cause an accident or injury...
... straight 1 and sharp for the stitch pattern you use the wrong presser foot, the needle may strike the presser foot and bend or break, and may cause injury. ● Only use extreme force when loosening or tightening the needle clamp screw, otherwise certain parts of the sewing machine may cause an accident or injury...
Users Manual - English
Page 16
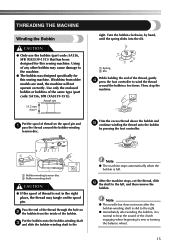
... was designed specifically for this sewing machine. After the machine stops, cut the thread, slide 6 the shaft to sew or turning the balance wheel. 15 Then, stop the machine. THREADING THE MACHINE Winding the Bobbin CAUTION ● Only use the bobbin (part code: SA156, SFB (XA5539-151)) that has been designed for this sewing machine. Put the bobbin onto...
... was designed specifically for this sewing machine. After the machine stops, cut the thread, slide 6 the shaft to sew or turning the balance wheel. 15 Then, stop the machine. THREADING THE MACHINE Winding the Bobbin CAUTION ● Only use the bobbin (part code: SA156, SFB (XA5539-151)) that has been designed for this sewing machine. Put the bobbin onto...

Users Manual - English
Page 17
... break the needle. 1 2 1 Wound evenly 2 Wound poorly 1 2 1 Wound evenly 2 Wound poorly ● The bobbin was designed specifically for this sewing machine. CAUTION ● Setting the bobbin improperly may cause the thread tension to loosen, and may cause the thread tension to loosen, breaking the needle and... accidentally step on the front of the machine and pull the bobbin case out of the same type (part code: SA156, SFB (XA5539-151)). Actual size 11.5 mm (7/16") CAUTION ● Make sure you could be injured. KNOWING YOUR SEWING MACHINE CAUTION ● Make sure you do ...
... break the needle. 1 2 1 Wound evenly 2 Wound poorly 1 2 1 Wound evenly 2 Wound poorly ● The bobbin was designed specifically for this sewing machine. CAUTION ● Setting the bobbin improperly may cause the thread tension to loosen, and may cause the thread tension to loosen, breaking the needle and... accidentally step on the front of the machine and pull the bobbin case out of the same type (part code: SA156, SFB (XA5539-151)). Actual size 11.5 mm (7/16") CAUTION ● Make sure you could be injured. KNOWING YOUR SEWING MACHINE CAUTION ● Make sure you do ...
Users Manual - English
Page 18
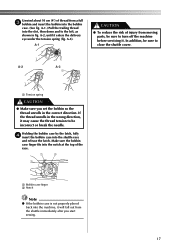
Unwind about 10 cm (4") of injury from moving parts, be sure to turn off the machine before servicing it. A-1.) Pull the trailing thread into the bobbin case. (See ...thread unrolls in fig. Holding the bobbin case by the latch, fully 4 insert the bobbin case into the machine, it will fall out from a full 3 bobbin and insert the bobbin into the slot, then down ... addition, be incorrect or break the needle. A-2 A-3 1 1 Tension spring CAUTION ● Make sure you start sewing. 17 A-2, until it may cause the thread tension to be sure to the left, as shown in the correct ...
Unwind about 10 cm (4") of injury from moving parts, be sure to turn off the machine before servicing it. A-1.) Pull the trailing thread into the bobbin case. (See ...thread unrolls in fig. Holding the bobbin case by the latch, fully 4 insert the bobbin case into the machine, it will fall out from a full 3 bobbin and insert the bobbin into the slot, then down ... addition, be incorrect or break the needle. A-2 A-3 1 1 Tension spring CAUTION ● Make sure you start sewing. 17 A-2, until it may cause the thread tension to be sure to the left, as shown in the correct ...
Users Manual - English
Page 22
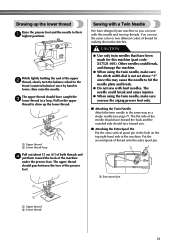
..., then raise the needle. Pull on the top right-hand side of thread for this machine (part code: X57521-001). You can sew with bent needles. CAUTION ● Use only twin needles that have designed your machine so you can use the zigzag presser foot only. ■ Attaching the Twin Needle Attach... face toward the back and the rounded side should pass between the toes of the machine under the presser foot. The needle could break, and damage the machine. ● When using the twin needle, make sure the stitch width dial is not set above "3" since this may cause the needle to their...
..., then raise the needle. Pull on the top right-hand side of thread for this machine (part code: X57521-001). You can sew with bent needles. CAUTION ● Use only twin needles that have designed your machine so you can use the zigzag presser foot only. ■ Attaching the Twin Needle Attach... face toward the back and the rounded side should pass between the toes of the machine under the presser foot. The needle could break, and damage the machine. ● When using the twin needle, make sure the stitch width dial is not set above "3" since this may cause the needle to their...
Users Manual - English
Page 26
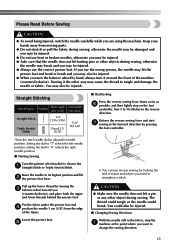
...parts. ● Do not stretch or pull the fabric during sewing. Keep your hands away from the edge of seams and where you may cause the thread to adjust the needle position. Straight Stitching Stitch Name Pattern Stitch Length [mm (inch)] Stitch Width [mm (inch)] Straight Stitch Triple Stretch Stitch ... to strengthen a stitch. Turning it toward you are using the machine. Sew 5 to its highest position and lift 2 the presser foot lever. Release the reverse sewing lever and start 7 sewing in the reverse direction. Raise the needle to 10 stitches in the forward direction...
...parts. ● Do not stretch or pull the fabric during sewing. Keep your hands away from the edge of seams and where you may cause the thread to adjust the needle position. Straight Stitching Stitch Name Pattern Stitch Length [mm (inch)] Stitch Width [mm (inch)] Straight Stitch Triple Stretch Stitch ... to strengthen a stitch. Turning it toward you are using the machine. Sew 5 to its highest position and lift 2 the presser foot lever. Release the reverse sewing lever and start 7 sewing in the reverse direction. Raise the needle to 10 stitches in the forward direction...
Users Manual - English
Page 44
... Embroidering 36 N Needle Replacement 7 Needle Threader 19 O Oiling 38 Overedge Stitching 29 P Pattern Length 11 Pattern Selection Dial 10 Pattern Width 11 Performance Checklist 40 Presser foot lever 4 Presser Foot Replacement 8 Principal Parts 4 Q Quick Thread-setting System 20 R Rampart Stitch 11 Recommended Widths and Lengths for Stitches 11 Repacking the Machine 42 Reverse Sewing Lever 14 43
... Embroidering 36 N Needle Replacement 7 Needle Threader 19 O Oiling 38 Overedge Stitching 29 P Pattern Length 11 Pattern Selection Dial 10 Pattern Width 11 Performance Checklist 40 Presser foot lever 4 Presser Foot Replacement 8 Principal Parts 4 Q Quick Thread-setting System 20 R Rampart Stitch 11 Recommended Widths and Lengths for Stitches 11 Repacking the Machine 42 Reverse Sewing Lever 14 43


