

Users Manual - English
Page 2
... using." Do not allow this sewing machine. turer as a toy. Return the sewing machine to the off , then remove plug from outlet. 9. Never operate the sewing machine with same type rated 15 watts. Always unplug this manual. 3. Special care is not intended for its intended use this manual. Do not use the proper needle plate. Use this sewing machine only for use ." Do not use as threading the needle, changing the needle, threading the bobbin, or changing the presser foot...
... using." Do not allow this sewing machine. turer as a toy. Return the sewing machine to the off , then remove plug from outlet. 9. Never operate the sewing machine with same type rated 15 watts. Always unplug this manual. 3. Special care is not intended for its intended use this manual. Do not use the proper needle plate. Use this sewing machine only for use ." Do not use as threading the needle, changing the needle, threading the bobbin, or changing the presser foot...

Users Manual - English
Page 6
... MACHINE PRINCIPAL PARTS 1 ACCESSORIES 3 OPERATING YOUR SEWING MACHINE 5 Connecting Plugs 5 Main Power and Sewing Light Switches 6 Foot Controller 6 Inserting the Needle 7 Checking the Needle 7 Changing the Presser Foot 8 Converting to Free-Arm Style 9 Steadying the Machine 9 VARIOUS CONTROLS 10 Pattern Selection Dial 10 RECOMMENDED WIDTHS AND LENGTHS FOR STITCHES 11 Stitch Length Dial 14 Stretch Stitching 15 Stitch Width Dial 16 Reverse Sewing Lever 17 THREADING THE MACHINE 18 Winding the Bobbin 18 Lower Threading 19 Upper (Needle) Threading 20 Using the Needle Threader...
... MACHINE PRINCIPAL PARTS 1 ACCESSORIES 3 OPERATING YOUR SEWING MACHINE 5 Connecting Plugs 5 Main Power and Sewing Light Switches 6 Foot Controller 6 Inserting the Needle 7 Checking the Needle 7 Changing the Presser Foot 8 Converting to Free-Arm Style 9 Steadying the Machine 9 VARIOUS CONTROLS 10 Pattern Selection Dial 10 RECOMMENDED WIDTHS AND LENGTHS FOR STITCHES 11 Stitch Length Dial 14 Stretch Stitching 15 Stitch Width Dial 16 Reverse Sewing Lever 17 THREADING THE MACHINE 18 Winding the Bobbin 18 Lower Threading 19 Upper (Needle) Threading 20 Using the Needle Threader...

Users Manual - English
Page 9
... PARTS 34 62 1 1 Bobbin winding assembly Winds the thread onto the bobbin to be used for operation. B 0 7 Stitch width dial Controls the stitch width. 8 Pattern selection dial Turn in the reverse direction. G Presser foot lever Raises and lowers the presser foot. D C E G F H BUTTONHOLE AND BUTTON SEWING USING ATTACHMENTS AND APPLICATIONS MAINTENANCE INDEX 1 H Foot controller Used to select the desired stitch. 9 Stitch length dial Controls the length of the upper thread. A Buttonhole fine-adjustment screw B Buttonhole lever (1 Step automatic buttonhole...
... PARTS 34 62 1 1 Bobbin winding assembly Winds the thread onto the bobbin to be used for operation. B 0 7 Stitch width dial Controls the stitch width. 8 Pattern selection dial Turn in the reverse direction. G Presser foot lever Raises and lowers the presser foot. D C E G F H BUTTONHOLE AND BUTTON SEWING USING ATTACHMENTS AND APPLICATIONS MAINTENANCE INDEX 1 H Foot controller Used to select the desired stitch. 9 Stitch length dial Controls the length of the upper thread. A Buttonhole fine-adjustment screw B Buttonhole lever (1 Step automatic buttonhole...

Users Manual - English
Page 13
... à une prise secteur. When changing the needle, bobbin or light bulb or when the sew- FUNCIONAMIENTO DE LA MÁQUINA DE COSER FONCTIONNEMENT DE LA MACHINE A COUDRE Conexión de los enchufes Raccordement 1. PRÉCAUTION: 1. BUTTONHOLE AND BUTTON SEWING USING ATTACHMENTS AND APPLICATIONS MAINTENANCE INDEX 5 CONTENTS KNOWING YOUR SEWING MACHINE STRAIGHT AND ZIGZAG STITCHING BUILT-IN STITCHES OPERATING YOUR SEWING MACHINE Connecting Plugs 1. For U.S.A. Connect the power cord plug into a wall outlet. If...
... à une prise secteur. When changing the needle, bobbin or light bulb or when the sew- FUNCIONAMIENTO DE LA MÁQUINA DE COSER FONCTIONNEMENT DE LA MACHINE A COUDRE Conexión de los enchufes Raccordement 1. PRÉCAUTION: 1. BUTTONHOLE AND BUTTON SEWING USING ATTACHMENTS AND APPLICATIONS MAINTENANCE INDEX 5 CONTENTS KNOWING YOUR SEWING MACHINE STRAIGHT AND ZIGZAG STITCHING BUILT-IN STITCHES OPERATING YOUR SEWING MACHINE Connecting Plugs 1. For U.S.A. Connect the power cord plug into a wall outlet. If...
Users Manual - English
Page 19
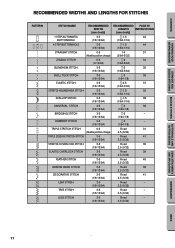
... SEWING MACHINE STRAIGHT AND ZIGZAG STITCHING BUILT-IN STITCHES RECOMMENDED WIDTHS AND LENGTHS FOR STITCHES PATTERN C A STITCH NAME RECOMMENDED WIDTH [mm (inch)] RECOMMENDED PAGE IN LENGTH INSTRUCTIONS [mm (inch)] 1 STEP AUTOMATIC BUTTONHOLE 3-5 -1.5 42 (1/8-13/64) (1/64-1/16) 4 STEP BUTTONHOLE 3-5 -1.5 44 (1/8-13/64) (1/64-1/16) STRAIGHT STITCH 0-5 1-4 31 (Needle position change) (3/64-5/32) ZIGZAG STITCH 0-5 -2 34 (0-13/64) (1/64-5/64) BLINDHEM STITCH 3-5 -2 35 (1/8-13/64) (1/64-5/64) SHELL TUCK STITCH 3-5 -3 36 (1/8-13/64) (1/64-1/8) ELASTIC...
... SEWING MACHINE STRAIGHT AND ZIGZAG STITCHING BUILT-IN STITCHES RECOMMENDED WIDTHS AND LENGTHS FOR STITCHES PATTERN C A STITCH NAME RECOMMENDED WIDTH [mm (inch)] RECOMMENDED PAGE IN LENGTH INSTRUCTIONS [mm (inch)] 1 STEP AUTOMATIC BUTTONHOLE 3-5 -1.5 42 (1/8-13/64) (1/64-1/16) 4 STEP BUTTONHOLE 3-5 -1.5 44 (1/8-13/64) (1/64-1/16) STRAIGHT STITCH 0-5 1-4 31 (Needle position change) (3/64-5/32) ZIGZAG STITCH 0-5 -2 34 (0-13/64) (1/64-5/64) BLINDHEM STITCH 3-5 -2 35 (1/8-13/64) (1/64-5/64) SHELL TUCK STITCH 3-5 -3 36 (1/8-13/64) (1/64-1/8) ELASTIC...

Users Manual - English
Page 28
... spool pin and place a spool of the thread take-up lever and around to break, skip stitches or wrinkle the fabric. 20 MAINTENANCE INDEX Raise the presser foot lever and turn the balance wheel toward you (counterclockwise) to raise the thread take -up lever to "O". 1. CONTENTS KNOWING YOUR SEWING MACHINE STRAIGHT AND ZIGZAG STITCHING BUILT-IN STITCHES 1 2 4 3 BUTTONHOLE AND BUTTON SEWING USING ATTACHMENTS AND APPLICATIONS A 4 23 1 C B D 4 4 E 5 Upper (Needle) Threading Turn power switch to its highest position. 2. A.) 1 Spool pin 2 Thread guide 3 Tension discs...
... spool pin and place a spool of the thread take-up lever and around to break, skip stitches or wrinkle the fabric. 20 MAINTENANCE INDEX Raise the presser foot lever and turn the balance wheel toward you (counterclockwise) to raise the thread take -up lever to "O". 1. CONTENTS KNOWING YOUR SEWING MACHINE STRAIGHT AND ZIGZAG STITCHING BUILT-IN STITCHES 1 2 4 3 BUTTONHOLE AND BUTTON SEWING USING ATTACHMENTS AND APPLICATIONS A 4 23 1 C B D 4 4 E 5 Upper (Needle) Threading Turn power switch to its highest position. 2. A.) 1 Spool pin 2 Thread guide 3 Tension discs...

Users Manual - English
Page 30
... needle threader lever as much as possible, then rotate the lever toward the back of the machine (toward you ). Otherwise, the hook may be sure to #100. When using the needle threader, be damaged. 3. CONTENTS KNOWING YOUR SEWING MACHINE STRAIGHT AND ZIGZAG STITCHING BUILT-IN STITCHES 1 2 3 1 2 4 5 7 6 6 Using the Needle Threader (when the machine is equipped with the bottom of the needle in front of the holder for the needle-threading hook before lowering the needle threader lever. Lower the presser foot lever...
... needle threader lever as much as possible, then rotate the lever toward the back of the machine (toward you ). Otherwise, the hook may be sure to #100. When using the needle threader, be damaged. 3. CONTENTS KNOWING YOUR SEWING MACHINE STRAIGHT AND ZIGZAG STITCHING BUILT-IN STITCHES 1 2 3 1 2 4 5 7 6 6 Using the Needle Threader (when the machine is equipped with the bottom of the needle in front of the holder for the needle-threading hook before lowering the needle threader lever. Lower the presser foot lever...

Users Manual - English
Page 33
... upper thread toward the back of the upper thread. Le fil supérieur doit passer entre les branches du pied-de-biche. 1 Fil supérieur 2 Boucle du fil inférieur 3 Fil inférieur BUTTONHOLE AND BUTTON SEWING USING ATTACHMENTS AND APPLICATIONS MAINTENANCE INDEX 25 With your left hand, hold the end of the machine straight behind the presser foot. El hilo...
... upper thread toward the back of the upper thread. Le fil supérieur doit passer entre les branches du pied-de-biche. 1 Fil supérieur 2 Boucle du fil inférieur 3 Fil inférieur BUTTONHOLE AND BUTTON SEWING USING ATTACHMENTS AND APPLICATIONS MAINTENANCE INDEX 25 With your left hand, hold the end of the machine straight behind the presser foot. El hilo...

Users Manual - English
Page 35
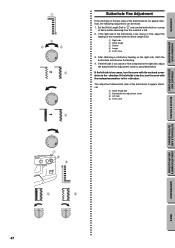
... screw with the upper tension control dial. If the result is needed. However, do not turn the screw more than one full turn. It may need to the procedure described below. Locks appear on thin fabrics, the thread tension cannot be adjusted when you change fabric or thread type. For most sewing applications, no adjustment is still not satisfactory, then adjust the bobbin thread tension as explained in your fabric. 1 Reverse 2 Surface BUTTONHOLE AND BUTTON SEWING USING ATTACHMENTS AND APPLICATIONS MAINTENANCE...
... screw with the upper tension control dial. If the result is needed. However, do not turn the screw more than one full turn. It may need to the procedure described below. Locks appear on thin fabrics, the thread tension cannot be adjusted when you change fabric or thread type. For most sewing applications, no adjustment is still not satisfactory, then adjust the bobbin thread tension as explained in your fabric. 1 Reverse 2 Surface BUTTONHOLE AND BUTTON SEWING USING ATTACHMENTS AND APPLICATIONS MAINTENANCE...

Users Manual - English
Page 37
Use the same size thread for the upper (spool) and lower (bobbin) threads. Utilice el mismo tamaño de hilo para los hilos superior (carrete) e inferior (canilla). 29 INDEX Elija la aguja y el hilo correctos en la tabla de arriba. 2. Select the correct needle and thread size from the above chart. 2. BUTTONHOLE AND BUTTON SEWING USING ATTACHMENTS AND APPLICATIONS MAINTENANCE TABLA DE COMBINACIONES ENTRE TEJIDOS, AGUJAS Y HILOS MUY FINO LIGERO MEDIO PESADO TEJIDOS...
Use the same size thread for the upper (spool) and lower (bobbin) threads. Utilice el mismo tamaño de hilo para los hilos superior (carrete) e inferior (canilla). 29 INDEX Elija la aguja y el hilo correctos en la tabla de arriba. 2. Select the correct needle and thread size from the above chart. 2. BUTTONHOLE AND BUTTON SEWING USING ATTACHMENTS AND APPLICATIONS MAINTENANCE TABLA DE COMBINACIONES ENTRE TEJIDOS, AGUJAS Y HILOS MUY FINO LIGERO MEDIO PESADO TEJIDOS...
Users Manual - English
Page 42
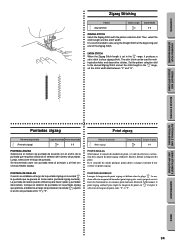
... is set the stitch width dial between "0" and "5". La puntada de realce puede utilizarse para hacer ojales y puntadas decorativas. Il est conseillé de coudre quelques points droits à chaque extrémité d'une couture en points zigzag. The satin stitch can be used for making buttonholes and decorative stitches. BUTTONHOLE AND BUTTON SEWING USING ATTACHMENTS AND APPLICATIONS Puntadas zigzag Point zigzag Número de puntada (Puntada zigzag...
... is set the stitch width dial between "0" and "5". La puntada de realce puede utilizarse para hacer ojales y puntadas decorativas. Il est conseillé de coudre quelques points droits à chaque extrémité d'une couture en points zigzag. The satin stitch can be used for making buttonholes and decorative stitches. BUTTONHOLE AND BUTTON SEWING USING ATTACHMENTS AND APPLICATIONS Puntadas zigzag Point zigzag Número de puntada (Puntada zigzag...
Users Manual - English
Page 43
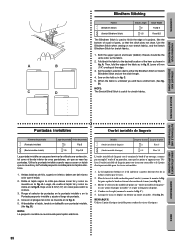
CONTENTS KNOWING YOUR SEWING MACHINE STRAIGHT AND ZIGZAG STITCHING BUILT-IN STITCHES A B C D Blindhem Stitching Pattern (Blindhem Stitch) (Stretch Blindhem Stitch) Stitch Length -2 -1.5 Stitch Width Fixed 5 Fixed 3.5 The Blindhem Stitch is used to finish the edge of a project, like the bottom of a pair of the hem as shown in fig. Use the Blindhem Stitch when sewing on obtient un ourlet invisible. (Voir fig. Both the upper (spool) and lower (bobbin) threads should be the same color as in fig...
CONTENTS KNOWING YOUR SEWING MACHINE STRAIGHT AND ZIGZAG STITCHING BUILT-IN STITCHES A B C D Blindhem Stitching Pattern (Blindhem Stitch) (Stretch Blindhem Stitch) Stitch Length -2 -1.5 Stitch Width Fixed 5 Fixed 3.5 The Blindhem Stitch is used to finish the edge of a project, like the bottom of a pair of the hem as shown in fig. Use the Blindhem Stitch when sewing on obtient un ourlet invisible. (Voir fig. Both the upper (spool) and lower (bobbin) threads should be the same color as in fig...

Users Manual - English
Page 50
....) 4. Open the button plate and insert the button. (See fig. D. 8. E) When sewing buttonholes on the underside of the foot, insert them into the grooves and temporarily tie them there. 3. Lower the presser foot and start the machine. 7. While gently holding the upper thread, start sewing. * Set the stitch width to the front of the fabric. When sewing buttonholes on thin fabrics, place stabilizer material on stretch fabric, place a gimp thread under the buttonhole stitching. 1. Attach the buttonhole foot and set the pattern selection dial to remove...
....) 4. Open the button plate and insert the button. (See fig. D. 8. E) When sewing buttonholes on the underside of the foot, insert them into the grooves and temporarily tie them there. 3. Lower the presser foot and start the machine. 7. While gently holding the upper thread, start sewing. * Set the stitch width to the front of the fabric. When sewing buttonholes on thin fabrics, place stabilizer material on stretch fabric, place a gimp thread under the buttonhole stitching. 1. Attach the buttonhole foot and set the pattern selection dial to remove...
Users Manual - English
Page 55
... the + direction. Set the Stitch Length Dial to appear identical. 6 Stitch length dial 7 Buttonhole fine adjustment screw 8 Left side 9 In this case 3. If the left side is too coarse, turn the screw with the Stitch Length Dial. 1 Right side 2 Stitch length 3 Shorter 4 Longer 5 In this case 9 9 BUTTONHOLE AND BUTTON SEWING USING ATTACHMENTS AND APPLICATIONS MAINTENANCE INDEX 47 SS 10 5 432 - SS 10 7 6 8 Buttonhole Fine Adjustment If the stitching on the right side, stitch the buttonhole and observe the feeding. 4. direction. If the...
... the + direction. Set the Stitch Length Dial to appear identical. 6 Stitch length dial 7 Buttonhole fine adjustment screw 8 Left side 9 In this case 3. If the left side is too coarse, turn the screw with the Stitch Length Dial. 1 Right side 2 Stitch length 3 Shorter 4 Longer 5 In this case 9 9 BUTTONHOLE AND BUTTON SEWING USING ATTACHMENTS AND APPLICATIONS MAINTENANCE INDEX 47 SS 10 5 432 - SS 10 7 6 8 Buttonhole Fine Adjustment If the stitching on the right side, stitch the buttonhole and observe the feeding. 4. direction. If the...

Users Manual - English
Page 57
... width with a drop feed lever, lower the feed dogs by setting the drop feed lever to "1.5". 2. For example, if the distance between the holes is equipped with the stitch width dial. Place a button between the holes and set the stitch width to the up position.) 4. Cut the upper and lower threads and tie the two threads at the back of the fabric. CONTENTS KNOWING YOUR SEWING MACHINE STRAIGHT AND ZIGZAG STITCHING BUILT-IN STITCHES Button Sewing Pattern (Zigzag Stitch) Stitch Length Stitch Width Any Foot Button Sewing Foot 1. Attach the button sewing foot. 3. Measure the...
... width with a drop feed lever, lower the feed dogs by setting the drop feed lever to "1.5". 2. For example, if the distance between the holes is equipped with the stitch width dial. Place a button between the holes and set the stitch width to the up position.) 4. Cut the upper and lower threads and tie the two threads at the back of the fabric. CONTENTS KNOWING YOUR SEWING MACHINE STRAIGHT AND ZIGZAG STITCHING BUILT-IN STITCHES Button Sewing Pattern (Zigzag Stitch) Stitch Length Stitch Width Any Foot Button Sewing Foot 1. Attach the button sewing foot. 3. Measure the...

Users Manual - English
Page 59
...attach the presser foot holder to about "2") so that the lower thread lies on both sides. Loosen the tension of the upper thread (to the right pin on the right or left side of the zipper toward the top on the underside of straight stitches. 4. Set the stitch length between "2" and "3". 2. Lower the presser foot lever and attach the presser foot holder to adjust the needle position. The needle should be positioned on the zipper foot. (See fig. BUTTONHOLE AND BUTTON SEWING USING ATTACHMENTS AND APPLICATIONS MAINTENANCE Gathering Pattern (Straight Stitch) Stitch Length...
...attach the presser foot holder to about "2") so that the lower thread lies on both sides. Loosen the tension of the upper thread (to the right pin on the right or left side of the zipper toward the top on the underside of straight stitches. 4. Set the stitch length between "2" and "3". 2. Lower the presser foot lever and attach the presser foot holder to adjust the needle position. The needle should be positioned on the zipper foot. (See fig. BUTTONHOLE AND BUTTON SEWING USING ATTACHMENTS AND APPLICATIONS MAINTENANCE Gathering Pattern (Straight Stitch) Stitch Length...
Users Manual - English
Page 65
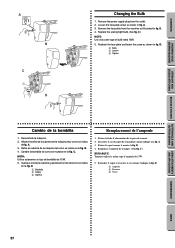
.... CONTENTS KNOWING YOUR SEWING MACHINE STRAIGHT AND ZIGZAG STITCHING BUILT-IN STITCHES A B C 1 2 3 D Changing the Bulb 1. Afloje el tornillo de la cubierta de la máquina tal y como se indica el fig. Remove the power supply plug from the machine as shown in fig. Remove the face plate from the outlet. 2. A. 3. D. 1 Ampoule 2 Desserrer 3 Visser BUTTONHOLE AND BUTTON SEWING USING ATTACHMENTS AND APPLICATIONS MAINTENANCE INDEX 57 C. Loosen the face plate screw as illustrated in...
.... CONTENTS KNOWING YOUR SEWING MACHINE STRAIGHT AND ZIGZAG STITCHING BUILT-IN STITCHES A B C 1 2 3 D Changing the Bulb 1. Afloje el tornillo de la cubierta de la máquina tal y como se indica el fig. Remove the power supply plug from the machine as shown in fig. Remove the face plate from the outlet. 2. A. 3. D. 1 Ampoule 2 Desserrer 3 Visser BUTTONHOLE AND BUTTON SEWING USING ATTACHMENTS AND APPLICATIONS MAINTENANCE INDEX 57 C. Loosen the face plate screw as illustrated in...

Users Manual - English
Page 68
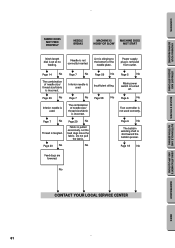
... tangled. w Page 7 No w Inferior needle is incorrectly inserted. w Page 27 No w w w w CONTACT YOUR LOCAL SERVICE CENTER BUTTONHOLE AND BUTTON SEWING USING ATTACHMENTS AND APPLICATIONS MAINTENANCE INDEX 60 If you to make sure you are encountered, review the section in the shuttle hook. Needle is used . Thread tension is too tight. w Page 20 No w Upper thread tension is incorrect. w Page 27 No w Spool of needle size/ thread size/fabric is not correctly installed. w Page 7 No w The combination of...
... tangled. w Page 7 No w Inferior needle is incorrectly inserted. w Page 27 No w w w w CONTACT YOUR LOCAL SERVICE CENTER BUTTONHOLE AND BUTTON SEWING USING ATTACHMENTS AND APPLICATIONS MAINTENANCE INDEX 60 If you to make sure you are encountered, review the section in the shuttle hook. Needle is used . Thread tension is too tight. w Page 20 No w Upper thread tension is incorrect. w Page 27 No w Spool of needle size/ thread size/fabric is not correctly installed. w Page 7 No w The combination of...
Users Manual - English
Page 69
... power switch is pulled excessively. w Page 29 No w Fabric is turned off. No w w w w CONTACT YOUR LOCAL SERVICE CENTER BUTTONHOLE AND BUTTON SEWING USING ATTACHMENTS AND APPLICATIONS MAINTENANCE INDEX 61 Lint is tangled. w Page 7 No w Thread is clinging to the bottom of needle size/ thread size/fabric is incorrect. CONTENTS KNOWING YOUR SEWING MACHINE STRAIGHT AND ZIGZAG STITCHING BUILT-IN STITCHES FABRIC DOES NOT FEED PROPERLY NEEDLE BREAKS MACHINE IS NOISY OR SLOW MACHINE DOES NOT START Stitch length dial is set at...
... power switch is pulled excessively. w Page 29 No w Fabric is turned off. No w w w w CONTACT YOUR LOCAL SERVICE CENTER BUTTONHOLE AND BUTTON SEWING USING ATTACHMENTS AND APPLICATIONS MAINTENANCE INDEX 61 Lint is tangled. w Page 7 No w Thread is clinging to the bottom of needle size/ thread size/fabric is incorrect. CONTENTS KNOWING YOUR SEWING MACHINE STRAIGHT AND ZIGZAG STITCHING BUILT-IN STITCHES FABRIC DOES NOT FEED PROPERLY NEEDLE BREAKS MACHINE IS NOISY OR SLOW MACHINE DOES NOT START Stitch length dial is set at...

Users Manual - English
Page 75
... Dial 10 Pattern Widths 11 Performance Checklist 60-61 Presser Foot Replacement 8 Principal Parts 1 Q Quick Thread-setting System 24 R Repacking 66 Reverse Sewing Lever 17 S Scallop Stitching 38 Sewing Direction 32 Sewing Light Bulb Replacement 57 Switch 6 Shell Tuck Stitching 36 Shuttle Hook Removal 57 Shuttle Race Cleaning 57 Spool Installing 20 Steadying the Machine 9 Stitch Length Dial 14 Straight Stitching 31 Stretch Blindhem Stitching 35 Stretch Material Sewing 33 Stretch Overlock 39 Stretch Stitching 15 T Threading Bobbin 19, 24 Needle 20, 22 Thread Tension...
... Dial 10 Pattern Widths 11 Performance Checklist 60-61 Presser Foot Replacement 8 Principal Parts 1 Q Quick Thread-setting System 24 R Repacking 66 Reverse Sewing Lever 17 S Scallop Stitching 38 Sewing Direction 32 Sewing Light Bulb Replacement 57 Switch 6 Shell Tuck Stitching 36 Shuttle Hook Removal 57 Shuttle Race Cleaning 57 Spool Installing 20 Steadying the Machine 9 Stitch Length Dial 14 Straight Stitching 31 Stretch Blindhem Stitching 35 Stretch Material Sewing 33 Stretch Overlock 39 Stretch Stitching 15 T Threading Bobbin 19, 24 Needle 20, 22 Thread Tension...


