

Users Manual - English
Page 2
...persons without supervision. 17. turer as threading the needle, changing the needle, threading the bobbin, or changing the presser foot. 15. Return the sewing machine to the symbol "O" position which represents off , symbol "O" position when making any adjustments in the needle area, such as contained in . Do .... Do not pull or push the fabric while stitching. To reduce the risk of lint, dust and loose cloth. 5. Never operate the sewing machine with any openings. 6. To unplug, grasp the plug and pull, not the cord. 10. Keep fingers away from the accumulation of burns, fire...
...persons without supervision. 17. turer as threading the needle, changing the needle, threading the bobbin, or changing the presser foot. 15. Return the sewing machine to the symbol "O" position which represents off , symbol "O" position when making any adjustments in the needle area, such as contained in . Do .... Do not pull or push the fabric while stitching. To reduce the risk of lint, dust and loose cloth. 5. Never operate the sewing machine with any openings. 6. To unplug, grasp the plug and pull, not the cord. 10. Keep fingers away from the accumulation of burns, fire...
Users Manual - English
Page 5
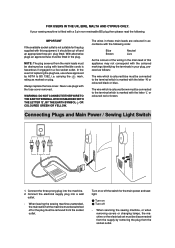
... the terminals in your plug, proceed as marked on 2 Turn off or the plug must be removed from the socket outlet. When leaving the sewing machine unattended, the main switch of this appliance may not correspond with this equipment, it should be connected to the terminal which is hazardous if engaged... Live As the colours of the wiring in the plug. The wire which is coloured brown must be fitted in the main lead of the machine must be cut off and an appropriate three pin plug fitted. FOR USERS IN THE UK, EIRE, MALTA AND CYPRUS ONLY. If your sewing...
... the terminals in your plug, proceed as marked on 2 Turn off or the plug must be removed from the socket outlet. When leaving the sewing machine unattended, the main switch of this appliance may not correspond with this equipment, it should be connected to the terminal which is hazardous if engaged... Live As the colours of the wiring in the plug. The wire which is coloured brown must be fitted in the main lead of the machine must be cut off and an appropriate three pin plug fitted. FOR USERS IN THE UK, EIRE, MALTA AND CYPRUS ONLY. If your sewing...

Users Manual - English
Page 6
... 6 Foot Controller 6 Inserting the Needle 7 Checking the Needle 7 Changing the Presser Foot 8 Converting to Free-Arm Style 9 Steadying the Machine 9 VARIOUS CONTROLS 10 Pattern Selection Dial 10 RECOMMENDED WIDTHS AND LENGTHS FOR STITCHES 11 Stitch Length Dial 14 Stretch Stitching 15 Stitch Width Dial ... Lower Threading 19 Upper (Needle) Threading 20 Using the Needle Threader (when the machine is equipped with a needle threader) .. 22 Quick Thread-setting System FAST START BOBBIN (when the machine is equipped with a quick thread-setting system 24 Drawing Up Lower Thread 25 Twin...
... 6 Foot Controller 6 Inserting the Needle 7 Checking the Needle 7 Changing the Presser Foot 8 Converting to Free-Arm Style 9 Steadying the Machine 9 VARIOUS CONTROLS 10 Pattern Selection Dial 10 RECOMMENDED WIDTHS AND LENGTHS FOR STITCHES 11 Stitch Length Dial 14 Stretch Stitching 15 Stitch Width Dial ... Lower Threading 19 Upper (Needle) Threading 20 Using the Needle Threader (when the machine is equipped with a needle threader) .. 22 Quick Thread-setting System FAST START BOBBIN (when the machine is equipped with a quick thread-setting system 24 Drawing Up Lower Thread 25 Twin...

Users Manual - English
Page 9
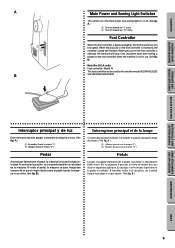
... light switch Turns the main power and sewing light on and off. G Presser foot lever Raises and lowers the presser foot. CONTENTS KNOWING YOUR SEWING MACHINE STRAIGHT AND ZIGZAG STITCHING BUILT-IN STITCHES PRINCIPAL PARTS 34 62 1 1 Bobbin winding assembly Winds the thread onto the bobbin to be used for the...
... light switch Turns the main power and sewing light on and off. G Presser foot lever Raises and lowers the presser foot. CONTENTS KNOWING YOUR SEWING MACHINE STRAIGHT AND ZIGZAG STITCHING BUILT-IN STITCHES PRINCIPAL PARTS 34 62 1 1 Bobbin winding assembly Winds the thread onto the bobbin to be used for the...

Users Manual - English
Page 13
... the plug. Conecte el enchufe de alimentación a una toma de corriente. FUNCIONAMIENTO DE LA MÁQUINA DE COSER FONCTIONNEMENT DE LA MACHINE A COUDRE Conexión de los enchufes Raccordement 1. Connect the power cord plug into a wall outlet. When changing the needle, bobbin or... light bulb or when the sew- PRÉCAUTION: 1. ATENCIÓN: 1. ing machine is not in a polarized outlet only one blade wider than the other). Brancher la fiche d'alimentation à une prise secteur. If the ...
... the plug. Conecte el enchufe de alimentación a una toma de corriente. FUNCIONAMIENTO DE LA MÁQUINA DE COSER FONCTIONNEMENT DE LA MACHINE A COUDRE Conexión de los enchufes Raccordement 1. Connect the power cord plug into a wall outlet. When changing the needle, bobbin or... light bulb or when the sew- PRÉCAUTION: 1. ATENCIÓN: 1. ing machine is not in a polarized outlet only one blade wider than the other). Brancher la fiche d'alimentation à une prise secteur. If the ...
Users Manual - English
Page 14
...aumentar la presión, se incrementa también la velocidad de la máquina. Si l'on appuie légèrement sur la pédale, la machine va fonctionner à faible vitesse. A.) 1 Encender (hacia la marca "I ") 2 Eteindre (pousser vers la marque "O") Pedal Pédale Al presionar ligeramente ... cuando la máquina no se utilire. (Ver fig. When the pressure on the foot controller is depressed lightly, the machine will stop. La machine s'arrête lorsque la pression sur la pédale est relâchée. B.) BUTTONHOLE AND BUTTON SEWING USING ...
...aumentar la presión, se incrementa también la velocidad de la máquina. Si l'on appuie légèrement sur la pédale, la machine va fonctionner à faible vitesse. A.) 1 Encender (hacia la marca "I ") 2 Eteindre (pousser vers la marque "O") Pedal Pédale Al presionar ligeramente ... cuando la máquina no se utilire. (Ver fig. When the pressure on the foot controller is depressed lightly, the machine will stop. La machine s'arrête lorsque la pression sur la pédale est relâchée. B.) BUTTONHOLE AND BUTTON SEWING USING ...
Users Manual - English
Page 19
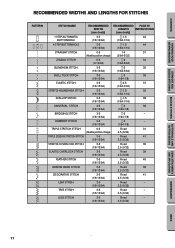
CONTENTS KNOWING YOUR SEWING MACHINE STRAIGHT AND ZIGZAG STITCHING BUILT-IN STITCHES RECOMMENDED WIDTHS AND LENGTHS FOR STITCHES PATTERN C A STITCH NAME RECOMMENDED WIDTH [mm (inch)] RECOMMENDED PAGE IN LENGTH INSTRUCTIONS [...
CONTENTS KNOWING YOUR SEWING MACHINE STRAIGHT AND ZIGZAG STITCHING BUILT-IN STITCHES RECOMMENDED WIDTHS AND LENGTHS FOR STITCHES PATTERN C A STITCH NAME RECOMMENDED WIDTH [mm (inch)] RECOMMENDED PAGE IN LENGTH INSTRUCTIONS [...

Users Manual - English
Page 28
CONTENTS KNOWING YOUR SEWING MACHINE STRAIGHT AND ZIGZAG STITCHING BUILT-IN STITCHES 1 2 4 3 BUTTONHOLE AND BUTTON SEWING USING ATTACHMENTS AND APPLICATIONS A 4 23 1 C B D 4 4 E 5 Upper (Needle) Threading Turn power switch to break, skip ...
CONTENTS KNOWING YOUR SEWING MACHINE STRAIGHT AND ZIGZAG STITCHING BUILT-IN STITCHES 1 2 4 3 BUTTONHOLE AND BUTTON SEWING USING ATTACHMENTS AND APPLICATIONS A 4 23 1 C B D 4 4 E 5 Upper (Needle) Threading Turn power switch to break, skip ...

Users Manual - English
Page 30
... with the bottom of the needlethreading-hook holder. 1 Needle holder 2 Needle threader lever NOTE: When using transparent nylon thread, use needles of the sewing machine. • Only use the needle threader with a needle threader) Turn power switch to align the bottom of the needle holder with the bottom of the... machine (toward the back of the needle in front of the machine (away from you ). The hook will pull the thread through the needle toward the front of the holder for ...
... with the bottom of the needlethreading-hook holder. 1 Needle holder 2 Needle threader lever NOTE: When using transparent nylon thread, use needles of the sewing machine. • Only use the needle threader with a needle threader) Turn power switch to align the bottom of the needle holder with the bottom of the... machine (toward the back of the needle in front of the machine (away from you ). The hook will pull the thread through the needle toward the front of the holder for ...

Users Manual - English
Page 33
... derrière le pied-de-biche. Avec la main gauche, tenir l'extrémité du fil supérieur. CONTENTS KNOWING YOUR SEWING MACHINE STRAIGHT AND ZIGZAG STITCHING BUILT-IN STITCHES 1 2 Drawing Up Lower Thread 1. Pull the upper thread toward you (counterclockwise) until the needle moves down and ... fil supérieur doit alors former une boucle avec le fil inférieur. The upper thread should pass between the toes of the machine straight behind the presser foot. Pull out about 15 cm (6") of the upper thread. Raise the presser foot and the needle to its highest...
... derrière le pied-de-biche. Avec la main gauche, tenir l'extrémité du fil supérieur. CONTENTS KNOWING YOUR SEWING MACHINE STRAIGHT AND ZIGZAG STITCHING BUILT-IN STITCHES 1 2 Drawing Up Lower Thread 1. Pull the upper thread toward you (counterclockwise) until the needle moves down and ... fil supérieur doit alors former une boucle avec le fil inférieur. The upper thread should pass between the toes of the machine straight behind the presser foot. Pull out about 15 cm (6") of the upper thread. Raise the presser foot and the needle to its highest...

Users Manual - English
Page 35
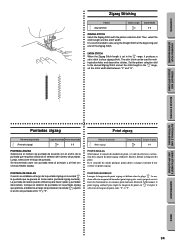
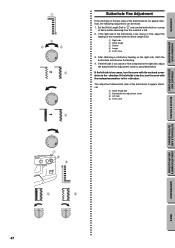
... Correct tension is recommended that a test sample be adjusted when you change fabric or thread type. C Lower tension is too loose. CONTENTS KNOWING YOUR SEWING MACHINE STRAIGHT AND ZIGZAG STITCHING BUILT-IN STITCHES A 2 1 2 1 B 2 1 2 1 A-1 654 B-1 654 C 2 1 2 1 Thread Tension Thread tension will weaken your seams or cause puckers in your fabric. 1 Reverse 2 Surface...
... Correct tension is recommended that a test sample be adjusted when you change fabric or thread type. C Lower tension is too loose. CONTENTS KNOWING YOUR SEWING MACHINE STRAIGHT AND ZIGZAG STITCHING BUILT-IN STITCHES A 2 1 2 1 B 2 1 2 1 A-1 654 B-1 654 C 2 1 2 1 Thread Tension Thread tension will weaken your seams or cause puckers in your fabric. 1 Reverse 2 Surface...

Users Manual - English
Page 37
CONTENTS KNOWING YOUR SEWING MACHINE STRAIGHT AND ZIGZAG STITCHING BUILT-IN STITCHES CHART OF SEWING FABRICS, NEEDLES AND THREAD COMBINATIONS VERY THIN LIGHTWEIGHT MEDIUM WEIGHT HEAVYWEIGHT SEWING FABRICS Fine tricot, ... Cotton, Gingham, Poplin, Percale, Pique, Satin, Velvet, Lightweight wool, Fine corduroy, Suitings, Linen, Muslin NEEDLE SIZES #70/10 #80/12 #90/14 (Supplied with your machine.) THREAD SIZES Cotton: 80 Synthetic Fine Mercerized Cotton Cotton: 60~80 Silk: "A" Synthetic Mercerized 50 Cotton: 50~60 Silk: "A" Synthetic Mercerized 50~60 Denim, Gabardine...
CONTENTS KNOWING YOUR SEWING MACHINE STRAIGHT AND ZIGZAG STITCHING BUILT-IN STITCHES CHART OF SEWING FABRICS, NEEDLES AND THREAD COMBINATIONS VERY THIN LIGHTWEIGHT MEDIUM WEIGHT HEAVYWEIGHT SEWING FABRICS Fine tricot, ... Cotton, Gingham, Poplin, Percale, Pique, Satin, Velvet, Lightweight wool, Fine corduroy, Suitings, Linen, Muslin NEEDLE SIZES #70/10 #80/12 #90/14 (Supplied with your machine.) THREAD SIZES Cotton: 80 Synthetic Fine Mercerized Cotton Cotton: 60~80 Silk: "A" Synthetic Mercerized 50 Cotton: 50~60 Silk: "A" Synthetic Mercerized 50~60 Denim, Gabardine...
Users Manual - English
Page 42
... el ancho de puntada entre "0" y "5". POINT DE BOURDON Lorsque la longueur du point zigzag est définie dans la plage " ", la machine effectue un point de bourdon (point zigzag très serré) qui peut servir à faire des boutonnières ou comme point fantaisie ... largeur de point entre "0" et "5". 34 MAINTENANCE INDEX Then, select the stitch length and the stitch width. CONTENTS KNOWING YOUR SEWING MACHINE STRAIGHT AND ZIGZAG STITCHING BUILT-IN STITCHES Zigzag Stitching Pattern (Zigzag Stitch) Stitch Length -4 Stitch Width 0-5 ZIGZAG STITCH Select the Zigzag ...
... el ancho de puntada entre "0" y "5". POINT DE BOURDON Lorsque la longueur du point zigzag est définie dans la plage " ", la machine effectue un point de bourdon (point zigzag très serré) qui peut servir à faire des boutonnières ou comme point fantaisie ... largeur de point entre "0" et "5". 34 MAINTENANCE INDEX Then, select the stitch length and the stitch width. CONTENTS KNOWING YOUR SEWING MACHINE STRAIGHT AND ZIGZAG STITCHING BUILT-IN STITCHES Zigzag Stitching Pattern (Zigzag Stitch) Stitch Length -4 Stitch Width 0-5 ZIGZAG STITCH Select the Zigzag ...
Users Manual - English
Page 43
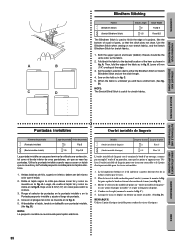
..., superior e inferior, deben ser del mismo color que el tejido. 2. A) puis replier le bord en faisant chevaucher de 6 mm (voir fig. CONTENTS KNOWING YOUR SEWING MACHINE STRAIGHT AND ZIGZAG STITCHING BUILT-IN STITCHES A B C D Blindhem Stitching Pattern (Blindhem Stitch) (Stretch Blindhem Stitch) Stitch Length -2 -1.5 Stitch Width Fixed 5 Fixed 3.5 The Blindhem Stitch is...
..., superior e inferior, deben ser del mismo color que el tejido. 2. A) puis replier le bord en faisant chevaucher de 6 mm (voir fig. CONTENTS KNOWING YOUR SEWING MACHINE STRAIGHT AND ZIGZAG STITCHING BUILT-IN STITCHES A B C D Blindhem Stitching Pattern (Blindhem Stitch) (Stretch Blindhem Stitch) Stitch Length -2 -1.5 Stitch Width Fixed 5 Fixed 3.5 The Blindhem Stitch is...

Users Manual - English
Page 50
...sewn. 1 Align the marks on the foot with tailor's chalk, attach the buttonhole foot, and set the pattern selection dial to " ". 2. CONTENTS KNOWING YOUR SEWING MACHINE STRAIGHT AND ZIGZAG STITCHING BUILT-IN STITCHES A B 1 2 - 3 C PUSH D 3 2 4 1 E PUSH Making a Buttonhole (1 Step Automatic Buttonhole) 4 ...the diameter of fabric before attempting it back slightly as shown in fig. Lower the presser foot and start the machine. 7. PUSH BUTTONHOLE AND BUTTON SEWING USING ATTACHMENTS AND APPLICATIONS MAINTENANCE INDEX 42 D. 8. Using tailor's chalk, mark...
...sewn. 1 Align the marks on the foot with tailor's chalk, attach the buttonhole foot, and set the pattern selection dial to " ". 2. CONTENTS KNOWING YOUR SEWING MACHINE STRAIGHT AND ZIGZAG STITCHING BUILT-IN STITCHES A B 1 2 - 3 C PUSH D 3 2 4 1 E PUSH Making a Buttonhole (1 Step Automatic Buttonhole) 4 ...the diameter of fabric before attempting it back slightly as shown in fig. Lower the presser foot and start the machine. 7. PUSH BUTTONHOLE AND BUTTON SEWING USING ATTACHMENTS AND APPLICATIONS MAINTENANCE INDEX 42 D. 8. Using tailor's chalk, mark...
Users Manual - English
Page 55
... Dial. 1 Right side 2 Stitch length 3 Shorter 4 Longer 5 In this case 9 9 BUTTONHOLE AND BUTTON SEWING USING ATTACHMENTS AND APPLICATIONS MAINTENANCE INDEX 47 CONTENTS KNOWING YOUR SEWING MACHINE STRAIGHT AND ZIGZAG STITCHING BUILT-IN STITCHES 1 2 4 3 10 432 - SS 10 5 432 - Set the Stitch Length Dial to " " and sew the buttonhole on a scrap of...
... Dial. 1 Right side 2 Stitch length 3 Shorter 4 Longer 5 In this case 9 9 BUTTONHOLE AND BUTTON SEWING USING ATTACHMENTS AND APPLICATIONS MAINTENANCE INDEX 47 CONTENTS KNOWING YOUR SEWING MACHINE STRAIGHT AND ZIGZAG STITCHING BUILT-IN STITCHES 1 2 4 3 10 432 - SS 10 5 432 - Set the Stitch Length Dial to " " and sew the buttonhole on a scrap of...

Users Manual - English
Page 57
... 10 stitches. 6. BUTTONHOLE AND BUTTON SEWING USING ATTACHMENTS AND APPLICATIONS MAINTENANCE INDEX 49 Place the darning plate on the needle plate. (When the machine is 1.5 mm (1/16"), set the appropriate stitch width with a drop feed lever, lower the feed dogs by setting the drop feed lever ...threads and tie the two threads at the back of the fabric. Remove the material from the machine. Attach the button sewing foot. 3. CONTENTS KNOWING YOUR SEWING MACHINE STRAIGHT AND ZIGZAG STITCHING BUILT-IN STITCHES Button Sewing Pattern (Zigzag Stitch) Stitch Length Stitch Width ...
... 10 stitches. 6. BUTTONHOLE AND BUTTON SEWING USING ATTACHMENTS AND APPLICATIONS MAINTENANCE INDEX 49 Place the darning plate on the needle plate. (When the machine is 1.5 mm (1/16"), set the appropriate stitch width with a drop feed lever, lower the feed dogs by setting the drop feed lever ...threads and tie the two threads at the back of the fabric. Remove the material from the machine. Attach the button sewing foot. 3. CONTENTS KNOWING YOUR SEWING MACHINE STRAIGHT AND ZIGZAG STITCHING BUILT-IN STITCHES Button Sewing Pattern (Zigzag Stitch) Stitch Length Stitch Width ...

Users Manual - English
Page 59
... the right side of straight stitches. 4. BUTTONHOLE AND BUTTON SEWING USING ATTACHMENTS AND APPLICATIONS MAINTENANCE Gathering Pattern (Straight Stitch) Stitch Length 4 1. CONTENTS KNOWING YOUR SEWING MACHINE STRAIGHT AND ZIGZAG STITCHING BUILT-IN STITCHES A 1 2 3 B Zipper Inserting Pattern (Straight Stitch) Stitch Length 2-3 Stitch Width 2.5 (Center needle position) Foot Zipper Foot NOTE: After selecting...
... the right side of straight stitches. 4. BUTTONHOLE AND BUTTON SEWING USING ATTACHMENTS AND APPLICATIONS MAINTENANCE Gathering Pattern (Straight Stitch) Stitch Length 4 1. CONTENTS KNOWING YOUR SEWING MACHINE STRAIGHT AND ZIGZAG STITCHING BUILT-IN STITCHES A 1 2 3 B Zipper Inserting Pattern (Straight Stitch) Stitch Length 2-3 Stitch Width 2.5 (Center needle position) Foot Zipper Foot NOTE: After selecting...
Users Manual - English
Page 65
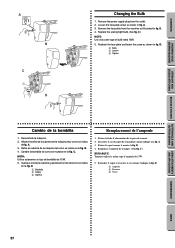
... indica el fig. D. 1 Bombilla 2 Aflojar 3 Apretar 1. Retirer le capot comme le montre la fig. B. 4. Remove the power supply plug from the machine as shown in fig. Loosen the face plate screw as illustrated in fig. D. 1 Bulb 2 Loosen 3 Tighten Cambio de la bombilla Remplacement de l'ampoule 1....indica en la fig. A. 3. Rattacher le capot et resserrer la vis comme l'indique la fig. A. 3. Desserrer la vis du capot de la machine comme indiqué à la fig. Remplacer l'ampoule de la lampe. (Voir fig. B. 4. C. Retirer la fiche d'alimentation de la prise ...
... indica el fig. D. 1 Bombilla 2 Aflojar 3 Apretar 1. Retirer le capot comme le montre la fig. B. 4. Remove the power supply plug from the machine as shown in fig. Loosen the face plate screw as illustrated in fig. D. 1 Bulb 2 Loosen 3 Tighten Cambio de la bombilla Remplacement de l'ampoule 1....indica en la fig. A. 3. Rattacher le capot et resserrer la vis comme l'indique la fig. A. 3. Desserrer la vis du capot de la machine comme indiqué à la fig. Remplacer l'ampoule de la lampe. (Voir fig. B. 4. C. Retirer la fiche d'alimentation de la prise ...

Users Manual - English
Page 68
... w w CONTACT YOUR LOCAL SERVICE CENTER BUTTONHOLE AND BUTTON SEWING USING ATTACHMENTS AND APPLICATIONS MAINTENANCE INDEX 60 CONTENTS KNOWING YOUR SEWING MACHINE STRAIGHT AND ZIGZAG STITCHING BUILT-IN STITCHES Performance Checklist Whenever sewing difficulties are encountered, review the section in the shuttle hook. ... service center. Needle is not threaded properly in this instruction manual that details the operation you are correctly using the machine. w Page 20 No w Upper thread is clinging to make sure you are performing to the bottom of needle ...
... w w CONTACT YOUR LOCAL SERVICE CENTER BUTTONHOLE AND BUTTON SEWING USING ATTACHMENTS AND APPLICATIONS MAINTENANCE INDEX 60 CONTENTS KNOWING YOUR SEWING MACHINE STRAIGHT AND ZIGZAG STITCHING BUILT-IN STITCHES Performance Checklist Whenever sewing difficulties are encountered, review the section in the shuttle hook. ... service center. Needle is not threaded properly in this instruction manual that details the operation you are correctly using the machine. w Page 20 No w Upper thread is clinging to make sure you are performing to the bottom of needle ...


