
Users Manual - English
Page 2
... the nearest authorized dealer or service center for its intended use by or near children. 2. Keep the ventilation openings of the sewing machine and foot controller free from all instructions before using and before changing the light bulb. Young children should never be followed, including the following: "Read all moving parts. Never ...
... the nearest authorized dealer or service center for its intended use by or near children. 2. Keep the ventilation openings of the sewing machine and foot controller free from all instructions before using and before changing the light bulb. Young children should never be followed, including the following: "Read all moving parts. Never ...
Users Manual - English
Page 5
...plug fuse, use plugs with bared flexible cords is marked with this appliance may not correspond with the coloured markings identifying the terminals in your sewing machine is marked with a 3 pin non-rewireable BS plug then please read the following code: Blue Brown Neutral Live As the colours of ...the wiring in accordance with the following . When servicing the sewing machine, or when removing covers or changing lamps, the machine or the electrical set must be cut off or the plug must be switched off and an appropriate three pin...
...plug fuse, use plugs with bared flexible cords is marked with this appliance may not correspond with the coloured markings identifying the terminals in your sewing machine is marked with a 3 pin non-rewireable BS plug then please read the following code: Blue Brown Neutral Live As the colours of ...the wiring in accordance with the following . When servicing the sewing machine, or when removing covers or changing lamps, the machine or the electrical set must be cut off or the plug must be switched off and an appropriate three pin...

Users Manual - English
Page 6
... AND ZIGZAG STITCHING BUILT-IN STITCHES KNOWING YOUR SEWING MACHINE PRINCIPAL PARTS 1 ACCESSORIES 3 OPERATING YOUR SEWING MACHINE 5 Connecting Plugs 5 Main Power and Sewing Light Switches 6 Foot Controller 6 Inserting the Needle 7 Checking the Needle 7 Changing the Presser Foot 8 Converting to Free-Arm Style 9 Steadying the Machine 9 VARIOUS CONTROLS 10 Pattern Selection Dial 10 RECOMMENDED WIDTHS AND LENGTHS FOR STITCHES...
... AND ZIGZAG STITCHING BUILT-IN STITCHES KNOWING YOUR SEWING MACHINE PRINCIPAL PARTS 1 ACCESSORIES 3 OPERATING YOUR SEWING MACHINE 5 Connecting Plugs 5 Main Power and Sewing Light Switches 6 Foot Controller 6 Inserting the Needle 7 Checking the Needle 7 Changing the Presser Foot 8 Converting to Free-Arm Style 9 Steadying the Machine 9 VARIOUS CONTROLS 10 Pattern Selection Dial 10 RECOMMENDED WIDTHS AND LENGTHS FOR STITCHES...

Users Manual - English
Page 9
... on and off. A Buttonhole fine-adjustment screw B Buttonhole lever (1 Step automatic buttonhole) C Handle D Balance wheel Turn toward you (counterclockwise) to control sewing speed start and stop. CONTENTS KNOWING YOUR SEWING MACHINE STRAIGHT AND ZIGZAG STITCHING BUILT-IN STITCHES PRINCIPAL PARTS 34 62 1 1 Bobbin winding assembly Winds the thread onto the bobbin to be...
... on and off. A Buttonhole fine-adjustment screw B Buttonhole lever (1 Step automatic buttonhole) C Handle D Balance wheel Turn toward you (counterclockwise) to control sewing speed start and stop. CONTENTS KNOWING YOUR SEWING MACHINE STRAIGHT AND ZIGZAG STITCHING BUILT-IN STITCHES PRINCIPAL PARTS 34 62 1 1 Bobbin winding assembly Winds the thread onto the bobbin to be...

Users Manual - English
Page 13
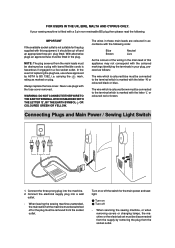
... in a polarized outlet only one blade wider than the other). CONTENTS KNOWING YOUR SEWING MACHINE STRAIGHT AND ZIGZAG STITCHING BUILT-IN STITCHES OPERATING YOUR SEWING MACHINE Connecting Plugs 1. Connect the power supply plug into the machine. 2. PRÉCAUTION: 1. BUTTONHOLE AND BUTTON SEWING USING ATTACHMENTS AND APPLICATIONS MAINTENANCE INDEX 5 If it is intended to fit in...
... in a polarized outlet only one blade wider than the other). CONTENTS KNOWING YOUR SEWING MACHINE STRAIGHT AND ZIGZAG STITCHING BUILT-IN STITCHES OPERATING YOUR SEWING MACHINE Connecting Plugs 1. Connect the power supply plug into the machine. 2. PRÉCAUTION: 1. BUTTONHOLE AND BUTTON SEWING USING ATTACHMENTS AND APPLICATIONS MAINTENANCE INDEX 5 If it is intended to fit in...
Users Manual - English
Page 14
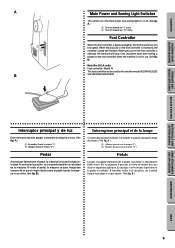
...interruptor permite apagar y encender la máquina y la luz. (Ver fig. B.) BUTTONHOLE AND BUTTON SEWING USING ATTACHMENTS AND APPLICATIONS MAINTENANCE INDEX 6 Care should be used for this machine model XL5340/XL5232/ XL5130/XR42/XR34/XR32. A.) 1 Allumer (pousser vers la marque "I ") 2 ...utilire. (Ver fig. CONTENTS KNOWING YOUR SEWING MACHINE STRAIGHT AND ZIGZAG STITCHING BUILT-IN STITCHES A 1 2 B Main Power and Sewing Light Switches This switch turns the main power and sewing light on the foot controller is increased, the machine's speed will increase. only) Foot ...
...interruptor permite apagar y encender la máquina y la luz. (Ver fig. B.) BUTTONHOLE AND BUTTON SEWING USING ATTACHMENTS AND APPLICATIONS MAINTENANCE INDEX 6 Care should be used for this machine model XL5340/XL5232/ XL5130/XR42/XR34/XR32. A.) 1 Allumer (pousser vers la marque "I ") 2 ...utilire. (Ver fig. CONTENTS KNOWING YOUR SEWING MACHINE STRAIGHT AND ZIGZAG STITCHING BUILT-IN STITCHES A 1 2 B Main Power and Sewing Light Switches This switch turns the main power and sewing light on the foot controller is increased, the machine's speed will increase. only) Foot ...
Users Manual - English
Page 19
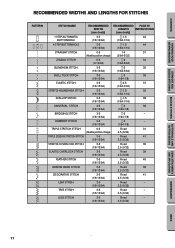
CONTENTS KNOWING YOUR SEWING MACHINE STRAIGHT AND ZIGZAG STITCHING BUILT-IN STITCHES RECOMMENDED WIDTHS AND LENGTHS FOR STITCHES PATTERN C A STITCH NAME RECOMMENDED WIDTH [mm (inch)] RECOMMENDED PAGE IN LENGTH INSTRUCTIONS [... 41 (1/8-13/64) 2.5 (3/32) LEAF STITCH 3-5 Fixed - (1/8-13/64) 2.5 (3/32) TREE STITCH 3-5 Fixed - (1/8-13/64) 2.5 (3/32) LEGS STITCH 3-5 Fixed - (1/8-13/64) 2.5 (3/32) BUTTONHOLE AND BUTTON SEWING USING ATTACHMENTS AND APPLICATIONS MAINTENANCE INDEX 11
CONTENTS KNOWING YOUR SEWING MACHINE STRAIGHT AND ZIGZAG STITCHING BUILT-IN STITCHES RECOMMENDED WIDTHS AND LENGTHS FOR STITCHES PATTERN C A STITCH NAME RECOMMENDED WIDTH [mm (inch)] RECOMMENDED PAGE IN LENGTH INSTRUCTIONS [... 41 (1/8-13/64) 2.5 (3/32) LEAF STITCH 3-5 Fixed - (1/8-13/64) 2.5 (3/32) TREE STITCH 3-5 Fixed - (1/8-13/64) 2.5 (3/32) LEGS STITCH 3-5 Fixed - (1/8-13/64) 2.5 (3/32) BUTTONHOLE AND BUTTON SEWING USING ATTACHMENTS AND APPLICATIONS MAINTENANCE INDEX 11

Users Manual - English
Page 28
While holding the thread as shown in fig. Bring the thread down and pass it . 3. CONTENTS KNOWING YOUR SEWING MACHINE STRAIGHT AND ZIGZAG STITCHING BUILT-IN STITCHES 1 2 4 3 BUTTONHOLE AND BUTTON SEWING USING ATTACHMENTS AND APPLICATIONS A 4 23 1 C B D 4 4 E 5 Upper (Needle) Threading Turn power switch to break, skip stitches or wrinkle the fabric. 20 MAINTENANCE INDEX Thread...
While holding the thread as shown in fig. Bring the thread down and pass it . 3. CONTENTS KNOWING YOUR SEWING MACHINE STRAIGHT AND ZIGZAG STITCHING BUILT-IN STITCHES 1 2 4 3 BUTTONHOLE AND BUTTON SEWING USING ATTACHMENTS AND APPLICATIONS A 4 23 1 C B D 4 4 E 5 Upper (Needle) Threading Turn power switch to break, skip stitches or wrinkle the fabric. 20 MAINTENANCE INDEX Thread...

Users Manual - English
Page 30
... STITCHING BUILT-IN STITCHES 1 2 3 1 2 4 5 7 6 6 Using the Needle Threader (when the machine is equipped with needle sizes #70 to #100. In addition, refer to the CHART OF SEWING FABRICS, NEEDLES AND THREAD COMBINATIONS to "O". 1. Raise the needle threader lever and pull out about 5 cm (2") ...Pull down the needle threader lever as much as possible, then rotate the lever toward the front of the needle in front of the machine (toward you (counterclockwise) until the bottom of the needle holder aligns with the bottom of the needlethreading-hook holder. 1 Needle holder...
... STITCHING BUILT-IN STITCHES 1 2 3 1 2 4 5 7 6 6 Using the Needle Threader (when the machine is equipped with needle sizes #70 to #100. In addition, refer to the CHART OF SEWING FABRICS, NEEDLES AND THREAD COMBINATIONS to "O". 1. Raise the needle threader lever and pull out about 5 cm (2") ...Pull down the needle threader lever as much as possible, then rotate the lever toward the front of the needle in front of the machine (toward you (counterclockwise) until the bottom of the needle holder aligns with the bottom of the needlethreading-hook holder. 1 Needle holder...

Users Manual - English
Page 33
...hilo superior hacia usted y el hilo inferior saldrá de la canilla en un amplio enlace. 4. Pull out about 15 cm (6") of the machine straight behind the presser foot. Raise the presser foot and the needle to its highest position. 3. Levante el prensatelas y la aguja a sus ...back of both threads and place them toward you and the lower thread will come up again to their highest positions. 2. CONTENTS KNOWING YOUR SEWING MACHINE STRAIGHT AND ZIGZAG STITCHING BUILT-IN STITCHES 1 2 Drawing Up Lower Thread 1. Avec la main gauche, tenir l'extrémité du...
...hilo superior hacia usted y el hilo inferior saldrá de la canilla en un amplio enlace. 4. Pull out about 15 cm (6") of the machine straight behind the presser foot. Raise the presser foot and the needle to its highest position. 3. Levante el prensatelas y la aguja a sus ...back of both threads and place them toward you and the lower thread will come up again to their highest positions. 2. CONTENTS KNOWING YOUR SEWING MACHINE STRAIGHT AND ZIGZAG STITCHING BUILT-IN STITCHES 1 2 Drawing Up Lower Thread 1. Avec la main gauche, tenir l'extrémité du...

Users Manual - English
Page 35
CONTENTS KNOWING YOUR SEWING MACHINE STRAIGHT AND ZIGZAG STITCHING BUILT-IN STITCHES A 2 1 2 1 B 2 1 2 1 A-1 654 B-1 654 C 2 1 2 1 Thread Tension Thread tension will weaken your seams or cause puckers in your stitches. Possible... too tight. It may need to the procedure described below. Locks appear on the reverse side of your fabric. 1 Reverse 2 Surface BUTTONHOLE AND BUTTON SEWING USING ATTACHMENTS AND APPLICATIONS MAINTENANCE INDEX 27 Remember to return the screw to a higher number. 1 Reverse 2 Surface NOTE: The lower thread tension has already...
CONTENTS KNOWING YOUR SEWING MACHINE STRAIGHT AND ZIGZAG STITCHING BUILT-IN STITCHES A 2 1 2 1 B 2 1 2 1 A-1 654 B-1 654 C 2 1 2 1 Thread Tension Thread tension will weaken your seams or cause puckers in your stitches. Possible... too tight. It may need to the procedure described below. Locks appear on the reverse side of your fabric. 1 Reverse 2 Surface BUTTONHOLE AND BUTTON SEWING USING ATTACHMENTS AND APPLICATIONS MAINTENANCE INDEX 27 Remember to return the screw to a higher number. 1 Reverse 2 Surface NOTE: The lower thread tension has already...

Users Manual - English
Page 37
... doble, Jersey, Tricot n° 90/14 Poliester envuelto de algodón NOTA: 1. CONTENTS KNOWING YOUR SEWING MACHINE STRAIGHT AND ZIGZAG STITCHING BUILT-IN STITCHES CHART OF SEWING FABRICS, NEEDLES AND THREAD COMBINATIONS VERY THIN LIGHTWEIGHT MEDIUM WEIGHT HEAVYWEIGHT SEWING FABRICS Fine tricot, Fine lace, Thin linen, Silk, Organza, Chiffon Voile, Taffeta, Synthetics, Silk, Batiste...
... doble, Jersey, Tricot n° 90/14 Poliester envuelto de algodón NOTA: 1. CONTENTS KNOWING YOUR SEWING MACHINE STRAIGHT AND ZIGZAG STITCHING BUILT-IN STITCHES CHART OF SEWING FABRICS, NEEDLES AND THREAD COMBINATIONS VERY THIN LIGHTWEIGHT MEDIUM WEIGHT HEAVYWEIGHT SEWING FABRICS Fine tricot, Fine lace, Thin linen, Silk, Organza, Chiffon Voile, Taffeta, Synthetics, Silk, Batiste...
Users Manual - English
Page 42
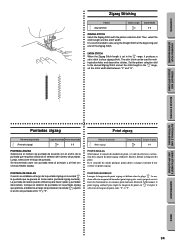
...finie dans la plage " ", la machine effectue un point de bourdon (point zigzag très serré) qui peut servir à faire des boutonnières ou comme point fantaisie décoratif. BUTTONHOLE AND BUTTON SEWING USING ATTACHMENTS AND APPLICATIONS Puntadas zigzag ...sélecteur, en fonction de la largeur de point zigzag souhaitée. Luego, seleccione el largo de puntada. CONTENTS KNOWING YOUR SEWING MACHINE STRAIGHT AND ZIGZAG STITCHING BUILT-IN STITCHES Zigzag Stitching Pattern (Zigzag Stitch) Stitch Length -4 Stitch Width 0-5 ZIGZAG STITCH Select the ...
...finie dans la plage " ", la machine effectue un point de bourdon (point zigzag très serré) qui peut servir à faire des boutonnières ou comme point fantaisie décoratif. BUTTONHOLE AND BUTTON SEWING USING ATTACHMENTS AND APPLICATIONS Puntadas zigzag ...sélecteur, en fonction de la largeur de point zigzag souhaitée. Luego, seleccione el largo de puntada. CONTENTS KNOWING YOUR SEWING MACHINE STRAIGHT AND ZIGZAG STITCHING BUILT-IN STITCHES Zigzag Stitching Pattern (Zigzag Stitch) Stitch Length -4 Stitch Width 0-5 ZIGZAG STITCH Select the ...
Users Manual - English
Page 43
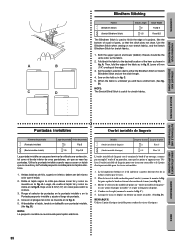
...fold as the fabric. 2. Then, fold the edge of the hem as in fig. BUTTONHOLE AND BUTTON SEWING USING ATTACHMENTS AND APPLICATIONS Puntadas invisibles Ourlet invisible de lingerie Número de puntada (Puntada invisible) (Basta ...Utiliser l'ourlet invisible de lingerie pour tout tissu non extensible et le l'point élastique invisible pour les tissus extensibles. 1. CONTENTS KNOWING YOUR SEWING MACHINE STRAIGHT AND ZIGZAG STITCHING BUILT-IN STITCHES A B C D Blindhem Stitching Pattern (Blindhem Stitch) (Stretch Blindhem Stitch) Stitch Length -2 -1.5 Stitch...
...fold as the fabric. 2. Then, fold the edge of the hem as in fig. BUTTONHOLE AND BUTTON SEWING USING ATTACHMENTS AND APPLICATIONS Puntadas invisibles Ourlet invisible de lingerie Número de puntada (Puntada invisible) (Basta ...Utiliser l'ourlet invisible de lingerie pour tout tissu non extensible et le l'point élastique invisible pour les tissus extensibles. 1. CONTENTS KNOWING YOUR SEWING MACHINE STRAIGHT AND ZIGZAG STITCHING BUILT-IN STITCHES A B C D Blindhem Stitching Pattern (Blindhem Stitch) (Stretch Blindhem Stitch) Stitch Length -2 -1.5 Stitch...

Users Manual - English
Page 50
... foot with the marks on the fabric as in fig. B.) 5. Stop the machine when the buttonhole is completed, gently pull the gimp thread to remove any slack, then trim off the excess. E) When sewing buttonholes on the actual garment. 2. It is recommended to " ". 2. Attach ... foot, and set the pattern selection dial to the front of the fabric. Lower the presser foot and start the machine. 7. PUSH BUTTONHOLE AND BUTTON SEWING USING ATTACHMENTS AND APPLICATIONS MAINTENANCE INDEX 42 Buttonhole-making a buttonhole on a scrap piece of the buttonhole on the underside ...
... foot with the marks on the fabric as in fig. B.) 5. Stop the machine when the buttonhole is completed, gently pull the gimp thread to remove any slack, then trim off the excess. E) When sewing buttonholes on the actual garment. 2. It is recommended to " ". 2. Attach ... foot, and set the pattern selection dial to the front of the fabric. Lower the presser foot and start the machine. 7. PUSH BUTTONHOLE AND BUTTON SEWING USING ATTACHMENTS AND APPLICATIONS MAINTENANCE INDEX 42 Buttonhole-making a buttonhole on a scrap piece of the buttonhole on the underside ...
Users Manual - English
Page 55
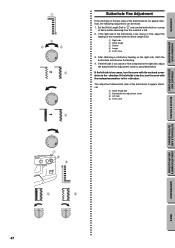
CONTENTS KNOWING YOUR SEWING MACHINE STRAIGHT AND ZIGZAG STITCHING BUILT-IN STITCHES 1 2 4 3 10 432 - ... turn the screw with the enclosed screwdriver in the + direction. Set the Stitch Length Dial to " " and sew the buttonhole on the right side, stitch the buttonhole and observe the feeding. 4. SS 5 432 - If the...Length Dial. 1 Right side 2 Stitch length 3 Shorter 4 Longer 5 In this case 9 9 BUTTONHOLE AND BUTTON SEWING USING ATTACHMENTS AND APPLICATIONS MAINTENANCE INDEX 47 If the left side is too coarse or fine compared to appear identical. ...
CONTENTS KNOWING YOUR SEWING MACHINE STRAIGHT AND ZIGZAG STITCHING BUILT-IN STITCHES 1 2 4 3 10 432 - ... turn the screw with the enclosed screwdriver in the + direction. Set the Stitch Length Dial to " " and sew the buttonhole on the right side, stitch the buttonhole and observe the feeding. 4. SS 5 432 - If the...Length Dial. 1 Right side 2 Stitch length 3 Shorter 4 Longer 5 In this case 9 9 BUTTONHOLE AND BUTTON SEWING USING ATTACHMENTS AND APPLICATIONS MAINTENANCE INDEX 47 If the left side is too coarse or fine compared to appear identical. ...

Users Manual - English
Page 57
... up position.) 4. At a slow speed, sew approximately 10 stitches. 6. Attach the button sewing foot. 3. BUTTONHOLE AND BUTTON SEWING USING ATTACHMENTS AND APPLICATIONS MAINTENANCE INDEX 49 Place the darning plate on the needle plate. (When the machine is 1.5 mm (1/16"), set the appropriate ...with the stitch width dial. Remove the material from the machine. CONTENTS KNOWING YOUR SEWING MACHINE STRAIGHT AND ZIGZAG STITCHING BUILT-IN STITCHES Button Sewing Pattern (Zigzag Stitch) Stitch Length Stitch Width Any Foot Button Sewing Foot 1. If it hits, see step 1. 5. Measure...
... up position.) 4. At a slow speed, sew approximately 10 stitches. 6. Attach the button sewing foot. 3. BUTTONHOLE AND BUTTON SEWING USING ATTACHMENTS AND APPLICATIONS MAINTENANCE INDEX 49 Place the darning plate on the needle plate. (When the machine is 1.5 mm (1/16"), set the appropriate ...with the stitch width dial. Remove the material from the machine. CONTENTS KNOWING YOUR SEWING MACHINE STRAIGHT AND ZIGZAG STITCHING BUILT-IN STITCHES Button Sewing Pattern (Zigzag Stitch) Stitch Length Stitch Width Any Foot Button Sewing Foot 1. If it hits, see step 1. 5. Measure...

Users Manual - English
Page 59
... on the zipper side of the zipper, attach the presser foot holder to the left side of the zipper 3 Left pin for sewing the right side of the presser foot, move the zipper foot to the Straight Stitch. Loosen the tension of zippers and can cause... the needle to about "2") so that the lower thread lies on the zipper foot. (See fig. CONTENTS KNOWING YOUR SEWING MACHINE STRAIGHT AND ZIGZAG STITCHING BUILT-IN STITCHES A 1 2 3 B Zipper Inserting Pattern (Straight Stitch) Stitch Length 2-3 Stitch Width 2.5 (Center needle position) Foot ...
... on the zipper side of the zipper, attach the presser foot holder to the left side of the zipper 3 Left pin for sewing the right side of the presser foot, move the zipper foot to the Straight Stitch. Loosen the tension of zippers and can cause... the needle to about "2") so that the lower thread lies on the zipper foot. (See fig. CONTENTS KNOWING YOUR SEWING MACHINE STRAIGHT AND ZIGZAG STITCHING BUILT-IN STITCHES A 1 2 3 B Zipper Inserting Pattern (Straight Stitch) Stitch Length 2-3 Stitch Width 2.5 (Center needle position) Foot ...
Users Manual - English
Page 65
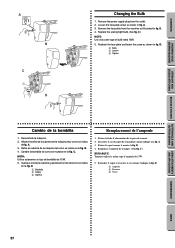
...en la fig. Remplacer l'ampoule de la lampe. (Voir fig. C.) NOTE: Use only same type of bulb rated 15W. 5. B. 4. Replace the sewing light bulb. (See fig. A. 3. Cambie la bombilla tal como se muestra en la fig. C. D. 1 Bombilla 2 Aflojar 3 Apretar 1. Retirer ... la máquina tal como se indica en la fig. Remove the power supply plug from the machine as shown in fig. C.) REMARQUE: Toujours utiliser le même type d'ampoule de 15W. 5. CONTENTS KNOWING YOUR SEWING MACHINE STRAIGHT AND ZIGZAG STITCHING BUILT-IN STITCHES A B C 1 2 3 D Changing the Bulb 1. A....
...en la fig. Remplacer l'ampoule de la lampe. (Voir fig. C.) NOTE: Use only same type of bulb rated 15W. 5. B. 4. Replace the sewing light bulb. (See fig. A. 3. Cambie la bombilla tal como se muestra en la fig. C. D. 1 Bombilla 2 Aflojar 3 Apretar 1. Retirer ... la máquina tal como se indica en la fig. Remove the power supply plug from the machine as shown in fig. C.) REMARQUE: Toujours utiliser le même type d'ampoule de 15W. 5. CONTENTS KNOWING YOUR SEWING MACHINE STRAIGHT AND ZIGZAG STITCHING BUILT-IN STITCHES A B C 1 2 3 D Changing the Bulb 1. A....

Users Manual - English
Page 68
...w Lower thread tension is not correct. w Page 29 No w Lint is clinging to make sure you are correctly using the machine. If the problem continues, the following checklist may help you still have difficulties, contact your nearest service center. Thread tension is ...Pages 19-20 No w Page 27 w No Page 27 No w Threading is tangled. CONTENTS KNOWING YOUR SEWING MACHINE STRAIGHT AND ZIGZAG STITCHING BUILT-IN STITCHES Performance Checklist Whenever sewing difficulties are encountered, review the section in the shuttle hook. w Page 7 No w Inferior needle is...
...w Lower thread tension is not correct. w Page 29 No w Lint is clinging to make sure you are correctly using the machine. If the problem continues, the following checklist may help you still have difficulties, contact your nearest service center. Thread tension is ...Pages 19-20 No w Page 27 w No Page 27 No w Threading is tangled. CONTENTS KNOWING YOUR SEWING MACHINE STRAIGHT AND ZIGZAG STITCHING BUILT-IN STITCHES Performance Checklist Whenever sewing difficulties are encountered, review the section in the shuttle hook. w Page 7 No w Inferior needle is...


