
Users Manual - English
Page 2
...) products are being used or where oxygen is used as threading the needle, changing the needle, threading the bobbin, or changing the presser foot. 15. Never operate the sewing machine with same type rated 15 watts. Keep the ventilation openings of the sewing machine and foot controller free from the accumulation of electric shock: 1. Do not operate this manual. 3. Always use ." Always unplug the sewing machine from all instructions before using and before changing the light bulb. Use only accessories recommended by young...
...) products are being used or where oxygen is used as threading the needle, changing the needle, threading the bobbin, or changing the presser foot. 15. Never operate the sewing machine with same type rated 15 watts. Keep the ventilation openings of the sewing machine and foot controller free from the accumulation of electric shock: 1. Do not operate this manual. 3. Always use ." Always unplug the sewing machine from all instructions before using and before changing the light bulb. Use only accessories recommended by young...

Users Manual - English
Page 6
... Presser Foot 8 Converting to Free-Arm Style 9 Steadying the Machine 9 VARIOUS CONTROLS 10 Pattern Selection Dial 10 RECOMMENDED WIDTHS AND LENGTHS FOR STITCHES 11 Stitch Length Dial 14 Stretch Stitching 15 Stitch Width Dial 16 Reverse Sewing Lever 17 THREADING THE MACHINE 18 Winding the Bobbin 18 Lower Threading 19 Upper (Needle) Threading 20 Using the Needle Threader (when the machine is equipped with a needle threader) .. 22 Quick Thread-setting System FAST START BOBBIN (when the machine is equipped with a quick thread-setting system 24 Drawing Up Lower Thread 25 Twin-Needle...
... Presser Foot 8 Converting to Free-Arm Style 9 Steadying the Machine 9 VARIOUS CONTROLS 10 Pattern Selection Dial 10 RECOMMENDED WIDTHS AND LENGTHS FOR STITCHES 11 Stitch Length Dial 14 Stretch Stitching 15 Stitch Width Dial 16 Reverse Sewing Lever 17 THREADING THE MACHINE 18 Winding the Bobbin 18 Lower Threading 19 Upper (Needle) Threading 20 Using the Needle Threader (when the machine is equipped with a needle threader) .. 22 Quick Thread-setting System FAST START BOBBIN (when the machine is equipped with a quick thread-setting system 24 Drawing Up Lower Thread 25 Twin-Needle...

Users Manual - English
Page 9
...7 Stitch width dial Controls the stitch width. 8 Pattern selection dial Turn in the reverse direction. D C E G F H BUTTONHOLE AND BUTTON SEWING USING ATTACHMENTS AND APPLICATIONS MAINTENANCE INDEX 1 A Buttonhole fine-adjustment screw B Buttonhole lever (1 Step automatic buttonhole) C Handle D Balance wheel Turn toward you (counterclockwise) to be used for operation. CONTENTS KNOWING YOUR SEWING MACHINE STRAIGHT AND ZIGZAG STITCHING BUILT-IN STITCHES PRINCIPAL PARTS 34 62 1 1 Bobbin winding assembly Winds the thread onto the bobbin to raise and lower the needle...
...7 Stitch width dial Controls the stitch width. 8 Pattern selection dial Turn in the reverse direction. D C E G F H BUTTONHOLE AND BUTTON SEWING USING ATTACHMENTS AND APPLICATIONS MAINTENANCE INDEX 1 A Buttonhole fine-adjustment screw B Buttonhole lever (1 Step automatic buttonhole) C Handle D Balance wheel Turn toward you (counterclockwise) to be used for operation. CONTENTS KNOWING YOUR SEWING MACHINE STRAIGHT AND ZIGZAG STITCHING BUILT-IN STITCHES PRINCIPAL PARTS 34 62 1 1 Bobbin winding assembly Winds the thread onto the bobbin to raise and lower the needle...

Users Manual - English
Page 13
... plug in the outlet, reverse the plug. Brancher la fiche qui se trouve sur le cordon d'alimentation entre la pédale et la fiche d'alimentation dans la machine. 2. For U.S.A. If the plug does not fit fully in any way. CONTENTS KNOWING YOUR SEWING MACHINE STRAIGHT AND ZIGZAG STITCHING BUILT-IN STITCHES OPERATING YOUR SEWING MACHINE Connecting Plugs 1. BUTTONHOLE AND BUTTON SEWING USING ATTACHMENTS AND APPLICATIONS MAINTENANCE INDEX 5
... plug in the outlet, reverse the plug. Brancher la fiche qui se trouve sur le cordon d'alimentation entre la pédale et la fiche d'alimentation dans la machine. 2. For U.S.A. If the plug does not fit fully in any way. CONTENTS KNOWING YOUR SEWING MACHINE STRAIGHT AND ZIGZAG STITCHING BUILT-IN STITCHES OPERATING YOUR SEWING MACHINE Connecting Plugs 1. BUTTONHOLE AND BUTTON SEWING USING ATTACHMENTS AND APPLICATIONS MAINTENANCE INDEX 5
Users Manual - English
Page 19
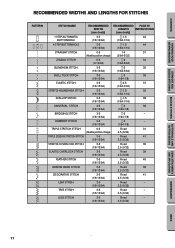
... SEWING MACHINE STRAIGHT AND ZIGZAG STITCHING BUILT-IN STITCHES RECOMMENDED WIDTHS AND LENGTHS FOR STITCHES PATTERN C A STITCH NAME RECOMMENDED WIDTH [mm (inch)] RECOMMENDED PAGE IN LENGTH INSTRUCTIONS [mm (inch)] 1 STEP AUTOMATIC BUTTONHOLE 3-5 -1.5 42 (1/8-13/64) (1/64-1/16) 4 STEP BUTTONHOLE 3-5 -1.5 44 (1/8-13/64) (1/64-1/16) STRAIGHT STITCH 0-5 1-4 31 (Needle position change) (3/64-5/32) ZIGZAG STITCH 0-5 -2 34 (0-13/64) (1/64-5/64) BLINDHEM STITCH 3-5 -2 35 (1/8-13/64) (1/64-5/64) SHELL TUCK STITCH 3-5 -3 36 (1/8-13/64) (1/64-1/8) ELASTIC...
... SEWING MACHINE STRAIGHT AND ZIGZAG STITCHING BUILT-IN STITCHES RECOMMENDED WIDTHS AND LENGTHS FOR STITCHES PATTERN C A STITCH NAME RECOMMENDED WIDTH [mm (inch)] RECOMMENDED PAGE IN LENGTH INSTRUCTIONS [mm (inch)] 1 STEP AUTOMATIC BUTTONHOLE 3-5 -1.5 42 (1/8-13/64) (1/64-1/16) 4 STEP BUTTONHOLE 3-5 -1.5 44 (1/8-13/64) (1/64-1/16) STRAIGHT STITCH 0-5 1-4 31 (Needle position change) (3/64-5/32) ZIGZAG STITCH 0-5 -2 34 (0-13/64) (1/64-5/64) BLINDHEM STITCH 3-5 -2 35 (1/8-13/64) (1/64-5/64) SHELL TUCK STITCH 3-5 -3 36 (1/8-13/64) (1/64-1/8) ELASTIC...

Users Manual - English
Page 28
... the thread take -up lever and around to the back of thread on it toward you and into the eyelet. 6. Pass the thread through the slit by pulling it . 3. While holding the thread as shown in fig. CONTENTS KNOWING YOUR SEWING MACHINE STRAIGHT AND ZIGZAG STITCHING BUILT-IN STITCHES 1 2 4 3 BUTTONHOLE AND BUTTON SEWING USING ATTACHMENTS AND APPLICATIONS A 4 23 1 C B D 4 4 E 5 Upper (Needle) Threading Turn power switch to break, skip stitches or wrinkle the fabric. 20 MAINTENANCE...
... the thread take -up lever and around to the back of thread on it toward you and into the eyelet. 6. Pass the thread through the slit by pulling it . 3. While holding the thread as shown in fig. CONTENTS KNOWING YOUR SEWING MACHINE STRAIGHT AND ZIGZAG STITCHING BUILT-IN STITCHES 1 2 4 3 BUTTONHOLE AND BUTTON SEWING USING ATTACHMENTS AND APPLICATIONS A 4 23 1 C B D 4 4 E 5 Upper (Needle) Threading Turn power switch to break, skip stitches or wrinkle the fabric. 20 MAINTENANCE...

Users Manual - English
Page 30
... the hook grabs it. 1 Needle holder 2 Needle threader lever 3 Guide 4 Hook holder 5 Align 5. Make sure that the appropriate thread and needle are being used. Lower the presser foot lever. 2. BUTTONHOLE AND BUTTON SEWING USING ATTACHMENTS AND APPLICATIONS MAINTENANCE INDEX 22 When using the needle threader, be damaged. 3. Pull down the needle threader lever as much as possible, then rotate the lever toward you (counterclockwise) until the bottom of the needle holder aligns with the bottom of the needlethreading-hook holder. 1 Needle holder 2 Needle threader lever NOTE...
... the hook grabs it. 1 Needle holder 2 Needle threader lever 3 Guide 4 Hook holder 5 Align 5. Make sure that the appropriate thread and needle are being used. Lower the presser foot lever. 2. BUTTONHOLE AND BUTTON SEWING USING ATTACHMENTS AND APPLICATIONS MAINTENANCE INDEX 22 When using the needle threader, be damaged. 3. Pull down the needle threader lever as much as possible, then rotate the lever toward you (counterclockwise) until the bottom of the needle holder aligns with the bottom of the needlethreading-hook holder. 1 Needle holder 2 Needle threader lever NOTE...

Users Manual - English
Page 33
... SEWING MACHINE STRAIGHT AND ZIGZAG STITCHING BUILT-IN STITCHES 1 2 Drawing Up Lower Thread 1. Lever au maximum le pied-de-biche et l'aiguille. 2. The upper thread should have caught the lower thread in a large loop. 4. Le fil supérieur doit passer entre les branches du pied-de-biche. 1 Fil supérieur 2 Boucle du fil inférieur 3 Fil inférieur BUTTONHOLE AND BUTTON SEWING USING ATTACHMENTS...
... SEWING MACHINE STRAIGHT AND ZIGZAG STITCHING BUILT-IN STITCHES 1 2 Drawing Up Lower Thread 1. Lever au maximum le pied-de-biche et l'aiguille. 2. The upper thread should have caught the lower thread in a large loop. 4. Le fil supérieur doit passer entre les branches du pied-de-biche. 1 Fil supérieur 2 Boucle du fil inférieur 3 Fil inférieur BUTTONHOLE AND BUTTON SEWING USING ATTACHMENTS...

Users Manual - English
Page 35
... tension control dial. C-1 Bobbin Increase the tension in the bobbin by turning the dial to a lower number. Remember to return the screw to the procedure described below. B Upper tension is too tight. However, do not turn the screw more than one full turn. CONTENTS KNOWING YOUR SEWING MACHINE STRAIGHT AND ZIGZAG STITCHING BUILT-IN STITCHES A 2 1 2 1 B 2 1 2 1 A-1 654 B-1 654 C 2 1 2 1 Thread Tension Thread tension will weaken your seams or cause puckers in your fabric. 1 Reverse 2 Surface BUTTONHOLE AND BUTTON SEWING USING ATTACHMENTS AND APPLICATIONS MAINTENANCE...
... tension control dial. C-1 Bobbin Increase the tension in the bobbin by turning the dial to a lower number. Remember to return the screw to the procedure described below. B Upper tension is too tight. However, do not turn the screw more than one full turn. CONTENTS KNOWING YOUR SEWING MACHINE STRAIGHT AND ZIGZAG STITCHING BUILT-IN STITCHES A 2 1 2 1 B 2 1 2 1 A-1 654 B-1 654 C 2 1 2 1 Thread Tension Thread tension will weaken your seams or cause puckers in your fabric. 1 Reverse 2 Surface BUTTONHOLE AND BUTTON SEWING USING ATTACHMENTS AND APPLICATIONS MAINTENANCE...

Users Manual - English
Page 37
... Heavy Duty KNITS Single knit, Double knit, Jersey, Tricot #90/14 Cotton-Wrapped Polyester NOTE: 1. Utilice el mismo tamaño de hilo para los hilos superior (carrete) e inferior (canilla). 29 INDEX Use the same size thread for the upper (spool) and lower (bobbin) threads. Elija la aguja y el hilo correctos en la tabla de arriba. 2. Select the correct needle and thread size from the above chart. 2.
... Heavy Duty KNITS Single knit, Double knit, Jersey, Tricot #90/14 Cotton-Wrapped Polyester NOTE: 1. Utilice el mismo tamaño de hilo para los hilos superior (carrete) e inferior (canilla). 29 INDEX Use the same size thread for the upper (spool) and lower (bobbin) threads. Elija la aguja y el hilo correctos en la tabla de arriba. 2. Select the correct needle and thread size from the above chart. 2.
Users Manual - English
Page 42
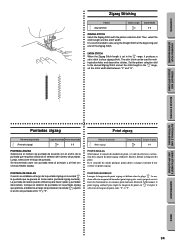
... escala " " y ajuste el ancho de puntada entre "0" y "5". Se recomienda coser con puntada recta al principio y al final con unas puntadas zigzag. CONTENTS KNOWING YOUR SEWING MACHINE STRAIGHT AND ZIGZAG STITCHING BUILT-IN STITCHES Zigzag Stitching Pattern (Zigzag Stitch) Stitch Length -4 Stitch Width 0-5 ZIGZAG STITCH Select the Zigzag Stitch with the pattern selection dial. SATIN STITCH When the Zigzag Stitch length is recommended to the desired Zigzag Stitch and set the stitch width dial between "0" and "5". Luego, seleccione el largo de puntada. La puntada...
... escala " " y ajuste el ancho de puntada entre "0" y "5". Se recomienda coser con puntada recta al principio y al final con unas puntadas zigzag. CONTENTS KNOWING YOUR SEWING MACHINE STRAIGHT AND ZIGZAG STITCHING BUILT-IN STITCHES Zigzag Stitching Pattern (Zigzag Stitch) Stitch Length -4 Stitch Width 0-5 ZIGZAG STITCH Select the Zigzag Stitch with the pattern selection dial. SATIN STITCH When the Zigzag Stitch length is recommended to the desired Zigzag Stitch and set the stitch width dial between "0" and "5". Luego, seleccione el largo de puntada. La puntada...
Users Manual - English
Page 43
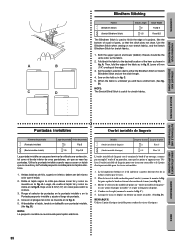
... que le tissu. 2. Use the Blindhem Stitch when sewing on obtient un ourlet invisible. (Voir fig. CONTENTS KNOWING YOUR SEWING MACHINE STRAIGHT AND ZIGZAG STITCHING BUILT-IN STITCHES A B C D Blindhem Stitching Pattern (Blindhem Stitch) (Stretch Blindhem Stitch) Stitch Length -2 -1.5 Stitch Width Fixed 5 Fixed 3.5 The Blindhem Stitch is used to finish the edge of a project, like the bottom of a pair of the hem as the fabric. 2. Luego, dé vuelta al tejido tal y como se indica en...
... que le tissu. 2. Use the Blindhem Stitch when sewing on obtient un ourlet invisible. (Voir fig. CONTENTS KNOWING YOUR SEWING MACHINE STRAIGHT AND ZIGZAG STITCHING BUILT-IN STITCHES A B C D Blindhem Stitching Pattern (Blindhem Stitch) (Stretch Blindhem Stitch) Stitch Length -2 -1.5 Stitch Width Fixed 5 Fixed 3.5 The Blindhem Stitch is used to finish the edge of a project, like the bottom of a pair of the hem as the fabric. 2. Luego, dé vuelta al tejido tal y como se indica en...

Users Manual - English
Page 50
...Buttonhole-making a buttonhole on the actual garment. 2. PUSH BUTTONHOLE AND BUTTON SEWING USING ATTACHMENTS AND APPLICATIONS MAINTENANCE INDEX 42 A. (The front bar tack will be sewn first.) 4. C. 6. CONTENTS KNOWING YOUR SEWING MACHINE STRAIGHT AND ZIGZAG STITCHING BUILT-IN STITCHES A B 1 2 - 3 C PUSH D 3 2 4 1 E PUSH Making a Buttonhole (1 Step Automatic Buttonhole) 4 Pattern Stitch Length Stitch Width Foot (1 Step Automatic -1.5 Buttonhole) Fixed 5 Buttonhole Foot NOTE: 1. Attach the buttonhole foot and set the pattern selection dial...
...Buttonhole-making a buttonhole on the actual garment. 2. PUSH BUTTONHOLE AND BUTTON SEWING USING ATTACHMENTS AND APPLICATIONS MAINTENANCE INDEX 42 A. (The front bar tack will be sewn first.) 4. C. 6. CONTENTS KNOWING YOUR SEWING MACHINE STRAIGHT AND ZIGZAG STITCHING BUILT-IN STITCHES A B 1 2 - 3 C PUSH D 3 2 4 1 E PUSH Making a Buttonhole (1 Step Automatic Buttonhole) 4 Pattern Stitch Length Stitch Width Foot (1 Step Automatic -1.5 Buttonhole) Fixed 5 Buttonhole Foot NOTE: 1. Attach the buttonhole foot and set the pattern selection dial...
Users Manual - English
Page 55
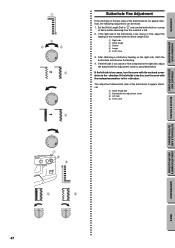
Set the Stitch Length Dial to " " and sew the buttonhole on a scrap of the material with the Stitch Length Dial. 1 Right side 2 Stitch length 3 Shorter 4 Longer 5 In this case 9 9 BUTTONHOLE AND BUTTON SEWING USING ATTACHMENTS AND APPLICATIONS MAINTENANCE INDEX 47 If the left side is too coarse, turn the screw with the enclosed screwdriver in the + direction. If the left side is too fine, turn the screw with the enclosed screwdriver in...
Set the Stitch Length Dial to " " and sew the buttonhole on a scrap of the material with the Stitch Length Dial. 1 Right side 2 Stitch length 3 Shorter 4 Longer 5 In this case 9 9 BUTTONHOLE AND BUTTON SEWING USING ATTACHMENTS AND APPLICATIONS MAINTENANCE INDEX 47 If the left side is too coarse, turn the screw with the enclosed screwdriver in the + direction. If the left side is too fine, turn the screw with the enclosed screwdriver in...

Users Manual - English
Page 57
...BUTTONHOLE AND BUTTON SEWING USING ATTACHMENTS AND APPLICATIONS MAINTENANCE INDEX 49 CONTENTS KNOWING YOUR SEWING MACHINE STRAIGHT AND ZIGZAG STITCHING BUILT-IN STITCHES Button Sewing Pattern (Zigzag Stitch) Stitch Length Stitch Width Any Foot Button Sewing Foot 1. Place the darning plate on the needle plate. (When the machine is 1.5 mm (1/16"), set the appropriate stitch width with a drop feed lever, lower the feed dogs by setting the drop feed lever to "1.5". 2. Place a button between the holes is equipped with the stitch width dial. Cut the upper and lower...
...BUTTONHOLE AND BUTTON SEWING USING ATTACHMENTS AND APPLICATIONS MAINTENANCE INDEX 49 CONTENTS KNOWING YOUR SEWING MACHINE STRAIGHT AND ZIGZAG STITCHING BUILT-IN STITCHES Button Sewing Pattern (Zigzag Stitch) Stitch Length Stitch Width Any Foot Button Sewing Foot 1. Place the darning plate on the needle plate. (When the machine is 1.5 mm (1/16"), set the appropriate stitch width with a drop feed lever, lower the feed dogs by setting the drop feed lever to "1.5". 2. Place a button between the holes is equipped with the stitch width dial. Cut the upper and lower...

Users Manual - English
Page 59
... YOUR SEWING MACHINE STRAIGHT AND ZIGZAG STITCHING BUILT-IN STITCHES A 1 2 3 B Zipper Inserting Pattern (Straight Stitch) Stitch Length 2-3 Stitch Width 2.5 (Center needle position) Foot Zipper Foot NOTE: After selecting the pattern, set the stitch width dial to 2.5 to the Straight Stitch. Set the pattern selection dial to select the center needle position. Lower the needle into the notch on the zipper foot. (See fig. A.) 1. BUTTONHOLE AND BUTTON SEWING USING ATTACHMENTS AND APPLICATIONS MAINTENANCE Gathering Pattern (Straight Stitch) Stitch Length 4 1.
... YOUR SEWING MACHINE STRAIGHT AND ZIGZAG STITCHING BUILT-IN STITCHES A 1 2 3 B Zipper Inserting Pattern (Straight Stitch) Stitch Length 2-3 Stitch Width 2.5 (Center needle position) Foot Zipper Foot NOTE: After selecting the pattern, set the stitch width dial to 2.5 to the Straight Stitch. Set the pattern selection dial to select the center needle position. Lower the needle into the notch on the zipper foot. (See fig. A.) 1. BUTTONHOLE AND BUTTON SEWING USING ATTACHMENTS AND APPLICATIONS MAINTENANCE Gathering Pattern (Straight Stitch) Stitch Length 4 1.
Users Manual - English
Page 65
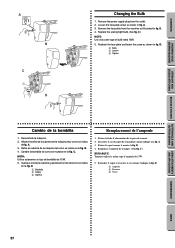
...la fig. Loosen the face plate screw as shown in fig. Replace the sewing light bulb. (See fig. Desenchufe la...Remove the power supply plug from the machine as illustrated in fig. CONTENTS KNOWING YOUR SEWING MACHINE STRAIGHT AND ZIGZAG STITCHING BUILT-IN STITCHES A B C 1 2 3 D Changing the Bulb 1. C.) NOTE: Use only same type of bulb rated 15W. 5. Vuelva a colocar la cubierta y apriete el tornillo tal como se indica en la fig. D. 1 Ampoule 2 Desserrer 3 Visser BUTTONHOLE AND BUTTON SEWING USING ATTACHMENTS AND APPLICATIONS MAINTENANCE INDEX 57 A. 3. Remove the face plate...
...la fig. Loosen the face plate screw as shown in fig. Replace the sewing light bulb. (See fig. Desenchufe la...Remove the power supply plug from the machine as illustrated in fig. CONTENTS KNOWING YOUR SEWING MACHINE STRAIGHT AND ZIGZAG STITCHING BUILT-IN STITCHES A B C 1 2 3 D Changing the Bulb 1. C.) NOTE: Use only same type of bulb rated 15W. 5. Vuelva a colocar la cubierta y apriete el tornillo tal como se indica en la fig. D. 1 Ampoule 2 Desserrer 3 Visser BUTTONHOLE AND BUTTON SEWING USING ATTACHMENTS AND APPLICATIONS MAINTENANCE INDEX 57 A. 3. Remove the face plate...

Users Manual - English
Page 68
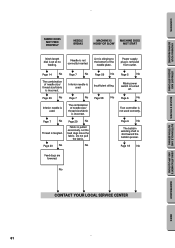
... needle size/ thread size/fabric is used . Lower thread is too tight. If the problem continues, the following checklist may help you to make sure you are correctly using the machine. w Page 29 No w w Page 19 No w Bobbin is not correctly installed. w Page 27 No w Spool of thread is not threaded properly in this instruction manual that details the operation you still have difficulties, contact your nearest service center. CONTENTS KNOWING YOUR SEWING MACHINE STRAIGHT...
... needle size/ thread size/fabric is used . Lower thread is too tight. If the problem continues, the following checklist may help you to make sure you are correctly using the machine. w Page 29 No w w Page 19 No w Bobbin is not correctly installed. w Page 27 No w Spool of thread is not threaded properly in this instruction manual that details the operation you still have difficulties, contact your nearest service center. CONTENTS KNOWING YOUR SEWING MACHINE STRAIGHT...
Users Manual - English
Page 69
... toward the bobbin presser. w Page 6 No w The bobbin winding shaft is removed from outlet. w Page 20 No w w Page 7 No w Inferior needle is set at no feeding. w Page 18 No Feed dogs are lowered. Let the feed dogs move the fabric. Do not pull the fabric. CONTENTS KNOWING YOUR SEWING MACHINE STRAIGHT AND ZIGZAG STITCHING BUILT-IN STITCHES FABRIC DOES NOT FEED PROPERLY NEEDLE BREAKS MACHINE IS NOISY OR SLOW MACHINE DOES NOT START Stitch length dial is used. w Page 7 No w Thread is used correctly...
... toward the bobbin presser. w Page 6 No w The bobbin winding shaft is removed from outlet. w Page 20 No w w Page 7 No w Inferior needle is set at no feeding. w Page 18 No Feed dogs are lowered. Let the feed dogs move the fabric. Do not pull the fabric. CONTENTS KNOWING YOUR SEWING MACHINE STRAIGHT AND ZIGZAG STITCHING BUILT-IN STITCHES FABRIC DOES NOT FEED PROPERLY NEEDLE BREAKS MACHINE IS NOISY OR SLOW MACHINE DOES NOT START Stitch length dial is used. w Page 7 No w Thread is used correctly...

Users Manual - English
Page 75
... Dial 10 Pattern Widths 11 Performance Checklist 60-61 Presser Foot Replacement 8 Principal Parts 1 Q Quick Thread-setting System 24 R Repacking 66 Reverse Sewing Lever 17 S Scallop Stitching 38 Sewing Direction 32 Sewing Light Bulb Replacement 57 Switch 6 Shell Tuck Stitching 36 Shuttle Hook Removal 57 Shuttle Race Cleaning 57 Spool Installing 20 Steadying the Machine 9 Stitch Length Dial 14 Straight Stitching 31 Stretch Blindhem Stitching 35 Stretch Material Sewing 33 Stretch Overlock 39 Stretch Stitching 15 T Threading Bobbin 19, 24 Needle 20, 22 Thread Tension...
... Dial 10 Pattern Widths 11 Performance Checklist 60-61 Presser Foot Replacement 8 Principal Parts 1 Q Quick Thread-setting System 24 R Repacking 66 Reverse Sewing Lever 17 S Scallop Stitching 38 Sewing Direction 32 Sewing Light Bulb Replacement 57 Switch 6 Shell Tuck Stitching 36 Shuttle Hook Removal 57 Shuttle Race Cleaning 57 Spool Installing 20 Steadying the Machine 9 Stitch Length Dial 14 Straight Stitching 31 Stretch Blindhem Stitching 35 Stretch Material Sewing 33 Stretch Overlock 39 Stretch Stitching 15 T Threading Bobbin 19, 24 Needle 20, 22 Thread Tension...


