Brother International XL 5130 Support Question
Brother International XL 5130 Support Question
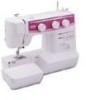
Find answers below for this question about Brother International XL 5130 - Free Arm Sewing Machine.Need a Brother International XL 5130 manual? We have 1 online manual for this item!
Question posted by cengle640 on August 17th, 2013
Where Should The Machine Be Set For Regular Stitching? Brothers Xl-5130
Where should the machine be set for regular stitches? Brothers XL-5130
Current Answers
Related Brother International XL 5130 Manual Pages
Users Manual - English - Page 2

... fabric while stitching. Young children should never be used by young children or infirm persons without supervision. 17. Always unplug this sewing machine only for use this sewing machine if it has... use a bent needle. 13. Keep the ventilation openings of the sewing machine and foot controller free from all instructions before using and before changing the light bulb. Special...
Users Manual - English - Page 5
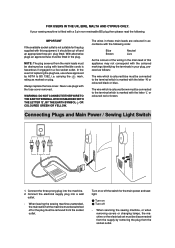
... off the switch for the plug supplied with this appliance may not correspond with the fuse cover removed.
When servicing the sewing machine, or when removing covers or changing lamps, the machine or the electrical set must be removed from the supply by ASTA to the terminal which is hazardous if engaged in your...
Users Manual - English - Page 6

...Needle 7 Checking the Needle 7 Changing the Presser Foot 8 Converting to Free-Arm Style 9 Steadying the Machine 9 VARIOUS CONTROLS 10 Pattern Selection Dial 10 RECOMMENDED WIDTHS AND LENGTHS FOR STITCHES 11 Stitch Length Dial 14 Stretch Stitching 15 Stitch Width Dial 16 Reverse Sewing Lever 17 THREADING THE MACHINE 18 Winding the Bobbin 18 Lower Threading 19 Upper (Needle) Threading...
Users Manual - English - Page 9

...9
4 Thread take-up lever
8
5 Thread cutter
7
6 Upper tension control dial Controls the tension of the stitches.
0 Reverse sewing lever Push for stitching in either direction to be used for operation. CONTENTS
KNOWING YOUR SEWING MACHINE
STRAIGHT AND ZIGZAG STITCHING
BUILT-IN STITCHES
PRINCIPAL PARTS
34
62
1
1 Bobbin winding assembly Winds the thread onto the bobbin to select...
Users Manual - English - Page 13

... way. Conecte el enchufe de alimentación a una toma de corriente. Brancher la fiche d'alimentation à une prise secteur. CONTENTS
KNOWING YOUR SEWING MACHINE
STRAIGHT AND ZIGZAG STITCHING
BUILT-IN STITCHES
OPERATING YOUR SEWING MACHINE
Connecting Plugs
1. Connect the power cord plug into a wall outlet. Cuando se cambia una aguja, la canilla o la bombilla de luz...
Users Manual - English - Page 14
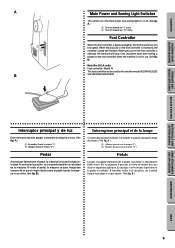
... la pression, la vitesse de couture de la machine va augmenter également. B.)
BUTTONHOLE AND BUTTON SEWING
USING ATTACHMENTS AND APPLICATIONS
MAINTENANCE
INDEX
6 CONTENTS
KNOWING YOUR SEWING MACHINE
STRAIGHT AND ZIGZAG STITCHING
BUILT-IN STITCHES
A
1 2
B
Main Power and Sewing Light Switches
This switch turns the main power and sewing light on or off (toward the "I" mark...
Users Manual - English - Page 19
...
KNOWING YOUR SEWING MACHINE
STRAIGHT AND ZIGZAG STITCHING
BUILT-IN STITCHES
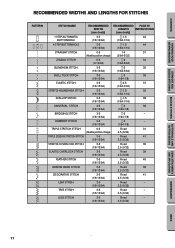
RECOMMENDED WIDTHS AND LENGTHS FOR STITCHES
PATTERN
C A
STITCH NAME
RECOMMENDED WIDTH
[mm (inch)]
RECOMMENDED PAGE IN LENGTH INSTRUCTIONS
[mm (inch)]
1 STEP AUTOMATIC BUTTONHOLE
3-5
-1.5
42
(1/8-13/64)
(1/64-1/16)
4 STEP BUTTONHOLE
3-5
-1.5
44
(1/8-13/64)
(1/64-1/16)
STRAIGHT STITCH
0-5
1-4
31...
Users Manual - English - Page 28

... (2") of thread on it behind the thread guide. 5 Thread guide 7. Thread the needle from front to raise the thread take -up lever 4. CONTENTS
KNOWING YOUR SEWING MACHINE
STRAIGHT AND ZIGZAG STITCHING
BUILT-IN STITCHES
1 2
4 3
BUTTONHOLE AND BUTTON SEWING
USING ATTACHMENTS AND APPLICATIONS
A
4
23
1
C
B
D
4 4
E
5
Upper (Needle) Threading
Turn power switch to break, skip...
Users Manual - English - Page 30

... The hook will pull the thread through the needle toward the back of the sewing machine.
• Only use needles of the machine (away from you ). CONTENTS
KNOWING YOUR SEWING MACHINE
STRAIGHT AND ZIGZAG STITCHING
BUILT-IN STITCHES
1 2
3
1
2
4
5
7
6
6
Using the Needle Threader (when the machine is equipped with a
needle threader)
Turn power switch to #100. Pull down the...
Users Manual - English - Page 33

...environ 15 cm de chacun des deux fils et les placer vers l'arrière de la machine, juste derrière le pied-de-biche. Le fil supérieur doit passer entre ... hacia abajo y suba a su posición más alta.
3. CONTENTS
KNOWING YOUR SEWING MACHINE
STRAIGHT AND ZIGZAG STITCHING
BUILT-IN STITCHES
1 2
Drawing Up Lower Thread
1. With your left hand, hold the end of both...
Users Manual - English - Page 35

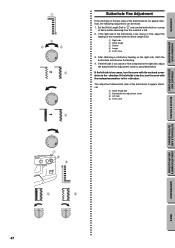
... already been adjusted at the factory for general use. C Lower tension is "5".
CONTENTS
KNOWING YOUR SEWING MACHINE
STRAIGHT AND ZIGZAG STITCHING
BUILT-IN STITCHES
A
2
1
2
1
B
2
1
2
1
A-1
654
B-1
654
C
2 1
2... Increase the tension in the bobbin by turning the dial to its original setting before sewing on the surface of the fabric. B Upper tension is too tight....
Users Manual - English - Page 37

Use the same size thread for the upper (spool) and lower (bobbin) threads. CONTENTS
KNOWING YOUR SEWING MACHINE
STRAIGHT AND ZIGZAG STITCHING
BUILT-IN STITCHES
CHART OF SEWING FABRICS, NEEDLES AND THREAD COMBINATIONS
VERY THIN LIGHTWEIGHT MEDIUM WEIGHT HEAVYWEIGHT
SEWING FABRICS
Fine tricot, Fine lace, Thin linen, Silk, Organza, Chiffon
Voile, Taffeta, Synthetics, Silk, Batiste
Cotton, ...
Users Manual - English - Page 42
... Ensuite, définir la longueur du point. CONTENTS
KNOWING YOUR SEWING MACHINE
STRAIGHT AND ZIGZAG STITCHING
BUILT-IN STITCHES
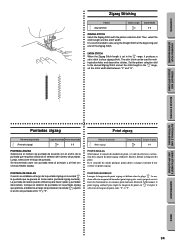
Zigzag Stitching
Pattern (Zigzag Stitch)
Stitch Length -4
Stitch Width 0-5
ZIGZAG STITCH Select the Zigzag Stitch with the pattern selection dial.
Set the pattern selection dial to sew using the Straight Stitch at the beginning and end of the Zigzag...
Users Manual - English - Page 43
...
KNOWING YOUR SEWING MACHINE
STRAIGHT AND ZIGZAG STITCHING
BUILT-IN STITCHES
A
B
C
D
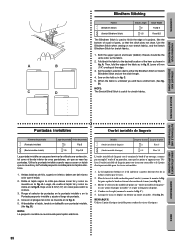
Blindhem Stitching
Pattern (Blindhem Stitch) (Stretch Blindhem Stitch)
Stitch Length -2 -1.5
Stitch Width Fixed 5 Fixed 3.5
The Blindhem Stitch is used to finish the edge of a project, like the bottom of a pair of the hem as shown in fig. Fold back the fabric to either the Blindhem Stitch or...
Users Manual - English - Page 50

... MACHINE
STRAIGHT AND ZIGZAG STITCHING
BUILT-IN STITCHES
A
B
1
2
-
3
C
PUSH
D
3
2
4
1
E
PUSH
Making a Buttonhole (1 Step Automatic Buttonhole)
4
Pattern
Stitch Length Stitch Width
Foot
(1 Step Automatic
-1.5
Buttonhole)
Fixed 5 Buttonhole Foot
NOTE: 1. While gently holding the upper thread, start sewing.
* Set the stitch width to " ". 3. When sewing buttonholes on...
Users Manual - English - Page 55
...SEWING MACHINE
STRAIGHT AND ZIGZAG STITCHING
BUILT-IN STITCHES
1
2
4
3
10
432
- direction. If the right side of the buttonhole is too coarse or fine, adjust the
feeding of fabric while observing how the material is too fine, turn the screw with the enclosed screwdriver in the + direction. If the left side is fed. 2. Set the Stitch... Length Dial to " " and sew ...
Users Manual - English - Page 57

... on the needle plate. (When the machine is 1.5 mm (1/16"), set the appropriate stitch width with a drop feed lever, lower the feed dogs by setting the drop feed lever to "1.5".
2. Measure the distance between the holes and set the stitch width to the up position.)
4. At a slow speed, sew approximately 10 stitches.
6. Cut the upper and lower threads...
Users Manual - English - Page 59

...
4. CONTENTS
KNOWING YOUR SEWING MACHINE
STRAIGHT AND ZIGZAG STITCHING
BUILT-IN STITCHES
A
1
2
3
B
Zipper Inserting
Pattern (Straight Stitch)
Stitch Length 2-3
Stitch Width
2.5 (Center needle
position)
Foot Zipper Foot
NOTE: After selecting the pattern, set the stitch width dial to 2.5 to break. Set the pattern selection dial to the Straight Stitch. 2. Sew from the bottom of...
Users Manual - English - Page 69
... is slid toward the bobbin presser. CONTENTS
KNOWING YOUR SEWING MACHINE
STRAIGHT AND ZIGZAG STITCHING
BUILT-IN STITCHES
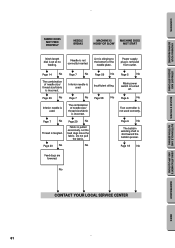
FABRIC DOES NOT FEED PROPERLY
NEEDLE BREAKS
MACHINE IS NOISY OR SLOW
MACHINE DOES NOT START
Stitch length dial is clinging to the bottom of the
needle plate.
Lint is set at no
feeding.
No
w Page 59
No w
Insufficient oiling...
Users Manual - English - Page 75

... 59 Lever 17
Finishing a Seam 32-33 Foot Controller
Connecting 5 Operating 6 Free-Arm Sewing 9
G
Gathering 51
L
Legs Stitch 11 Light Bulb Replacement 57 Lower Threading 19
M
Main Power Switch 6 Monogramming 55
N
Needle Inspection 7 Replacement 7 Threading 20 Threader 22
Page
O
Oiling 58 Overedge Stitching 39
P
Pattern Lengths 11 Pattern Selection Dial 10 Pattern Widths 11...
Similar Questions

How To Use Straight Stitch Brother Xl 5130
(Posted by daeltedju 10 years ago)

Brother 17-stitch Free-arm Sewing Machine Lx2500 How To Set Tension
(Posted by laptoprustar 10 years ago)

How Do I Open The Case On A Brother Xl-5130 Sewing Machine?
(Posted by hornsPerr 10 years ago)

How To Making Zig Zag Stich On Brother Xl-5130 Machine
(Posted by jofallo 10 years ago)
Im Trying To Get A Manuel For This Brother Xl 5130 Sewing Machine..
where can I find a manuel for a Brother XL 5130 sewing machine
where can I find a manuel for a Brother XL 5130 sewing machine
(Posted by karlatrains 11 years ago)