
Users Manual - English
Page 2
... of the air openings blocked. Do not operate this instruction manual. 16. Do not use the proper needle plate. Switch the sewing machine to the symbol "O" position which represents off , symbol "O" position when making any of the sewing machine and foot controller free from the electrical outlet when removing covers, lubricating, or when making any openings...
... of the air openings blocked. Do not operate this instruction manual. 16. Do not use the proper needle plate. Switch the sewing machine to the symbol "O" position which represents off , symbol "O" position when making any of the sewing machine and foot controller free from the electrical outlet when removing covers, lubricating, or when making any openings...
Users Manual - English
Page 5
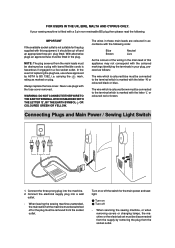
... Never use a fuse approved by removing the plug from the socket outlet. Connect the three-prong plug into a wall outlet. - Turn on or off the switch for the plug supplied with this appliance may not correspond with the coloured markings identifying the terminals in your sewing machine is ...the wiring in accordance with bared flexible cords is not suitable for the main power and sewlight. 1 Turn on plug. When leaving the sewing machine unattended, the main switch of this equipment, it should be destroyed as a plug with the following . IMPORTANT If the available socket outlet...
... Never use a fuse approved by removing the plug from the socket outlet. Connect the three-prong plug into a wall outlet. - Turn on or off the switch for the plug supplied with this appliance may not correspond with the coloured markings identifying the terminals in your sewing machine is ...the wiring in accordance with bared flexible cords is not suitable for the main power and sewlight. 1 Turn on plug. When leaving the sewing machine unattended, the main switch of this equipment, it should be destroyed as a plug with the following . IMPORTANT If the available socket outlet...

Users Manual - English
Page 6
... 8 Converting to Free-Arm Style 9 Steadying the Machine 9 VARIOUS CONTROLS 10 Pattern Selection Dial 10 RECOMMENDED WIDTHS AND LENGTHS FOR STITCHES 11 Stitch Length Dial 14 Stretch Stitching 15 Stitch Width Dial 16 Reverse Sewing Lever 17 THREADING THE MACHINE 18 Winding the Bobbin 18 Lower Threading 19 Upper (Needle) Threading 20 Using the Needle Threader...
... 8 Converting to Free-Arm Style 9 Steadying the Machine 9 VARIOUS CONTROLS 10 Pattern Selection Dial 10 RECOMMENDED WIDTHS AND LENGTHS FOR STITCHES 11 Stitch Length Dial 14 Stretch Stitching 15 Stitch Width Dial 16 Reverse Sewing Lever 17 THREADING THE MACHINE 18 Winding the Bobbin 18 Lower Threading 19 Upper (Needle) Threading 20 Using the Needle Threader...

Users Manual - English
Page 9
... reverse direction. D C E G F H BUTTONHOLE AND BUTTON SEWING USING ATTACHMENTS AND APPLICATIONS MAINTENANCE INDEX 1 A Buttonhole fine-adjustment screw B Buttonhole lever (1 Step automatic buttonhole) C Handle D Balance wheel Turn toward you (counterclockwise) to control sewing speed start and stop. G Presser foot lever Raises and lowers the presser foot. CONTENTS KNOWING YOUR SEWING MACHINE STRAIGHT AND ZIGZAG STITCHING BUILT-IN...
... reverse direction. D C E G F H BUTTONHOLE AND BUTTON SEWING USING ATTACHMENTS AND APPLICATIONS MAINTENANCE INDEX 1 A Buttonhole fine-adjustment screw B Buttonhole lever (1 Step automatic buttonhole) C Handle D Balance wheel Turn toward you (counterclockwise) to control sewing speed start and stop. G Presser foot lever Raises and lowers the presser foot. CONTENTS KNOWING YOUR SEWING MACHINE STRAIGHT AND ZIGZAG STITCHING BUILT-IN...

Users Manual - English
Page 13
...machine. 2. When changing the needle, bobbin or light bulb or when the sew- BUTTONHOLE AND BUTTON SEWING USING ATTACHMENTS AND APPLICATIONS MAINTENANCE INDEX 5 For U.S.A. ATENCIÓN: 1. only This appliance has a polarized plug (one way. If it still does not fit, contact a qualified electrician to fit in use...pour éviter toute décharge électrique. CONTENTS KNOWING YOUR SEWING MACHINE STRAIGHT AND ZIGZAG STITCHING BUILT-IN STITCHES OPERATING YOUR SEWING MACHINE Connecting Plugs 1. Brancher la fiche qui se trouve sur le cordon d'alimentation...
...machine. 2. When changing the needle, bobbin or light bulb or when the sew- BUTTONHOLE AND BUTTON SEWING USING ATTACHMENTS AND APPLICATIONS MAINTENANCE INDEX 5 For U.S.A. ATENCIÓN: 1. only This appliance has a polarized plug (one way. If it still does not fit, contact a qualified electrician to fit in use...pour éviter toute décharge électrique. CONTENTS KNOWING YOUR SEWING MACHINE STRAIGHT AND ZIGZAG STITCHING BUILT-IN STITCHES OPERATING YOUR SEWING MACHINE Connecting Plugs 1. Brancher la fiche qui se trouve sur le cordon d'alimentation...
Users Manual - English
Page 14
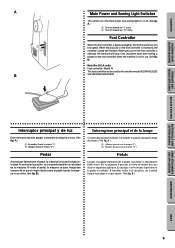
... controller can be taken that nothing is placed on the foot controller when the machine is not in use. (See fig. B.) BUTTONHOLE AND BUTTON SEWING USING ATTACHMENTS AND APPLICATIONS MAINTENANCE INDEX 6 When the pressure on the foot controller is increased, the machine's speed will run at a low speed. A.) 1 Allumer (pousser vers la marque "I ") 2 Apagar (hacia...
... controller can be taken that nothing is placed on the foot controller when the machine is not in use. (See fig. B.) BUTTONHOLE AND BUTTON SEWING USING ATTACHMENTS AND APPLICATIONS MAINTENANCE INDEX 6 When the pressure on the foot controller is increased, the machine's speed will run at a low speed. A.) 1 Allumer (pousser vers la marque "I ") 2 Apagar (hacia...
Users Manual - English
Page 19
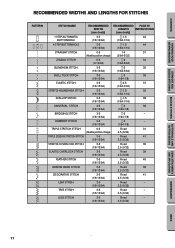
CONTENTS KNOWING YOUR SEWING MACHINE STRAIGHT AND ZIGZAG STITCHING BUILT-IN STITCHES RECOMMENDED WIDTHS AND LENGTHS FOR STITCHES PATTERN C A STITCH NAME RECOMMENDED WIDTH [mm (inch)] RECOMMENDED PAGE IN LENGTH INSTRUCTIONS [... 41 (1/8-13/64) 2.5 (3/32) LEAF STITCH 3-5 Fixed - (1/8-13/64) 2.5 (3/32) TREE STITCH 3-5 Fixed - (1/8-13/64) 2.5 (3/32) LEGS STITCH 3-5 Fixed - (1/8-13/64) 2.5 (3/32) BUTTONHOLE AND BUTTON SEWING USING ATTACHMENTS AND APPLICATIONS MAINTENANCE INDEX 11
CONTENTS KNOWING YOUR SEWING MACHINE STRAIGHT AND ZIGZAG STITCHING BUILT-IN STITCHES RECOMMENDED WIDTHS AND LENGTHS FOR STITCHES PATTERN C A STITCH NAME RECOMMENDED WIDTH [mm (inch)] RECOMMENDED PAGE IN LENGTH INSTRUCTIONS [... 41 (1/8-13/64) 2.5 (3/32) LEAF STITCH 3-5 Fixed - (1/8-13/64) 2.5 (3/32) TREE STITCH 3-5 Fixed - (1/8-13/64) 2.5 (3/32) LEGS STITCH 3-5 Fixed - (1/8-13/64) 2.5 (3/32) BUTTONHOLE AND BUTTON SEWING USING ATTACHMENTS AND APPLICATIONS MAINTENANCE INDEX 11

Users Manual - English
Page 28
... in fig. NOTE: Incorrectly feeding the thread may cause it toward you and into the eyelet. 6. B, C, pull it between the tension discs. 5. CONTENTS KNOWING YOUR SEWING MACHINE STRAIGHT AND ZIGZAG STITCHING BUILT-IN STITCHES 1 2 4 3 BUTTONHOLE AND BUTTON SEWING USING ATTACHMENTS AND APPLICATIONS A 4 23 1 C B D 4 4 E 5 Upper (Needle) Threading Turn power switch to its highest position. 2.
... in fig. NOTE: Incorrectly feeding the thread may cause it toward you and into the eyelet. 6. B, C, pull it between the tension discs. 5. CONTENTS KNOWING YOUR SEWING MACHINE STRAIGHT AND ZIGZAG STITCHING BUILT-IN STITCHES 1 2 4 3 BUTTONHOLE AND BUTTON SEWING USING ATTACHMENTS AND APPLICATIONS A 4 23 1 C B D 4 4 E 5 Upper (Needle) Threading Turn power switch to its highest position. 2.

Users Manual - English
Page 30
... to check that the hook grabs it. 1 Needle holder 2 Needle threader lever 3 Guide 4 Hook holder 5 Align 5. CONTENTS KNOWING YOUR SEWING MACHINE STRAIGHT AND ZIGZAG STITCHING BUILT-IN STITCHES 1 2 3 1 2 4 5 7 6 6 Using the Needle Threader (when the machine is equipped with needle sizes #70 to #100. Lower the presser foot lever. 2. Raise the needle threader lever and...
... to check that the hook grabs it. 1 Needle holder 2 Needle threader lever 3 Guide 4 Hook holder 5 Align 5. CONTENTS KNOWING YOUR SEWING MACHINE STRAIGHT AND ZIGZAG STITCHING BUILT-IN STITCHES 1 2 3 1 2 4 5 7 6 6 Using the Needle Threader (when the machine is equipped with needle sizes #70 to #100. Lower the presser foot lever. 2. Raise the needle threader lever and...

Users Manual - English
Page 33
... toward you (counterclockwise) until the needle moves down and back up from the bobbin in a loop. Pull out about 15 cm (6") of the machine straight behind the presser foot. Tire del hilo superior hacia usted y el hilo inferior saldrá de la canilla en un amplio enlace. 4. ... BUTTON SEWING USING ATTACHMENTS AND APPLICATIONS MAINTENANCE INDEX 25 Lever au maximum le pied-de-biche et l'aiguille. 2. Tirer environ 15 cm de chacun des deux fils et les placer vers l'arrière de la machine, juste derrière le pied-de-biche. CONTENTS KNOWING YOUR SEWING MACHINE STRAIGHT ...
... toward you (counterclockwise) until the needle moves down and back up from the bobbin in a loop. Pull out about 15 cm (6") of the machine straight behind the presser foot. Tire del hilo superior hacia usted y el hilo inferior saldrá de la canilla en un amplio enlace. 4. ... BUTTON SEWING USING ATTACHMENTS AND APPLICATIONS MAINTENANCE INDEX 25 Lever au maximum le pied-de-biche et l'aiguille. 2. Tirer environ 15 cm de chacun des deux fils et les placer vers l'arrière de la machine, juste derrière le pied-de-biche. CONTENTS KNOWING YOUR SEWING MACHINE STRAIGHT ...

Users Manual - English
Page 35
...Correct Them A Upper tension is too loose. Locks appear on your fabric. 1 Reverse 2 Surface BUTTONHOLE AND BUTTON SEWING USING ATTACHMENTS AND APPLICATIONS MAINTENANCE INDEX 27 Locks appear on thin fabrics, the thread tension cannot be adjusted when you change fabric... quality of the fabric. The basic thread tension setting is still not satisfactory, then adjust the bobbin thread tension as explained in C-1. CONTENTS KNOWING YOUR SEWING MACHINE STRAIGHT AND ZIGZAG STITCHING BUILT-IN STITCHES A 2 1 2 1 B 2 1 2 1 A-1 654 B-1 654 C 2 1 2 1 Thread Tension Thread ...
...Correct Them A Upper tension is too loose. Locks appear on your fabric. 1 Reverse 2 Surface BUTTONHOLE AND BUTTON SEWING USING ATTACHMENTS AND APPLICATIONS MAINTENANCE INDEX 27 Locks appear on thin fabrics, the thread tension cannot be adjusted when you change fabric... quality of the fabric. The basic thread tension setting is still not satisfactory, then adjust the bobbin thread tension as explained in C-1. CONTENTS KNOWING YOUR SEWING MACHINE STRAIGHT AND ZIGZAG STITCHING BUILT-IN STITCHES A 2 1 2 1 B 2 1 2 1 A-1 654 B-1 654 C 2 1 2 1 Thread Tension Thread ...

Users Manual - English
Page 37
...Utilice el mismo tamaño de hilo para los hilos superior (carrete) e inferior (canilla). 29 INDEX BUTTONHOLE AND BUTTON SEWING USING ATTACHMENTS AND APPLICATIONS MAINTENANCE TABLA DE COMBINACIONES ENTRE TEJIDOS, AGUJAS Y HILOS MUY FINO LIGERO MEDIO PESADO TEJIDOS Punto fino, Encaje... and thread size from the above chart. 2. CONTENTS KNOWING YOUR SEWING MACHINE STRAIGHT AND ZIGZAG STITCHING BUILT-IN STITCHES CHART OF SEWING FABRICS, NEEDLES AND THREAD COMBINATIONS VERY THIN LIGHTWEIGHT MEDIUM WEIGHT HEAVYWEIGHT SEWING FABRICS Fine tricot, Fine lace, Thin linen, Silk, Organza,...
...Utilice el mismo tamaño de hilo para los hilos superior (carrete) e inferior (canilla). 29 INDEX BUTTONHOLE AND BUTTON SEWING USING ATTACHMENTS AND APPLICATIONS MAINTENANCE TABLA DE COMBINACIONES ENTRE TEJIDOS, AGUJAS Y HILOS MUY FINO LIGERO MEDIO PESADO TEJIDOS Punto fino, Encaje... and thread size from the above chart. 2. CONTENTS KNOWING YOUR SEWING MACHINE STRAIGHT AND ZIGZAG STITCHING BUILT-IN STITCHES CHART OF SEWING FABRICS, NEEDLES AND THREAD COMBINATIONS VERY THIN LIGHTWEIGHT MEDIUM WEIGHT HEAVYWEIGHT SEWING FABRICS Fine tricot, Fine lace, Thin linen, Silk, Organza,...
Users Manual - English
Page 42
..." " range, set in the " " range, it produces a satin stitch (a close zigzag stitch). Set the pattern selection dial to sew using the Straight Stitch at the beginning and end of the Zigzag Stitch. Sélectionner le point zigzag souhaité puis régler la ...que prefiera, establezca el largo de puntada en la escala " " y ajuste el ancho de puntada entre "0" y "5". CONTENTS KNOWING YOUR SEWING MACHINE STRAIGHT AND ZIGZAG STITCHING BUILT-IN STITCHES Zigzag Stitching Pattern (Zigzag Stitch) Stitch Length -4 Stitch Width 0-5 ZIGZAG STITCH Select the Zigzag Stitch ...
..." " range, set in the " " range, it produces a satin stitch (a close zigzag stitch). Set the pattern selection dial to sew using the Straight Stitch at the beginning and end of the Zigzag Stitch. Sélectionner le point zigzag souhaité puis régler la ...que prefiera, establezca el largo de puntada en la escala " " y ajuste el ancho de puntada entre "0" y "5". CONTENTS KNOWING YOUR SEWING MACHINE STRAIGHT AND ZIGZAG STITCHING BUILT-IN STITCHES Zigzag Stitching Pattern (Zigzag Stitch) Stitch Length -4 Stitch Width 0-5 ZIGZAG STITCH Select the Zigzag Stitch ...
Users Manual - English
Page 43
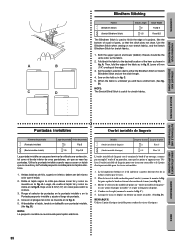
... al tejido tal y como se indica en la fig. B.) 3. Deje unos 6 mm(1/4") sin coser para cubrir la costura. 3. CONTENTS KNOWING YOUR SEWING MACHINE STRAIGHT AND ZIGZAG STITCHING BUILT-IN STITCHES A B C D Blindhem Stitching Pattern (Blindhem Stitch) (Stretch Blindhem Stitch) Stitch Length -2 -1.5 Stitch Width Fixed... 5 Fixed 3.5 The Blindhem Stitch is used to finish the edge of a project, like the bottom of a pair of the fabric as in fig. Then, fold the edge of...
... al tejido tal y como se indica en la fig. B.) 3. Deje unos 6 mm(1/4") sin coser para cubrir la costura. 3. CONTENTS KNOWING YOUR SEWING MACHINE STRAIGHT AND ZIGZAG STITCHING BUILT-IN STITCHES A B C D Blindhem Stitching Pattern (Blindhem Stitch) (Stretch Blindhem Stitch) Stitch Length -2 -1.5 Stitch Width Fixed... 5 Fixed 3.5 The Blindhem Stitch is used to finish the edge of a project, like the bottom of a pair of the fabric as in fig. Then, fold the edge of...

Users Manual - English
Page 50
... on thin fabrics, place stabilizer material on the fabric. 2. Using tailor's chalk, mark the position of the buttonhole on the underside of the gimp thread. 4. Lower the presser foot and start the machine. 7. Buttonhole stitching is a simple process that provides reliable results. D. 8. E) When sewing buttonholes on the fabric as in fig. Buttonhole-making...
... on thin fabrics, place stabilizer material on the fabric. 2. Using tailor's chalk, mark the position of the buttonhole on the underside of the gimp thread. 4. Lower the presser foot and start the machine. 7. Buttonhole stitching is a simple process that provides reliable results. D. 8. E) When sewing buttonholes on the fabric as in fig. Buttonhole-making...
Users Manual - English
Page 55
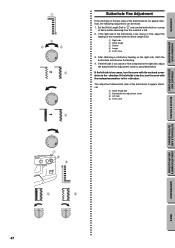
..., turn the screw with the Stitch Length Dial. 1 Right side 2 Stitch length 3 Shorter 4 Longer 5 In this case 9 9 BUTTONHOLE AND BUTTON SEWING USING ATTACHMENTS AND APPLICATIONS MAINTENANCE INDEX 47 CONTENTS KNOWING YOUR SEWING MACHINE STRAIGHT AND ZIGZAG STITCHING BUILT-IN STITCHES 1 2 4 3 10 432 - SS 10 5 432 - Set the Stitch Length Dial to the right side...
..., turn the screw with the Stitch Length Dial. 1 Right side 2 Stitch length 3 Shorter 4 Longer 5 In this case 9 9 BUTTONHOLE AND BUTTON SEWING USING ATTACHMENTS AND APPLICATIONS MAINTENANCE INDEX 47 CONTENTS KNOWING YOUR SEWING MACHINE STRAIGHT AND ZIGZAG STITCHING BUILT-IN STITCHES 1 2 4 3 10 432 - SS 10 5 432 - Set the Stitch Length Dial to the right side...

Users Manual - English
Page 57
.... At a slow speed, sew approximately 10 stitches. 6. Attach the button sewing foot. 3. BUTTONHOLE AND BUTTON SEWING USING ATTACHMENTS AND APPLICATIONS MAINTENANCE INDEX 49 For example, if the distance between the foot and the fabric and make sure that the needle enters the holes without hitting the button. CONTENTS KNOWING YOUR SEWING MACHINE STRAIGHT AND ZIGZAG STITCHING...
.... At a slow speed, sew approximately 10 stitches. 6. Attach the button sewing foot. 3. BUTTONHOLE AND BUTTON SEWING USING ATTACHMENTS AND APPLICATIONS MAINTENANCE INDEX 49 For example, if the distance between the foot and the fabric and make sure that the needle enters the holes without hitting the button. CONTENTS KNOWING YOUR SEWING MACHINE STRAIGHT AND ZIGZAG STITCHING...

Users Manual - English
Page 59
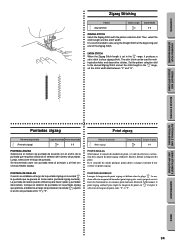
...needle should be positioned on either the left or right side of the zipper Check for best results. (See fig. CONTENTS KNOWING YOUR SEWING MACHINE STRAIGHT AND ZIGZAG STITCHING BUILT-IN STITCHES A 1 2 3 B Zipper Inserting Pattern (Straight Stitch) Stitch Length 2-3 Stitch Width 2.5 (... into the notch on the right or left side of the zipper 3 Left pin for sewing the right side of the zipper foot. 5. B.) 6. BUTTONHOLE AND BUTTON SEWING USING ATTACHMENTS AND APPLICATIONS MAINTENANCE Gathering Pattern (Straight Stitch) Stitch Length 4 1. Set the pattern selection...
...needle should be positioned on either the left or right side of the zipper Check for best results. (See fig. CONTENTS KNOWING YOUR SEWING MACHINE STRAIGHT AND ZIGZAG STITCHING BUILT-IN STITCHES A 1 2 3 B Zipper Inserting Pattern (Straight Stitch) Stitch Length 2-3 Stitch Width 2.5 (... into the notch on the right or left side of the zipper 3 Left pin for sewing the right side of the zipper foot. 5. B.) 6. BUTTONHOLE AND BUTTON SEWING USING ATTACHMENTS AND APPLICATIONS MAINTENANCE Gathering Pattern (Straight Stitch) Stitch Length 4 1. Set the pattern selection...
Users Manual - English
Page 65
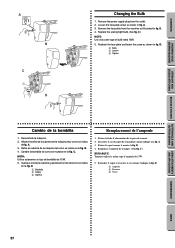
...máquina. 2. Retire la cubierta de la máquina tal como se indica en la fig. A. 3. D. 1 Ampoule 2 Desserrer 3 Visser BUTTONHOLE AND BUTTON SEWING USING ATTACHMENTS AND APPLICATIONS MAINTENANCE INDEX 57 D. 1 Bulb 2 Loosen 3 Tighten Cambio de la bombilla Remplacement de l'ampoule 1. B. 4. Loosen the face plate screw as shown in... NOTA: Utilice solamente un tipo de bombilla de 15 W. 5. Desserrer la vis du capot de la machine comme indiqué à la fig. C.) NOTE: Use only same type of bulb rated 15W. 5. Retirer le capot comme le montre la fig. Remove the...
...máquina. 2. Retire la cubierta de la máquina tal como se indica en la fig. A. 3. D. 1 Ampoule 2 Desserrer 3 Visser BUTTONHOLE AND BUTTON SEWING USING ATTACHMENTS AND APPLICATIONS MAINTENANCE INDEX 57 D. 1 Bulb 2 Loosen 3 Tighten Cambio de la bombilla Remplacement de l'ampoule 1. B. 4. Loosen the face plate screw as shown in... NOTA: Utilice solamente un tipo de bombilla de 15 W. 5. Desserrer la vis du capot de la machine comme indiqué à la fig. C.) NOTE: Use only same type of bulb rated 15W. 5. Retirer le capot comme le montre la fig. Remove the...

Users Manual - English
Page 68
... CONTACT YOUR LOCAL SERVICE CENTER BUTTONHOLE AND BUTTON SEWING USING ATTACHMENTS AND APPLICATIONS MAINTENANCE INDEX 60 CONTENTS KNOWING YOUR SEWING MACHINE STRAIGHT AND ZIGZAG STITCHING BUILT-IN STITCHES Performance Checklist Whenever sewing difficulties are correctly using the machine. w Page 27 No w Spool of needle ...Thread tension is not correct. w Page 7 No w The combination of thread is used . w Page 7 No w The combination of needle size/ thread size/fabric is used . w Pages 19-20 No w Wrong needle is incorrect. UPPER THREAD BREAKS ...
... CONTACT YOUR LOCAL SERVICE CENTER BUTTONHOLE AND BUTTON SEWING USING ATTACHMENTS AND APPLICATIONS MAINTENANCE INDEX 60 CONTENTS KNOWING YOUR SEWING MACHINE STRAIGHT AND ZIGZAG STITCHING BUILT-IN STITCHES Performance Checklist Whenever sewing difficulties are correctly using the machine. w Page 27 No w Spool of needle ...Thread tension is not correct. w Page 7 No w The combination of thread is used . w Page 7 No w The combination of needle size/ thread size/fabric is used . w Pages 19-20 No w Wrong needle is incorrect. UPPER THREAD BREAKS ...


