
Operation Manual
Page 3
... the problem persists, please consult your local authorized Brother dealer. Use this machine, avoid direct sunlight and high humidity locations. The contents of this manual and specifications of this manual. Children should never be supervised to clean the case. For additional product information, visit our web site at www.brother.com SAVE THESE INSTRUCTIONS This machine is damaged, it off when making any assemblies, the presser feet, needle...
... the problem persists, please consult your local authorized Brother dealer. Use this machine, avoid direct sunlight and high humidity locations. The contents of this manual and specifications of this manual. Children should never be supervised to clean the case. For additional product information, visit our web site at www.brother.com SAVE THESE INSTRUCTIONS This machine is damaged, it off when making any assemblies, the presser feet, needle...
Operation Manual
Page 4
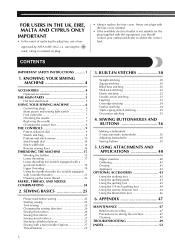
... 4 Optional accessories 4 THE MAIN PARTS 5 Flat bed attachment 5 USING YOUR SEWING MACHINE 6 Connecting plugs 6 Main power and sewing light switch 7 Foot controller 7 Checking the needle 7 Replacing the needle 7 Changing the presser foot 8 THE CONTROLS 9 Pattern selection dial 9 Stretch stitching 9 Patterns and stitch names 10 Stitch length dial 14 Stitch width dial 14 Reverse sewing lever 14 THREADING THE MACHINE 15 Winding the bobbin 15 Lower threading 17 Lower threading (for models equipped with a quick-set bobbin 18 Upper threading 19 Using the needle threader (for...
... 4 Optional accessories 4 THE MAIN PARTS 5 Flat bed attachment 5 USING YOUR SEWING MACHINE 6 Connecting plugs 6 Main power and sewing light switch 7 Foot controller 7 Checking the needle 7 Replacing the needle 7 Changing the presser foot 8 THE CONTROLS 9 Pattern selection dial 9 Stretch stitching 9 Patterns and stitch names 10 Stitch length dial 14 Stitch width dial 14 Reverse sewing lever 14 THREADING THE MACHINE 15 Winding the bobbin 15 Lower threading 17 Lower threading (for models equipped with a quick-set bobbin 18 Upper threading 19 Using the needle threader (for...
Operation Manual
Page 5
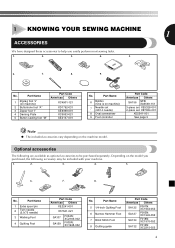
.../14 needle) 8 Oval screwdriver 9 Foot controller Part Code Americas Others SA156 SFB: XA5539-151 3-piece set: XE5328-001 2-piece set: XE7064-001 XE5241-001 See page 5 Note ● The included accessories vary depending on machine) 2 Buttonhole foot "A" 3 Zipper foot "I" 4 Darning Plate 5 Button sewing foot "M" Part Code Americas Others XC4901-121 XD1792-031 XE9369-001 XC6063-021 XE2137-001 No. Optional accessories The following accessory may be purchased separately. Part Name 5 1/4-inch Quilting Foot 6 Narrow Hemmer Foot 7 Blind Stitch Foot 8 Quilting guide Part Code...
.../14 needle) 8 Oval screwdriver 9 Foot controller Part Code Americas Others SA156 SFB: XA5539-151 3-piece set: XE5328-001 2-piece set: XE7064-001 XE5241-001 See page 5 Note ● The included accessories vary depending on machine) 2 Buttonhole foot "A" 3 Zipper foot "I" 4 Darning Plate 5 Button sewing foot "M" Part Code Americas Others XC4901-121 XD1792-031 XE9369-001 XC6063-021 XE2137-001 No. Optional accessories The following accessory may be purchased separately. Part Name 5 1/4-inch Quilting Foot 6 Narrow Hemmer Foot 7 Blind Stitch Foot 8 Quilting guide Part Code...
Operation Manual
Page 6
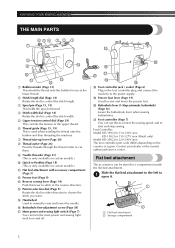
... left to manually raise and lower the needle. KNOWING YOUR SEWING MACHINE THE MAIN PARTS 654 3 2 1 7 E 8 9 D 0 A C B 1 Bobbin winder (Page 15) This winds the thread onto the bobbin for 220-240V area The foot controller part code differs depending on the country or region. J F KG H I Presser foot lever (Page 19) Used to choose the stitch you want. E Handwheel Used to 1 open it. 1 2 1 Flat bed attachment 2 Storage compartment 5 D Pattern selection dial (Page 9) Rotate the dial in the reverse direction. I H Foot controller jack...
... left to manually raise and lower the needle. KNOWING YOUR SEWING MACHINE THE MAIN PARTS 654 3 2 1 7 E 8 9 D 0 A C B 1 Bobbin winder (Page 15) This winds the thread onto the bobbin for 220-240V area The foot controller part code differs depending on the country or region. J F KG H I Presser foot lever (Page 19) Used to choose the stitch you want. E Handwheel Used to 1 open it. 1 2 1 Flat bed attachment 2 Storage compartment 5 D Pattern selection dial (Page 9) Rotate the dial in the reverse direction. I H Foot controller jack...
Operation Manual
Page 9
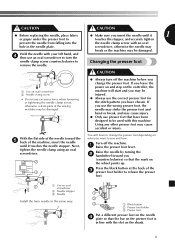
... 3 presser foot holder to Changing the presser foot remove the needle. CAUTION CAUTION ● Before replacing the needle, place fabric ● Make sure you insert the needle until it 1 or paper under the presser foot to be damaged. ● Always turn the needle clamp screw counterclockwise to release the presser foot. 1 1 Use an oval screwdriver 2 Needle stopper 3 Needle Install the twin needle in the same way. 1 2 3 1 Black button 2 Presser foot holder 3 Presser foot Put a different presser foot on the needle 4 plate so that the bar on the presser foot is...
... 3 presser foot holder to Changing the presser foot remove the needle. CAUTION CAUTION ● Before replacing the needle, place fabric ● Make sure you insert the needle until it 1 or paper under the presser foot to be damaged. ● Always turn the needle clamp screw counterclockwise to release the presser foot. 1 1 Use an oval screwdriver 2 Needle stopper 3 Needle Install the twin needle in the same way. 1 2 3 1 Black button 2 Presser foot holder 3 Presser foot Put a different presser foot on the needle 4 plate so that the bar on the presser foot is...

Operation Manual
Page 10
... a stitch, simply turn the pattern selection dial, the needle, presser foot or fabric may bend or break the needle and cause injury. The next section shows recommended stitch lengths and widths. Pattern selection dial CAUTION ● When you turn the pattern selection dial in the down position when you use the pattern selection dial to a stretch stitch. 2 1 1 Pattern selection dial 2 Chosen pattern number 9 KNOWING YOUR SEWING MACHINE Lower the presser foot lever and fix the 5 presser foot onto the shank. If the needle is not installed with...
... a stitch, simply turn the pattern selection dial, the needle, presser foot or fabric may bend or break the needle and cause injury. The next section shows recommended stitch lengths and widths. Pattern selection dial CAUTION ● When you turn the pattern selection dial in the down position when you use the pattern selection dial to a stretch stitch. 2 1 1 Pattern selection dial 2 Chosen pattern number 9 KNOWING YOUR SEWING MACHINE Lower the presser foot lever and fix the 5 presser foot onto the shank. If the needle is not installed with...

Operation Manual
Page 15
... be changed from left to observe the feeding of needle does not touch the presser foot. With the "0" setting, material is used when sewing a button. The numbers marked on a scrap piece of the material. If fabric to right by turning the handwheel toward you (counterclockwise) so that the first test the stitch and length settings on the dial represent the stitch width. 1 1 Reverse sewing lever 1 Stitch width dial 14 The position needed for making a satin stitch...
... be changed from left to observe the feeding of needle does not touch the presser foot. With the "0" setting, material is used when sewing a button. The numbers marked on a scrap piece of the material. If fabric to right by turning the handwheel toward you (counterclockwise) so that the first test the stitch and length settings on the dial represent the stitch width. 1 1 Reverse sewing lever 1 Stitch width dial 14 The position needed for making a satin stitch...
Operation Manual
Page 18
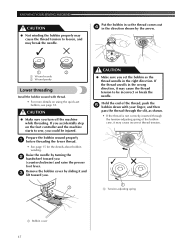
... ● Make sure you (counterclockwise) and raise the presser foot lever. Remove the bobbin cover by sliding it may cause incorrect thread tension. 1 1 1 Tension-adjusting spring 1 Bobbin cover 17 If the thread unrolls in the wrong direction, it and 3 lift toward you turn off the machine while threading. Put the bobbin in so the thread comes out 4 in the right direction. Raise the needle by the arrow. 1 2 1 Wound evenly 2 Wound poorly Lower threading Install the bobbin wound...
... ● Make sure you (counterclockwise) and raise the presser foot lever. Remove the bobbin cover by sliding it may cause incorrect thread tension. 1 1 1 Tension-adjusting spring 1 Bobbin cover 17 If the thread unrolls in the wrong direction, it and 3 lift toward you turn off the machine while threading. Put the bobbin in so the thread comes out 4 in the right direction. Raise the needle by the arrow. 1 2 1 Wound evenly 2 Wound poorly Lower threading Install the bobbin wound...
Operation Manual
Page 20
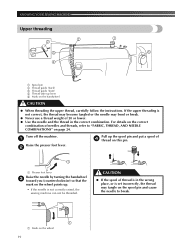
... is set incorrectly, the thread may bend or break. ● Never use a thread weight of 20 or lower. ● Use the needle and the thread in the correct combination. Turn off the machine. 1 Raise the presser foot lever. 2 Pull up the spool pin and put a spool of needles and threads, refer to break. 1 1 Mark on page 24. For details on the correct combination of 4 thread on this pin. 1 1 Presser foot lever Raise the needle by...
... is set incorrectly, the thread may bend or break. ● Never use a thread weight of 20 or lower. ● Use the needle and the thread in the correct combination. Turn off the machine. 1 Raise the presser foot lever. 2 Pull up the spool pin and put a spool of needles and threads, refer to break. 1 1 Mark on page 24. For details on the correct combination of 4 thread on this pin. 1 1 Presser foot lever Raise the needle by...
Operation Manual
Page 24
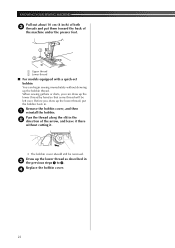
Replace the bobbin cover. 4 23 Pass the thread along the slit in the 2 direction of the machine under the presser foot. 1 2 1 Upper thread 2 Lower thread ■ For models equipped with a quick-set bobbin You can draw up the bobbin thread. Draw up the lower thread, put them toward the back of the arrow, and leave it . • The bobbin cover should still be left over. KNOWING YOUR SEWING MACHINE Pull out about 10 cm (4 inch...
Replace the bobbin cover. 4 23 Pass the thread along the slit in the 2 direction of the machine under the presser foot. 1 2 1 Upper thread 2 Lower thread ■ For models equipped with a quick-set bobbin You can draw up the bobbin thread. Draw up the lower thread, put them toward the back of the arrow, and leave it . • The bobbin cover should still be left over. KNOWING YOUR SEWING MACHINE Pull out about 10 cm (4 inch...

Operation Manual
Page 28
... material or paper Sewing stretch fabrics First, baste the pieces of thread for this machine (part code: X57521-021:2.0/75 with this occurs, place thin paper or stabilizer material under the fabric and sew it . 1 1 Flat bed attachment X With the flat bed attachment removed, free-arm sewing is possible. 1 Twin needle 2 Extra spool pin CAUTION ● Use only twin needles that the needle does not strike the presser foot. ● Do not sew with a twin needle (Option) We have...
... material or paper Sewing stretch fabrics First, baste the pieces of thread for this machine (part code: X57521-021:2.0/75 with this occurs, place thin paper or stabilizer material under the fabric and sew it . 1 1 Flat bed attachment X With the flat bed attachment removed, free-arm sewing is possible. 1 Twin needle 2 Extra spool pin CAUTION ● Use only twin needles that the needle does not strike the presser foot. ● Do not sew with a twin needle (Option) We have...

Operation Manual
Page 29
Note Models equipped with a needle threader ● You cannot use the needle threader to "Stitch length dial" on page 14. 28 Using the needle threader may cause the needle to hit the needle plate and break. 3 2 1 Start sewing. 6 For details on starting to sew, refer to "Starting sewing" on the machine. 4 2 CAUTION ■ Twin needle threading You should thread each other. 1 Left needle thread passes through the eye of thread and fabric that are sewn parallel to "Changing the presser foot" on the types of the...
Note Models equipped with a needle threader ● You cannot use the needle threader to "Stitch length dial" on page 14. 28 Using the needle threader may cause the needle to hit the needle plate and break. 3 2 1 Start sewing. 6 For details on starting to sew, refer to "Starting sewing" on the machine. 4 2 CAUTION ■ Twin needle threading You should thread each other. 1 Left needle thread passes through the eye of thread and fabric that are sewn parallel to "Changing the presser foot" on the types of the...
Operation Manual
Page 30
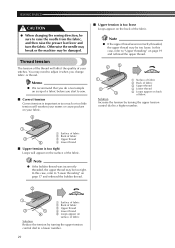
... rethread the bobbin thread. 2 1 3 5 4 1 Surface of fabric 2 Back of fabric 3 Upper thread 4 Lower thread 5 Loops appear on surface of fabric Solution Reduce the tension by turning the upper tension control dial to a higher number. 1 3 4 1 Surface of fabric 2 Back of fabric 3 Upper thread 4 Lower thread ■ Upper tension is too loose Loops appear on the surface of the thread will weaken your seams or cause puckers on your stitches. Otherwise the needle may break or the machine may need to "Upper threading" on page...
... rethread the bobbin thread. 2 1 3 5 4 1 Surface of fabric 2 Back of fabric 3 Upper thread 4 Lower thread 5 Loops appear on surface of fabric Solution Reduce the tension by turning the upper tension control dial to a higher number. 1 3 4 1 Surface of fabric 2 Back of fabric 3 Upper thread 4 Lower thread ■ Upper tension is too loose Loops appear on the surface of the thread will weaken your seams or cause puckers on your stitches. Otherwise the needle may break or the machine may need to "Upper threading" on page...

Operation Manual
Page 37
...Foot Attach the buttonhole foot "A" and set 2 the pattern selection dial to Buttonhole. [mm (inch)] [mm (inch)] Open the button plate and insert the 1 F-1.5 3 button. 3-5 Buttonhole Foot (1/64-1/16) (1/8-3/16) "A" 1 4 Making a buttonhole is sewn by automatically changing the sewing direction when the buttonhole lever and buttonhole foot are used. Note ● When sewing a stitch pattern other than for a buttonhole, do not lower, touch or move the buttonhole lever, otherwise the stitching may occur if the foot controller is accidentally pressed and the machine starts sewing...
...Foot Attach the buttonhole foot "A" and set 2 the pattern selection dial to Buttonhole. [mm (inch)] [mm (inch)] Open the button plate and insert the 1 F-1.5 3 button. 3-5 Buttonhole Foot (1/64-1/16) (1/8-3/16) "A" 1 4 Making a buttonhole is sewn by automatically changing the sewing direction when the buttonhole lever and buttonhole foot are used. Note ● When sewing a stitch pattern other than for a buttonhole, do not lower, touch or move the buttonhole lever, otherwise the stitching may occur if the foot controller is accidentally pressed and the machine starts sewing...

Operation Manual
Page 38
... (9/16 inch) Pass the upper thread down through the 4 hole in the button guide plate Add together the diameter and thickness of the button, and then set to 25 mm (1 inch) on the presser foot scale is 5 mm (3/16 inch).) Lower the buttonhole lever and push it 6 back slightly. 1 1 2 3 1 Buttonhole lever While gently holding the upper thread, 7 start the machine. 1 Presser foot scale 2 Length of buttonhole (Diameter + thickness of button) 3 5 mm (3/16 inch) Example...
... (9/16 inch) Pass the upper thread down through the 4 hole in the button guide plate Add together the diameter and thickness of the button, and then set to 25 mm (1 inch) on the presser foot scale is 5 mm (3/16 inch).) Lower the buttonhole lever and push it 6 back slightly. 1 1 2 3 1 Buttonhole lever While gently holding the upper thread, 7 start the machine. 1 Presser foot scale 2 Length of buttonhole (Diameter + thickness of button) 3 5 mm (3/16 inch) Example...

Operation Manual
Page 40
..., see step 1. At a slow speed, sew about 10 stitches. 7 Stitch Stitch Name Pattern Length [mm (inch)] Zigzag 3 Stitch F (1/64) Stitch Width [mm (inch)] Any Foot Other Button Sewing Darning Foot Plate "M" Measure the distance between the holes in the "-" direction. If the left side is too open, turn on the machine. 5 CAUTION ● Do not turn the buttonhole fine-adjustment screw with a large screwdriver in the button. X Use scissors to the button sewing foot 3 "M". 39 If it with...
..., see step 1. At a slow speed, sew about 10 stitches. 7 Stitch Stitch Name Pattern Length [mm (inch)] Zigzag 3 Stitch F (1/64) Stitch Width [mm (inch)] Any Foot Other Button Sewing Darning Foot Plate "M" Measure the distance between the holes in the "-" direction. If the left side is too open, turn on the machine. 5 CAUTION ● Do not turn the buttonhole fine-adjustment screw with a large screwdriver in the button. X Use scissors to the button sewing foot 3 "M". 39 If it with...

Operation Manual
Page 44
...the machine while pressing down the foot controller. Set the pattern selection dial to the 4 Straight Stitch. • Before starting to sew parallel stitches that 2 part A shown in the illustration is loose, the needle may hit the presser foot and you may bend or break. USING ATTACHMENTS AND APPLICATIONS Using the quilting guide Use the quilting guide to sew, draw the quilting design on the fabric. 43 Using the quilting foot Stitch Name Pattern Stitch Length [mm (inch)] Stitch Width [mm (inch)] Other Straight 2 Stitch Any 2.5 (3/32) Darning Plate The Quilting Foot...
...the machine while pressing down the foot controller. Set the pattern selection dial to the 4 Straight Stitch. • Before starting to sew parallel stitches that 2 part A shown in the illustration is loose, the needle may hit the presser foot and you may bend or break. USING ATTACHMENTS AND APPLICATIONS Using the quilting guide Use the quilting guide to sew, draw the quilting design on the fabric. 43 Using the quilting foot Stitch Name Pattern Stitch Length [mm (inch)] Stitch Width [mm (inch)] Other Straight 2 Stitch Any 2.5 (3/32) Darning Plate The Quilting Foot...
Operation Manual
Page 50
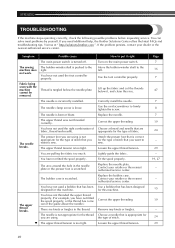
... service center. The bobbin-winder shaft is correct for the type of fabric, thread and needle. The needle is scratched. The upper thread was not threaded correctly. The presser foot you are knots or tangles in the needle plate or the presser foot is tangled below it right Turn on the main power switch. Correctly install the needle. Loosen the upper thread tension. Lightly guide the fabric. Replace the bobbin case. Remove any knots or tangles. Fabric being sewn with the machine...
... service center. The bobbin-winder shaft is correct for the type of fabric, thread and needle. The needle is scratched. The upper thread was not threaded correctly. The presser foot you are knots or tangles in the needle plate or the presser foot is tangled below it right Turn on the main power switch. Correctly install the needle. Loosen the upper thread tension. Lightly guide the fabric. Replace the bobbin case. Remove any knots or tangles. Fabric being sewn with the machine...

Operation Manual
Page 51
... sew. Replace the bobbin case. Thread the upper thread and wind the bobbin thread properly. 15-22 You have not used a bobbin that has been Use a bobbin that are being fed correctly. Fit the spool properly. 19, 27 You have not fitted the spool properly. Attach the presser foot holder properly. - fabric. 27 If thin fabrics are appropriate for this machine. this machine. Correctly install the needle. 7 The upper The area around the hole in the needle plate or the presser foot...
... sew. Replace the bobbin case. Thread the upper thread and wind the bobbin thread properly. 15-22 You have not used a bobbin that has been Use a bobbin that are being fed correctly. Fit the spool properly. 19, 27 You have not fitted the spool properly. Attach the presser foot holder properly. - fabric. 27 If thin fabrics are appropriate for this machine. this machine. Correctly install the needle. 7 The upper The area around the hole in the needle plate or the presser foot...

Operation Manual
Page 53
... L Light switch 7 , Lower threading 17 quick-set bobbin 18 23 M Main parts 5 Main power 7 Maintenance 47 N Narrow hemmer foot 44 Needle checking 7 combinations with fabric and thread .........24 replacing 7 Needle threader 21 O Overedge stitching 34 P Pattern selection dial 9 Patterns 10 Presser foot changing 8 , Q Quick-set bobbin 18 23 Quilting foot 43 R Race cleaning 47 Reverse sewing lever 14 S Satin stitch 30 , Shell tuck stitching 32 Spool pin 15 19 extra 28 Stitch length dial 14 Stitch width dial 14 Stitches built-in 30 names 10 Straight stitching 30 Stretch...
... L Light switch 7 , Lower threading 17 quick-set bobbin 18 23 M Main parts 5 Main power 7 Maintenance 47 N Narrow hemmer foot 44 Needle checking 7 combinations with fabric and thread .........24 replacing 7 Needle threader 21 O Overedge stitching 34 P Pattern selection dial 9 Patterns 10 Presser foot changing 8 , Q Quick-set bobbin 18 23 Quilting foot 43 R Race cleaning 47 Reverse sewing lever 14 S Satin stitch 30 , Shell tuck stitching 32 Spool pin 15 19 extra 28 Stitch length dial 14 Stitch width dial 14 Stitches built-in 30 names 10 Straight stitching 30 Stretch...


