Operation Manual
Page 2
... from the build up of the electrical outlet. IMPORTANT SAFETY INSTRUCTIONS Please read these safety instructions before attempting to carry it by any other part may fall, resulting in the instruction manual: • To unplug the machine, switch the machine to the symbol "O" position to the ... Special care is spilled on the foot controller. • Do not use bent or damaged needles. • Keep fingers away from all moving parts. Plug the machine directly into the electrical outlet. • Never drop or insert any object into the electrical outlet. Special care is stored or...
... from the build up of the electrical outlet. IMPORTANT SAFETY INSTRUCTIONS Please read these safety instructions before attempting to carry it by any other part may fall, resulting in the instruction manual: • To unplug the machine, switch the machine to the symbol "O" position to the ... Special care is spilled on the foot controller. • Do not use bent or damaged needles. • Keep fingers away from all moving parts. Plug the machine directly into the electrical outlet. • Never drop or insert any object into the electrical outlet. Special care is stored or...

Operation Manual
Page 3
... that this machine was supplied in this manual. If the problem persists, please consult your local authorized Brother dealer. For additional product information, visit our web site at www.brother.com SAVE THESE INSTRUCTIONS This machine is not intended for their safety. Children shall not play with reduced...to clean the case. Use this machine only for household use of the appliance by or near a space heater, iron, halogen lamp, or other parts to assure correct installation. 8 For repair or adjustment: • If the Light unit (light-emitting diode) is damaged, it must be kept ...
... that this machine was supplied in this manual. If the problem persists, please consult your local authorized Brother dealer. For additional product information, visit our web site at www.brother.com SAVE THESE INSTRUCTIONS This machine is not intended for their safety. Children shall not play with reduced...to clean the case. Use this machine only for household use of the appliance by or near a space heater, iron, halogen lamp, or other parts to assure correct installation. 8 For repair or adjustment: • If the Light unit (light-emitting diode) is damaged, it must be kept ...
Operation Manual
Page 4
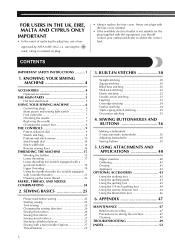
KNOWING YOUR SEWING MACHINE 4 ACCESSORIES 4 Optional accessories 4 THE MAIN PARTS 5 Flat bed attachment 5 USING YOUR SEWING MACHINE 6 Connecting plugs 6 Main power and sewing light switch 7 Foot controller 7 Checking the needle 7 Replacing the needle 7 Changing the ...
KNOWING YOUR SEWING MACHINE 4 ACCESSORIES 4 Optional accessories 4 THE MAIN PARTS 5 Flat bed attachment 5 USING YOUR SEWING MACHINE 6 Connecting plugs 6 Main power and sewing light switch 7 Foot controller 7 Checking the needle 7 Replacing the needle 7 Changing the ...
Operation Manual
Page 5
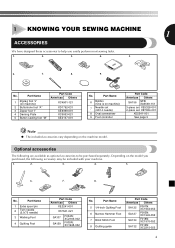
... foot "I" 4 Darning Plate 5 Button sewing foot "M" Part Code Americas Others XC4901-121 XD1792-031 XE9369-001 XC6063-021 XE2137-001 No. Part Name 1 Extra spool pin 2 Twin needle (2.0/75 needle) 3 Walking Foot 4 Quilting Foot Part Code Americas Others XE2241-001 X57521-021 SA107 SA129 F034N:... XC2165-002 F005N: XC1948-052 No. Part Name 5 1/4-inch Quilting Foot 6 Narrow Hemmer Foot 7 Blind Stitch Foot 8 Quilting guide Part Code Americas Others SA125 F001N: XC1944-052 SA127 F003N: XC1945-052 SA134 F018N: XC1976-052...
... foot "I" 4 Darning Plate 5 Button sewing foot "M" Part Code Americas Others XC4901-121 XD1792-031 XE9369-001 XC6063-021 XE2137-001 No. Part Name 1 Extra spool pin 2 Twin needle (2.0/75 needle) 3 Walking Foot 4 Quilting Foot Part Code Americas Others XE2241-001 X57521-021 SA107 SA129 F034N:... XC2165-002 F005N: XC1948-052 No. Part Name 5 1/4-inch Quilting Foot 6 Narrow Hemmer Foot 7 Blind Stitch Foot 8 Quilting guide Part Code Americas Others SA125 F001N: XC1944-052 SA127 F003N: XC1945-052 SA134 F018N: XC1976-052...
Operation Manual
Page 6
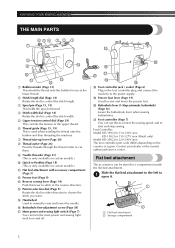
... selection dial (Page 9) Rotate the dial in the foot controller plug and connect the machine to the power supply. KNOWING YOUR SEWING MACHINE THE MAIN PARTS 654 3 2 1 7 E 8 9 D 0 A C B 1 Bobbin winder (Page 15) This winds the thread onto the bobbin for 220-240V area The foot controller... part code differs depending on and off. J F KG H I Presser foot lever (Page 19) Used to choose the stitch you want. Contact your dealer or the nearest ...
... selection dial (Page 9) Rotate the dial in the foot controller plug and connect the machine to the power supply. KNOWING YOUR SEWING MACHINE THE MAIN PARTS 654 3 2 1 7 E 8 9 D 0 A C B 1 Bobbin winder (Page 15) This winds the thread onto the bobbin for 220-240V area The foot controller... part code differs depending on and off. J F KG H I Presser foot lever (Page 19) Used to choose the stitch you want. Contact your dealer or the nearest ...
Operation Manual
Page 9
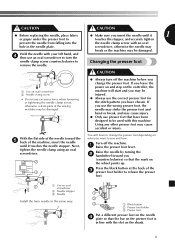
.... CAUTION 21 1 Use an oval screwdriver 2 Needle clamp screw • Do not use excessive force when loosening or tightening the needle clamp screw, otherwise certain parts of the machine, insert the needle until it touches the needle stopper. If you leave the power on and step on the shank. 8 Raise the...
.... CAUTION 21 1 Use an oval screwdriver 2 Needle clamp screw • Do not use excessive force when loosening or tightening the needle clamp screw, otherwise certain parts of the machine, insert the needle until it touches the needle stopper. If you leave the power on and step on the shank. 8 Raise the...
Operation Manual
Page 16
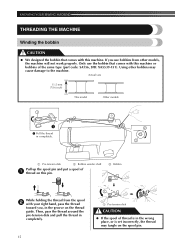
... SEWING MACHINE THREADING THE MACHINE Winding the bobbin CAUTION ● We designed the bobbin that comes with this machine or bobbins of the same type (part code: SA156, SFB: XA5539-151). Actual size 11.5 mm (7/16 inch) This model Other models 1 1 Pull the thread in completely. 2 3 1 Pre-tension disk 2 Bobbin winder...
... SEWING MACHINE THREADING THE MACHINE Winding the bobbin CAUTION ● We designed the bobbin that comes with this machine or bobbins of the same type (part code: SA156, SFB: XA5539-151). Actual size 11.5 mm (7/16 inch) This model Other models 1 1 Pull the thread in completely. 2 3 1 Pre-tension disk 2 Bobbin winder...
Operation Manual
Page 26
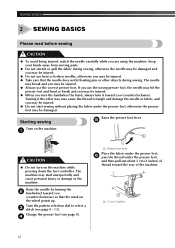
... you may be injured. ● Take care that the mark on the machine while pressing down the foot controller. Keep your hands away from moving parts. ● Do not stretch or pull the fabric during sewing. Starting sewing Raise the presser foot lever. 5 Turn on the machine. 1 1 CAUTION ● Do not...
... you may be injured. ● Take care that the mark on the machine while pressing down the foot controller. Keep your hands away from moving parts. ● Do not stretch or pull the fabric during sewing. Starting sewing Raise the presser foot lever. 5 Turn on the machine. 1 1 CAUTION ● Do not...

Operation Manual
Page 28
... or stabilizer material under the fabric and sew it together with bent needles. Note ● When you are finished with a 2 mm width). Slide the part that have been made for making decorative stitches. 1 1 Basting Stitching cylindrical pieces Removing the flat bed attachment makes it . 1 1 Flat bed attachment X...side should face toward you . ■ Attaching the twin needle Attach the twin needle in its original position. Sewing with this machine (part code: X57521-021:2.0/75 with free-arm sewing, install the flat bed attachment back in the same way as cuffs and pant legs, or...
... or stabilizer material under the fabric and sew it together with bent needles. Note ● When you are finished with a 2 mm width). Slide the part that have been made for making decorative stitches. 1 1 Basting Stitching cylindrical pieces Removing the flat bed attachment makes it . 1 1 Flat bed attachment X...side should face toward you . ■ Attaching the twin needle Attach the twin needle in its original position. Sewing with this machine (part code: X57521-021:2.0/75 with free-arm sewing, install the flat bed attachment back in the same way as cuffs and pant legs, or...

Operation Manual
Page 32
... 4 3 Edge of fabric 4 Desired edge of hem 1 32 1 2 3 Use a chalk to mark on free-arm sewing, refer to "Stitching cylindrical pieces" (Page 27). Slide the part that the fabric feeds correctly, and then start sewing. 1 1 Arm After selecting a stitch, slowly turn the 8 handwheel toward you wish to sew onto 7 the arm...
... 4 3 Edge of fabric 4 Desired edge of hem 1 32 1 2 3 Use a chalk to mark on free-arm sewing, refer to "Stitching cylindrical pieces" (Page 27). Slide the part that the fabric feeds correctly, and then start sewing. 1 1 Arm After selecting a stitch, slowly turn the 8 handwheel toward you wish to sew onto 7 the arm...

Operation Manual
Page 44
... stem of the quilting guide into 1 the hole at the rear of the quilting guide so 2 that the quilting guide aligns with the seam that 2 part A shown in the illustration is loose, the needle may hit the presser foot and you may bend or break. If the screw is above the...
... stem of the quilting guide into 1 the hole at the rear of the quilting guide so 2 that the quilting guide aligns with the seam that 2 part A shown in the illustration is loose, the needle may hit the presser foot and you may bend or break. If the screw is above the...

Operation Manual
Page 46
... the left with your left hand. ■ If too much fabric is wrapped around the curl, then a wide threefold seam is wrapped around the curled part of the presser foot, lightly pull on the thread while slowly sewing. Position the edge of fabric wrapped in the same way. Wrap the fabric... the presser foot, then 5 hold the ends of the upper and lower thread to the right with your both threads, pass them through 6 the curled part of the presser foot and pull them from being sewn Holding both hands. At the same time, carefully guide the fabric to prevent them toward...
... the left with your left hand. ■ If too much fabric is wrapped around the curl, then a wide threefold seam is wrapped around the curled part of the presser foot, lightly pull on the thread while slowly sewing. Position the edge of fabric wrapped in the same way. Wrap the fabric... the presser foot, then 5 hold the ends of the upper and lower thread to the right with your both threads, pass them through 6 the curled part of the presser foot and pull them from being sewn Holding both hands. At the same time, carefully guide the fabric to prevent them toward...
Operation Manual
Page 49
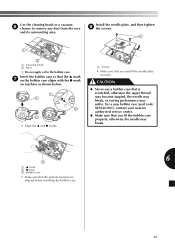
... remove any dust from the race and its surrounding area. Use the cleaning brush or a vacuum 6 cleaner to the bobbin case. For a new bobbin case (part code: XE9326-001), contact your nearest authorized service center. ● Make sure that you install the needle plate securely. otherwise the upper thread may become...
... remove any dust from the race and its surrounding area. Use the cleaning brush or a vacuum 6 cleaner to the bobbin case. For a new bobbin case (part code: XE9326-001), contact your nearest authorized service center. ● Make sure that you install the needle plate securely. otherwise the upper thread may become...

Operation Manual
Page 53
... 34 Flat bed attachment 5 Foot controller 7 Free-arm style 27 G Gathering 41 H Handwheel 19 L Light switch 7 , Lower threading 17 quick-set bobbin 18 23 M Main parts 5 Main power 7 Maintenance 47 N Narrow hemmer foot 44 Needle checking 7 combinations with fabric and thread .........24 replacing 7 Needle threader 21 O Overedge stitching 34 P Pattern selection...
... 34 Flat bed attachment 5 Foot controller 7 Free-arm style 27 G Gathering 41 H Handwheel 19 L Light switch 7 , Lower threading 17 quick-set bobbin 18 23 M Main parts 5 Main power 7 Maintenance 47 N Narrow hemmer foot 44 Needle checking 7 combinations with fabric and thread .........24 replacing 7 Needle threader 21 O Overedge stitching 34 P Pattern selection...

