Operation Manual
Page 4
...14 Stitch width dial 14 Reverse sewing lever 14 THREADING THE MACHINE 15 Winding the bobbin 15 Lower threading 17 Lower threading (for models equipped with a quick-set bobbin 18 Upper threading 19 Using the needle threader (for the plug supplied with this equipment, you ... event of replacing the plug fuse, use plugs with the fuse cover omitted. • If the available electrical outlet is not suitable for models equipped with a twin needle (Option 27 Thread tension 29 3. SEWING BUTTONHOLES AND BUTTONS 36 Making a buttonhole (1-step automatic buttonhole 36 Adjusting buttonholes...
...14 Stitch width dial 14 Reverse sewing lever 14 THREADING THE MACHINE 15 Winding the bobbin 15 Lower threading 17 Lower threading (for models equipped with a quick-set bobbin 18 Upper threading 19 Using the needle threader (for the plug supplied with this equipment, you ... event of replacing the plug fuse, use plugs with the fuse cover omitted. • If the available electrical outlet is not suitable for models equipped with a twin needle (Option 27 Thread tension 29 3. SEWING BUTTONHOLES AND BUTTONS 36 Making a buttonhole (1-step automatic buttonhole 36 Adjusting buttonholes...
Operation Manual
Page 5
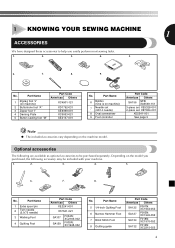
Optional accessories The following are available as optional accessories to help you purchased, the following accessory may be purchased separately. Depending on the model you easily perform most sewing tasks. 1. 2. 3. 4. 5. 6. 7. 8. 9. Part Name 1 Extra spool pin 2 Twin needle (2.0/75 needle) 3 Walking Foot 4 Quilting Foot Part Code Americas Others XE2241-... No. 1 KNOWING YOUR SEWING MACHINE 1 ACCESSORIES We have designed these accessories to be included with your machine. 1. 2. 3. 4. 5. 6. 7. 8. Part Name 1 Zigzag foot "J" (on the machine model.
Optional accessories The following are available as optional accessories to help you purchased, the following accessory may be purchased separately. Depending on the model you easily perform most sewing tasks. 1. 2. 3. 4. 5. 6. 7. 8. 9. Part Name 1 Extra spool pin 2 Twin needle (2.0/75 needle) 3 Walking Foot 4 Quilting Foot Part Code Americas Others XE2241-... No. 1 KNOWING YOUR SEWING MACHINE 1 ACCESSORIES We have designed these accessories to be included with your machine. 1. 2. 3. 4. 5. 6. 7. 8. Part Name 1 Zigzag foot "J" (on the machine model.
Operation Manual
Page 6
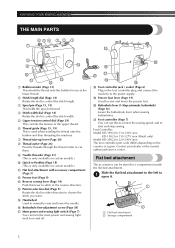
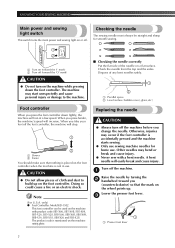
... and off. J F KG H I Presser foot lever (Page 19) Used to the power supply. Foot Controller: Model KD-1902 for 110-120V area KD-1902 for 110-127V area (Brazil only) Model KD-2902 for use this lever to stitch in the foot controller plug and connect the machine to...) Pass the threads through the thread cutter to cut them. 9 Needle threader (Page 21) (This is only available on certain models.) 0 Quick-set bobbin (Page 18) (This is only available on certain models.) A Flat bed attachment with accessory compartment (Page 5) B Presser foot (Page 8) C Reverse sewing lever (Page 14) Push ...
... and off. J F KG H I Presser foot lever (Page 19) Used to the power supply. Foot Controller: Model KD-1902 for 110-120V area KD-1902 for 110-127V area (Brazil only) Model KD-2902 for use this lever to stitch in the foot controller plug and connect the machine to...) Pass the threads through the thread cutter to cut them. 9 Needle threader (Page 21) (This is only available on certain models.) 0 Quick-set bobbin (Page 18) (This is only available on certain models.) A Flat bed attachment with accessory compartment (Page 5) B Presser foot (Page 8) C Reverse sewing lever (Page 14) Push ...
Operation Manual
Page 8
... the foot controller when the machine is not in use . Note (For U.S.A. Doing so could cause a fire or an electric shock. only) ● Foot Controller: Model KD-1902 This foot controller can be straight and sharp for home use . Other needles may start unexpectedly and cause personal injury or damage to...
... the foot controller when the machine is not in use . Note (For U.S.A. Doing so could cause a fire or an electric shock. only) ● Foot Controller: Model KD-1902 This foot controller can be straight and sharp for home use . Other needles may start unexpectedly and cause personal injury or damage to...
Operation Manual
Page 11
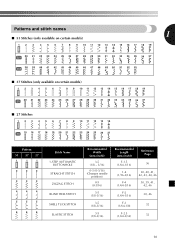
Patterns and stitch names 1 ■ 53 Stitches (only available on certain models) 1 2 3 4 5 6 7 8 9 10 11 12 13 14 15 16 17 18 19 1 20 21 22 23 24 25 26 27 28 29 30 31 32 33 34 ... 36 37 38 39 40 41 42 43 44 45 46 47 48 49 50 51 52 53 ■ 37 Stitches (only available on certain models) 1 2 3 4 5 6 7 8 9 10 11 12 13 14 15 16 17 18 19 20 21 22 23 24 25 26 27 28 29 30 31 32 33 34...
Patterns and stitch names 1 ■ 53 Stitches (only available on certain models) 1 2 3 4 5 6 7 8 9 10 11 12 13 14 15 16 17 18 19 1 20 21 22 23 24 25 26 27 28 29 30 31 32 33 34 ... 36 37 38 39 40 41 42 43 44 45 46 47 48 49 50 51 52 53 ■ 37 Stitches (only available on certain models) 1 2 3 4 5 6 7 8 9 10 11 12 13 14 15 16 17 18 19 20 21 22 23 24 25 26 27 28 29 30 31 32 33 34...
Operation Manual
Page 16
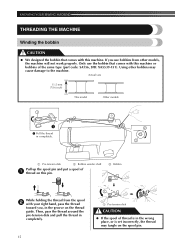
... the thread toward you use the bobbin that comes with this machine. Actual size 11.5 mm (7/16 inch) This model Other models 1 1 Pull the thread in the groove on the spool pin. Using other models, the machine will not work properly. If you , in completely. 2 3 1 Pre-tension disk 2 Bobbin winder shaft Pull up...
... the thread toward you use the bobbin that comes with this machine. Actual size 11.5 mm (7/16 inch) This model Other models 1 1 Pull the thread in the groove on the spool pin. Using other models, the machine will not work properly. If you , in completely. 2 3 1 Pre-tension disk 2 Bobbin winder shaft Pull up...
Operation Manual
Page 19
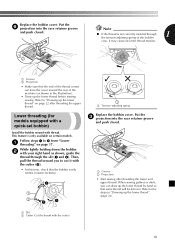
Refer to 4 from the cover toward you can draw up the lower thread" on certain models. Then, pull the thread toward the rear of the machine (as shown, guide the thread through 1 the tension-adjusting spring of the thread comes...thread tension. 12 1 Groove 2 Projection • Make sure that the bobbin easily rotates counterclockwise. 2 1 2 3 1 1 1 Tension-adjusting spring Replace the bobbin cover. Lower threading (for models equipped with a quick-set bobbin) Install the bobbin wound with the cutter (3). • At this time, check that the end of the bobbin case, it...
Refer to 4 from the cover toward you can draw up the lower thread" on certain models. Then, pull the thread toward the rear of the machine (as shown, guide the thread through 1 the tension-adjusting spring of the thread comes...thread tension. 12 1 Groove 2 Projection • Make sure that the bobbin easily rotates counterclockwise. 2 1 2 3 1 1 1 Tension-adjusting spring Replace the bobbin cover. Lower threading (for models equipped with a quick-set bobbin) Install the bobbin wound with the cutter (3). • At this time, check that the end of the bobbin case, it...
Operation Manual
Page 22
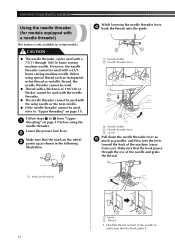
... needle threader cannot be used with a needle threader) This feature is only available on page 19. Follow steps 1 to "Upper threading" on certain models. Make sure that the hook passes through 100/16 home sewing machine needle. KNOWING YOUR SEWING MACHINE Using the needle threader (for... models equipped with a 65/9 home sewing machine needle. CAUTION ● The needle threader can be used. ● Thread with a thickness of the machine (away from ...
... needle threader cannot be used with a needle threader) This feature is only available on page 19. Follow steps 1 to "Upper threading" on certain models. Make sure that the hook passes through 100/16 home sewing machine needle. KNOWING YOUR SEWING MACHINE Using the needle threader (for... models equipped with a 65/9 home sewing machine needle. CAUTION ● The needle threader can be used. ● Thread with a thickness of the machine (away from ...
Operation Manual
Page 24
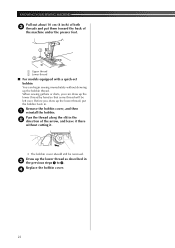
... the bobbin thread. Pass the thread along the slit in the 2 direction of the machine under the presser foot. 1 2 1 Upper thread 2 Lower thread ■ For models equipped with a quick-set bobbin You can draw up the lower thread, put them toward the back of the arrow, and leave it . • The...
... the bobbin thread. Pass the thread along the slit in the 2 direction of the machine under the presser foot. 1 2 1 Upper thread 2 Lower thread ■ For models equipped with a quick-set bobbin You can draw up the lower thread, put them toward the back of the arrow, and leave it . • The...

Operation Manual
Page 29
... spool onto the extra spool pin. 1 Bobbin winder shaft 3 2 Extra spool pin 2 3 Thread spool CAUTION ● When using the thread from front to back. Note Models equipped with a needle threader ● You cannot use the needle threader to the machine. Instead, thread the twin needle by hand, from the spool on...
... spool onto the extra spool pin. 1 Bobbin winder shaft 3 2 Extra spool pin 2 3 Thread spool CAUTION ● When using the thread from front to back. Note Models equipped with a needle threader ● You cannot use the needle threader to the machine. Instead, thread the twin needle by hand, from the spool on...


