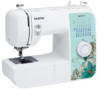
Operation Manual
Page 2
...source, such as an unsteady or slanted table, otherwise the machine may damage the machine or result in injuries. 5 Special care is required around the machine needle. 1 Lifting the machine by its handle. Special care is required when sewing: • Always pay close attention to use if you are... being used or where oxygen is being sewn may injure your back or knees. 4 Always keep your machine if the power ...
...source, such as an unsteady or slanted table, otherwise the machine may damage the machine or result in injuries. 5 Special care is required around the machine needle. 1 Lifting the machine by its handle. Special care is required when sewing: • Always pay close attention to use if you are... being used or where oxygen is being sewn may injure your back or knees. 4 Always keep your machine if the power ...

Operation Manual
Page 3
... of this manual. Never allow children to play with the appliance. If the problem persists, please consult your local authorized Brother dealer. Children should be supervised to ensure that this machine was supplied in should never be used. • Always consult the operation manual when replacing or installing any adjustments in... case. Use accessories recommended by the manufacturer as it could cause the needle to break. • Do not push or pull the fabric when sewing, and follow the troubleshooting table in this product are subject to change without supervision. 2
... of this manual. Never allow children to play with the appliance. If the problem persists, please consult your local authorized Brother dealer. Children should be supervised to ensure that this machine was supplied in should never be used. • Always consult the operation manual when replacing or installing any adjustments in... case. Use accessories recommended by the manufacturer as it could cause the needle to break. • Do not push or pull the fabric when sewing, and follow the troubleshooting table in this product are subject to change without supervision. 2
Operation Manual
Page 4
... AND BUTTONS 36 Making a buttonhole (1-step automatic buttonhole 36 Adjusting buttonholes 38 Sewing buttons 39 5. KNOWING YOUR SEWING MACHINE 4 ACCESSORIES 4 Optional accessories 4 THE MAIN PARTS 5 Flat bed attachment 5 USING YOUR SEWING MACHINE 6 Connecting plugs 6 Main power and sewing light switch 7 Foot controller 7 Checking the needle 7 Replacing the needle 7 Changing the presser foot 8 THE CONTROLS 9 Pattern selection...
... AND BUTTONS 36 Making a buttonhole (1-step automatic buttonhole 36 Adjusting buttonholes 38 Sewing buttons 39 5. KNOWING YOUR SEWING MACHINE 4 ACCESSORIES 4 Optional accessories 4 THE MAIN PARTS 5 Flat bed attachment 5 USING YOUR SEWING MACHINE 6 Connecting plugs 6 Main power and sewing light switch 7 Foot controller 7 Checking the needle 7 Replacing the needle 7 Changing the presser foot 8 THE CONTROLS 9 Pattern selection...
Operation Manual
Page 5
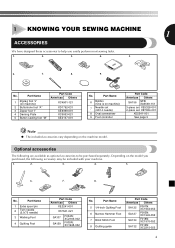
... Americas Others XC4901-121 XD1792-031 XE9369-001 XC6063-021 XE2137-001 No. No. 1 KNOWING YOUR SEWING MACHINE 1 ACCESSORIES We have designed these accessories to be included with your machine. 1. 2. 3. 4. 5. 6. 7. 8. No. Part Name 1 Zigzag foot "J" (on the machine model. Part Name 1 Extra spool pin 2 Twin needle (2.0/75 needle) 3 Walking Foot 4 Quilting Foot Part Code...
... Americas Others XC4901-121 XD1792-031 XE9369-001 XC6063-021 XE2137-001 No. No. 1 KNOWING YOUR SEWING MACHINE 1 ACCESSORIES We have designed these accessories to be included with your machine. 1. 2. 3. 4. 5. 6. 7. 8. No. Part Name 1 Zigzag foot "J" (on the machine model. Part Name 1 Extra spool pin 2 Twin needle (2.0/75 needle) 3 Walking Foot 4 Quilting Foot Part Code...
Operation Manual
Page 6
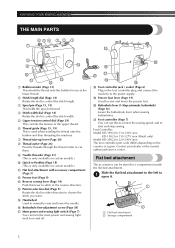
... want. E Handwheel Used to manually raise and lower the needle. Flat bed attachment The accessories can turn the main power and sewing light switch on the country or region. KNOWING YOUR SEWING MACHINE THE MAIN PARTS 654 3 2 1 7 E 8 9 D 0 A C B 1 Bobbin winder (Page 15) This winds the thread onto the bobbin for 220-240V area The...
... want. E Handwheel Used to manually raise and lower the needle. Flat bed attachment The accessories can turn the main power and sewing light switch on the country or region. KNOWING YOUR SEWING MACHINE THE MAIN PARTS 654 3 2 1 7 E 8 9 D 0 A C B 1 Bobbin winder (Page 15) This winds the thread onto the bobbin for 220-240V area The...

Operation Manual
Page 7
...2 outlet. Connecting plugs Connect the foot controller plug to correctly operate the machine. (For U.S.A. To reduce the risk of time. When restarting the sewing machine, follow the necessary procedure to the 1 machine. These things may damage the cord, or lead to fire or electric ... to be cut, damaged, modified, forcefully bent, pulled, twisted, or bundled. USING YOUR SEWING MACHINE 1 WARNING ● Use only regular household electricity for a long period of electric shock, this machine. ● Do not use extension cords or multi-plug adapters with wet hands. b a...
...2 outlet. Connecting plugs Connect the foot controller plug to correctly operate the machine. (For U.S.A. To reduce the risk of time. When restarting the sewing machine, follow the necessary procedure to the 1 machine. These things may damage the cord, or lead to fire or electric ... to be cut, damaged, modified, forcefully bent, pulled, twisted, or bundled. USING YOUR SEWING MACHINE 1 WARNING ● Use only regular household electricity for a long period of electric shock, this machine. ● Do not use extension cords or multi-plug adapters with wet hands. b a...
Operation Manual
Page 8
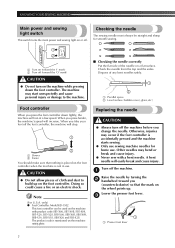
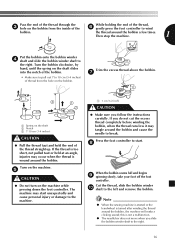
... up . Lower the presser foot lever. 3 1 1 Presser foot lever 7 KNOWING YOUR SEWING MACHINE Main power and sewing light switch This switch turns the main power and sewing light on or off the machine. 1 Raise the needle by turning the 2 handwheel toward the 'O' mark) CAUTION ●...could cause a fire or an electric shock. The machine may occur if the foot controller is accidentally pressed and the machine starts sewing. ● Only use sewing machine needles for smooth sewing. 1 2 1 Turn on the machine while pressing down lightly, the machine will run at a low speed. Foot controller ...
... up . Lower the presser foot lever. 3 1 1 Presser foot lever 7 KNOWING YOUR SEWING MACHINE Main power and sewing light switch This switch turns the main power and sewing light on or off the machine. 1 Raise the needle by turning the 2 handwheel toward the 'O' mark) CAUTION ●...could cause a fire or an electric shock. The machine may occur if the foot controller is accidentally pressed and the machine starts sewing. ● Only use sewing machine needles for smooth sewing. 1 2 1 Turn on the machine while pressing down lightly, the machine will run at a low speed. Foot controller ...
Operation Manual
Page 9
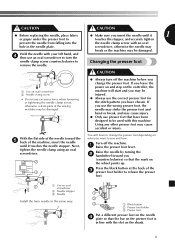
... or tightening the needle clamp screw, otherwise certain parts of the sewing machine may be damaged. ● Always turn the needle clamp screw counterclockwise to turn off the machine. 1 Raise the presser foot lever. Turn off the machine before you change the presser foot depending on the shank. 8 ...CAUTION CAUTION ● Before replacing the needle, place fabric ● Make sure you insert the needle until it 1 or paper under the presser foot to sew and how. If you ...
... or tightening the needle clamp screw, otherwise certain parts of the sewing machine may be damaged. ● Always turn the needle clamp screw counterclockwise to turn off the machine. 1 Raise the presser foot lever. Turn off the machine before you change the presser foot depending on the shank. 8 ...CAUTION CAUTION ● Before replacing the needle, place fabric ● Make sure you insert the needle until it 1 or paper under the presser foot to sew and how. If you ...

Operation Manual
Page 10
... cause injury. If the needle is not installed with the correct orientation, the needle may strike the presser foot, which may be damaged. KNOWING YOUR SEWING MACHINE Lower the presser foot lever and fix the 5 presser foot onto the shank. To choose a stitch, simply turn the dial further to the left (direction...
... cause injury. If the needle is not installed with the correct orientation, the needle may strike the presser foot, which may be damaged. KNOWING YOUR SEWING MACHINE Lower the presser foot lever and fix the 5 presser foot onto the shank. To choose a stitch, simply turn the dial further to the left (direction...

Operation Manual
Page 12
KNOWING YOUR SEWING MACHINE Pattern 53 37 27 7 7 7 Stitch Name STRETCH BLIND HEM STITCH Recommended Width (mm (inch)) 3-5 (1/8-3/16) 8 8 8 SCALLOP STITCH 3-5 (1/8-3/16) 9 9 9 DOUBLE ACTION STITCH 3-5 (1/8-3/16) 10 10 10 ...
KNOWING YOUR SEWING MACHINE Pattern 53 37 27 7 7 7 Stitch Name STRETCH BLIND HEM STITCH Recommended Width (mm (inch)) 3-5 (1/8-3/16) 8 8 8 SCALLOP STITCH 3-5 (1/8-3/16) 9 9 9 DOUBLE ACTION STITCH 3-5 (1/8-3/16) 10 10 10 ...

Operation Manual
Page 14
... 2.5 (3/32) Fixed 2.5 (3/32) Fixed 2.5 (3/32) Fixed 2.5 (3/32) Fixed 2.5 (3/32) Reference Page 35 35 35 35 35 35 35 35 35 35 35 13 KNOWING YOUR SEWING MACHINE Pattern 53 37 27 43 -- 44 -- 45 -- 46 -- 47 -- 48 -- 49 -- 50 -- 51 -- 52 -- 53 --
... 2.5 (3/32) Fixed 2.5 (3/32) Fixed 2.5 (3/32) Fixed 2.5 (3/32) Fixed 2.5 (3/32) Reference Page 35 35 35 35 35 35 35 35 35 35 35 13 KNOWING YOUR SEWING MACHINE Pattern 53 37 27 43 -- 44 -- 45 -- 46 -- 47 -- 48 -- 49 -- 50 -- 51 -- 52 -- 53 --

Operation Manual
Page 15
... setting, material is used when sewing a button. Continuing to 1 sew with the stitches bunched together may bend or break. 1 2 3 ● If the stitches are bunched together, lengthen the stitch length and continue sewing. The machine will then sew forward. 1 Stitch width dial ...Raise the needle by Depending on the dial represent the stitch width. 1 1 Reverse sewing lever 1 Stitch width dial 14 The numbers marked on the ...
... setting, material is used when sewing a button. Continuing to 1 sew with the stitches bunched together may bend or break. 1 2 3 ● If the stitches are bunched together, lengthen the stitch length and continue sewing. The machine will then sew forward. 1 Stitch width dial ...Raise the needle by Depending on the dial represent the stitch width. 1 1 Reverse sewing lever 1 Stitch width dial 14 The numbers marked on the ...
Operation Manual
Page 16
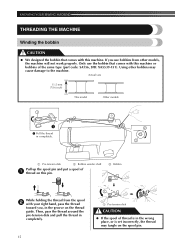
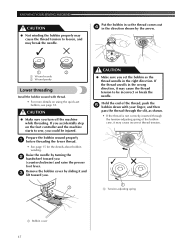
KNOWING YOUR SEWING MACHINE THREADING THE MACHINE Winding the bobbin CAUTION ● We designed the bobbin that comes with this machine or bobbins of thread is in the wrong place, or is set incorrectly, the thread may cause damage to the machine. Using other models, the machine will not work properly....: SA156, SFB: XA5539-151). Actual size 11.5 mm (7/16 inch) This model Other models 1 1 Pull the thread in the groove on this machine. If you use the bobbin that comes with your right hand, pass the thread toward you, in completely. 2 3 1 Pre-tension disk 2 Bobbin...
KNOWING YOUR SEWING MACHINE THREADING THE MACHINE Winding the bobbin CAUTION ● We designed the bobbin that comes with this machine or bobbins of thread is in the wrong place, or is set incorrectly, the thread may cause damage to the machine. Using other models, the machine will not work properly....: SA156, SFB: XA5539-151). Actual size 11.5 mm (7/16 inch) This model Other models 1 1 Pull the thread in the groove on this machine. If you use the bobbin that comes with your right hand, pass the thread toward you, in completely. 2 3 1 Pre-tension disk 2 Bobbin...
Operation Manual
Page 17
... inch) CAUTION ● Make sure you follow the instructions carefully. If you slide the bobbin winder shaft to break. Note ● When the sewing machine is started or the handwheel is not a malfunction. ● The needle bar does not move when you do not cut the excess thread completely ...thread is wound around the bobbin a few times. the thread around the bobbin. Trim the excess thread above the bobbin. 7 1 3 1 2 1 Spring on the machine while pressing down the foot controller. If the thread is too short, not pulled taut or held at an angle, injuries may tangle around the...
... inch) CAUTION ● Make sure you follow the instructions carefully. If you slide the bobbin winder shaft to break. Note ● When the sewing machine is started or the handwheel is not a malfunction. ● The needle bar does not move when you do not cut the excess thread completely ...thread is wound around the bobbin a few times. the thread around the bobbin. Trim the excess thread above the bobbin. 7 1 3 1 2 1 Spring on the machine while pressing down the foot controller. If the thread is too short, not pulled taut or held at an angle, injuries may tangle around the...
Operation Manual
Page 18
...it may cause the thread tension to be injured. If the thread unrolls in the wrong direction, it and 3 lift toward you turn off the machine while threading. If you accidentally step on using the quick-set the bobbin so the thread unrolls in the direction shown by sliding it may...For more details on the foot controller and the machine starts to loosen, and may break the needle. Put the bobbin in so the thread comes out 4 in the right direction. CAUTION ● Make sure you set bobbin, see page 18. KNOWING YOUR SEWING MACHINE CAUTION ● Not winding the bobbin properly may...
...it may cause the thread tension to be injured. If the thread unrolls in the wrong direction, it and 3 lift toward you turn off the machine while threading. If you accidentally step on using the quick-set the bobbin so the thread unrolls in the direction shown by sliding it may...For more details on the foot controller and the machine starts to loosen, and may break the needle. Put the bobbin in so the thread comes out 4 in the right direction. CAUTION ● Make sure you set bobbin, see page 18. KNOWING YOUR SEWING MACHINE CAUTION ● Not winding the bobbin properly may...
Operation Manual
Page 20
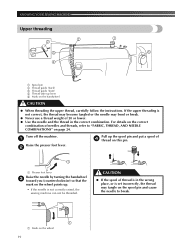
...or is set incorrectly, the thread may bend or break. ● Never use a thread weight of thread is not correctly raised, the sewing machine can not be threaded. For details on the correct combination of 4 thread on this pin. 1 1 Presser foot lever Raise the needle by... needles and threads, refer to break. 1 1 Mark on the handwheel CAUTION ● When threading the upper thread, carefully follow the instructions. KNOWING YOUR SEWING MACHINE Upper threading 2 2 3 4 1 5 1 Spool pin 2 Thread guide (back) 3 Thread guide (front) 4 Thread take-up . • If the needle ...
...or is set incorrectly, the thread may bend or break. ● Never use a thread weight of thread is not correctly raised, the sewing machine can not be threaded. For details on the correct combination of 4 thread on this pin. 1 1 Presser foot lever Raise the needle by... needles and threads, refer to break. 1 1 Mark on the handwheel CAUTION ● When threading the upper thread, carefully follow the instructions. KNOWING YOUR SEWING MACHINE Upper threading 2 2 3 4 1 5 1 Spool pin 2 Thread guide (back) 3 Thread guide (front) 4 Thread take-up . • If the needle ...
Operation Manual
Page 21
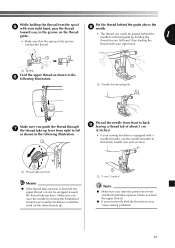
...Make sure you raise the needle by holding the thread from front to back 9 leaving a thread tail of about 5 cm (2 inches). • If your sewing machine is equipped with your right hand. 1 1 Spring Feed the upper thread as shown in the groove catches the thread. toward you (counterclockwise) so that the... easily be wrapped around the thread take -up lever before you feed the upper thread. ● If you incorrectly feed the thread you may cause sewing problems. 20 While holding the 1 • Make sure that the mark on the wheel points up. 1 1 5 cm (2 inches) Note ● Make ...
...Make sure you raise the needle by holding the thread from front to back 9 leaving a thread tail of about 5 cm (2 inches). • If your sewing machine is equipped with your right hand. 1 1 Spring Feed the upper thread as shown in the groove catches the thread. toward you (counterclockwise) so that the... easily be wrapped around the thread take -up lever before you feed the upper thread. ● If you incorrectly feed the thread you may cause sewing problems. 20 While holding the 1 • Make sure that the mark on the wheel points up. 1 1 5 cm (2 inches) Note ● Make ...
Operation Manual
Page 22
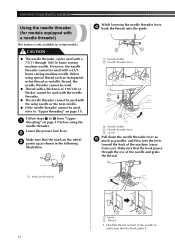
... used with the wing needle or the twin needle. ● If the needle threader cannot be used with a 75/11 through 100/16 home sewing machine needle. Lower the presser foot lever. 2 Make sure that the hook grabs it. 21 CAUTION ● The needle threader can be used with... a needle threader) This feature is only available on page 19. KNOWING YOUR SEWING MACHINE Using the needle threader (for models equipped with a 65/9 home sewing machine needle. However, the needle threader cannot be used , refer to 8 from you).
... used with the wing needle or the twin needle. ● If the needle threader cannot be used with a 75/11 through 100/16 home sewing machine needle. Lower the presser foot lever. 2 Make sure that the hook grabs it. 21 CAUTION ● The needle threader can be used with... a needle threader) This feature is only available on page 19. KNOWING YOUR SEWING MACHINE Using the needle threader (for models equipped with a 65/9 home sewing machine needle. However, the needle threader cannot be used , refer to 8 from you).
Operation Manual
Page 24
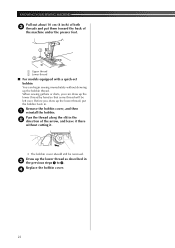
...there without drawing up the bobbin thread. Remove the bobbin cover, and then 1 reinstall the bobbin. When sewing gathers or darts, you draw up the lower thread, put them toward the back of the machine under the presser foot. 1 2 1 Upper thread 2 Lower thread ■ For models equipped with ... in 3 the previous steps 1 to 3. Replace the bobbin cover. 4 23 Before you can begin sewing immediately without cutting it. • The bobbin cover should still be left over. KNOWING YOUR SEWING MACHINE Pull out about 10 cm (4 inch) of both 3 threads and put the bobbin back in. Draw...
...there without drawing up the bobbin thread. Remove the bobbin cover, and then 1 reinstall the bobbin. When sewing gathers or darts, you draw up the lower thread, put them toward the back of the machine under the presser foot. 1 2 1 Upper thread 2 Lower thread ■ For models equipped with ... in 3 the previous steps 1 to 3. Replace the bobbin cover. 4 23 Before you can begin sewing immediately without cutting it. • The bobbin cover should still be left over. KNOWING YOUR SEWING MACHINE Pull out about 10 cm (4 inch) of both 3 threads and put the bobbin back in. Draw...
Operation Manual
Page 50
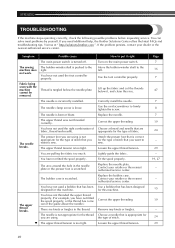
... the type of fabric, thread and needle. Remove any knots or tangles. Visit us at " http://solutions.brother.com ". If the problem persists, contact your retailer or the nearest authorized service center. Symptom The sewing machine does not work. The upper thread was not threaded correctly. Move the bobbin-winder shaft to firmly...
... the type of fabric, thread and needle. Remove any knots or tangles. Visit us at " http://solutions.brother.com ". If the problem persists, contact your retailer or the nearest authorized service center. Symptom The sewing machine does not work. The upper thread was not threaded correctly. Move the bobbin-winder shaft to firmly...


