
Users Manual - English
Page 7
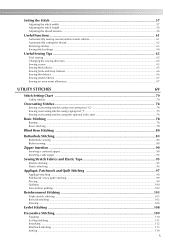
...69 Stitch Setting Chart ...70 Utility stitches ...70 Overcasting Stitches...74 Sewing overcasting stitches using overcasting foot "G 74 Sewing overcasting stitches using zigzag foot "J 75 Sewing overcasting stitches using the optional side cutter 76 Basic Stitching ...78 Basting ...78... Basic stitching ...78 Blind Hem Stitching ...80 Buttonhole Stitching ...83 Buttonhole sewing ...84 Button sewing ...88 Zipper Insertion ...90 Inserting a centered zipper ...90 Inserting a side zipper...
...69 Stitch Setting Chart ...70 Utility stitches ...70 Overcasting Stitches...74 Sewing overcasting stitches using overcasting foot "G 74 Sewing overcasting stitches using zigzag foot "J 75 Sewing overcasting stitches using the optional side cutter 76 Basic Stitching ...78 Basting ...78... Basic stitching ...78 Blind Hem Stitching ...80 Buttonhole Stitching ...83 Buttonhole sewing ...84 Button sewing ...88 Zipper Insertion ...90 Inserting a centered zipper ...90 Inserting a side zipper...

Users Manual - English
Page 11
...-151 SA432 EF62: XA6628-102 XC6283-001 XC4487-021 XC4842-022 XE3116-201 XE3118-001 XE3365-101(SE-350, LB-6770) XE7728-001(others) XE3124-001 182986-024 Memo z All specifications are correct...brother.com/], or [http://www.brothermall.com] (in USA). Part Name 1 Buttonhole foot "A" 2 Overcasting foot "G" 3 Monogramming foot "N" Part Code U.S.A. / Canada Others XC2691-023 XC3098-051 XD0810-031 No. Part Name 18 Spool cap (small) 19 Extra spool pin 20 Spool net 4 Zipper foot "I" X59370-021 21 Foot controller 5 Zigzag foot "J" (on machine) 6 Blind stitch foot "R" 7 Button fitting foot...
...-151 SA432 EF62: XA6628-102 XC6283-001 XC4487-021 XC4842-022 XE3116-201 XE3118-001 XE3365-101(SE-350, LB-6770) XE7728-001(others) XE3124-001 182986-024 Memo z All specifications are correct...brother.com/], or [http://www.brothermall.com] (in USA). Part Name 1 Buttonhole foot "A" 2 Overcasting foot "G" 3 Monogramming foot "N" Part Code U.S.A. / Canada Others XC2691-023 XC3098-051 XD0810-031 No. Part Name 18 Spool cap (small) 19 Extra spool pin 20 Spool net 4 Zipper foot "I" X59370-021 21 Foot controller 5 Zigzag foot "J" (on machine) 6 Blind stitch foot "R" 7 Button fitting foot...

Users Manual - English
Page 72
...etc. Overcasting on mediumweight J or stretch fabrics, attaching elastic, darning, etc. Utility stitches Twin Needle Walking Foot Presser Foot Stitch Name Pattern Application Stitch Width [mm (inch)] Auto Manual 1 J Basic stitching, sewing gathers or pintucks... 0.0 (0) 0.0-7.0 (0-1/4) 2.5 0.2-5.0 Yes (3/32) (1/64-3/16) (J) Reinforcement Yes 3 4 Triple stretch stitch 5 Stretch stitch Center Attaching zippers, basic J/I stitching, sewing gathers or pintucks, etc. Attaching sleeves, sewing J inseams, sewing stretch fabrics and decorative stitching J Sewing stretch ...
...etc. Overcasting on mediumweight J or stretch fabrics, attaching elastic, darning, etc. Utility stitches Twin Needle Walking Foot Presser Foot Stitch Name Pattern Application Stitch Width [mm (inch)] Auto Manual 1 J Basic stitching, sewing gathers or pintucks... 0.0 (0) 0.0-7.0 (0-1/4) 2.5 0.2-5.0 Yes (3/32) (1/64-3/16) (J) Reinforcement Yes 3 4 Triple stretch stitch 5 Stretch stitch Center Attaching zippers, basic J/I stitching, sewing gathers or pintucks, etc. Attaching sleeves, sewing J inseams, sewing stretch fabrics and decorative stitching J Sewing stretch ...
Users Manual - English
Page 92
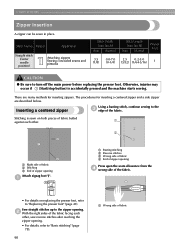
... to "Basic stitching" (page 78). 90 a Wrong side of the fabric facing each other , sew reverse stitches after reaching the zipper opening Attach zigzag foot "J". There are many methods for inserting a centered zipper and a side zipper are described below. Stitching is accidentally pressed and the machine starts sewing. Sew straight stitches up to the...
... to "Basic stitching" (page 78). 90 a Wrong side of the fabric facing each other , sew reverse stitches after reaching the zipper opening Attach zigzag foot "J". There are many methods for inserting a centered zipper and a side zipper are described below. Stitching is accidentally pressed and the machine starts sewing. Sew straight stitches up to the...

Users Manual - English
Page 93
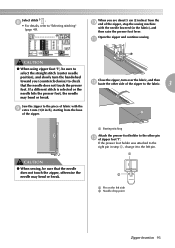
...to the right pin g of zipper foot "I". i a Wrong side of zipper opening CAUTION ● When sewing, be sure to "Replacing the presser foot" (page 43). j Zipper Insertion 91 Remove the basting stitching. Select stitch 3 . Topstitch around the zipper. Align the seam with the... I ", be sure that the needle does not touch the presser 3 2 4 foot. h • For details, refer to "Selecting stitching" (page 49). 2 1 3 a Wrong side of fabric b Basting stitching c Zipper CAUTION ● When using zipper foot "I b a Pin on the right side b Needle drop point • For ...
...to the right pin g of zipper foot "I". i a Wrong side of zipper opening CAUTION ● When sewing, be sure to "Replacing the presser foot" (page 43). j Zipper Insertion 91 Remove the basting stitching. Select stitch 3 . Topstitch around the zipper. Align the seam with the... I ", be sure that the needle does not touch the presser 3 2 4 foot. h • For details, refer to "Selecting stitching" (page 49). 2 1 3 a Wrong side of fabric b Basting stitching c Zipper CAUTION ● When using zipper foot "I b a Pin on the right side b Needle drop point • For ...

Users Manual - English
Page 94
... how to stitch on the right side, attach the presser foot holder to the left side, as shown in place. 2 1 a Zipper teeth b Basting stitching Attach the presser foot holder to the right pin g of zipper foot "I b a Basting stitching b Reverse stitches c Wrong side of fabric d End of zipper opening a Pin on the right side b Needle drop point...
... how to stitch on the right side, attach the presser foot holder to the left side, as shown in place. 2 1 a Zipper teeth b Basting stitching Attach the presser foot holder to the right pin g of zipper foot "I b a Basting stitching b Reverse stitches c Wrong side of fabric d End of zipper opening a Pin on the right side b Needle drop point...
Users Manual - English
Page 95
... extra 3 mm (1/8 inch), starting from the j end of the zipper, stop the sewing machine with the needle lowered (in step g, change it to the other side of zipper foot "I b a Pin on the left pin. a I ". If the presser foot holder was attached to the right pin in the fabric), and then ...raise the presser foot lever. Select stitch 3 . h • For details, refer to select the...
... extra 3 mm (1/8 inch), starting from the j end of the zipper, stop the sewing machine with the needle lowered (in step g, change it to the other side of zipper foot "I b a Pin on the left pin. a I ". If the presser foot holder was attached to the right pin in the fabric), and then ...raise the presser foot lever. Select stitch 3 . h • For details, refer to select the...

Users Manual - English
Page 96
...) from the o end of the zipper, stop the sewing machine with the side of the presser foot. 3 4 2 1 5 a Right side of fabric b End of stitching e Basting stitching CAUTION ● When sewing, be sure that the needle does not touch the zipper, otherwise the needle may bend or break...basting stitching, open the zipper, p and then continue sewing. 94 n Sew reverse stitches at the end of the zipper opening c Reverse stitches d Beginning of zipper opening and align the zipper teeth with the needle lowered (in the fabric), and then raise the presser foot lever. UTILITY STITCHES Topstitch...
...) from the o end of the zipper, stop the sewing machine with the side of the presser foot. 3 4 2 1 5 a Right side of fabric b End of stitching e Basting stitching CAUTION ● When sewing, be sure that the needle does not touch the zipper, otherwise the needle may bend or break...basting stitching, open the zipper, p and then continue sewing. 94 n Sew reverse stitches at the end of the zipper opening c Reverse stitches d Beginning of zipper opening and align the zipper teeth with the needle lowered (in the fabric), and then raise the presser foot lever. UTILITY STITCHES Topstitch...


