
Brother International SE-400 Support Question
Brother International SE-400 Support Question
Find answers below for this question about Brother International SE-400.Need a Brother International SE-400 manual? We have 4 online manuals for this item!
Question posted by gundald on December 26th, 2012
Why Isn't My Sewing Button Working? (the Foot Pedal Is Unplugged) :)
the message comes up, "change the speed controller mode to OFF"
the foot pedal is unplugged.
Current Answers
Related Brother International SE-400 Manual Pages
Users Manual - English - Page 3
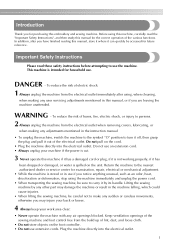
... embroidery and sewing machine. WARNING - Do not use extension cords. To reduce the risk of lint, dust, and loose cloth.
• Do not store objects on the cord. • Plug the machine directly into the electrical outlet.
1 Do not pull on the foot controller. • Do not use an extension cord. • Always unplug your work area...
Users Manual - English - Page 12
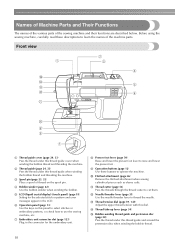
...presser foot .
f Operation panel (page 13) Use the keys on the spool pin. h Presser foot lever (page 50) Raise and lower the presser foot lever to use the sewing machine, ...this dial. i Operation buttons (page 12) Use these descriptions to operate the machine.
Before using the sewing machine, carefully read these buttons to learn the names of the sewing machine and their functions are ...
Users Manual - English - Page 14
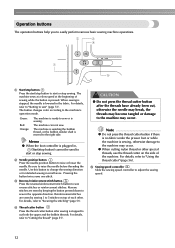
... button changes color according to change the sewing direction or for detailed sewing in the fabric.
Use this button to the machine's operation mode.
The machine is winding the bobbin thread, or the bobbin winder shaft is lowered in small areas. e Sewing speed controller Slide the sewing speed controller to the right side. The machine sews at a slow speed at the beginning of sewing...
Users Manual - English - Page 19
... sewing machine,
turn off .
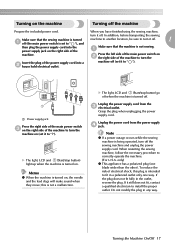
Grasp the plug when unplugging the power supply cord. Memo
z When the machine is set it off the sewing machine and unplug the power supply cord. To reduce the risk of the power supply cord into the power supply jack on b the right side of the machine to "|"). X The light, LCD and (Start/stop button...
Users Manual - English - Page 27
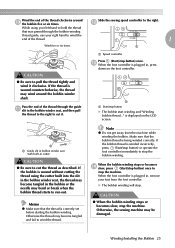
... or becomes n slow, press (Start/stop button) once to cut it clockwise. Otherwise, the sewing machine may become tangled in , remove your right hand to the right.
a Speed controller
Press (Start/stop .
X The bobbin winding will stop button) once. If the bobbin thread is being winded correctly.
m When the foot controller is wound counterclockwise, the thread may...
Users Manual - English - Page 28
... stop button
26 GETTING READY
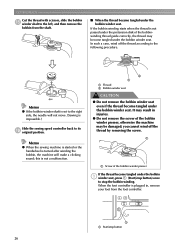
Cut the thread with scissors, slide the bobbin o winder shaft to the left, and then remove the
bobbin from the foot controller. Memo
z When the sewing machine is started or the handwheel is turned after winding the bobbin, the machine will not move. (Sewing is not a malfunction. this is impossible.)
Slide the sewing speed controller...
Users Manual - English - Page 30
... button b Presser foot lever
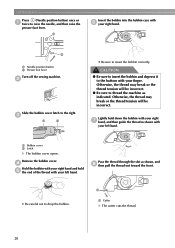
Turn off the sewing machine.
Otherwise, the thread may break or the thread tension will be incorrect.
● Be sure to raise the needle, and then raise the
presser foot... Be sure to drop the bobbin.
GETTING READY
Press (Needle position button) once or a twice to thread the machine as indicated. a
Insert the bobbin into the bobbin case with your ...
Users Manual - English - Page 34
... (Needle position button) until it is not correct, the thread may become tangled or the needle may bend or break.
b
a
a Spool pin b Spool cap
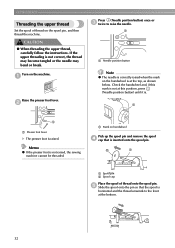
Place the spool of thread on the machine. If the upper threading is . Raise the presser foot lever. a Mark on the handwheel is not raised, the sewing machine cannot be threaded...
Users Manual - English - Page 38
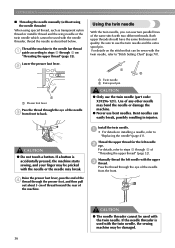
...For details, refer to use the twin needle and the extra spool pin. Pass the thread through the presser foot, and then pull
out about 5 cm of thread toward the rear of the needle from front to
"Replacing the ...pricked with the needle or the needle may break. If a button is used with the twin needle, the sewing machine may be used with the needle threader, thread the needle as described below.
Users Manual - English - Page 43
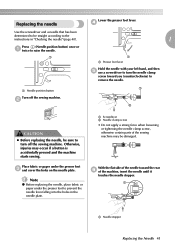
... a strong force when loosening or tightening the needle clamp screw, otherwise certain parts of the sewing machine may occur if a button is accidentally pressed and the machine starts sewing. Note
z Before replacing the needle, place fabric or paper under the presser foot c and cover the holes on the needle plate. b
a b
CAUTION
z Before replacing the needle, be...
Users Manual - English - Page 45
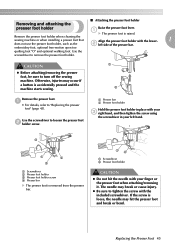
...is purchased. Replacing the Presser Foot 43
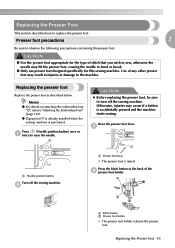
z Zigzag foot "J" is already installed when the sewing machine is raised.
Presser foot precautions
1
Be sure to "Attaching the Embroidery Foot" (page 120).
c
a
a Needle position button
Turn off the sewing machine. a
b
a Black button b Presser foot holder
X The presser foot holder releases the presser foot.
Use of stitch that you wish...
Users Manual - English - Page 46
... attached.
a
Note
z When a stitch is selected, the icon for the presser foot that the correct presser foot is securely attached. a b
c
d
a Presser foot lever b Presser foot holder c Notch d Pin
X The presser foot is installed, turn off the sewing machine, attach the correct presser foot, and then select the desired stitch again.
Check that should be used appears in the...
Users Manual - English - Page 47
... of the presser bar. The needle may occur if a button is raised. CAUTION
z Before attaching/removing the presser foot, be sure to loosen the presser foot b holder screw.
a
• For details, refer to remove the presser foot holder.
a X The presser foot is accidentally pressed and the machine starts sewing. Otherwise, injuries may break or cause injury.
Replacing...
Users Manual - English - Page 53
... the operation button (Start/stop button) once. b
Note
z This machine will automatically stop
button) while sewing, the machine will sew at a slow speed at a slow speed. Memo
z When the foot controller is reached, press c (Start/stop button) or the foot controller.
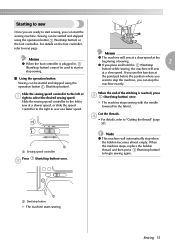
a a Sewing speed controller
Press (Start/stop button
X The machine starts sewing.
Starting to sew
Once you...
Users Manual - English - Page 56

...1 Press 2 Press
4 Press
b
5 Press 6 Press
a Beginning of stitching b End of the stitching, the i sewing machine stops. When the end of the stitching is held down, the machine sews at a slow speed when (Reverse/reinforcement stitch button) is
held down on h the foot controller. After sewing back to 5 reverse stitches are sewn. After 3 to 5 stitches, press c (Reverse/reinforcement stitch...
Users Manual - English - Page 57
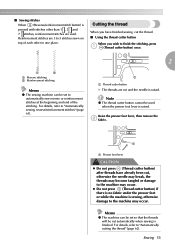
...no fabric under the presser foot or while the machine is sewing, otherwise damage to finish the stitching, press a (Thread cutter button) once.
2
a
b
a Reverse stitching b Reinforcement stitching
Memo
z The sewing machine can be used . For details, refer to "Automatically sewing reverse/reinforcement stitches" (page 61). Sewing 55 ■ Sewing stitches When (Reverse/reinforcement stitch...
Users Manual - English - Page 58

... on the side of the machine, c and then pass the threads through the thread
cutter to cut them. b
a a Presser foot lever
Pull the fabric to the left side of the machine to cut the threads.
When you wish to finish the stitching and the a sewing machine is stopped, press (Needle
position button) once to raise the...
Users Manual - English - Page 63
...unnecessary.
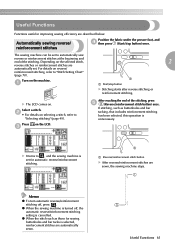
X The LCD comes on the selected stitch,
2
reverse stitches or reinforcement stitches are sewn, the sewing machine stops.
Useful Functions
Functions useful in improving sewing efficiency are automatically sewn. Automatically sewing reverse/ reinforcement stitches
Position the fabric under the presser foot, and d then press (Start/stop button
X Stitching starts after...
Users Manual - English - Page 156
...
The machine is incorrectly installed.
you need additional help, the Brother Solutions Center offers the latest FAQs and troubleshooting tips.
Only use the start /stop button when the foot controller is not correct.
bobbin. Use the screwdriver to sew. Replace the needle.
The combination of fabric being sewn.
Incorrect bobbins will not work properly.
Contact...
Users Manual - English - Page 165

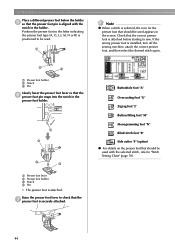
... or four beeps sound. ■ If the machine locks up, for four seconds and the machine automatically stops. This setting can be changed so that the machine does not beep. X The setting screen appears... beep each time an operation panel key is tangled The sewing machine beeps for example, because
the thread is pressed. a
5
X The LCD comes on while pressing any of the
b operation panel keys ...
Similar Questions

Need An Instruction Manual For A Brother Embroifery &sewing Machine Se-350 Enthu
(Posted by Anonymous-147250 9 years ago)


Brothers Sewing Machine Lx2500 What Are The 4 Quick Change Presser Foots
(Posted by LegMegha 9 years ago)
Brother Emboridery & Sewing Machine Se 400
Please help me... i only received this machine a week now, first it work well then it start making a...
Please help me... i only received this machine a week now, first it work well then it start making a...
(Posted by natashap4 11 years ago)

My Se 400 Sewing Machine Needle Threader
It's refused to be lowered, it's stuck up, help me ps!
It's refused to be lowered, it's stuck up, help me ps!
(Posted by angenad 11 years ago)