
Brother International PC 420 Support Question
Brother International PC 420 Support Question
Find answers below for this question about Brother International PC 420 - PRW Limited Edition Project Runway Sewing Machine.Need a Brother International PC 420 manual? We have 1 online manual for this item!
Question posted by Ricfedo on July 26th, 2014
Brother Sewing Machine Pc-420 How To Change Speed Controller Mode To Off
The person who posted this question about this Brother International product did not include a detailed explanation. Please use the "Request More Information" button to the right if more details would help you to answer this question.
Current Answers
Related Brother International PC 420 Manual Pages
Users Manual - English - Page 2
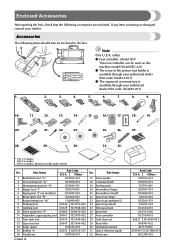
...Overcasting foot "G" 3 Monogramming foot "N" 4 Zipper foot "I" 5 Zigzag foot "J" (on this machine model NX-400/PC-420. ● The screw of the presser foot holder is available through your authorized dealer (Part code...spool pin 26 Spool net 27 Foot controller 28 Grid sheet set
Cover A
Part Code
U.S.A. only) ● Foot controller: Model N5V
This foot controller can be enclosed in the box....
Users Manual - English - Page 3

... in the operation panel. (page Cover E)
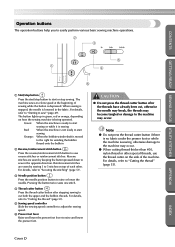
8 Sewing speed controller Use the sewing speed controller to adjust the sewing speed.
9 Knee lifter mounting slot Plug the knee lifter into the knee lifter mounting slot.
0 Operation buttons Use the operation buttons to thread the needle.
CONTENTS
GETTING READY SEWING BASICS UTILITY STITCHES
Names of Machine Parts and Their Functions
The names of...
Users Manual - English - Page 4
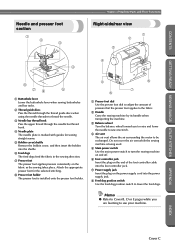
... guides for the selected stitching.
8 Presser foot holder The presser foot is being used.
5 Main power switch Use the main power switch to turn the sewing machine on and off.
6 Foot controller jack Insert the plug on the end of pressure that the presser foot applies to the fabric.
2 Handle Carry the...
Users Manual - English - Page 5
... become tangled or damage to the machine may occur.
● When cutting thread thicker than #30, nylon thread or other special threads, use the thread cutter on the side of each other. For details, refer to "Cutting the thread" (page 53).
5 Sewing speed controller Slide the sewing speed controller to adjust the sewing speed.
6 Presser foot lever Raise and...
Users Manual - English - Page 9
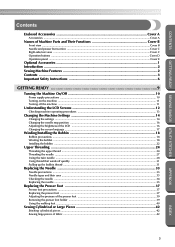
... ...1 Introduction ...2 Sewing Machine Features ...2 Contents ...3 Important Safety Instructions 6
GETTING READY 9
Turning the Machine On/Off 10
Power supply precautions ...10 Turning on the machine ...11 Turning off the machine ...11
Understanding the LCD Screens 12
Checking machine operating procedures ...13
Changing the Machine Settings 14
Changing the settings ...14 Changing the needle...
Users Manual - English - Page 12

... the risk of the machine and foot control free from the electrical outlet immediately after using and before using this machine, basic safety precautions should always be taken, including the following:
Read all moving parts. WARNING - Use this machine only for household use as threading needle, changing needle, threading bobbin, or changing presser foot, and the...
Users Manual - English - Page 14

... and updates, visit our web site at www.brother.com
8
APPENDIX
INDEX CONTENTS
GETTING READY SEWING BASICS UTILITY STITCHES
CONGRATULATIONS ON CHOOSING OUR MACHINE
Your machine is required, first follow the troubleshooting table in the back of the most advanced computerized household sewing machines. PLEASE READ BEFORE USING THIS MACHINE
For safe operation 1. Remember to turn off...
Users Manual - English - Page 20
...6
X The initial stitch screen appears again.
GETTING READY SEWING BASICS UTILITY STITCHES
GETTING READY
CONTENTS
Changing the Machine Settings
Various sewing machine operations and sewing settings can be changed .
14
Press , , and (arrow keys) until 3 the stitch or machine attribute that you wish
to set is changed .
Press 2 panel.
(settings key) in the operation
X The...
Users Manual - English - Page 21
...
GETTING READY SEWING BASICS UTILITY STITCHES
■ List of stitch or machine attribute The stitch or machine attribute that can be changed. page 117
Repeated/ single sewing
Specifies whether ...Needle position
Specifies where the needle is positioned when the sewing machine is sounded with the sewing speed controller. page 143 page 16
Vertical pattern adjustment
Adjusts the up...
Users Manual - English - Page 22

... UTILITY STITCHES
GETTING READY
CONTENTS
Changing the needle stop position
When the sewing machine is purchased, it is set to , press . Press to select .
3
To return to leave the needle lowered in the operation
1 panel, and then press , , and
(...
Users Manual - English - Page 23
...stitch screen appears again.
Press or 3 selected.
CONTENTS
GETTING READY SEWING BASICS UTILITY STITCHES
Changing the screen language
The language used in the screens that are displayed can be changed to one of the many available.
When the sewing machine is selected.
APPENDIX
INDEX
Changing the Machine Settings 17
Press
(settings key) in English. until
is purchased...
Users Manual - English - Page 27
... or the balance wheel is full.
X The bobbin stops spinning when it is turned after winding the thread around the bobbin, the machine will make a clicking sound;
Slide the sewing speed controller to the right c (so that has been correctly wound, otherwise the needle may bend or break when the bobbin thread starts to...
Users Manual - English - Page 35
... upper thread for the needle on changing the presser foot, refer
to "Replacing the presser foot" (page 37). Upper Threading 29
INDEX
The thread should unroll from the front.
If the needle threader is used with the twin needle, the sewing machine may be damaged. GETTING READY SEWING BASICS UTILITY STITCHES
APPENDIX
1 Bobbin winder...
Users Manual - English - Page 55
... controller
Sewing can be sure
to turn off the sewing machine. 1 When connecting the foot controller, be used on 2 the side of the stitching is reached,
3 press
(start the sewing machine. Insert the foot controller plug into its jack on this machine model NX-400/PC-420.
only)
● Foot controller: Model N5V This foot controller can be started . Turn off the sewing machine...
Users Manual - English - Page 56

... foot controller. X The machine stops sewing with the needle lowered (in , the start sewing, slowly 5 press down hard starts sewing too quickly. CONTENTS
GETTING READY SEWING BASICS UTILITY STITCHES
Slide the sewing speed controller to the left to sew at a slower speed, or slide the speed controller to the right to sew at a faster speed.
1
1 Sewing speed controller • The speed set so...
Users Manual - English - Page 58

... end of the stitching, the 9 sewing machine stops. X The machine starts sewing in the normal sewing direction.
X The machine stops sewing. After sewing to "Stitch Settings" (page 128).
5 4
6 2
1 Beginning of stitching 2 End of stitching
APPENDIX
INDEX
52
Release the start/stop button or foot controller.
1
3
1
2
■ Sewing reinforcement stitches When sewing stitches other...
Users Manual - English - Page 61

... Width and Length 55 Adjusting the stitch width
The stitch width can be adjusted with the sewing speed controller. Select a stitch.
2
X A screen containing settings for the selected stitch appears.
&#...stitch) was selected, changing the stitch width changes the needle position.
reducing the width moves the needle to "Saving stitch settings" (page 60).
● The sewing machine can be set ,...
Users Manual - English - Page 105

... STITCHES
Satin stitching
A decorative stitch can be sewn by changing the stitch width of the thread being sewn and the thickness of a satin stitch.
Slide the controller to the left to "Selecting stitching" (page 68). X The settings screen appears.
X The machine is adjusted with the sewing speed controller.
Attach zigzag foot "J".
2
J
Press
7
(OK key). Select stitch...
Users Manual - English - Page 147
...cannot be changed with the twin needle is selected. The start/stop button was pressed while the foot controller was pressed...controller while the setting for adjusting the stitch width using the sewing speed controller is set up because the thread is tangled.
CONTENTS
GETTING READY SEWING BASICS UTILITY STITCHES
Error messages
If the start/stop button is pressed before the sewing machine...
Users Manual - English - Page 151
... scallop stitching 107 screen language 17
screwdriver Cover A, 35 seam ripper Cover A, 81
selecting stitching 68 settings 14
settings key Cover E, 14 sewing machine help key Cover E, 13
sewing machine needles 33 sewing speed 49
sewing speed controller Cover B, Cover D, 99
shell tuck stitch 108 shutter 26
shuttle 22, 135
shuttle hook 136
side cutter 1, 72
side view Cover...
Similar Questions

Whats The Resale Value Of The Brother 2300 Prw Limited Edition Project Runway?
(Posted by Anonymous-139615 9 years ago)


How To Thread The Brother Limited Edition Project Runway Sewing Machine
ls2300prw manual
ls2300prw manual
(Posted by jjmaf0 10 years ago)
Brother Pc-420 Prw Limited Edition Project Runway Sewing Machine Will Not
thread needle
thread needle
(Posted by graphevaru 10 years ago)
