
Users Manual - English
Page 2
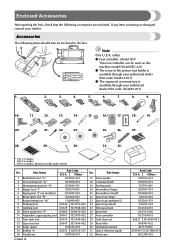
... (small) 25 Extra spool pin 26 Spool net 27 Foot controller 28 Grid sheet set Cover A Part Code U.S.A. Accessories The following accessories are enclosed. Enclosed Accessories After opening the box, check that the following items should also be used on machine) 6 Blind stitch foot "R" 7 Button fitting foot "M" 8 Walking foot 9 Quilting foot 10 Stitch guide foot "P" 11 Adjustable zipper/piping foot 12 Non stick foot 13 Open toe foot 14 Seam ripper 15 Bobbin (4) 16 Needle set 29 Knee lifter 30 Operation manual 31 Quick reference guide 32 Hard case Part Code U.S.A. Others XC2691-051...
... (small) 25 Extra spool pin 26 Spool net 27 Foot controller 28 Grid sheet set Cover A Part Code U.S.A. Accessories The following accessories are enclosed. Enclosed Accessories After opening the box, check that the following items should also be used on machine) 6 Blind stitch foot "R" 7 Button fitting foot "M" 8 Walking foot 9 Quilting foot 10 Stitch guide foot "P" 11 Adjustable zipper/piping foot 12 Non stick foot 13 Open toe foot 14 Seam ripper 15 Bobbin (4) 16 Needle set 29 Knee lifter 30 Operation manual 31 Quick reference guide 32 Hard case Part Code U.S.A. Others XC2691-051...

Users Manual - English
Page 3
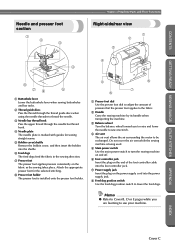
... D) A Flat bed attachment with accessory compartment Store presser feet and bobbins in the operation panel. (page Cover E) 8 Sewing speed controller Use the sewing speed controller to adjust the sewing speed. 9 Knee lifter mounting slot Plug the knee lifter into the knee lifter mounting slot. 0 Operation buttons Use the operation buttons to start the sewing machine and automatically cut them. D Thread tension dial Use the thread tension dial to place the spool of the machine parts. Front view 1 D C B 2 3 4 5 6 7 8 A 0 9 1 Thread guide plate / 2 Thread guide cover Pass the...
... D) A Flat bed attachment with accessory compartment Store presser feet and bobbins in the operation panel. (page Cover E) 8 Sewing speed controller Use the sewing speed controller to adjust the sewing speed. 9 Knee lifter mounting slot Plug the knee lifter into the knee lifter mounting slot. 0 Operation buttons Use the operation buttons to start the sewing machine and automatically cut them. D Thread tension dial Use the thread tension dial to place the spool of the machine parts. Front view 1 D C B 2 3 4 5 6 7 8 A 0 9 1 Thread guide plate / 2 Thread guide cover Pass the...
Users Manual - English
Page 4
...while the sewing machine is installed onto the presser foot holder. 5 6 8 7 1 Presser foot dial Use the presser foot dial to adjust the amount of the foot controller cable into the power supply jack. 8 Feed dog position switch Use the feed dog position switch to lower the feed dogs. APPENDIX INDEX Cover C Attach the appropriate presser foot for sewing straight seams. 5 Bobbin cover/shuttle Remove the bobbin cover, and then insert the bobbin into the shuttle. 6 Feed dogs The feed dogs feed the fabric in the sewing direction. 7 Presser foot The presser foot applies pressure consistently...
...while the sewing machine is installed onto the presser foot holder. 5 6 8 7 1 Presser foot dial Use the presser foot dial to adjust the amount of the foot controller cable into the power supply jack. 8 Feed dog position switch Use the feed dog position switch to lower the feed dogs. APPENDIX INDEX Cover C Attach the appropriate presser foot for sewing straight seams. 5 Bobbin cover/shuttle Remove the bobbin cover, and then insert the bobbin into the shuttle. 6 Feed dogs The feed dogs feed the fabric in the sewing direction. 7 Presser foot The presser foot applies pressure consistently...
Users Manual - English
Page 5
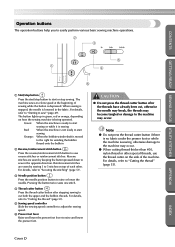
... or lower the needle. When sewing is stopped, the needle is depressed. For details, refer to "Cutting the thread" (page 53). 5 Sewing speed controller Slide the sewing speed controller to adjust the sewing speed. 6 Presser foot lever Raise and lower the presser foot lever to start or stop button to raise and lower the presser foot. CONTENTS GETTING READY SEWING BASICS UTILITY STITCHES Operation buttons The operation buttons help you to easily perform various basic sewing machine operations. 2 3 5 1 4 6 1 Start/stop button Press the start/stop sewing. Reverse stitches are...
... or lower the needle. When sewing is stopped, the needle is depressed. For details, refer to "Cutting the thread" (page 53). 5 Sewing speed controller Slide the sewing speed controller to adjust the sewing speed. 6 Presser foot lever Raise and lower the presser foot lever to start or stop button to raise and lower the presser foot. CONTENTS GETTING READY SEWING BASICS UTILITY STITCHES Operation buttons The operation buttons help you to easily perform various basic sewing machine operations. 2 3 5 1 4 6 1 Start/stop button Press the start/stop sewing. Reverse stitches are...
Users Manual - English
Page 8
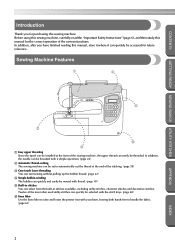
... you for purchasing this manual, store it where it can quickly be accessed for the correct operation of the most often used utility stitches can quickly be selected with the stitch keys. (page 68) 6 Knee lifter Use the knee lifter to raise and lower the presser foot with a simple operation. (page 24) 2 Automatic thread-cutting The sewing machine can be set to handle the fabric. (page 61) APPENDIX...
... you for purchasing this manual, store it where it can quickly be accessed for the correct operation of the most often used utility stitches can quickly be selected with the stitch keys. (page 68) 6 Knee lifter Use the knee lifter to raise and lower the presser foot with a simple operation. (page 24) 2 Automatic thread-cutting The sewing machine can be set to handle the fabric. (page 61) APPENDIX...
Users Manual - English
Page 9
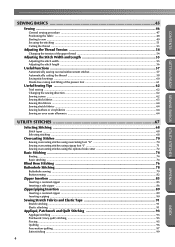
... bobbin ...22 Upper Threading ...24 Threading the upper thread ...24 Threading the needle ...27 Using the twin needle ...28 Using thread that winds off quickly ...31 Pulling up the bobbin thread ...31 Replacing the Needle ...33 Needle precautions ...33 Needle types and their uses ...33 Checking the needle ...34 Replacing the needle ...35 Replacing the Presser Foot 37 Presser foot precautions ...37 Replacing the presser foot ...37 Adjusting the pressure of the presser foot ...39 Removing the presser foot holder ...39 Using the walking foot ...40 Sewing Cylindrical or Large Pieces 42 Stitching...
... bobbin ...22 Upper Threading ...24 Threading the upper thread ...24 Threading the needle ...27 Using the twin needle ...28 Using thread that winds off quickly ...31 Pulling up the bobbin thread ...31 Replacing the Needle ...33 Needle precautions ...33 Needle types and their uses ...33 Checking the needle ...34 Replacing the needle ...35 Replacing the Presser Foot 37 Presser foot precautions ...37 Replacing the presser foot ...37 Adjusting the pressure of the presser foot ...39 Removing the presser foot holder ...39 Using the walking foot ...40 Sewing Cylindrical or Large Pieces 42 Stitching...
Users Manual - English
Page 10
...54 Changing the tension of theupper thread ...54 Adjusting the Stitch Width and Length 55 Adjusting the stitch width ...55 Adjusting the stitch length ...56 Useful Functions ...57 Automatically sewing reverse/reinforcement stitches 57 Automatically cutting the thread ...58 Saving stitch settings ...60 Hands-free raising and lifting of the presser foot 61 Useful Sewing Tips ...62 Trial sewing ...62 Changing the sewing direction ...62 Sewing curves ...62 Sewing thick fabrics ...63 Sewing thin fabrics ...64 Sewing stretch fabrics ...64 Sewing leathers or vinyl fabrics ...64 Sewing an even seam...
...54 Changing the tension of theupper thread ...54 Adjusting the Stitch Width and Length 55 Adjusting the stitch width ...55 Adjusting the stitch length ...56 Useful Functions ...57 Automatically sewing reverse/reinforcement stitches 57 Automatically cutting the thread ...58 Saving stitch settings ...60 Hands-free raising and lifting of the presser foot 61 Useful Sewing Tips ...62 Trial sewing ...62 Changing the sewing direction ...62 Sewing curves ...62 Sewing thick fabrics ...63 Sewing thin fabrics ...64 Sewing stretch fabrics ...64 Sewing leathers or vinyl fabrics ...64 Sewing an even seam...

Users Manual - English
Page 12
... dropped or damaged, or dropped into any other user servicing adjustments mentioned in the needle area, such as a toy. The wrong plate can cause the needle to ensure that they do not play with any object into water. Do not use the proper needle plate. Do not operate where aerosol (spray) products are being used as threading needle, changing needle, threading bobbin, or changing presser foot, and the like. 15. Always use bent needles...
... dropped or damaged, or dropped into any other user servicing adjustments mentioned in the needle area, such as a toy. The wrong plate can cause the needle to ensure that they do not play with any object into water. Do not use the proper needle plate. Do not operate where aerosol (spray) products are being used as threading needle, changing needle, threading bobbin, or changing presser foot, and the like. 15. Always use bent needles...

Users Manual - English
Page 14
..., thread take- Do not use extension cords. When storing this machine, avoid direct sunlight and high humidity locations. Use only neutral soaps or detergents to inspect and adjust the machine yourself. CONTENTS GETTING READY SEWING BASICS UTILITY STITCHES CONGRATULATIONS ON CHOOSING OUR MACHINE Your machine is completed • Replacing or removing the needle or any assemblies, the presser feet, needle, or other parts to keep your local authorized Brother dealer. For repair or adjustment...
..., thread take- Do not use extension cords. When storing this machine, avoid direct sunlight and high humidity locations. Use only neutral soaps or detergents to inspect and adjust the machine yourself. CONTENTS GETTING READY SEWING BASICS UTILITY STITCHES CONGRATULATIONS ON CHOOSING OUR MACHINE Your machine is completed • Replacing or removing the needle or any assemblies, the presser feet, needle, or other parts to keep your local authorized Brother dealer. For repair or adjustment...
Users Manual - English
Page 26
... best fits the size of the thread clockwise around the bobbin four or five times. 1 Thread guide cover Pass the thread under the thread guide plate 9 from the right. If the spool cap is too small for the spool being used , the thread may catch on the thread guide for bobbin winding, and then wind it through b the slit in the spool or the needle may break. ● Three spool cap sizes are available (large...
... best fits the size of the thread clockwise around the bobbin four or five times. 1 Thread guide cover Pass the thread under the thread guide plate 9 from the right. If the spool cap is too small for the spool being used , the thread may catch on the thread guide for bobbin winding, and then wind it through b the slit in the spool or the needle may break. ● Three spool cap sizes are available (large...
Users Manual - English
Page 28
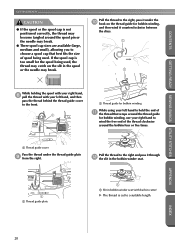
... break or the thread tension will not operate correctly. Insert the bobbin into the shuttle so that the bobbin thread should be incorrect. ● The bobbin was designed specifically for this sewing machine. Use only the enclosed bobbin or bobbins of the thread with thread. INDEX 22 GETTING READY SEWING BASICS UTILITY STITCHES GETTING READY CONTENTS Installing the bobbin Install the bobbin wound with your left. • Be careful not to drop the bobbin. If bobbins from older models...
... break or the thread tension will not operate correctly. Insert the bobbin into the shuttle so that the bobbin thread should be incorrect. ● The bobbin was designed specifically for this sewing machine. Use only the enclosed bobbin or bobbins of the thread with thread. INDEX 22 GETTING READY SEWING BASICS UTILITY STITCHES GETTING READY CONTENTS Installing the bobbin Install the bobbin wound with your left. • Be careful not to drop the bobbin. If bobbins from older models...

Users Manual - English
Page 61
... straight stitch (left . ● The settings can easily be adjusted with the sewing speed controller. APPENDIX INDEX Adjusting the Thread Tension/Adjusting the Stitch Width and Length 55 Turn on the sewing machine. 1 X The LCD comes on selecting a stitch, refer to "Stitch Settings" (page 128). If the needle hits the presser foot, the needle may bend or break. To make the stitch width narrower, press 3 (-). For details, refer to "Saving stitch settings" (page 60). ● The sewing machine can be set...
... straight stitch (left . ● The settings can easily be adjusted with the sewing speed controller. APPENDIX INDEX Adjusting the Thread Tension/Adjusting the Stitch Width and Length 55 Turn on the sewing machine. 1 X The LCD comes on selecting a stitch, refer to "Stitch Settings" (page 128). If the needle hits the presser foot, the needle may bend or break. To make the stitch width narrower, press 3 (-). For details, refer to "Saving stitch settings" (page 60). ● The sewing machine can be set...
Users Manual - English
Page 86
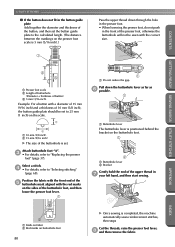
... button, and then set the button guide plate to the calculated length. (The distance between the markings on the buttonhole foot. 1 2 1 Buttonhole lever 2 Bracket Gently hold the end of the upper thread in the front of the presser foot, otherwise the buttonhole will not be set to 25 mm (1 inch) on buttonhole foot 80 X Once sewing is completed, the machine automatically sews reinforcement stitches, then stops Cut the threads, raise the presser foot lever, 8 and then remove the fabric. Position...
... button, and then set the button guide plate to the calculated length. (The distance between the markings on the buttonhole foot. 1 2 1 Buttonhole lever 2 Bracket Gently hold the end of the upper thread in the front of the presser foot, otherwise the buttonhole will not be set to 25 mm (1 inch) on buttonhole foot 80 X Once sewing is completed, the machine automatically sews reinforcement stitches, then stops Cut the threads, raise the presser foot lever, 8 and then remove the fabric. Position...
Users Manual - English
Page 88
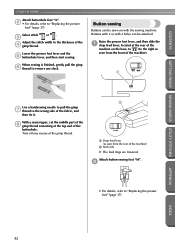
... sewing machine. Attach button-sewing foot "M". 2 • For details, refer to remove any excess of the gimp thread. 2 1 Drop feed lever (as seen from the rear of the buttonhole. With a seam ripper, cut the middle part of the 8 gimp thread remaining at the rear of the machine on with 4 holes can be attached. When sewing is finished, gently pull the gimp 6 thread to "Replacing the presser foot" (page 37). Select stitch 46 or 47 . 3 Adjust...
... sewing machine. Attach button-sewing foot "M". 2 • For details, refer to remove any excess of the gimp thread. 2 1 Drop feed lever (as seen from the rear of the buttonhole. With a seam ripper, cut the middle part of the 8 gimp thread remaining at the rear of the machine on with 4 holes can be attached. When sewing is finished, gently pull the gimp 6 thread to "Replacing the presser foot" (page 37). Select stitch 46 or 47 . 3 Adjust...
Users Manual - English
Page 89
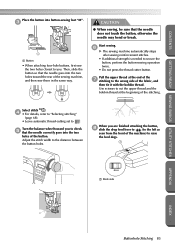
... button. CONTENTS GETTING READY SEWING BASICS UTILITY STITCHES Place the button into button-sewing foot "M". 3 1 1 Button • When attaching four-hole buttons, first sew the two holes closest to the distance between the button holes. Adjust the stitch width to you are finished attaching the button, 8 slide the drop feed lever to (to the left as seen from the front of the machine) to cut the upper thread and the bobbin thread at the end of the 7 stitching...
... button. CONTENTS GETTING READY SEWING BASICS UTILITY STITCHES Place the button into button-sewing foot "M". 3 1 1 Button • When attaching four-hole buttons, first sew the two holes closest to the distance between the button holes. Adjust the stitch width to you are finished attaching the button, 8 slide the drop feed lever to (to the left as seen from the front of the machine) to cut the upper thread and the bobbin thread at the end of the 7 stitching...
Users Manual - English
Page 134
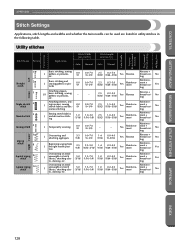
... whether the twin needle can be used are listed for utility stitches in the following table. No ting Attaching sleeves, sew- Reinforce- Twin Needle Reverse/ Reinforcement Stitching Programmed Thread-Cutting Walking Foot Presser Foot Utility stitches Stitch Name Pattern Application Stitch Width [mm (inch.)] Stitch Length [mm (inch.)] Auto Manual Auto Manual Left 1 2 Straight stitch 3 Center Triple stretch 4 stitch 5 Stretch stitch 6 Basting stitch 7 Zigzag stitch 8 Right Center 2-point zigzag 9 stitch 3-point zigzag 10 stitch Basic stitching, sewing J gathers or pintucks...
... whether the twin needle can be used are listed for utility stitches in the following table. No ting Attaching sleeves, sew- Reinforce- Twin Needle Reverse/ Reinforcement Stitching Programmed Thread-Cutting Walking Foot Presser Foot Utility stitches Stitch Name Pattern Application Stitch Width [mm (inch.)] Stitch Length [mm (inch.)] Auto Manual Auto Manual Left 1 2 Straight stitch 3 Center Triple stretch 4 stitch 5 Stretch stitch 6 Basting stitch 7 Zigzag stitch 8 Right Center 2-point zigzag 9 stitch 3-point zigzag 10 stitch Basic stitching, sewing J gathers or pintucks...
Users Manual - English
Page 143
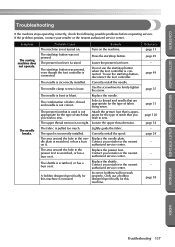
.... Replace the needle. Select a thread and needle that you you wish to sew. The presser foot that is used . The fabric is appro- The needle clamp screw is raised. dle plate is scratched, or has a burr on the machine. The presser foot lever is loose. A bobbin designed specifically for this machine is incorrectly installed. Incorrect bobbins will not work properly. Symptom The sewing machine does not operate. The start /stop button was not pressed. The spool is not used is not Attach the presser foot...
.... Replace the needle. Select a thread and needle that you you wish to sew. The presser foot that is used . The fabric is appro- The needle clamp screw is raised. dle plate is scratched, or has a burr on the machine. The presser foot lever is loose. A bobbin designed specifically for this machine is incorrectly installed. Incorrect bobbins will not work properly. Symptom The sewing machine does not operate. The start /stop button was not pressed. The spool is not used is not Attach the presser foot...
Users Manual - English
Page 144
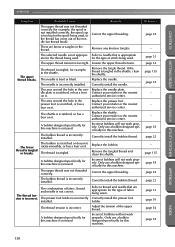
... of the upper thread. A bobbin designed specifically for the thread being sewn. There are appropriate for the type of the needle bar thread hook). Loosen the upper thread tension. The needle is tangled or breaks. dle plate is too big for the spool being used, or the thread has come out of stitch being used . The lower thread is bent or blunt. The bobbin thread is incorrectly installed. Correctly install the presser foot holder. Replace the needle. The area around the hole in the presser foot is...
... of the upper thread. A bobbin designed specifically for the thread being sewn. There are appropriate for the type of the needle bar thread hook). Loosen the upper thread tension. The needle is tangled or breaks. dle plate is too big for the spool being used, or the thread has come out of stitch being used . The lower thread is bent or blunt. The bobbin thread is incorrectly installed. Correctly install the presser foot holder. Replace the needle. The area around the hole in the presser foot is...

Users Manual - English
Page 150
...seat 20 bobbin winder shaft spring 19 bobbin-winding 18 button sewing 82 buttonhole foot 80 buttonhole lever Cover C, 80, 101, 103 buttonhole stitching 78 C C key Cover E changing sewing direction 62 changing the needle 35 checking patterns 116 cleaning 135 cleaning brush Cover A, 136 combining patterns 114 crazy quilt stitching 95 creating patterns 123 cross-stitch 113 cross-wound thread 19 curves 62 cylindrical pieces 42 D darning 102 designing patterns 123 E elastic tape 91 electrical outlet 11 error messages 141 even seam allowance 64 extra spool pin Cover A, 29...
...seat 20 bobbin winder shaft spring 19 bobbin-winding 18 button sewing 82 buttonhole foot 80 buttonhole lever Cover C, 80, 101, 103 buttonhole stitching 78 C C key Cover E changing sewing direction 62 changing the needle 35 checking patterns 116 cleaning 135 cleaning brush Cover A, 136 combining patterns 114 crazy quilt stitching 95 creating patterns 123 cross-stitch 113 cross-wound thread 19 curves 62 cylindrical pieces 42 D darning 102 designing patterns 123 E elastic tape 91 electrical outlet 11 error messages 141 even seam allowance 64 extra spool pin Cover A, 29...
Users Manual - English
Page 151
...13 sewing machine needles 33 sewing speed 49 sewing speed controller Cover B, Cover D, 99 shell tuck stitch 108 shutter 26 shuttle 22, 135 shuttle hook 136 side cutter 1, 72 side view Cover C size 117 sleeves 100 smocking 107 spool cap Cover A, 19, 25 spool net Cover A, 31 spool pin Cover B, 19, 25 start/stop button Cover D, 49 starting sewing 49 stitch guide foot Cover A, 64 stitch keys Cover E stitch length 56 stitch selection key Cover E stitch settings 128 stitch width 55 controlling 99 stitching density 118 storing patterns 120 straight stitch 74 stretch fabrics...
...13 sewing machine needles 33 sewing speed 49 sewing speed controller Cover B, Cover D, 99 shell tuck stitch 108 shutter 26 shuttle 22, 135 shuttle hook 136 side cutter 1, 72 side view Cover C size 117 sleeves 100 smocking 107 spool cap Cover A, 19, 25 spool net Cover A, 31 spool pin Cover B, 19, 25 start/stop button Cover D, 49 starting sewing 49 stitch guide foot Cover A, 64 stitch keys Cover E stitch length 56 stitch selection key Cover E stitch settings 128 stitch width 55 controlling 99 stitching density 118 storing patterns 120 straight stitch 74 stretch fabrics...


