
Accessory Catalog
Page 11
... the presser foot, and place each cord into each guide (to 7 cords or decorative threads. It can be used with maximum stitch width. Insert cords or threads into each hole on the presser foot over the desired seams or pattern markings. 3. Insert cords or threads into each hole on the machine. 2. Attach the presser foot and select a stitch from the right of seams or pattern markings are desired. SA157 ABCDEFJKMN Cording Foot (7-hole) Used for couching! 1. SA158 ABCDEFJKMN www.brother.com Set the zigzag...
... the presser foot, and place each cord into each guide (to 7 cords or decorative threads. It can be used with maximum stitch width. Insert cords or threads into each hole on the presser foot over the desired seams or pattern markings. 3. Insert cords or threads into each hole on the machine. 2. Attach the presser foot and select a stitch from the right of seams or pattern markings are desired. SA157 ABCDEFJKMN Cording Foot (7-hole) Used for couching! 1. SA158 ABCDEFJKMN www.brother.com Set the zigzag...

Accessory Catalog
Page 13
... center position. 3. www.brother.com For seven grooves: SA179 ABCDEJ For five grooves: SA162 IP This presser foot does not include the bobbin cover. The intervals of tucks can be adjusted. 1. Install and manually thread a twin needle. 2. Sew slowly for details.) Brother Embellishment Feet Pin Tuck Foot 24 Ruffler Foot Pin Tuck Foot This presser foot has 7 grooves and produces perfect pin tucks and corded pin tucks using a twin needle on the lower portion of stitching and use that to get started.
... center position. 3. www.brother.com For seven grooves: SA179 ABCDEJ For five grooves: SA162 IP This presser foot does not include the bobbin cover. The intervals of tucks can be adjusted. 1. Install and manually thread a twin needle. 2. Sew slowly for details.) Brother Embellishment Feet Pin Tuck Foot 24 Ruffler Foot Pin Tuck Foot This presser foot has 7 grooves and produces perfect pin tucks and corded pin tucks using a twin needle on the lower portion of stitching and use that to get started.

Accessory Catalog
Page 15
... quilting is needed. 1. Lower the feed dogs. 2. Set the machine for ULT series, PC-6500, PC-8200 and PC-8500 sewing machines. Requires Low Shank Adapter for free-motion, outline quilting, etc. 1. Fabrics that both hands to hold the fabric firmly. 5. Sew. Brother Quilting Feet 27 Open Toe Quilting Foot Quilting Foot SA187 ABCDEFGHMNO SA129 ABCDEFGHMNO SA165 L Open Toe Quilting Foot The large opening on the Open Toe Quilting Foot, with the pin over the needle clamp screw. 2. Select a straight stitch or your preferred stitch such as zigzag stitch. 5. The foot...
... quilting is needed. 1. Lower the feed dogs. 2. Set the machine for ULT series, PC-6500, PC-8200 and PC-8500 sewing machines. Requires Low Shank Adapter for free-motion, outline quilting, etc. 1. Fabrics that both hands to hold the fabric firmly. 5. Sew. Brother Quilting Feet 27 Open Toe Quilting Foot Quilting Foot SA187 ABCDEFGHMNO SA129 ABCDEFGHMNO SA165 L Open Toe Quilting Foot The large opening on the Open Toe Quilting Foot, with the pin over the needle clamp screw. 2. Select a straight stitch or your preferred stitch such as zigzag stitch. 5. The foot...

Accessory Catalog
Page 17
... new free-motion presser feet: Free-motion quilting foot "C" for more features to see embroidery designs. - Add even more control with center needle position straight stitch Open toe quilting foot "O" for greater visibility Echo quilting foot "E" for all Duetta™ 4500D's and Innov-is compatible with the built-in software in USB port on your top of Brother Embroidery Cards, including licensed content. Change your machine with USB hub devices* to provide access to repeat designs vertically or horizontally. Automatic Height Adjuster...
... new free-motion presser feet: Free-motion quilting foot "C" for more features to see embroidery designs. - Add even more control with center needle position straight stitch Open toe quilting foot "O" for greater visibility Echo quilting foot "E" for all Duetta™ 4500D's and Innov-is compatible with the built-in software in USB port on your top of Brother Embroidery Cards, including licensed content. Change your machine with USB hub devices* to provide access to repeat designs vertically or horizontally. Automatic Height Adjuster...

Accessory Catalog
Page 33
... thread delivery or bobbin storage. Some hoops can easily be used thread colors. Take control of your machine. Spend less time changing threads, and more on creating. Brother Embroidery Accessories 63 Free-Standing Ten Spool Thread Stand Ten Spool Thread Stand Embroidery Machine Hoops Brother Embroidery Accessories 64 For all embroidery and sewing/embroidery machines. The spool pins can be removed to the machine as well as a thread locking system which keeps those loose ends tamed when not in use. Each thread has it's own thread guide to deliver thread...
... thread delivery or bobbin storage. Some hoops can easily be used thread colors. Take control of your machine. Spend less time changing threads, and more on creating. Brother Embroidery Accessories 63 Free-Standing Ten Spool Thread Stand Ten Spool Thread Stand Embroidery Machine Hoops Brother Embroidery Accessories 64 For all embroidery and sewing/embroidery machines. The spool pins can be removed to the machine as well as a thread locking system which keeps those loose ends tamed when not in use. Each thread has it's own thread guide to deliver thread...

Accessory Catalog
Page 34
..., use these embroidery threads especially designed for Brother sewing and embroidering machines. 61 Color Thread Set with Wooden Rack ETKSP999 PacesetterTM Polyester Threads (61 Color Thread Set with a high nap such as fur or terrycloth. Dependable thread delivery through machine tensions. Out metallic thread maintains its color, heat resistance and strength. Designed for high speed embroidery stitching, made in the most intricate designs. Bobbin Threads Stabilizers and Water Water Soluble Stabilizers Brother Embroidery Accessories 66 Bobbin Threads Brother Bobbin Threads...
..., use these embroidery threads especially designed for Brother sewing and embroidering machines. 61 Color Thread Set with Wooden Rack ETKSP999 PacesetterTM Polyester Threads (61 Color Thread Set with a high nap such as fur or terrycloth. Dependable thread delivery through machine tensions. Out metallic thread maintains its color, heat resistance and strength. Designed for high speed embroidery stitching, made in the most intricate designs. Bobbin Threads Stabilizers and Water Water Soluble Stabilizers Brother Embroidery Accessories 66 Bobbin Threads Brother Bobbin Threads...

Accessory Catalog
Page 40
... and quickly. SA226CV www.brother.com Set up your machine. 3. Set T1/T2 presser foot. 2. Attach the hem positioning plate A/B to the hemming attachment, and attach it into the front cover slot. 3. Attaching 12 mm (approx. 1/2") bias tape: Use the large bias tape sliding plate with the LC1 presser foot (included with your machine for a cover stitch, with 3 or 6 mm wide cover stitch. 3. The stitches are always smooth. 1. Fold fabric and set through the holder). 4. Sew as folding them. Open the seams...
... and quickly. SA226CV www.brother.com Set up your machine. 3. Set T1/T2 presser foot. 2. Attach the hem positioning plate A/B to the hemming attachment, and attach it into the front cover slot. 3. Attaching 12 mm (approx. 1/2") bias tape: Use the large bias tape sliding plate with the LC1 presser foot (included with your machine for a cover stitch, with 3 or 6 mm wide cover stitch. 3. The stitches are always smooth. 1. Fold fabric and set through the holder). 4. Sew as folding them. Open the seams...
Users Manual - English
Page 4
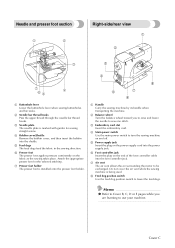
... the foot controller cable into the foot controller jack. d Main power switch Use the main power switch to sew one stitch. g Air vent The air vent allows the air surrounding the motor to lower the feed dogs. b Needle bar thread hooks Pass the upper thread through the needle bar thread hooks. Attach the appropriate presser foot for sewing straight seams. d Bobbin cover/Shuttle Remove the bobbin cover, and then insert the bobbin into the power supply jack. Do not cover the air vent while the sewing machine is installed onto the presser foot holder. 4 8 5 7 6 a Handle...
... the foot controller cable into the foot controller jack. d Main power switch Use the main power switch to sew one stitch. g Air vent The air vent allows the air surrounding the motor to lower the feed dogs. b Needle bar thread hooks Pass the upper thread through the needle bar thread hooks. Attach the appropriate presser foot for sewing straight seams. d Bobbin cover/Shuttle Remove the bobbin cover, and then insert the bobbin into the power supply jack. Do not cover the air vent while the sewing machine is installed onto the presser foot holder. 4 8 5 7 6 a Handle...
Users Manual - English
Page 8
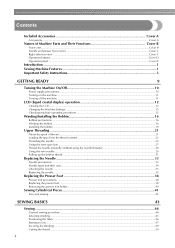
...spool pin ...27 Thread the needle manually (without using the needle threader 28 Using the twin needle ...29 Pulling up the bobbin thread...31 Replacing the Needle ...33 Needle precautions ...33 Needle types and their uses...34 Checking the needle ...35 Replacing the needle...35 Replacing the Presser Foot 38 Presser foot precautions ...38 Replacing the presser foot ...38 Removing the presser foot holder ...40 Sewing Cylindrical Pieces 41 Free-arm sewing...41 SEWING BASICS 43 Sewing ...44 General sewing procedure ...44 Selecting stitching ...45 Positioning the fabric ...46 Starting to sew...
...spool pin ...27 Thread the needle manually (without using the needle threader 28 Using the twin needle ...29 Pulling up the bobbin thread...31 Replacing the Needle ...33 Needle precautions ...33 Needle types and their uses...34 Checking the needle ...35 Replacing the needle...35 Replacing the Presser Foot 38 Presser foot precautions ...38 Replacing the presser foot ...38 Removing the presser foot holder ...40 Sewing Cylindrical Pieces 41 Free-arm sewing...41 SEWING BASICS 43 Sewing ...44 General sewing procedure ...44 Selecting stitching ...45 Positioning the fabric ...46 Starting to sew...
Users Manual - English
Page 13
... operation manual when replacing or installing any other parts • A power failure occurs during use extension cords. For additional product information and updates, visit our web site at www.brother.com 7 When storing this machine, avoid direct sunlight and high humidity locations. Do not store anything on the needle while sewing. Do not drop or hit the machine. 4. CONGRATULATIONS ON CHOOSING OUR MACHINE Your machine is completed • Replacing or removing...
... operation manual when replacing or installing any other parts • A power failure occurs during use extension cords. For additional product information and updates, visit our web site at www.brother.com 7 When storing this machine, avoid direct sunlight and high humidity locations. Do not store anything on the needle while sewing. Do not drop or hit the machine. 4. CONGRATULATIONS ON CHOOSING OUR MACHINE Your machine is completed • Replacing or removing...
Users Manual - English
Page 21
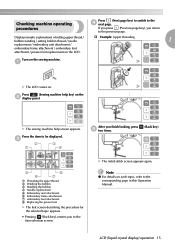
... / bobbin winding / setting bobbin thread / needle † Example: Upper threading 1 replacement / embroidery unit attachment / embroidery frame attachment / embroidery foot attachment / presser foot replacement on the sewing machine. Press (Sewing machine help screen appears. a X The LCD comes on the b display panel. Note z For details on each topic, refer to be displayed. Checking machine operating procedures Press (Next page key) to switch to the item selection screen. X The sewing machine help key) on . c 2 3 1 4 After you finish looking, press e two times...
... / bobbin winding / setting bobbin thread / needle † Example: Upper threading 1 replacement / embroidery unit attachment / embroidery frame attachment / embroidery foot attachment / presser foot replacement on the sewing machine. Press (Sewing machine help screen appears. a X The LCD comes on the b display panel. Note z For details on each topic, refer to be displayed. Checking machine operating procedures Press (Next page key) to switch to the item selection screen. X The sewing machine help key) on . c 2 3 1 4 After you finish looking, press e two times...
Users Manual - English
Page 25
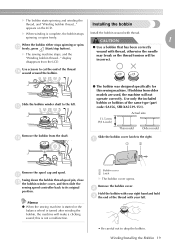
... the bobbin thread spool pin, close r the bobbin winder cover, and then slide the sewing speed controller back to the right. this sewing machine. Use scissors to drop the bobbin. Winding/Installing the Bobbin 19 X The bobbin starts spinning and winding the thread, and "Winding bobbin thread..." CAUTION 1 When the bobbin either stops spinning or spins m freely, press (Start/stop button). Installing the bobbin X When winding is complete, the bobbin stops Install the bobbin wound with thread, otherwise the needle may break or the thread tension will not operate correctly...
... the bobbin thread spool pin, close r the bobbin winder cover, and then slide the sewing speed controller back to the right. this sewing machine. Use scissors to drop the bobbin. Winding/Installing the Bobbin 19 X The bobbin starts spinning and winding the thread, and "Winding bobbin thread..." CAUTION 1 When the bobbin either stops spinning or spins m freely, press (Start/stop button). Installing the bobbin X When winding is complete, the bobbin stops Install the bobbin wound with thread, otherwise the needle may break or the thread tension will not operate correctly...

Users Manual - English
Page 37
... the upper thread upward to select the twin needle setting, otherwise the needle may break or the machine may be pulled up the bobbin thread as described below. 1 Insert the bobbin into the shuttle. CAUTION ● When using the twin needle, be sure to pull d out the end of "Installing the bobbin" (page 19). Pulling up the bobbin thread When making gathers or before free-motion quilting, first pull up . a Needle position button X The bobbin thread is looped around the upper thread...
... the upper thread upward to select the twin needle setting, otherwise the needle may break or the machine may be pulled up the bobbin thread as described below. 1 Insert the bobbin into the shuttle. CAUTION ● When using the twin needle, be sure to pull d out the end of "Installing the bobbin" (page 19). Pulling up the bobbin thread When making gathers or before free-motion quilting, first pull up . a Needle position button X The bobbin thread is looped around the upper thread...
Users Manual - English
Page 60
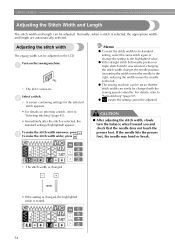
... settings (highlighted) appear. Memo z To reset the stitch width to its standard setting, select the same stitch again or change the setting to the left needle position or triple stretch stitch) was selected, changing the stitch width changes the needle position. If the needle hits the presser foot, the needle may bend or break. X The stitch width is changed. • If the setting is selected, the appropriate width and length are automatically selected. Adjusting the stitch width The zigzag...
... settings (highlighted) appear. Memo z To reset the stitch width to its standard setting, select the same stitch again or change the setting to the left needle position or triple stretch stitch) was selected, changing the stitch width changes the needle position. If the needle hits the presser foot, the needle may bend or break. X The stitch width is changed. • If the setting is selected, the appropriate width and length are automatically selected. Adjusting the stitch width The zigzag...

Users Manual - English
Page 85
... the scale. 1 A 2 a Mark on fabric (front) b Red marks on buttonhole foot Pass the upper thread down the buttonhole lever as far as f possible. 1 a Buttonhole lever Buttonhole Stitching 79 Select a stitch. Pull down through the hole in the presser foot. • When lowering the presser foot, do not push in the button guide plate Add together the diameter and thickness of the button, and then set the button guide plate to the calculated length. (The distance between the...
... the scale. 1 A 2 a Mark on fabric (front) b Red marks on buttonhole foot Pass the upper thread down the buttonhole lever as far as f possible. 1 a Buttonhole lever Buttonhole Stitching 79 Select a stitch. Pull down through the hole in the presser foot. • When lowering the presser foot, do not push in the button guide plate Add together the diameter and thickness of the button, and then set the button guide plate to the calculated length. (The distance between the...
Users Manual - English
Page 154
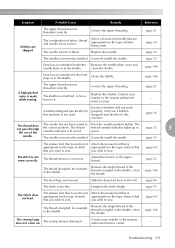
... use a bobbin designed specifically for the type of stitch that that are appropriate for this machine is scratched, or has a burr on the machine. The presser foot that is used . The start /stop button. Replace the needle. The needle breaks. Correctly install the spool. The fabric is appropriate for the type of stitch appropriate for the type of fabric being sewn. Lightly guide the fabric. Correctly install the needle. The area around the hole in the Replace the needle plate. Press the start /stop button...
... use a bobbin designed specifically for the type of stitch that that are appropriate for this machine is scratched, or has a burr on the machine. The presser foot that is used . The start /stop button. Replace the needle. The needle breaks. Correctly install the spool. The fabric is appropriate for the type of stitch appropriate for the type of fabric being sewn. Lightly guide the fabric. Correctly install the needle. The area around the hole in the Replace the needle plate. Press the start /stop button...
Users Manual - English
Page 155
... pulled off around the hole in the shuttle. burr on it . Contact 5 presser foot is appropriate for the type of the needle bar thread hook). Only use a bobbin designed specifically for this machine is scratched, or has a burr on the bobbin. The thread is bent or blunt. The needle is tangled, for example, in the Replace the needle plate. Replace the shuttle. Raise the spool pin until it stops. Move the sewing speed controller to the right...
... pulled off around the hole in the shuttle. burr on it . Contact 5 presser foot is appropriate for the type of the needle bar thread hook). Only use a bobbin designed specifically for this machine is scratched, or has a burr on the bobbin. The thread is bent or blunt. The needle is tangled, for example, in the Replace the needle plate. Replace the shuttle. Raise the spool pin until it stops. Move the sewing speed controller to the right...
Users Manual - English
Page 157
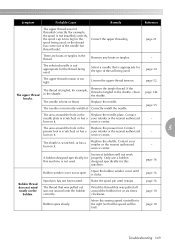
... fabric, thread and needle is not Attach the presser foot that you wish to sew. page 35 The presser foot that is used is not correct. Adjust the tension of stitch that that is not Attach the presser foot that you wish to the left. Correctly install the needle. A bobbin designed specifically for example, in the shuttle. The needle is too fine. you wish to sew. Remove the tangle thread. Symptom Probable Cause Remedy Reference The upper thread...
... fabric, thread and needle is not Attach the presser foot that you wish to sew. page 35 The presser foot that is used is not correct. Adjust the tension of stitch that that is not Attach the presser foot that you wish to the left. Correctly install the needle. A bobbin designed specifically for example, in the shuttle. The needle is too fine. you wish to sew. Remove the tangle thread. Symptom Probable Cause Remedy Reference The upper thread...
Users Manual - English
Page 163
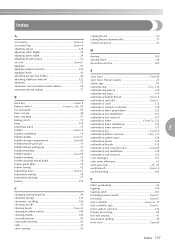
...20 embroidery unit installation 118 bobbin winder Cover B embroidery unit removal 120 bobbin winding 16 error messages 153 bobbin winding thread guide 18 even seam allowance 61 button guide plate 79 , extra spool pin 27 29 button sewing 82 eyelet punch Cover A buttonhole lever Cover C eyelet stitching 102 buttonhole sewing 78 buttonhole stitching 77 buzzer 155 F fabric positioning 46 C changing sewing direction 59 character storage 139 characters, recalling 140 checking needle 35 cleaning brush Cover A cleaning machine surface 146 cleaning shuttle 146...
...20 embroidery unit installation 118 bobbin winder Cover B embroidery unit removal 120 bobbin winding 16 error messages 153 bobbin winding thread guide 18 even seam allowance 61 button guide plate 79 , extra spool pin 27 29 button sewing 82 eyelet punch Cover A buttonhole lever Cover C eyelet stitching 102 buttonhole sewing 78 buttonhole stitching 77 buzzer 155 F fabric positioning 46 C changing sewing direction 59 character storage 139 characters, recalling 140 checking needle 35 cleaning brush Cover A cleaning machine surface 146 cleaning shuttle 146...
Users Manual - English
Page 164
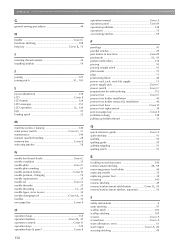
... operations 15 overcasting stitches 69 P pant legs 41 parallel stitches 29 part names & functions Cover B , patchwork 91 93 pattern embroidery 134 piecing 93 piecing straight stitch 91 plain seams 73 plug 11 positioning fabric 46 power cord, jack, switch & supply 11 power supply jack Cover C power switch Cover C preparations for embroidering 112 presser foot Cover C presser foot holder installation 40 presser foot holder removal & installation 40 presser foot lever Cover D presser foot replacement 38 previous page key Cover E problem-solving 148 pulling up bobbin thread...
... operations 15 overcasting stitches 69 P pant legs 41 parallel stitches 29 part names & functions Cover B , patchwork 91 93 pattern embroidery 134 piecing 93 piecing straight stitch 91 plain seams 73 plug 11 positioning fabric 46 power cord, jack, switch & supply 11 power supply jack Cover C power switch Cover C preparations for embroidering 112 presser foot Cover C presser foot holder installation 40 presser foot holder removal & installation 40 presser foot lever Cover D presser foot replacement 38 previous page key Cover E problem-solving 148 pulling up bobbin thread...


