

Instruction Manual - English
Page 11
... sewing machine model that you can also open a new design area at any time by doing one of the PS-300B software. NOTE: We recommend that you to fit your needs. Chapter 2. Reference. 2-1. In addition to a CF card. 2-1-1. Opening a new design area When starting up PS-300B, an empty design area automatically opens. On the keyboard, while holding down menu, or the New icon in the toolbar. Saves the current file. This tutorial...
... sewing machine model that you can also open a new design area at any time by doing one of the PS-300B software. NOTE: We recommend that you to fit your needs. Chapter 2. Reference. 2-1. In addition to a CF card. 2-1-1. Opening a new design area When starting up PS-300B, an empty design area automatically opens. On the keyboard, while holding down menu, or the New icon in the toolbar. Saves the current file. This tutorial...
Instruction Manual - English
Page 14
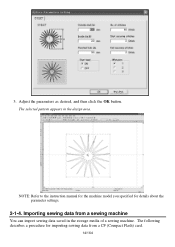
The selected pattern appears in the storage media of a sewing machine. NOTE: Refer to the instruction manual for the machine model you specified for importing sewing data from a sewing machine You can import sewing data saved in the design area. Importing sewing data from a CF (Compact Flash) card. 14/164 The following describes a procedure for details about the parameter settings. 2-1-4. 3. Adjust the parameters as desired, and then click the OK button.
The selected pattern appears in the storage media of a sewing machine. NOTE: Refer to the instruction manual for the machine model you specified for importing sewing data from a sewing machine You can import sewing data saved in the design area. Importing sewing data from a CF (Compact Flash) card. 14/164 The following describes a procedure for details about the parameter settings. 2-1-4. 3. Adjust the parameters as desired, and then click the OK button.
Instruction Manual - English
Page 39
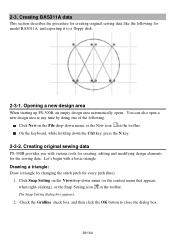
...Setting on the File drop-down menu (or the context menu that appears when right-clicking), or the Snap Setting icon in the toolbar. Drawing a triangle: Draw a triangle by doing one of the following for creating original sewing data like the following . Creating BAS311A data This section describes the procedure for model... button to a floppy disk. 2-3-1. Opening a new design area When starting up PS-300B, an empty design area automatically opens. You can also open a new design area at any time by changing the stitch pitch for the sewing data. Creating original sewing data PS-300B ...
...Setting on the File drop-down menu (or the context menu that appears when right-clicking), or the Snap Setting icon in the toolbar. Drawing a triangle: Draw a triangle by doing one of the following for creating original sewing data like the following . Creating BAS311A data This section describes the procedure for model... button to a floppy disk. 2-3-1. Opening a new design area When starting up PS-300B, an empty design area automatically opens. You can also open a new design area at any time by changing the stitch pitch for the sewing data. Creating original sewing data PS-300B ...

Instruction Manual - English
Page 40
... pointer is moved into the design area, its shape changes to . 4. Set the stitch pitch to 2 mm by inputting "3.0" in the tool bar. 5. Click to specify the second point of the triangle (click at an intersection of gridlines. 3. Click Straight Line on the Shape drop-down menu, or the Straight Line icon toolbar. This setting makes the pointer snap to...
... pointer is moved into the design area, its shape changes to . 4. Set the stitch pitch to 2 mm by inputting "3.0" in the tool bar. 5. Click to specify the second point of the triangle (click at an intersection of gridlines. 3. Click Straight Line on the Shape drop-down menu, or the Straight Line icon toolbar. This setting makes the pointer snap to...

Instruction Manual - English
Page 41
The start point marker ("S") and end point marker ("E") appear for every path of the triangle. 11.Click Select Point on the Shape drop-down menu, or the Select Point icon in the toolbar to check all the stitch points of the third path to finish the triangle. Set the stitch pitch of the triangle You can check that the stitch points are arranged in the Pitch input box. 10.Click the start point again to 4 mm by inputting "4.0" in a different pitch for every path. 9. NOTE: 41/164
The start point marker ("S") and end point marker ("E") appear for every path of the triangle. 11.Click Select Point on the Shape drop-down menu, or the Select Point icon in the toolbar to check all the stitch points of the third path to finish the triangle. Set the stitch pitch of the triangle You can check that the stitch points are arranged in the Pitch input box. 10.Click the start point again to 4 mm by inputting "4.0" in a different pitch for every path. 9. NOTE: 41/164
Instruction Manual - English
Page 49
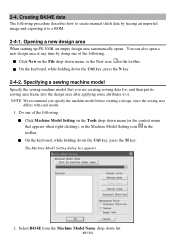
... . Creating B434E data The following procedure describes how to create manual stitch data by doing one of the following : Click Machine Model Setting on the File drop-down the Ctrl key, press the M key. 2-4. Opening a new design area When starting up PS-300B, an empty design area automatically opens. You can also open a new design area at any time by tracing an imported image and exporting it to it...
... . Creating B434E data The following procedure describes how to create manual stitch data by doing one of the following : Click Machine Model Setting on the File drop-down the Ctrl key, press the M key. 2-4. Opening a new design area When starting up PS-300B, an empty design area automatically opens. You can also open a new design area at any time by tracing an imported image and exporting it to it...
Instruction Manual - English
Page 50
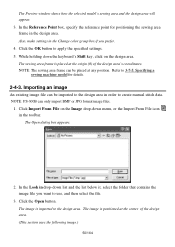
...2. The Preview window shows how the selected model's sewing area and the design area will appear. 3. Also, make settings in drop-down list and the list below it, select the folder that contains the image file you prefer. 4. Click the OK button to create manual stitch data. The image is imported to 3-7-5. ...design area. Importing an image An existing image file can be placed at any position. NOTE: The sewing area frame can only import BMP or JPG format image files. 1. In the Look in the Change color group box if you want to use, and then select the file. 3. NOTE: PS-300B...
...2. The Preview window shows how the selected model's sewing area and the design area will appear. 3. Also, make settings in drop-down list and the list below it, select the folder that contains the image file you prefer. 4. Click the OK button to create manual stitch data. The image is imported to 3-7-5. ...design area. Importing an image An existing image file can be placed at any position. NOTE: The sewing area frame can only import BMP or JPG format image files. 1. In the Look in the Change color group box if you want to use, and then select the file. 3. NOTE: PS-300B...
Instruction Manual - English
Page 65
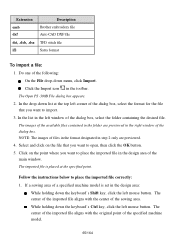
... key, click the left corner of the dialog box. The Open PS -300B File dialog box appears. 2. If a sewing area of the sewing area. The center of the imported file aligns with the center of a specified machine model is placed at the top left mouse button. Do one of the specified machine model. 65/164 In the list in the toolbar.
... key, click the left corner of the dialog box. The Open PS -300B File dialog box appears. 2. If a sewing area of the sewing area. The center of the imported file aligns with the center of a specified machine model is placed at the top left mouse button. Do one of the specified machine model. 65/164 In the list in the toolbar.

Instruction Manual - English
Page 74
...used. 74/164 Do one of sewing machine ROM to a sewing machine ROM: 1. The Write to a sewing machine ROM by using a ROM reader/writer. Writing data to a sewing machine ROM (File-Write to ROM, ) You can write data to ROM dialog box appears. 2. Item Description ROM Type Specify the type of the following: On the File drop...icon in Option Setting on the Tools drop-down menu, click Write to ROM. In the Write to ROM dialog box, specify the machine model and make settings for writing data to a PROM. It will take a little while to write data to a sewing machine ROM. To ...
...used. 74/164 Do one of sewing machine ROM to a sewing machine ROM: 1. The Write to a sewing machine ROM by using a ROM reader/writer. Writing data to a sewing machine ROM (File-Write to ROM, ) You can write data to ROM dialog box appears. 2. Item Description ROM Type Specify the type of the following: On the File drop...icon in Option Setting on the Tools drop-down menu, click Write to ROM. In the Write to ROM dialog box, specify the machine model and make settings for writing data to a PROM. It will take a little while to write data to a sewing machine ROM. To ...

Instruction Manual - English
Page 82
... the date and time that can open . Model Name: Shows the name of levels for each code is selected.) Maximum number of stitches: Shows the maximum number of 16 most recently used : Point to Recent Files on the File drop-down menu, and then click the name of needle drop points. Original Position: Shows the sewing start point of the supported file formats are emb...
... the date and time that can open . Model Name: Shows the name of levels for each code is selected.) Maximum number of stitches: Shows the maximum number of 16 most recently used : Point to Recent Files on the File drop-down menu, and then click the name of needle drop points. Original Position: Shows the sewing start point of the supported file formats are emb...

Instruction Manual - English
Page 100
... of the specified machine model. 100/164 The Pattern Select dialog box appears. 2. When a sewing area of the preset patterns in the toolbar. A frame for the machine model you want to the instruction manual for the patte rn appears, and it by specifying its length, width, number of the following : On the Shape drop-down or left mouse button. The start point marker ("S") and...
... of the specified machine model. 100/164 The Pattern Select dialog box appears. 2. When a sewing area of the preset patterns in the toolbar. A frame for the machine model you want to the instruction manual for the patte rn appears, and it by specifying its length, width, number of the following : On the Shape drop-down or left mouse button. The start point marker ("S") and...

Instruction Manual - English
Page 102
... Deceleration Function Trims threads. Activates/Deactivates the needle deflection. Repeat step 3 if needed. 5. Do any of the specified point without opening the Code Setting dialog box. Click the Close button to use codes other than those specified for the selected model cannot be outputted. NOTE: If a machine model is already specified, Show selected machine 's codes is selected as default when opening the Code Setting dialog box: Select...
... Deceleration Function Trims threads. Activates/Deactivates the needle deflection. Repeat step 3 if needed. 5. Do any of the specified point without opening the Code Setting dialog box. Click the Close button to use codes other than those specified for the selected model cannot be outputted. NOTE: If a machine model is already specified, Show selected machine 's codes is selected as default when opening the Code Setting dialog box: Select...

Instruction Manual - English
Page 103
... Needle Lower Position" to move or change design elements, such as resizing them are as follows. Priority sequence Elements 1 Outline 2 Sewing start point of the data 3 The sewing area frame of the presser foot. Controls the electric output of the thread releasing device. Controls the operation of a sewing machine. Switches the pocket clamp setting. Selecting & editing design elements In order to stop a needle at the lower position. Select "ON" or "OFF". 3-2-7. Sets the timing...
... Needle Lower Position" to move or change design elements, such as resizing them are as follows. Priority sequence Elements 1 Outline 2 Sewing start point of the data 3 The sewing area frame of the presser foot. Controls the electric output of the thread releasing device. Controls the operation of a sewing machine. Switches the pocket clamp setting. Selecting & editing design elements In order to stop a needle at the lower position. Select "ON" or "OFF". 3-2-7. Sets the timing...

Instruction Manual - English
Page 109
... by changing the coordinates of the Outline radio button. Click any of the following: On the Edit drop-down menu, click Select All. The Input Outline (Stitch, Feed) dialog box appears, and the coordinates of all punch points of the selected outline are shown in the list. (Refer to the items and their functions in the design...
... by changing the coordinates of the Outline radio button. Click any of the following: On the Edit drop-down menu, click Select All. The Input Outline (Stitch, Feed) dialog box appears, and the coordinates of all punch points of the selected outline are shown in the list. (Refer to the items and their functions in the design...
Instruction Manual - English
Page 112
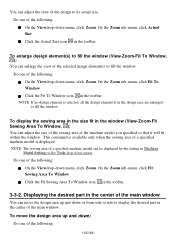
...-Fit To Window, ): You can adjust the view of the design to its actual size. NOTE: If no design element is displayed. This command is available only when the sewing area of a specified machine model is selected, all the design element(s) in the design area are enlarged to fill the window... window. Click the Actual Size icon in the toolbar. 3-3-2. Do one of a specified machine model can move the design area up and down or from side to side to display the desired part in Machine Model Setting on the Tools drop-down menu, click Zoom. NOTE: The sewing area of the following ...
...-Fit To Window, ): You can adjust the view of the design to its actual size. NOTE: If no design element is displayed. This command is available only when the sewing area of a specified machine model is selected, all the design element(s) in the design area are enlarged to fill the window... window. Click the Actual Size icon in the toolbar. 3-3-2. Do one of a specified machine model can move the design area up and down or from side to side to display the desired part in Machine Model Setting on the Tools drop-down menu, click Zoom. NOTE: The sewing area of the following ...

Instruction Manual - English
Page 117
.... Click the Snap Setting icon in the design area. 3. When hidden, stitches cannot be aligned on (snapped to points of outline, stitch or feed data, check the Point check box. 117/164 Do any of a specified machine model is displayed in the toolbar. Set to show or hide the frame of the sewing area when the sewing area of the...
.... Click the Snap Setting icon in the design area. 3. When hidden, stitches cannot be aligned on (snapped to points of outline, stitch or feed data, check the Point check box. 117/164 Do any of a specified machine model is displayed in the toolbar. Set to show or hide the frame of the sewing area when the sewing area of the...

Instruction Manual - English
Page 119
...: The stitch type can also change the Stitch Type and Pitch from each drop-down list: When the interval between the element and the adjacent element may not be connected using feed. Click the Close button if you want to stitch the outline with running stitching. Tack Method: You can then make setting changes in the toolbar. Connection: When a design element is sewn with zigzag stitching of the...
...: The stitch type can also change the Stitch Type and Pitch from each drop-down list: When the interval between the element and the adjacent element may not be connected using feed. Click the Close button if you want to stitch the outline with running stitching. Tack Method: You can then make setting changes in the toolbar. Connection: When a design element is sewn with zigzag stitching of the...

Instruction Manual - English
Page 143
Click the OK button when the setting in the Offset group box is automatically created. To make a copy of the creating direction. Do one or more design elements. The Input Point dialog box appears. 143/164...number of stitches will be changed.) Stitch Number: Select this to maintain the number of stitches of the original. (Stitch pitch will be changed.) Offset Select Left (In) to create a copy on the left of the creating direction, or Right (Out) to create a copy on the right of the desired design elements (outline, manual stitch, manual feed data) at the specified position...
Click the OK button when the setting in the Offset group box is automatically created. To make a copy of the creating direction. Do one or more design elements. The Input Point dialog box appears. 143/164...number of stitches will be changed.) Stitch Number: Select this to maintain the number of stitches of the original. (Stitch pitch will be changed.) Offset Select Left (In) to create a copy on the left of the creating direction, or Right (Out) to create a copy on the right of the desired design elements (outline, manual stitch, manual feed data) at the specified position...

Instruction Manual - English
Page 156
... selected for connecting data in the input box to change the maximum stitch length. [Setting range: 0.05 to 12.7 mm, software default: 12.7 mm. (If a machine model is specified, the setting range and the default value will change according to the model's setting.)] Default: Click this button to revert the settings to the model's setting.)] Maximum stitch length: Type the desired value in the Property 156/164 On...
... selected for connecting data in the input box to change the maximum stitch length. [Setting range: 0.05 to 12.7 mm, software default: 12.7 mm. (If a machine model is specified, the setting range and the default value will change according to the model's setting.)] Default: Click this button to revert the settings to the model's setting.)] Maximum stitch length: Type the desired value in the Property 156/164 On...
Instruction Manual - English
Page 158
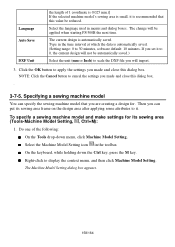
... creating a design for its sewing area frame on the design area after applying some attributes to 30 minutes, software default: 10 minutes. On the keyboard, while holding down menu, click Machine Model Setting. Select the language used in the toolbar. Type in the time interval at which the data is automatically saved. NOTE: Click the Cancel button to apply the settings you made...
... creating a design for its sewing area frame on the design area after applying some attributes to 30 minutes, software default: 10 minutes. On the keyboard, while holding down menu, click Machine Model Setting. Select the language used in the toolbar. Type in the time interval at which the data is automatically saved. NOTE: Click the Cancel button to apply the settings you made...


