
Instruction Manual - English
Page 10
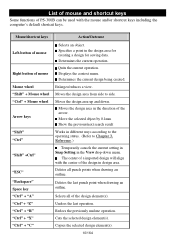
...search result Works in the direction of the arrow. Deletes all of PS-300B can be used with the center of mouse Selects an object. Undoes the last operation. Mouse/shortcut keys Action/Outcome Left-button of mouse Right button of the design in design... status. (Refer to side. Cuts the selected design element(s). Displays the context menu. Mouse wheel "Shift" + Mouse wheel "Ctrl" + Mouse wheel Arrow keys "Shift" "Ctrl" "Shift" +Ctrl" "ESC" "Backspace" Space key "Ctrl" + "A" "Ctrl" + "Z" "Ctrl" + "R" "Ctrl" + "X" "Ctrl" + "C" Enlarges/reduces a view. Copies the selected design element...
...search result Works in the direction of the arrow. Deletes all of PS-300B can be used with the center of mouse Selects an object. Undoes the last operation. Mouse/shortcut keys Action/Outcome Left-button of mouse Right button of the design in design... status. (Refer to side. Cuts the selected design element(s). Displays the context menu. Mouse wheel "Shift" + Mouse wheel "Ctrl" + Mouse wheel Arrow keys "Shift" "Ctrl" "Shift" +Ctrl" "ESC" "Backspace" Space key "Ctrl" + "A" "Ctrl" + "Z" "Ctrl" + "R" "Ctrl" + "X" "Ctrl" + "C" Enlarges/reduces a view. Copies the selected design element...

Instruction Manual - English
Page 11
...however, provides basic information for the use of Brother electronic sewing machines. Opening a new design area When starting up PS-300B, an empty design area automatically opens. Click New on the File drop-down the Ctrl key, press the N key. 2-1-2. Deletes the selected design element(s). Determine the...patterns for sewing on the various functions, refer to fit your specific machine. Saves the current file. Tutorial The Brother PS-300B software provides numerous functions to a CF card. 2-1-1. Your custommade sewing designs and patterns can be printed or exported for a...
...however, provides basic information for the use of Brother electronic sewing machines. Opening a new design area When starting up PS-300B, an empty design area automatically opens. Click New on the File drop-down the Ctrl key, press the N key. 2-1-2. Deletes the selected design element(s). Determine the...patterns for sewing on the various functions, refer to fit your specific machine. Saves the current file. Tutorial The Brother PS-300B software provides numerous functions to a CF card. 2-1-1. Your custommade sewing designs and patterns can be printed or exported for a...
Instruction Manual - English
Page 12
...'s coordinates. On the keyboard, while holding down list. Click the OK button to 3-7-5. Select KE430D from the Machine Model Name drop-down the keyboard's Shift key, click on the Tools drop-down the Ctrl...
...'s coordinates. On the keyboard, while holding down list. Click the OK button to 3-7-5. Select KE430D from the Machine Model Name drop-down the keyboard's Shift key, click on the Tools drop-down the Ctrl...
Instruction Manual - English
Page 18
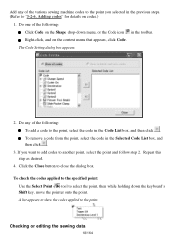
... as desired. 4. Checking or editing the sewing data 18/164 Add any of the following : Click Code on the Shape drop-down the keyboard's Shift key, move the pointer onto the point. If you selected in the previous steps. (Refer to the point. Click the Close button to another point, select...
... as desired. 4. Checking or editing the sewing data 18/164 Add any of the following : Click Code on the Shape drop-down the keyboard's Shift key, move the pointer onto the point. If you selected in the previous steps. (Refer to the point. Click the Close button to another point, select...

Instruction Manual - English
Page 19
Click the Select Point tool and then Click Sequence Window on the keyboard. The Sequence window appears. 2. Click to select the pattern in the Sequence window, and then press any of the numeric keys on the Viewdrop-down menu, or the Sequence window icon in the list. 19/164 The Sewing Data List dialog box appears, and the coordinates of the pattern. You can also move the point by changing its coordinates. 1. You can check or edit the sewing data of all points and codes are shown in the toolbar.
Click the Select Point tool and then Click Sequence Window on the keyboard. The Sequence window appears. 2. Click to select the pattern in the Sequence window, and then press any of the numeric keys on the Viewdrop-down menu, or the Sequence window icon in the list. 19/164 The Sewing Data List dialog box appears, and the coordinates of the pattern. You can also move the point by changing its coordinates. 1. You can check or edit the sewing data of all points and codes are shown in the toolbar.

Instruction Manual - English
Page 21
... at the desired position. To align the sewing start point to the start point of all the sewing data: While holding down the keyboard's Shift key, drag the sewing start point. To align the sewing start point to the center of the first outline: While holding down the keyboard's Ctrl... the sewing start point. 21/164 The sewing start point will move to click the sewing start point, do one of the numeric keys. To change the sewing start point. 2. The Input Point dialog box appears. Input the coordinates and click the OK button. Use the Select Point tool ...
... at the desired position. To align the sewing start point to the start point of all the sewing data: While holding down the keyboard's Shift key, drag the sewing start point. To align the sewing start point to the center of the first outline: While holding down the keyboard's Ctrl... the sewing start point. 21/164 The sewing start point will move to click the sewing start point, do one of the numeric keys. To change the sewing start point. 2. The Input Point dialog box appears. Input the coordinates and click the OK button. Use the Select Point tool ...
Instruction Manual - English
Page 24
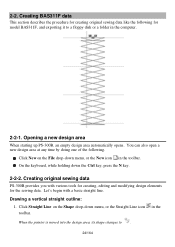
Click New on the Shape drop-down menu, or the Straight Line icon toolbar. Creating original sewing data PS-300B provides you with a basic straight line. Drawing a vertical straight outline: 1. On the keyboard, while holding down menu, or the New icon in the toolbar... one of the following for the sewing data. Click Straight Line on the File drop-down the Ctrl key, press the N key. 2-2-2. in the computer. 2-2-1. Opening a new design area When starting up PS-300B, an empty design area automatically opens. Let's begin with various tools for creating, editing and modifying design...
Click New on the Shape drop-down menu, or the Straight Line icon toolbar. Creating original sewing data PS-300B provides you with a basic straight line. Drawing a vertical straight outline: 1. On the keyboard, while holding down menu, or the New icon in the toolbar... one of the following for the sewing data. Click Straight Line on the File drop-down the Ctrl key, press the N key. 2-2-2. in the computer. 2-2-1. Opening a new design area When starting up PS-300B, an empty design area automatically opens. Let's begin with various tools for creating, editing and modifying design...

Instruction Manual - English
Page 25
... 2. The start point marker ("S") and end point marker ("E") for the start point of the straight outline (2 in the Stitch Type drop-down the keyboard's Shift key, click to show that it is set to select it. Change the stitch type to Border in figure below ). 3. NOTE: To keep the straight line... Select icon in the design area. In the design area, click to finish the outline. Then click on the Shape drop-down the keyboard's Shift key while moving the pointer in the toolbar.
... 2. The start point marker ("S") and end point marker ("E") for the start point of the straight outline (2 in the Stitch Type drop-down the keyboard's Shift key, click to show that it is set to select it. Change the stitch type to Border in figure below ). 3. NOTE: To keep the straight line... Select icon in the design area. In the design area, click to finish the outline. Then click on the Shape drop-down the keyboard's Shift key while moving the pointer in the toolbar.

Instruction Manual - English
Page 30
..." appears around the outline to show that it . To scroll the design area upward and downward quickly: While holding down the keyboard's Ctrl key, rotate the mouse wheel. To move the design area from side to select it is cleared and the stitch data remains. Then click on ... the sewing data (making fine adjustments of the stitch points). 1. Click Select on the outline to side quickly: While holding down the keyboard's Shift key, rotate the mouse wheel. Use the Select keyboard. Clearing the outline: 1. Click Clear Outline on the 30/164 tool to be enlarged or reduced,...
..." appears around the outline to show that it . To scroll the design area upward and downward quickly: While holding down the keyboard's Ctrl key, rotate the mouse wheel. To move the design area from side to select it is cleared and the stitch data remains. Then click on ... the sewing data (making fine adjustments of the stitch points). 1. Click Select on the outline to side quickly: While holding down the keyboard's Shift key, rotate the mouse wheel. Use the Select keyboard. Clearing the outline: 1. Click Clear Outline on the 30/164 tool to be enlarged or reduced,...

Instruction Manual - English
Page 36
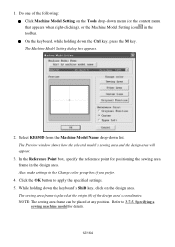
... Machine Model Setting dialog box appears. 36/164 Do one of the following: Click Machine Model Setting on the Tools drop-down the Ctrl key, press the M key. On the keyboard, while holding down menu (or the context menu that you created sewing data for, and then put its sewing area frame...
... Machine Model Setting dialog box appears. 36/164 Do one of the following: Click Machine Model Setting on the Tools drop-down the Ctrl key, press the M key. On the keyboard, while holding down menu (or the context menu that you created sewing data for, and then put its sewing area frame...
Instruction Manual - English
Page 37
Select BAS311F from the Machine Model Name drop-down the keyboard's Shift key, click on the computer. 1. Click the OK button to 3-7-5. Exporting the data to a sewing machine You can be placed at the center of the data ...
Select BAS311F from the Machine Model Name drop-down the keyboard's Shift key, click on the computer. 1. Click the OK button to 3-7-5. Exporting the data to a sewing machine You can be placed at the center of the data ...
Instruction Manual - English
Page 39
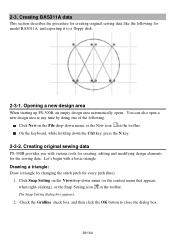
...). 1. On the keyboard, while holding down menu, or the New icon in the toolbar. Opening a new design area When starting up PS-300B, an empty design area automatically opens. Click New on the Viewdrop-down menu (or the context menu that appears when right-clicking), or the... Snap Setting icon in the toolbar. Click Snap Setting on the File drop-down the Ctrl key, press the N key. 2-3-2. Creating original sewing data PS-300B provides you with a basic triangle. 2-3. Creating BAS311A data This section describes the procedure for the sewing data. Let's ...
...). 1. On the keyboard, while holding down menu, or the New icon in the toolbar. Opening a new design area When starting up PS-300B, an empty design area automatically opens. Click New on the Viewdrop-down menu (or the context menu that appears when right-clicking), or the... Snap Setting icon in the toolbar. Click Snap Setting on the File drop-down the Ctrl key, press the N key. 2-3-2. Creating original sewing data PS-300B provides you with a basic triangle. 2-3. Creating BAS311A data This section describes the procedure for the sewing data. Let's ...

Instruction Manual - English
Page 42
... context menu that appears when right-clicking), or the Vertically icon in the toolbar. 3. Click Circle on the Modify-Flip drop-down the keyboard's Shift key while moving the pointer in both the X and Y input boxes, and click the OK button. To keep the straight line vertically or horizontally, hold down...
... context menu that appears when right-clicking), or the Vertically icon in the toolbar. 3. Click Circle on the Modify-Flip drop-down the keyboard's Shift key while moving the pointer in both the X and Y input boxes, and click the OK button. To keep the straight line vertically or horizontally, hold down...

Instruction Manual - English
Page 44
... toolbar. While holding down menu, or the Sequence window icon in the actual sewing order. 2. Click Sequence Window on the Viewdrop-down the keyboard's Shift key, drag the punch point of the circle and drop it on a punch point of the circle can change the sewing order for all the design...
... toolbar. While holding down menu, or the Sequence window icon in the actual sewing order. 2. Click Sequence Window on the Viewdrop-down the keyboard's Shift key, drag the punch point of the circle and drop it on a punch point of the circle can change the sewing order for all the design...
Instruction Manual - English
Page 46
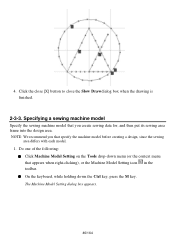
Do one of the following: Click Machine Model Setting on the Tools drop-down the Ctrl key, press the M key. Specifying a sewing machine model Specify the sewing machine model that you that appears when right-clicking), or the Machine Model Setting icon in the toolbar. ...
Do one of the following: Click Machine Model Setting on the Tools drop-down the Ctrl key, press the M key. Specifying a sewing machine model Specify the sewing machine model that you that appears when right-clicking), or the Machine Model Setting icon in the toolbar. ...
Instruction Manual - English
Page 47
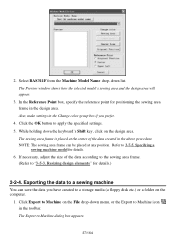
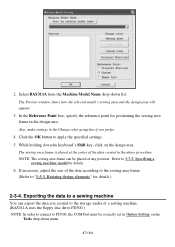
... Machine Model Name drop-down menu. 47/164 Click the OK button to 3-7-5. Refer to apply the specified settings. 5. While holding down the keyboard's Shift key, click on the Tools drop-down list. The Preview window shows how the selected model's sewing area and the design area will appear. 3. Exporting the...
... Machine Model Name drop-down menu. 47/164 Click the OK button to 3-7-5. Refer to apply the specified settings. 5. While holding down the keyboard's Shift key, click on the Tools drop-down list. The Preview window shows how the selected model's sewing area and the design area will appear. 3. Exporting the...
Instruction Manual - English
Page 49
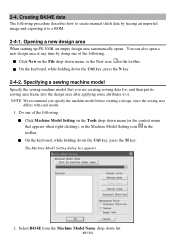
...down menu, or the New icon in the toolbar. The Machine Model Setting dialog box appears. 2. Opening a new design area When starting up PS-300B, an empty design area automatically opens. Specifying a sewing machine model Specify the sewing machine model that appears when right-clicking), or the Machine ... New on the Tools drop-down list. 49/164 On the keyboard, while holding down the Ctrl key, press the M key. On the keyboard, while holding down the Ctrl key, press the N key. 2-4-2. Select B434E from the Machine Model Name drop-down menu (or the context menu that you specify...
...down menu, or the New icon in the toolbar. The Machine Model Setting dialog box appears. 2. Opening a new design area When starting up PS-300B, an empty design area automatically opens. Specifying a sewing machine model Specify the sewing machine model that appears when right-clicking), or the Machine ... New on the Tools drop-down list. 49/164 On the keyboard, while holding down the Ctrl key, press the M key. On the keyboard, while holding down the Ctrl key, press the N key. 2-4-2. Select B434E from the Machine Model Name drop-down menu (or the context menu that you specify...
Instruction Manual - English
Page 50
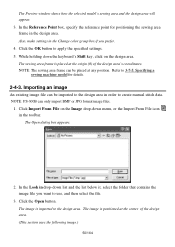
... point for details. 2-4-3. The sewing area frame is placed at the origin (0) of the design area. (This section uses the following image.) 50/164 NOTE: PS-300B can be imported to the design area in the toolbar. In the Look in drop-down menu, or the Import From File icon in order... to the design area. Click the OK button to 3-7-5. While holding down the keyboard's Shift key, click on the Image drop-down list and the list below it, select the folder that contains the image file you prefer. 4. Specifying a sewing machine...
... point for details. 2-4-3. The sewing area frame is placed at the origin (0) of the design area. (This section uses the following image.) 50/164 NOTE: PS-300B can be imported to the design area in the toolbar. In the Look in drop-down menu, or the Import From File icon in order... to the design area. Click the OK button to 3-7-5. While holding down the keyboard's Shift key, click on the Image drop-down list and the list below it, select the folder that contains the image file you prefer. 4. Specifying a sewing machine...

Instruction Manual - English
Page 51
.... Adjusting the size of the image: If the image is selected, and handles (small squares) also appear on the Shape drop-down the Ctrl key, press the T key. 2-4-4. Set the tracing pitch and margin: (a) Do one of the image so that it is either too large or too small for the sewing...
.... Adjusting the size of the image: If the image is selected, and handles (small squares) also appear on the Shape drop-down the Ctrl key, press the T key. 2-4-4. Set the tracing pitch and margin: (a) Do one of the image so that it is either too large or too small for the sewing...

Instruction Manual - English
Page 53
You can draw a smooth curve with the specified pitch. While holding down the keyboard's Shift key, click the left mouse button at the position where you can also make a stitch point. In that case, you want to make stitch points at ...
You can draw a smooth curve with the specified pitch. While holding down the keyboard's Shift key, click the left mouse button at the position where you can also make a stitch point. In that case, you want to make stitch points at ...


