
Instruction Manual - English
Page 1
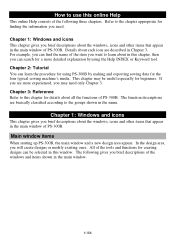
... typical sewing machine's media. Chapter 1: Windows and icons This chapter gives you brief descriptions about all the functions of PS-300B. For example, you want to the groups shown in Chapter 3. Main window items When starting up PS-300B, the main window and a new design area appear. All...of the tools and functions for creating designs can be selected in the main window of the following gives you may be useful especially for a more experienced, you brief descriptions of PS-300B. The following three chapters. Chapter 2: Tutorial You can search for beginners. In...
... typical sewing machine's media. Chapter 1: Windows and icons This chapter gives you brief descriptions about all the functions of PS-300B. For example, you want to the groups shown in Chapter 3. Main window items When starting up PS-300B, the main window and a new design area appear. All...of the tools and functions for creating designs can be selected in the main window of the following gives you may be useful especially for a more experienced, you brief descriptions of PS-300B. The following three chapters. Chapter 2: Tutorial You can search for beginners. In...
Instruction Manual - English
Page 4
... indicates the names of sewing machine is specified in Machine Model Setting on the Tools drop-down menu. 13.Reference window Can be displayed by clicking Sequence Window on the left side 1. Reference" or search for the desired icon by clicking Reference Windowon the View drop-down menu...frame Displayed in the design area when a model of icons in the toolbar. This window shows all the design. 14.Sequence window Can be displayed by using the Help INDEX or Keyword tool. This window shows all the design elements separately in the sewing order. Stitch 13. Select Punch point...
... indicates the names of sewing machine is specified in Machine Model Setting on the Tools drop-down menu. 13.Reference window Can be displayed by clicking Sequence Window on the left side 1. Reference" or search for the desired icon by clicking Reference Windowon the View drop-down menu...frame Displayed in the design area when a model of icons in the toolbar. This window shows all the design. 14.Sequence window Can be displayed by using the Help INDEX or Keyword tool. This window shows all the design elements separately in the sewing order. Stitch 13. Select Punch point...

Instruction Manual - English
Page 5
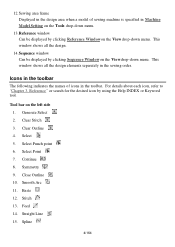
Arc 17. Circle 20. Export To Machine 7. Gridlines 12.Pseudo 3D 13. Polygon 19. Trace 23. Open 3. File Info 10. Rectangle 18. Import 5. Read From ROM 8. Code Tool bar on the upper side 1. Ellipse 22. Write To ROM 9. Center Circle 21. New 2. Save 4. Import From Machine 6. Pattern 24. Property 14.Reference Window 15.Sequence Window 16.Slow Draw 17.Snap Setting 5/164 16. Print 11.
Arc 17. Circle 20. Export To Machine 7. Gridlines 12.Pseudo 3D 13. Polygon 19. Trace 23. Open 3. File Info 10. Rectangle 18. Import 5. Read From ROM 8. Code Tool bar on the upper side 1. Ellipse 22. Write To ROM 9. Center Circle 21. New 2. Save 4. Import From Machine 6. Pattern 24. Property 14.Reference Window 15.Sequence Window 16.Slow Draw 17.Snap Setting 5/164 16. Print 11.

Instruction Manual - English
Page 6
Measure 21.Import From File 22.Zoom In 23.Zoom Out 24.Actual size 25.Fit To Window 26.Fit Sewing Area To Window 27. Delete 32. Connect 37. Cut 29. Search 33. Redo 35. Cusp 39.Rotate By Drag 40.Rotate By Point 41.Flip Horizontally 42.Flip Vertically 43.Flip By Reference Line 44.Mirror Copy 45. Option 19.Machine Model Setting 20. Paste 31. Offset 6/164 Help 28. Undo 34. 18. Split 36. Smooth 38. Copy 30.
Measure 21.Import From File 22.Zoom In 23.Zoom Out 24.Actual size 25.Fit To Window 26.Fit Sewing Area To Window 27. Delete 32. Connect 37. Cut 29. Search 33. Redo 35. Cusp 39.Rotate By Drag 40.Rotate By Point 41.Flip Horizontally 42.Flip Vertically 43.Flip By Reference Line 44.Mirror Copy 45. Option 19.Machine Model Setting 20. Paste 31. Offset 6/164 Help 28. Undo 34. 18. Split 36. Smooth 38. Copy 30.
Instruction Manual - English
Page 7
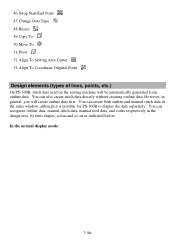
... will create outline data first. You can recognize outline data, manual stitch data, manual feed data, and codes respectively in the same window, although it is possible for PS-300B to display the data separately. You can also create stitch data directly without creating outline data. Resize 49.Copy To 50.Move To....Change Data Type 48. Pivot 52.Align To Sewing Area Center 53.Align To Coordinate Original Point Design elements (types of lines, points, etc.) On PS-300B, stitch data used on as indicated below: In the normal display mode: 7/164
... will create outline data first. You can recognize outline data, manual stitch data, manual feed data, and codes respectively in the same window, although it is possible for PS-300B to display the data separately. You can also create stitch data directly without creating outline data. Resize 49.Copy To 50.Move To....Change Data Type 48. Pivot 52.Align To Sewing Area Center 53.Align To Coordinate Original Point Design elements (types of lines, points, etc.) On PS-300B, stitch data used on as indicated below: In the normal display mode: 7/164

Instruction Manual - English
Page 11
...11/164 For details on the various functions, refer to a CF card. 2-1-1. Determine the current creating outline. Opens a new window. Opens the Option Setting dialog box. This tutorial, however, provides basic information for the use of the following procedure explains how ...your needs. Reference. 2-1. Prints the current file. Chapter 2. This tutorial describes examples for a wide variety of Brother electronic sewing machines. Tutorial The Brother PS-300B software provides numerous functions to enable you are creating design elements for sewing on the File drop-down the Ctrl ...
...11/164 For details on the various functions, refer to a CF card. 2-1-1. Determine the current creating outline. Opens a new window. Opens the Option Setting dialog box. This tutorial, however, provides basic information for the use of the following procedure explains how ...your needs. Reference. 2-1. Prints the current file. Chapter 2. This tutorial describes examples for a wide variety of Brother electronic sewing machines. Tutorial The Brother PS-300B software provides numerous functions to enable you are creating design elements for sewing on the File drop-down the Ctrl ...
Instruction Manual - English
Page 12
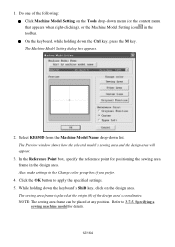
... appears. 2. Also, make settings in the design area. While holding down the Ctrl key, press the M key. Refer to apply the specified settings. 5. The Preview window shows how the selected model's sewing area and the design area will appear. 3. Do one of the design area's coordinates. On the keyboard, while holding...
... appears. 2. Also, make settings in the design area. While holding down the Ctrl key, press the M key. Refer to apply the specified settings. 5. The Preview window shows how the selected model's sewing area and the design area will appear. 3. Do one of the design area's coordinates. On the keyboard, while holding...
Instruction Manual - English
Page 17
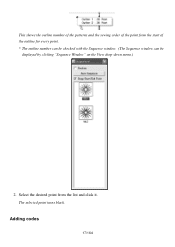
Select the desired point from the start of the outline for every point. * The outline number can be checked with the Sequence window. (The Sequence window can be displayed by clicking "Sequence Window" on the View drop-down menu.) 2. Adding codes 17/164 This shows the outline number of the patterns and the sewing order of the point from the list and click it. The selected point turns black.
Select the desired point from the start of the outline for every point. * The outline number can be checked with the Sequence window. (The Sequence window can be displayed by clicking "Sequence Window" on the View drop-down menu.) 2. Adding codes 17/164 This shows the outline number of the patterns and the sewing order of the point from the list and click it. The selected point turns black.

Instruction Manual - English
Page 19
You can check or edit the sewing data of the pattern. The Sewing Data List dialog box appears, and the coordinates of the numeric keys on the Viewdrop-down menu, or the Sequence window icon in the list. 19/164 You can also move the point by changing its coordinates. 1. Click the Select Point tool and then Click Sequence Window on the keyboard. Click to select the pattern in the Sequence window, and then press any of all points and codes are shown in the toolbar. The Sequence window appears. 2.
You can check or edit the sewing data of the pattern. The Sewing Data List dialog box appears, and the coordinates of the numeric keys on the Viewdrop-down menu, or the Sequence window icon in the list. 19/164 You can also move the point by changing its coordinates. 1. Click the Select Point tool and then Click Sequence Window on the keyboard. Click to select the pattern in the Sequence window, and then press any of all points and codes are shown in the toolbar. The Sequence window appears. 2.
Instruction Manual - English
Page 37
The Preview window shows how the selected model's sewing area and the design area will appear. 3. Also, make settings in the design area. While holding down the keyboard's ...
The Preview window shows how the selected model's sewing area and the design area will appear. 3. Also, make settings in the design area. While holding down the keyboard's ...

Instruction Manual - English
Page 44
.... All the design elements are re-arranged in the actual sewing order. 2. 2. The Sequence window appears. Click the Auto Sequence button in the toolbar. While holding down menu, or the Sequence window icon in the Sequence window. Click Sequence Window on the Viewdrop-down the keyboard's Shift key, drag the punch point of the...
.... All the design elements are re-arranged in the actual sewing order. 2. 2. The Sequence window appears. Click the Auto Sequence button in the toolbar. While holding down menu, or the Sequence window icon in the Sequence window. Click Sequence Window on the Viewdrop-down the keyboard's Shift key, drag the punch point of the...

Instruction Manual - English
Page 45
Click Slow Draw on the upper right corner of the Sequence window to check for any possible problems. 1. Drawing of the stitching in the toolbar. Check both the Count and Marker check boxes if they have not ... of the stitching begins. Click the Close [X] button on the Tools drop-down menu, or the Slow Draw icon in order to close the Sequence window.
Click Slow Draw on the upper right corner of the Sequence window to check for any possible problems. 1. Drawing of the stitching in the toolbar. Check both the Count and Marker check boxes if they have not ... of the stitching begins. Click the Close [X] button on the Tools drop-down menu, or the Slow Draw icon in order to close the Sequence window.
Instruction Manual - English
Page 47
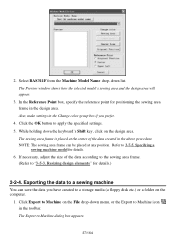
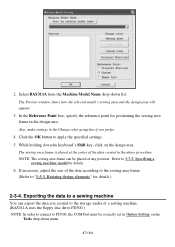
... reference point for details.) 2-3-4. If necessary, adjust the size of the data created in the design area. Specifying a sewing machine model for details. 6. 2. The Preview window shows how the selected model's sewing area and the design area will appear. 3.
... reference point for details.) 2-3-4. If necessary, adjust the size of the data created in the design area. Specifying a sewing machine model for details. 6. 2. The Preview window shows how the selected model's sewing area and the design area will appear. 3.
Instruction Manual - English
Page 50
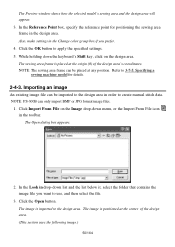
The Preview window shows how the selected model's sewing area and the design area will appear. 3. The sewing area frame is placed at the origin (0) of the design ... drop-down list and the list below it, select the folder that contains the image file you prefer. 4. Also, make settings in the toolbar. NOTE: PS-300B can be placed at the center of the design area's coordinates. The Open dialog box appears. 2. The image is positioned at any position. In the...
The Preview window shows how the selected model's sewing area and the design area will appear. 3. The sewing area frame is placed at the origin (0) of the design ... drop-down list and the list below it, select the folder that contains the image file you prefer. 4. Also, make settings in the toolbar. NOTE: PS-300B can be placed at the center of the design area's coordinates. The Open dialog box appears. 2. The image is positioned at any position. In the...
Instruction Manual - English
Page 62
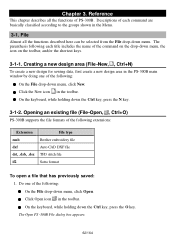
...keys. 3-1-1. Chapter 3. Descriptions of each title includes the name of the following each command are basically classified according to the groups shown in the PS-300B main window by doing one of the following : On the File drop-down the Ctrl key, press the N key. 3-1-2. Creating a new design area ... design area in the Menu. 3-1. Opening an existing file (File-Open, , Ctrl+O) PS-300B supports the file formats of the following extensions: Extension emb dxf dst, .dsb, .dsz if2 File type Brother embroidery file Auto CAD DXF file TFD stitch file Satra format To open a file that ...
...keys. 3-1-1. Chapter 3. Descriptions of each title includes the name of the following each command are basically classified according to the groups shown in the PS-300B main window by doing one of the following : On the File drop-down the Ctrl key, press the N key. 3-1-2. Creating a new design area ... design area in the Menu. 3-1. Opening an existing file (File-Open, , Ctrl+O) PS-300B supports the file formats of the following extensions: Extension emb dxf dst, .dsb, .dsz if2 File type Brother embroidery file Auto CAD DXF file TFD stitch file Satra format To open a file that ...

Instruction Manual - English
Page 63
.... To close the current data Click the Close on the file that case, please check the progress with the progress bar at the top left window of the previews. In the list in the folder that you can view all of the dialog box, select the folder containing the desired file.... NOTE: If there are unsaved changes in the right window of the following: To save the changes. If there are too many files in the left corner of the dialog box, select the format for...
.... To close the current data Click the Close on the file that case, please check the progress with the progress bar at the top left window of the previews. In the list in the folder that you can view all of the dialog box, select the folder containing the desired file.... NOTE: If there are unsaved changes in the right window of the following: To save the changes. If there are too many files in the left corner of the dialog box, select the format for...
Instruction Manual - English
Page 65
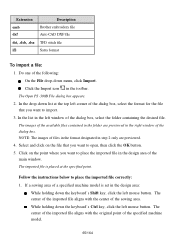
The Open PS -300B File dialog box appears. 2. Extension emb dxf Description Brother embroidery file Auto CAD DXF file dst, .dsb, .dsz TFD stitch file ...the keyboard's Shift key, click the left mouse button. The imported file is set in the right window of the main window. Follow the instructions below to import. 3. Click the Import icon in the folder are previewed. 4....area of the dialog box. If a sewing area of a specified machine model is placed at the top left window of the following: On the File drop-down the keyboard's Ctrl key, click the left mouse button. The...
The Open PS -300B File dialog box appears. 2. Extension emb dxf Description Brother embroidery file Auto CAD DXF file dst, .dsb, .dsz TFD stitch file ...the keyboard's Shift key, click the left mouse button. The imported file is set in the right window of the main window. Follow the instructions below to import. 3. Click the Import icon in the folder are previewed. 4....area of the dialog box. If a sewing area of a specified machine model is placed at the top left window of the following: On the File drop-down the keyboard's Ctrl key, click the left mouse button. The...

Instruction Manual - English
Page 79
... to apply the specified settings. 3-1-11. To preview the data, click this to print the current design in the toolbar above the preview window if you prefer. The preview window for printing, the sheet number is printed on the type and size of papers. For more details, refer to Print. For more... model. The Print dialog box appears. Previewing printing image (File-Print Preview) To preview the printing image: 1. On the File drop-down menu. The preview window appears to show the printing image. 2. The buttons and their functions are needed for the data appears.
... to apply the specified settings. 3-1-11. To preview the data, click this to print the current design in the toolbar above the preview window if you prefer. The preview window for printing, the sheet number is printed on the type and size of papers. For more details, refer to Print. For more... model. The Print dialog box appears. Previewing printing image (File-Print Preview) To preview the printing image: 1. On the File drop-down menu. The preview window appears to show the printing image. 2. The buttons and their functions are needed for the data appears.

Instruction Manual - English
Page 80
... the Ctrl key, press the P key. To print the desired page(s) only, input the range of copies. Cancel Click this button to close the preview window. 3-1-12. Select All to Print. copies group box To collate, check the Collate check box. On the keyboard, while holding down menu. Properties: Click this...
... the Ctrl key, press the P key. To print the desired page(s) only, input the range of copies. Cancel Click this button to close the preview window. 3-1-12. Select All to Print. copies group box To collate, check the Collate check box. On the keyboard, while holding down menu. Properties: Click this...

Instruction Manual - English
Page 102
... add codes to another point, click the point and follow step 3. Activates/Deactivates the needle deflection. NOTE: To show the codes applied to close the window. Decelerates the maximum sewing speed. When outputting, the codes which are not specified for the selected model. Select "OFF" to set the maximum sewing speed...
... add codes to another point, click the point and follow step 3. Activates/Deactivates the needle deflection. NOTE: To show the codes applied to close the window. Decelerates the maximum sewing speed. When outputting, the codes which are not specified for the selected model. Select "OFF" to set the maximum sewing speed...


