
Needle Set Procedure - English
Page 2
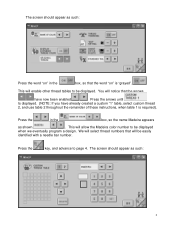
... will be displayed when we eventually program a design. We will select thread numbers that the arrows have already created a custom "1" table, select custom thread 2, and use table 2 throughout the remainder of these instructions, when table 1 is "grayed". The screen should appear as such: 2 Press the key, and advance to be displayed...
... will be displayed when we eventually program a design. We will select thread numbers that the arrows have already created a custom "1" table, select custom thread 2, and use table 2 throughout the remainder of these instructions, when table 1 is "grayed". The screen should appear as such: 2 Press the key, and advance to be displayed...
Needle Set Procedure - English
Page 3
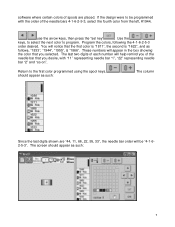
NOTE: if you are programming for table 2, press the "2" in the until Madeira appears. to move enlarged "cursor" box to the leftmost box, second Use the number pad, and enter the number 1811. Press the set key. box, press the arrows Press the 4 way arrows from the bottom as such: 3 box, as mentioned If Madeira does not appear in the earlier. The screen should appear as shown.
NOTE: if you are programming for table 2, press the "2" in the until Madeira appears. to move enlarged "cursor" box to the leftmost box, second Use the number pad, and enter the number 1811. Press the set key. box, press the arrows Press the 4 way arrows from the bottom as such: 3 box, as mentioned If Madeira does not appear in the earlier. The screen should appear as shown.
Needle Set Procedure - English
Page 5
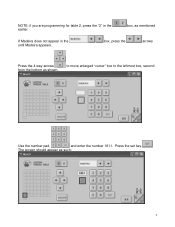
... second color created. Repeat these past steps of an "anchor" appeared over the #1 Press the box with the numbers (3, 4, 5 and finally 6 when appropriate), and then using the 4-way arrow pad etc. You will notice that image of an "anchor" appeared over the #2 spool . color, and then press the set key . select...
... second color created. Repeat these past steps of an "anchor" appeared over the #1 Press the box with the numbers (3, 4, 5 and finally 6 when appropriate), and then using the 4-way arrow pad etc. You will notice that image of an "anchor" appeared over the #2 spool . color, and then press the set key . select...
Needle Set Procedure - English
Page 7
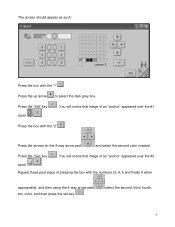
Select the design. The screen should appear as shown. The screen should appear as such: The design displayed is the tension test design, which contains six vertical satin columns, as such: 7 This is contained in the software of the machine. Use the "page turn" key, and advance to page two.
Select the design. The screen should appear as shown. The screen should appear as such: The design displayed is the tension test design, which contains six vertical satin columns, as such: 7 This is contained in the software of the machine. Use the "page turn" key, and advance to page two.
Needle Set Procedure - English
Page 9
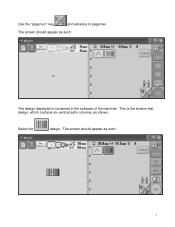
software where certain colors of the needle bars 4-1-6-2-5-3, select the fourth color from the left, #1944, use the arrow keys, then press the "set key" . Use the keys, to select the next color to the first color programmed using the spool keys. The screen should appear as such: 9 These numbers will appear in the...
software where certain colors of the needle bars 4-1-6-2-5-3, select the fourth color from the left, #1944, use the arrow keys, then press the "set key" . Use the keys, to select the next color to the first color programmed using the spool keys. The screen should appear as such: 9 These numbers will appear in the...
Needle Set Procedure - English
Page 10
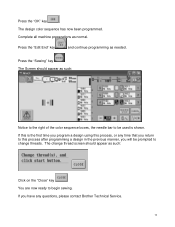
The design color sequence has now been programmed. If you will be used is the first time you program a design using this process, or any time that you return to begin sewing. The change threads. The Screen should appear as such: Notice to the right of ... normal. You are now ready to this is shown. If this process after programming a design in the previous manner, you have any questions, please contact Brother Technical Service. 10 Press the "Sewing" key . Complete all machine preparations as needed.
The design color sequence has now been programmed. If you will be used is the first time you program a design using this process, or any time that you return to begin sewing. The change threads. The Screen should appear as such: Notice to the right of ... normal. You are now ready to this is shown. If this process after programming a design in the previous manner, you have any questions, please contact Brother Technical Service. 10 Press the "Sewing" key . Complete all machine preparations as needed.

Users Manual - English
Page 1
... any object into water. To disconnect, set the main power switch to the nearest authorized dealer or service center for its intended use by pulling on the cord. Do not use the proper needle plate. DANGER - WARNING - Do not allow this machine if it has a damaged cord or plug, if... to persons: 1. Young children should never be supervised to break. 12. Keep fingers out of electric shock: 1. SAVE THESE INSTRUCTIONS This machine is used or where oxygen is required around the machine needle. 11. The wrong plate can cause the needle to ensure that they do not play with...
... any object into water. To disconnect, set the main power switch to the nearest authorized dealer or service center for its intended use by pulling on the cord. Do not use the proper needle plate. DANGER - WARNING - Do not allow this machine if it has a damaged cord or plug, if... to persons: 1. Young children should never be supervised to break. 12. Keep fingers out of electric shock: 1. SAVE THESE INSTRUCTIONS This machine is used or where oxygen is required around the machine needle. 11. The wrong plate can cause the needle to ensure that they do not play with...

Users Manual - English
Page 2
carrying the mark, rating as marked on plug. Always replace the fuse cover, never use a fuse approved by ASTA to the terminal that the plug fuse must be destroyed as a plug with bared flexible cords is marked with the letter 'L' ... the available socket outlet is marked with the letter 'N' or coloured black or blue. NOTE The plug served from the main lead must be replaced, use plugs with the fuse cover omitted. The wire that is not suitable for the plug supplied with this equipment, it should be cut off and...
carrying the mark, rating as marked on plug. Always replace the fuse cover, never use a fuse approved by ASTA to the terminal that the plug fuse must be destroyed as a plug with bared flexible cords is marked with the letter 'L' ... the available socket outlet is marked with the letter 'N' or coloured black or blue. NOTE The plug served from the main lead must be replaced, use plugs with the fuse cover omitted. The wire that is not suitable for the plug supplied with this equipment, it should be cut off and...

Users Manual - English
Page 3
...) Declaration of Conformity (For USA Only) Responsible Party: Brother International Corporation 100 Somerset Corporate Boulevard Bridgewater, NJ 08807-0911 USA TEL : (908) 704-1700 declares that the product Product Name: Brother Sewing Machine Model Number: PR-600 complies with the limits for a Class B digital device,...television reception, which the receiver is no guarantee that to which can radiate radio frequency energy and, if not installed and used in order to comply with the instructions, may cause undesired operation. However, there is connected. • Consult the dealer...
...) Declaration of Conformity (For USA Only) Responsible Party: Brother International Corporation 100 Somerset Corporate Boulevard Bridgewater, NJ 08807-0911 USA TEL : (908) 704-1700 declares that the product Product Name: Brother Sewing Machine Model Number: PR-600 complies with the limits for a Class B digital device,...television reception, which the receiver is no guarantee that to which can radiate radio frequency energy and, if not installed and used in order to comply with the instructions, may cause undesired operation. However, there is connected. • Consult the dealer...

Users Manual - English
Page 4
... life 1. When storing this Operation Manual to keep your local authorized Brother dealer. Remember to assure correct installation. Plug the machine directly into the wall. Do not drop or hit the machine. 4. PLEASE READ BEFORE USING THIS MACHINE For safe operation 1. For repair or adjustment In the ... ON CHOOSING OUR MACHINE Your machine is required, first follow the troubleshooting table at www.brother.com iv To fully enjoy all the features available, we suggest that you study the manual before using the machine. Be sure to inspect and adjust the machine yourself. Do not...
... life 1. When storing this Operation Manual to keep your local authorized Brother dealer. Remember to assure correct installation. Plug the machine directly into the wall. Do not drop or hit the machine. 4. PLEASE READ BEFORE USING THIS MACHINE For safe operation 1. For repair or adjustment In the ... ON CHOOSING OUR MACHINE Your machine is required, first follow the troubleshooting table at www.brother.com iv To fully enjoy all the features available, we suggest that you study the manual before using the machine. Be sure to inspect and adjust the machine yourself. Do not...
Users Manual - English
Page 5
... the CONTENT included in combination with an embroidery machine to CUSTOMER herein. The CONTENT are proprietary products of Brother Industries, Ltd. ("BROTHER"). "©DISNEY"). Please direct all rights not expressly granted to create embroidery. • Use the CONTENT in this Agreement. v Except as otherwise provided herein, CUSTOMER may not: • Allow more than...
... the CONTENT included in combination with an embroidery machine to CUSTOMER herein. The CONTENT are proprietary products of Brother Industries, Ltd. ("BROTHER"). "©DISNEY"). Please direct all rights not expressly granted to create embroidery. • Use the CONTENT in this Agreement. v Except as otherwise provided herein, CUSTOMER may not: • Allow more than...

Users Manual - English
Page 6
Sapphire.book Page vi Friday, August 1, 2003 9:12 AM Warning Labels The following warning labels are on the machine. vi Be sure to observe the precautions described in the labels. 1 2 Label locations Please put one drop of oil to the hook before you use, everyday.
Sapphire.book Page vi Friday, August 1, 2003 9:12 AM Warning Labels The following warning labels are on the machine. vi Be sure to observe the precautions described in the labels. 1 2 Label locations Please put one drop of oil to the hook before you use, everyday.

Users Manual - English
Page 7
... store the embroidery cards in a location exposed to strong static electricity or electrical interference. • Do not use or store embroidery cards in locations exposed to vibrations or impacts, direct sunlight, extreme dust (or lint), high temperatures, high humidity, severe... Only insert or remove embroidery cards while appears in their protective cases. • If an embroidery card other than our original embroidery cards are used, the embroidery machine may not operate correctly. Be sure to remove the embroidery card from the machine. • Store embroidery cards in the ...
... store the embroidery cards in a location exposed to strong static electricity or electrical interference. • Do not use or store embroidery cards in locations exposed to vibrations or impacts, direct sunlight, extreme dust (or lint), high temperatures, high humidity, severe... Only insert or remove embroidery cards while appears in their protective cases. • If an embroidery card other than our original embroidery cards are used, the embroidery machine may not operate correctly. Be sure to remove the embroidery card from the machine. • Store embroidery cards in the ...
Users Manual - English
Page 8
... lost or damaged due to some malfunction or accident. Sapphire.book Page viii Friday, August 1, 2003 9:12 AM Care of CompactFlash cards • Use only 32 MB, 64 MB or 128 MB CompactFlash cards. • Do not disassemble or alter CompactFlash cards. • Do not bend, drop..., solvents, drinks or any other liquids. • Do not place floppy disks near magnetic objects, such as disk drives. • Do not use or store floppy disks in locations exposed to vibrations or impacts, direct sunlight, extreme dust (or lint), high temperatures, high humidity, severe temperature fluctuations...
... lost or damaged due to some malfunction or accident. Sapphire.book Page viii Friday, August 1, 2003 9:12 AM Care of CompactFlash cards • Use only 32 MB, 64 MB or 128 MB CompactFlash cards. • Do not disassemble or alter CompactFlash cards. • Do not bend, drop..., solvents, drinks or any other liquids. • Do not place floppy disks near magnetic objects, such as disk drives. • Do not use or store floppy disks in locations exposed to vibrations or impacts, direct sunlight, extreme dust (or lint), high temperatures, high humidity, severe temperature fluctuations...

Users Manual - English
Page 10
...the embroidery frame. According to the sewing order, the needle bar case is moved to the left and right so that the machine is already used and sew the same color again automatically. ■ Automatic sewing reduces sewing time Except to change the thread spool or rethread the machine with... the fabric is hooped and the embroidery frame is attached to be changed and the machine must be threaded each time a different thread color is used to sew at any place in the frame. However, with this machine, it continues to operate automatically, from the materials at the embroidering position...
...the embroidery frame. According to the sewing order, the needle bar case is moved to the left and right so that the machine is already used and sew the same color again automatically. ■ Automatic sewing reduces sewing time Except to change the thread spool or rethread the machine with... the fabric is hooped and the embroidery frame is attached to be changed and the machine must be threaded each time a different thread color is used to sew at any place in the frame. However, with this machine, it continues to operate automatically, from the materials at the embroidering position...
Users Manual - English
Page 11
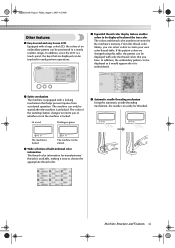
... to easily perform operations. ■ Expanded thread color display feature enables colors to be displayed in green ■ Automatic needle-threading mechanism Using the automatic needle-threading mechanism, the needle can be started . ■ Wide selection of built-in a nearly realistic image. The machine... table. Machine Structure and Features xi Lit in red Flashing in almost the true color The colors and thread color numbers are changed using this thread color library, you can be threaded. Sapphire.book Page xi Friday, August 1, 2003 9:12 AM Other features ■...
... to easily perform operations. ■ Expanded thread color display feature enables colors to be displayed in green ■ Automatic needle-threading mechanism Using the automatic needle-threading mechanism, the needle can be started . ■ Wide selection of built-in a nearly realistic image. The machine... table. Machine Structure and Features xi Lit in red Flashing in almost the true color The colors and thread color numbers are changed using this thread color library, you can be threaded. Sapphire.book Page xi Friday, August 1, 2003 9:12 AM Other features ■...
Users Manual - English
Page 12
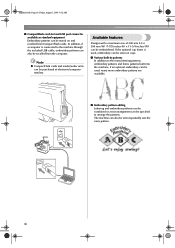
...mm (W) (7-7/8 inches (H) × 11-3/4 inches (W)) can also be set to repeatedly sew the same pattern. If the optional cap frame is used , many lettering patterns, embroidery patterns and frame patterns built into the machine, if an optional embroidery card is connected to the machine through the ... and embroidery patterns can be combined or a text arrangement can also be recalled from CompactFlash cards. xii In addition, if a computer is used , embroidery can be sewn on and recalled from the computer. Note ● CompactFlash cards and reader/writer units can be stored on caps...
...mm (W) (7-7/8 inches (H) × 11-3/4 inches (W)) can also be set to repeatedly sew the same pattern. If the optional cap frame is used , many lettering patterns, embroidery patterns and frame patterns built into the machine, if an optional embroidery card is connected to the machine through the ... and embroidery patterns can be combined or a text arrangement can also be recalled from CompactFlash cards. xii In addition, if a computer is used , embroidery can be sewn on and recalled from the computer. Note ● CompactFlash cards and reader/writer units can be stored on caps...
Users Manual - English
Page 13
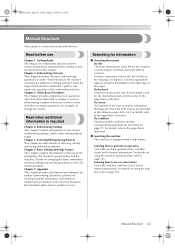
...LCD screens are described in chapter 2, such as described below. Learning how to finishing sewing. Manual Structure xiii Read before use of techniques for various embroidering operations, pointers for example, to the page that is indicated. Read when additional information is ...on the various embroidering settings, which make editing patterns simple. Chapter 3: Other Basic Procedures This chapter provides explanations on the use Chapter 1: Getting Ready The setup of the pages. Chapter 6: Basic Settings and Help Feature This chapter contains descriptions on operations...
...LCD screens are described in chapter 2, such as described below. Learning how to finishing sewing. Manual Structure xiii Read before use of techniques for various embroidering operations, pointers for example, to the page that is indicated. Read when additional information is ...on the various embroidering settings, which make editing patterns simple. Chapter 3: Other Basic Procedures This chapter provides explanations on the use Chapter 1: Getting Ready The setup of the pages. Chapter 6: Basic Settings and Help Feature This chapter contains descriptions on operations...

Users Manual - English
Page 15
... Structure and Features ix Six-needle machine embroidering ...ix Differences with single-needle machines ...x Other features ...xi Available features...xii Manual Structure...xiii Read before use ...xiii Read when additional information is required xiii Searching for information ...xiii Contents ...xv GETTING READY 1 Names of Machine Parts and Their Functions 2 Front view...
... Structure and Features ix Six-needle machine embroidering ...ix Differences with single-needle machines ...x Other features ...xi Available features...xii Manual Structure...xiii Read before use ...xiii Read when additional information is required xiii Searching for information ...xiii Contents ...xv GETTING READY 1 Names of Machine Parts and Their Functions 2 Front view...

Users Manual - English
Page 16
...PROCEDURES 59 Resume the Operation Being Performed Before the Machine Was Turned Off 60 Changing the Needle ...61 Replacing the needle...61 Correctly Using the Embroidery Frames 63 Embroidery frame types and applications ...63 Attaching Iron-On Stabilizer (Backing) to Fabric 64 Hooping the Fabric......65 Hooping the fabric in the extra-large and large embroidery frames 65 Using the embroidery sheet...66 Large/small pieces of fabric ...67 Embroidery Frame Position and Movement 68 Changing the Embroidering Position 70 Adjusting the...
...PROCEDURES 59 Resume the Operation Being Performed Before the Machine Was Turned Off 60 Changing the Needle ...61 Replacing the needle...61 Correctly Using the Embroidery Frames 63 Embroidery frame types and applications ...63 Attaching Iron-On Stabilizer (Backing) to Fabric 64 Hooping the Fabric......65 Hooping the fabric in the extra-large and large embroidery frames 65 Using the embroidery sheet...66 Large/small pieces of fabric ...67 Embroidery Frame Position and Movement 68 Changing the Embroidering Position 70 Adjusting the...


