
Users Manual - English
Page 15
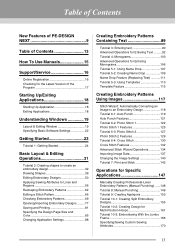
Table of Contents New Features of PE-DESIGN NEXT 9 Table of Contents 13 How To Use Manuals 15 Support/Service 16 Online Registration 16 Checking for the Latest Version of ... Operations for Specific Applications 147 Manually Creating Professional-Level Embroidery Patterns (Manual Punching).......148 Tutorial 8: Manual Punching 149 Tutorial 9: Creating Appliqués 153 Tutorial 10-1: Creating Split Embroidery Designs 155 Tutorial 10-2: Creating Design for Multi-Position Hoops 161 Tutorial 10-3: Embroidering With the Jumbo Frame 166 Specifying/Saving Custom Sewing Attributes 170 13
Table of Contents New Features of PE-DESIGN NEXT 9 Table of Contents 13 How To Use Manuals 15 Support/Service 16 Online Registration 16 Checking for the Latest Version of ... Operations for Specific Applications 147 Manually Creating Professional-Level Embroidery Patterns (Manual Punching).......148 Tutorial 8: Manual Punching 149 Tutorial 9: Creating Appliqués 153 Tutorial 10-1: Creating Split Embroidery Designs 155 Tutorial 10-2: Creating Design for Multi-Position Hoops 161 Tutorial 10-3: Embroidering With the Jumbo Frame 166 Specifying/Saving Custom Sewing Attributes 170 13
Users Manual - English
Page 17
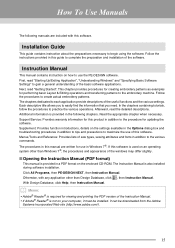
...Up/Exiting Application", "Understanding Windows" and "Specifying Basic Software Settings" to practice the various operations. In the chapters containing tutorials, follow the procedures to gain a general understanding of the useful functions and the various settings. Support/Service: Provides warranty ...attributes and fonts in addition to the various commands. Each descriptive title allows you need. Click All Programs, then PE-DESIGN NEXT, then Instruction Manual. Additional information is also installed during software installation. Follow the instructions provided in a PDF ...
...Up/Exiting Application", "Understanding Windows" and "Specifying Basic Software Settings" to practice the various operations. In the chapters containing tutorials, follow the procedures to gain a general understanding of the useful functions and the various settings. Support/Service: Provides warranty ...attributes and fonts in addition to the various commands. Each descriptive title allows you need. Click All Programs, then PE-DESIGN NEXT, then Instruction Manual. Additional information is also installed during software installation. Follow the instructions provided in a PDF ...
Users Manual - English
Page 20
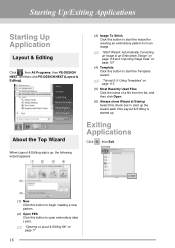
About the Top Wizard Exiting Applications Click , then Exit. When Layout & Editing starts up . c "Tutorial 5-3: Using Templates" on page 113 (5) Most Recently Used Files Click the name of a file from the list, and then click Open. (6) Always show ... wizard for creating an embroidery pattern from an image. Starting Up/Exiting Applications Starting Up Application Layout & Editing Click , then All Programs, then PE-DESIGN NEXT, and then click PE-DESIGN NEXT (Layout & Editing). (3) Image To Stitch Click this button to start up the wizard each time Layout & Editing is started up , ...
About the Top Wizard Exiting Applications Click , then Exit. When Layout & Editing starts up . c "Tutorial 5-3: Using Templates" on page 113 (5) Most Recently Used Files Click the name of a file from the list, and then click Open. (6) Always show ... wizard for creating an embroidery pattern from an image. Starting Up/Exiting Applications Starting Up Application Layout & Editing Click , then All Programs, then PE-DESIGN NEXT, and then click PE-DESIGN NEXT (Layout & Editing). (3) Image To Stitch Click this button to start up the wizard each time Layout & Editing is started up , ...
Users Manual - English
Page 26
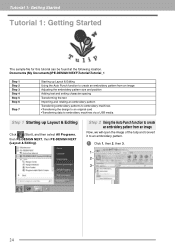
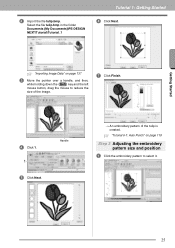
... an original card •Transferring data to an embroidery pattern. 1 Click 1, then 2, then 3. 1 2 3 24 Documents (My Documents)\PE-DESIGN NEXT\Tutorial\Tutorial_1 Step 1 Step 2 Step 3 Step 4 Step 5 Step 6 Step 7 Starting up Layout & Editing Using the Auto Punch function to ... embroidery machines via a USB media Step 1 Starting up Layout & Editing Click (Start), and then select All Programs, then PE-DESIGN NEXT, then PE-DESIGN NEXT (Layout & Editing). Tutorial 1: Getting Started Tutorial 1: Getting Started The sample file for this tutorial can be found at the following location.
... an original card •Transferring data to an embroidery pattern. 1 Click 1, then 2, then 3. 1 2 3 24 Documents (My Documents)\PE-DESIGN NEXT\Tutorial\Tutorial_1 Step 1 Step 2 Step 3 Step 4 Step 5 Step 6 Step 7 Starting up Layout & Editing Using the Auto Punch function to ... embroidery machines via a USB media Step 1 Starting up Layout & Editing Click (Start), and then select All Programs, then PE-DESIGN NEXT, then PE-DESIGN NEXT (Layout & Editing). Tutorial 1: Getting Started Tutorial 1: Getting Started The sample file for this tutorial can be found at the following location.
Users Manual - English
Page 27
Getting Started 2 Import the file tulip.bmp. c "Tutorial 6-1: Auto Punch" on page 137 3 Move the pointer over a handle, and then, while holding down the Shift key and the left mouse button, drag the ... position 1 Click the embroidery pattern to reduce the size of the tulip is created. Select the file tulip.bmp in the folder Documents (My Documents)\PE-DESIGN NEXT\Tutorial\Tutorial_1 Tutorial 1: Getting Started 6 Click Next. Handle An embroidery pattern of the image. 7 Click Finish. 4 Click 1. 1 5 Click Next.
Getting Started 2 Import the file tulip.bmp. c "Tutorial 6-1: Auto Punch" on page 137 3 Move the pointer over a handle, and then, while holding down the Shift key and the left mouse button, drag the ... position 1 Click the embroidery pattern to reduce the size of the tulip is created. Select the file tulip.bmp in the folder Documents (My Documents)\PE-DESIGN NEXT\Tutorial\Tutorial_1 Tutorial 1: Getting Started 6 Click Next. Handle An embroidery pattern of the image. 7 Click Finish. 4 Click 1. 1 5 Click Next.

Users Manual - English
Page 34
... and flower pot. Using these tools, we will describe how to draw various shapes and combine them to draw various shapes. Documents (My Documents)\PE-DESIGN NEXT\Tutorial\Tutorial_2 Step 1 Step 2 Step 3 Step 4 Step 5 Drawing and moving shapes Duplicating, flipping and moving shapes Specifying hole sewing Applying a pattern... button Shape tools 2 Specify the thread color and sew type for the lines. 3 Specify the thread color and sew type for this tutorial can be found at the following location. The sample file for the regions. 4 Drag the pointer in Layout & Editing allow you to...
... and flower pot. Using these tools, we will describe how to draw various shapes and combine them to draw various shapes. Documents (My Documents)\PE-DESIGN NEXT\Tutorial\Tutorial_2 Step 1 Step 2 Step 3 Step 4 Step 5 Drawing and moving shapes Duplicating, flipping and moving shapes Specifying hole sewing Applying a pattern... button Shape tools 2 Specify the thread color and sew type for the lines. 3 Specify the thread color and sew type for this tutorial can be found at the following location. The sample file for the regions. 4 Drag the pointer in Layout & Editing allow you to...

Users Manual - English
Page 92
... sample file for typing directly on the Design Page for this tutorial can also be found at the following location. Tutorial 3: Entering text Tutorial 3: Entering text This section describes the procedures for entering text and arranging it in the Design page. (1) A vertical dashed...characters in the character table (1) in the Text Attributes tab. 12 Click in the Transform style with a fan shape. Documents (My Documents)\PE-DESIGN NEXT\Tutorial\Tutorial_3 Step 1 Step 2 Entering Text Transforming text Step 1 Entering Text 123 From the keyboard, type in "ABCD". 1 Click 1, then...
... sample file for typing directly on the Design Page for this tutorial can also be found at the following location. Tutorial 3: Entering text Tutorial 3: Entering text This section describes the procedures for entering text and arranging it in the Design page. (1) A vertical dashed...characters in the character table (1) in the Text Attributes tab. 12 Click in the Transform style with a fan shape. Documents (My Documents)\PE-DESIGN NEXT\Tutorial\Tutorial_3 Step 1 Step 2 Entering Text Transforming text Step 1 Entering Text 123 From the keyboard, type in "ABCD". 1 Click 1, then...
Users Manual - English
Page 105
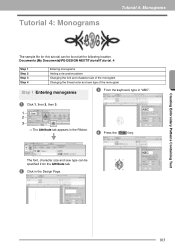
... size and sew type can be specified from the Attribute tab. 2 Click in the Ribbon. 4 Press the Enter key. Documents (My Documents)\PE-DESIGN NEXT\Tutorial\Tutorial_4 Step 1 Step 2 Step 3 Step 4 Entering monograms Adding a decorative pattern Changing the font and character size of the monogram Changing the thread... Step 1 Entering monograms 3 From the keyboard, type in "ABC". 1 Click 1, then 2, then 3. 1 2 3 The Attribute tab appears in the Design Page. Tutorial 4: Monograms Tutorial 4: Monograms The sample file for this tutorial can be found at the following location.
... size and sew type can be specified from the Attribute tab. 2 Click in the Ribbon. 4 Press the Enter key. Documents (My Documents)\PE-DESIGN NEXT\Tutorial\Tutorial_4 Step 1 Step 2 Step 3 Step 4 Entering monograms Adding a decorative pattern Changing the font and character size of the monogram Changing the thread... Step 1 Entering monograms 3 From the keyboard, type in "ABC". 1 Click 1, then 2, then 3. 1 2 3 The Attribute tab appears in the Design Page. Tutorial 4: Monograms Tutorial 4: Monograms The sample file for this tutorial can be found at the following location.
Users Manual - English
Page 109
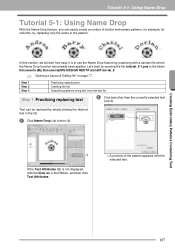
... Name Drop Tutorial 5-1: Using Name Drop With the Name Drop feature, you can be replaced by replacing only the name in the pattern. Let's start by opening the file tutorial_5-1.pes in the list. 1 Click Name Drop List button (1). 1 If the Text Attributes tab is to ...; A preview of similar embroidery patterns, for example, for uniforms, by simply clicking the desired text in the folder Documents (My Documents)\PE-DESIGN NEXT\Tutorial\Tutorial_5. Text can easily create a number of the pattern appears with a sample file where the Name Drop function has already been applied.
... Name Drop Tutorial 5-1: Using Name Drop With the Name Drop feature, you can be replaced by replacing only the name in the pattern. Let's start by opening the file tutorial_5-1.pes in the list. 1 Click Name Drop List button (1). 1 If the Text Attributes tab is to ...; A preview of similar embroidery patterns, for example, for uniforms, by simply clicking the desired text in the folder Documents (My Documents)\PE-DESIGN NEXT\Tutorial\Tutorial_5. Text can easily create a number of the pattern appears with a sample file where the Name Drop function has already been applied.
Users Manual - English
Page 111
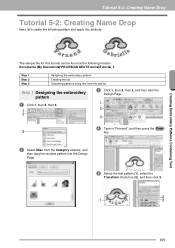
.... The sample file for this attribute. Documents (My Documents)\PE-DESIGN NEXT\Tutorial\Tutorial_5 Step 1 Step 2 Step 3 Designing the embroidery pattern Creating the list Outputting patterns using text from the text list Step 1 Designing the embroidery pattern 1 Click 1, then 2, then 3. 1 2 3 Click 1, then 2, then 3, and then click the Design Page. 1 2 3 4 Type in "Fernand", and then press the...
.... The sample file for this attribute. Documents (My Documents)\PE-DESIGN NEXT\Tutorial\Tutorial_5 Step 1 Step 2 Step 3 Designing the embroidery pattern Creating the list Outputting patterns using text from the text list Step 1 Designing the embroidery pattern 1 Click 1, then 2, then 3. 1 2 3 Click 1, then 2, then 3, and then click the Design Page. 1 2 3 4 Type in "Fernand", and then press the...
Users Manual - English
Page 121
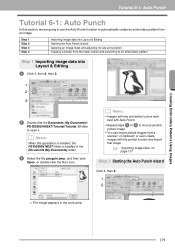
... this section, we are going to use the Auto Punch function to open it. Creating Embroidery Patterns Using Images Tutorial 6-1: Auto Punch Tutorial 6-1: Auto Punch In this application is installed, the PE-DESIGN NEXT folder is installed in the work best with the portrait function and import that image. Step 1 Step 2...converting to an embroidery pattern Step 1 Importing image data into Layout & Editing 1 Click 1, then 2, then 3. 1 2 3 2 Double-click the Documents (My Documents)\ PE-DESIGN NEXT\Tutorial\Tutorial_6 folder to automatically create an embroidery pattern from an image.
... this section, we are going to use the Auto Punch function to open it. Creating Embroidery Patterns Using Images Tutorial 6-1: Auto Punch Tutorial 6-1: Auto Punch In this application is installed, the PE-DESIGN NEXT folder is installed in the work best with the portrait function and import that image. Step 1 Step 2...converting to an embroidery pattern Step 1 Importing image data into Layout & Editing 1 Click 1, then 2, then 3. 1 2 3 2 Double-click the Documents (My Documents)\ PE-DESIGN NEXT\Tutorial\Tutorial_6 folder to automatically create an embroidery pattern from an image.
Users Manual - English
Page 144
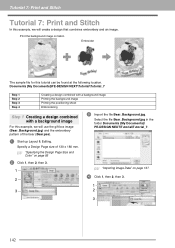
...at the following location. Documents (My Documents)\PE-DESIGN NEXT\Tutorial\Tutorial_7 Step 1 Step 2 Step 3 Step 4 Creating a design combined with a background image Printing the background image Printing the positioning sheet Embroidering Step 1 Creating a design combined with a background image For this example,...embroidery pattern of 130 x 180 mm. Select the file Bear_Background.jpg in the folder Documents (My Documents)\ PE-DESIGN NEXT\Tutorial\Tutorial_7. 1 Start up Layout & Editing. c "Specifying the Design Page Size and Color" on page 85 2 Click 1, then 2, then 3. 1 2 3 c "Importing ...
...at the following location. Documents (My Documents)\PE-DESIGN NEXT\Tutorial\Tutorial_7 Step 1 Step 2 Step 3 Step 4 Creating a design combined with a background image Printing the background image Printing the positioning sheet Embroidering Step 1 Creating a design combined with a background image For this example,...embroidery pattern of 130 x 180 mm. Select the file Bear_Background.jpg in the folder Documents (My Documents)\ PE-DESIGN NEXT\Tutorial\Tutorial_7. 1 Start up Layout & Editing. c "Specifying the Design Page Size and Color" on page 85 2 Click 1, then 2, then 3. 1 2 3 c "Importing ...
Users Manual - English
Page 145
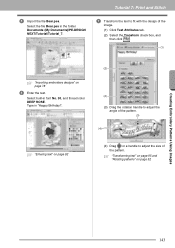
...!". (2) (2) (3) Drag the rotation handle to adjust the angle of the pattern. (3) (4) c "Entering text" on page 92 (4) Drag or a handle to fit with the design of the pattern. c "Transforming text" on page 95 and "Rotating patterns" on page 78 6 Enter the text. Select built-in the folder Documents (My Documents)\PE-DESIGN NEXT\Tutorial\Tutorial_7.
...!". (2) (2) (3) Drag the rotation handle to adjust the angle of the pattern. (3) (4) c "Entering text" on page 92 (4) Drag or a handle to fit with the design of the pattern. c "Transforming text" on page 95 and "Rotating patterns" on page 78 6 Enter the text. Select built-in the folder Documents (My Documents)\PE-DESIGN NEXT\Tutorial\Tutorial_7.
Users Manual - English
Page 148
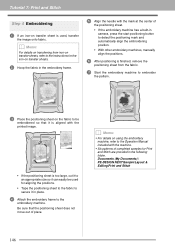
Be sure that it is aligned with the mark at the center of place. Documents (My Documents)\ PE-DESIGN NEXT\Sample\Layout & Editing\Print and Stitch 146 b Memo: • For details on using the embroidery machine, refer to the Operation Manual included with the ... sheet on transfer sheet is too large, cut it to an appropriate size so it in place. 4 Attach the embroidery frame to the embroidery machine. Tutorial 7: Print and Stitch Step 4 Embroidering 1 If an iron-on the fabric to be used , transfer the image onto fabric.
Be sure that it is aligned with the mark at the center of place. Documents (My Documents)\ PE-DESIGN NEXT\Sample\Layout & Editing\Print and Stitch 146 b Memo: • For details on using the embroidery machine, refer to the Operation Manual included with the ... sheet on transfer sheet is too large, cut it to an appropriate size so it in place. 4 Attach the embroidery frame to the embroidery machine. Tutorial 7: Print and Stitch Step 4 Embroidering 1 If an iron-on the fabric to be used , transfer the image onto fabric.
Users Manual - English
Page 151
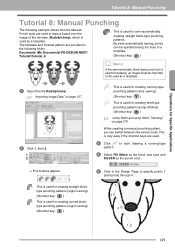
...must be imported to specify points 1 (start point) through 4. 4 3 2 1 149 Documents (My Documents)\PE-DESIGN NEXT\ Tutorial\Tutorial_8 : This is used as a template. By semi-automatically tracing, points can switch between the various tools. Operations for Specific Applications... Tutorial 8: Manual Punching Tutorial 8: Manual Punching The following example shows how the Manual Punch tools are used. 3 Click to start drawing a running -type...
...must be imported to specify points 1 (start point) through 4. 4 3 2 1 149 Documents (My Documents)\PE-DESIGN NEXT\ Tutorial\Tutorial_8 : This is used as a template. By semi-automatically tracing, points can switch between the various tools. Operations for Specific Applications... Tutorial 8: Manual Punching Tutorial 8: Manual Punching The following example shows how the Manual Punch tools are used. 3 Click to start drawing a running -type...
Users Manual - English
Page 155
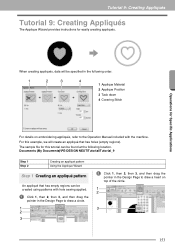
... found at the following order. 1 2 3 4 1 Applique Material 2 Applique Position 3 Tack down 4 Covering Stitch For details on top of the circle. 1 2 3 153 Documents (My Documents)\PE-DESIGN NEXT\Tutorial\Tutorial_9 Step 1 Step 2 Creating an appliqué pattern Using the Applique Wizard Step 1 Creating an appliqué pattern An appliqué that has holes (empty...
... found at the following order. 1 2 3 4 1 Applique Material 2 Applique Position 3 Tack down 4 Covering Stitch For details on top of the circle. 1 2 3 153 Documents (My Documents)\PE-DESIGN NEXT\Tutorial\Tutorial_9 Step 1 Step 2 Creating an appliqué pattern Using the Applique Wizard Step 1 Creating an appliqué pattern An appliqué that has holes (empty...
Users Manual - English
Page 157
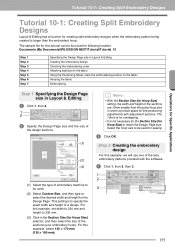
... sections. Select the hoop size to be used for sewing. 3 Click OK. Documents (My Documents)\PE-DESIGN NEXT\Tutorial\Tutorial_10 Step 1 Step 2 Step 3 Step 4 Step 5 Step 6 Step 7 Specifying the Design Page size in Layout & Editing Creating the embroidery design Checking the embroidering order Attaching stabilizer to the fabric Using the Positioning Sheet, mark the embroidering...
... sections. Select the hoop size to be used for sewing. 3 Click OK. Documents (My Documents)\PE-DESIGN NEXT\Tutorial\Tutorial_10 Step 1 Step 2 Step 3 Step 4 Step 5 Step 6 Step 7 Specifying the Design Page size in Layout & Editing Creating the embroidery design Checking the embroidering order Attaching stabilizer to the fabric Using the Positioning Sheet, mark the embroidering...
Users Manual - English
Page 158
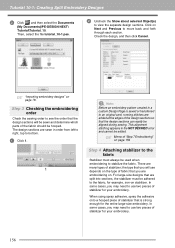
... that you may need to the fabric, for the entire large-size embroidery. Tutorial 10-1: Creating Split Embroidery Designs 2 Click , and then select the Documents (My Documents)\PE-DESIGN NEXT\ Tutorial\Tutorial_10. Check the design, and then click Cancel. Then, select the file tutorial_10-1.pes. 2 Uncheck the Show about selected Object(s) to move back and forth through...
... that you may need to the fabric, for the entire large-size embroidery. Tutorial 10-1: Creating Split Embroidery Designs 2 Click , and then select the Documents (My Documents)\PE-DESIGN NEXT\ Tutorial\Tutorial_10. Check the design, and then click Cancel. Then, select the file tutorial_10-1.pes. 2 Uncheck the Show about selected Object(s) to move back and forth through...
Users Manual - English
Page 159
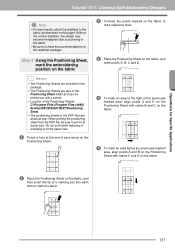
.... A B D C 5 To mark an area to the right of each hole to print it at actual size. Operations for Specific Applications Tutorial 10-1: Creating Split Embroidery Designs a Note: • For best results, attach the stabilizer to the fabric (as described on the stabilizer package. A AB B D DC...Sheet with marks B and C on the fabric, and then insert the tip of the Positioning Sheets: C:\Program Files (Program Files (x86))\ Brother\PE-DESIGN NEXT\Positioning Sheet. • The positioning sheets in the PDF files are also in the fabric. • Be sure to check the ...
.... A B D C 5 To mark an area to the right of each hole to print it at actual size. Operations for Specific Applications Tutorial 10-1: Creating Split Embroidery Designs a Note: • For best results, attach the stabilizer to the fabric (as described on the stabilizer package. A AB B D DC...Sheet with marks B and C on the fabric, and then insert the tip of the Positioning Sheets: C:\Program Files (Program Files (x86))\ Brother\PE-DESIGN NEXT\Positioning Sheet. • The positioning sheets in the PDF files are also in the fabric. • Be sure to check the ...
Users Manual - English
Page 163
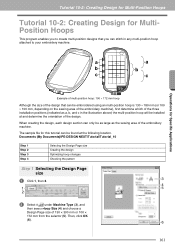
... Documents)\PE-DESIGN NEXT\Tutorial\Tutorial_10 Step 1 Step 2 Step 3 Step 4 Selecting the Design Page size Creating the design Optimizing hoop changes Checking the pattern Step 1 Selecting the Design Page size 1 Click 1, then 2. 3 4 1 5 2 2 Select under Machine Type (3), and then select Hoop Size (4) and choose a Design Page size of the embroidery machine. Then, click OK (6). 6 161 Tutorial 10-2: Creating Design for...
... Documents)\PE-DESIGN NEXT\Tutorial\Tutorial_10 Step 1 Step 2 Step 3 Step 4 Selecting the Design Page size Creating the design Optimizing hoop changes Checking the pattern Step 1 Selecting the Design Page size 1 Click 1, then 2. 3 4 1 5 2 2 Select under Machine Type (3), and then select Hoop Size (4) and choose a Design Page size of the embroidery machine. Then, click OK (6). 6 161 Tutorial 10-2: Creating Design for...


