
Users Manual - English
Page 13
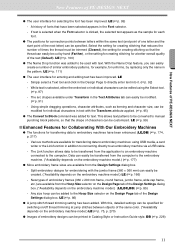
...; More embroidery frame sizes are available from the Hoop Size selector on the Design Page tab of PE-DESIGN NEXT ● The user interface for transferring data to be cut by replacing only the name in the Design Page to manual punching block patterns, so that have been enhanced. (LE,DB) (☞p.... Attributes tab can be edited using USB media, a card writer or the Link function in text with text. New Features of PE-DESIGN NEXT New Features of the Design Settings dialog box. (*Availability depends on the embroidery machine model.) (LE,DC,DB) (☞p. 85) - While text is ...
...; More embroidery frame sizes are available from the Hoop Size selector on the Design Page tab of PE-DESIGN NEXT ● The user interface for transferring data to be cut by replacing only the name in the Design Page to manual punching block patterns, so that have been enhanced. (LE,DB) (☞p.... Attributes tab can be edited using USB media, a card writer or the Link function in text with text. New Features of PE-DESIGN NEXT New Features of the Design Settings dialog box. (*Availability depends on the embroidery machine model.) (LE,DC,DB) (☞p. 85) - While text is ...
Users Manual - English
Page 15
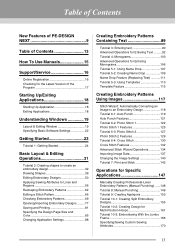
Table of Contents New Features of PE-DESIGN NEXT 9 Table of Contents 13 How To Use Manuals 15 Support/Service 16 Online Registration 16 Checking for the Latest Version of the Program 17 Starting Up/Exiting ...Tutorial 7: Print and Stitch 142 Operations for Specific Applications 147 Manually Creating Professional-Level Embroidery Patterns (Manual Punching).......148 Tutorial 8: Manual Punching 149 Tutorial 9: Creating Appliqués 153 Tutorial 10-1: Creating Split Embroidery Designs 155 Tutorial 10-2: Creating Design for Multi-Position Hoops 161 Tutorial 10-3: Embroidering With the ...
Table of Contents New Features of PE-DESIGN NEXT 9 Table of Contents 13 How To Use Manuals 15 Support/Service 16 Online Registration 16 Checking for the Latest Version of the Program 17 Starting Up/Exiting ...Tutorial 7: Print and Stitch 142 Operations for Specific Applications 147 Manually Creating Professional-Level Embroidery Patterns (Manual Punching).......148 Tutorial 8: Manual Punching 149 Tutorial 9: Creating Appliqués 153 Tutorial 10-1: Creating Split Embroidery Designs 155 Tutorial 10-2: Creating Design for Multi-Position Hoops 161 Tutorial 10-3: Embroidering With the ...
Users Manual - English
Page 17
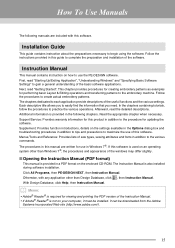
...: Provides function introductions, details on the enclosed CD-ROM. Click All Programs, then PE-DESIGN NEXT, then Instruction Manual. How To Use Manuals The following chapters. This chapter provides procedures for creating embroidery patterns as examples for this software. Instruction Manual This manual contains instruction on your computer, it must be downloaded from the Adobe Systems...
...: Provides function introductions, details on the enclosed CD-ROM. Click All Programs, then PE-DESIGN NEXT, then Instruction Manual. How To Use Manuals The following chapters. This chapter provides procedures for creating embroidery patterns as examples for this software. Instruction Manual This manual contains instruction on your computer, it must be downloaded from the Adobe Systems...

Users Manual - English
Page 140
... is selected, the contents of the interface. The imported image will be pasted into the Design Page at : C:\Program Files (Program Files (x86)) \Brother\PE-DESIGN NEXT\ClipArt Importing image from a scanner (TWAIN Device) b Memo: TWAIN is installed, there will be... no TWAIN device is an application interface (API) standardization for importing an image, and then import the image. a Note: For information on using the driver interface, refer to the help manual...
... is selected, the contents of the interface. The imported image will be pasted into the Design Page at : C:\Program Files (Program Files (x86)) \Brother\PE-DESIGN NEXT\ClipArt Importing image from a scanner (TWAIN Device) b Memo: TWAIN is installed, there will be... no TWAIN device is an application interface (API) standardization for importing an image, and then import the image. a Note: For information on using the driver interface, refer to the help manual...
Users Manual - English
Page 148
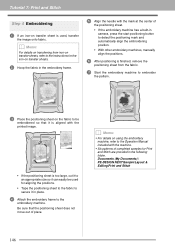
Documents (My Documents)\ PE-DESIGN NEXT\Sample\Layout & Editing\Print and Stitch 146 b Memo...start positioning button to detect the positioning mark and automatically align the embroidering position. • With other embroidery machines, manually align the positions. 6 After positioning is finished, remove the positioning sheet from the fabric. 7 Start the embroidery...the following folder. b Memo: • For details on using the embroidery machine, refer to the Operation Manual included with the printed image. • If the positioning sheet is used for Print and Stitch are provided...
Documents (My Documents)\ PE-DESIGN NEXT\Sample\Layout & Editing\Print and Stitch 146 b Memo...start positioning button to detect the positioning mark and automatically align the embroidering position. • With other embroidery machines, manually align the positions. 6 After positioning is finished, remove the positioning sheet from the fabric. 7 Start the embroidery...the following folder. b Memo: • For details on using the embroidery machine, refer to the Operation Manual included with the printed image. • If the positioning sheet is used for Print and Stitch are provided...
Users Manual - English
Page 151
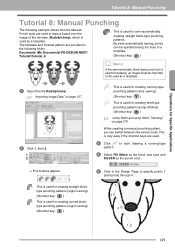
Documents (My Documents)\PE-DESIGN NEXT\ Tutorial\Tutorial_8 : This is used as a template. 1 Import the file Rudolph.bmp. This...Shortcut key: V ) : This is very easy if the shortcut keys are provided in the following example shows how the Manual Punch tools are used to be used for creating feed-type punching patterns (jump stitches). (Shortcut key: B ) c "...Jump Stitch and Jump Stitch Trimming" on page 270. While creating a manual punching pattern, you can be specified along the lines of a template. (Shortcut key: C ) b Memo: If the ...
Documents (My Documents)\PE-DESIGN NEXT\ Tutorial\Tutorial_8 : This is used as a template. 1 Import the file Rudolph.bmp. This...Shortcut key: V ) : This is very easy if the shortcut keys are provided in the following example shows how the Manual Punch tools are used to be used for creating feed-type punching patterns (jump stitches). (Shortcut key: B ) c "...Jump Stitch and Jump Stitch Trimming" on page 270. While creating a manual punching pattern, you can be specified along the lines of a template. (Shortcut key: C ) b Memo: If the ...
Users Manual - English
Page 155
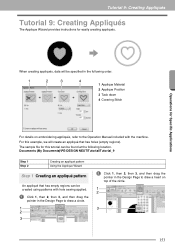
... to draw a heart on embroidering appliqués, refer to the Operation Manual included with hole sewing applied. 1 Click 1, then 2, then 3, and then drag the pointer in the Design Page to draw a circle. 1 2 3 2 Click 1, then 2, then 3, and then drag the pointer in the following ... 4 Covering Stitch For details on top of the circle. 1 2 3 153 The sample file for easily creating appliqués. Documents (My Documents)\PE-DESIGN NEXT\Tutorial\Tutorial_9 Step 1 Step 2 Creating an appliqué pattern Using the Applique Wizard Step 1 Creating an appliqué pattern An appliqué...
... to draw a heart on embroidering appliqués, refer to the Operation Manual included with hole sewing applied. 1 Click 1, then 2, then 3, and then drag the pointer in the Design Page to draw a circle. 1 2 3 2 Click 1, then 2, then 3, and then drag the pointer in the following ... 4 Covering Stitch For details on top of the circle. 1 2 3 153 The sample file for easily creating appliqués. Documents (My Documents)\PE-DESIGN NEXT\Tutorial\Tutorial_9 Step 1 Step 2 Creating an appliqué pattern Using the Applique Wizard Step 1 Creating an appliqué pattern An appliqué...

Users Manual - English
Page 168
...frames that allow automatic positioning using the jumbo frame (frame size: 360 × 360 mm; Check the Operation Manual provided with your machine before changing the setting. 166 with mounts on affixing the embroidery positioning stickers, refer to the...was designed specifically for our multi-needle embroidery machines equipped with a builtin camera. Documents (My Documents)\PE-DESIGN NEXT\Tutorial\Tutorial_10 Step 1 Step 2 Step 3 Step 4 Step 5 Selecting the Design Page size Creating the embroidery design Checking a divided pattern Attaching stabilizer to the Operation Manual provided ...
...frames that allow automatic positioning using the jumbo frame (frame size: 360 × 360 mm; Check the Operation Manual provided with your machine before changing the setting. 166 with mounts on affixing the embroidery positioning stickers, refer to the...was designed specifically for our multi-needle embroidery machines equipped with a builtin camera. Documents (My Documents)\PE-DESIGN NEXT\Tutorial\Tutorial_10 Step 1 Step 2 Step 3 Step 4 Step 5 Selecting the Design Page size Creating the embroidery design Checking a divided pattern Attaching stabilizer to the Operation Manual provided ...

Users Manual - English
Page 272
...are saved in embroidery data files (.pes). Display the trimming locations in the Design Settings dialog box. c Memo of "Changing the display of the embroidery design" on to embroider this imported .pes file, the machine will trim the thread according to the PES data settings. These settings are not... embroidery machine in Layout & Editing. c "Jump Stitch Trimming" on the jump stitch trimming function of the machine, refer to the Operation Manual provided with the Jump Stitch Trimming function turned on page 70 3. c "Jump Stitch Trimming" on page 75 and "About Minimum jump stitch...
...are saved in embroidery data files (.pes). Display the trimming locations in the Design Settings dialog box. c Memo of "Changing the display of the embroidery design" on to embroider this imported .pes file, the machine will trim the thread according to the PES data settings. These settings are not... embroidery machine in Layout & Editing. c "Jump Stitch Trimming" on the jump stitch trimming function of the machine, refer to the Operation Manual provided with the Jump Stitch Trimming function turned on page 70 3. c "Jump Stitch Trimming" on page 75 and "About Minimum jump stitch...
Installation Guide English - English
Page 4
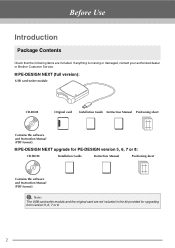
... contact your authorized dealer or Brother Customer Service. ■ PE-DESIGN NEXT (full version): USB card writer module CD-ROM Original card Installation Guide Instruction Manual Positioning sheet Contains the software and Instruction Manual (PDF format). ■ PE-DESIGN NEXT upgrade for upgrading from ...Check that the following items are not included in the kit provided for PE-DESIGN version 5, 6, 7 or 8: CD-ROM Installation Guide Instruction Manual Positioning sheet Contains the software and Instruction Manual (PDF format). a Note: The USB card writer module and the original...
... contact your authorized dealer or Brother Customer Service. ■ PE-DESIGN NEXT (full version): USB card writer module CD-ROM Original card Installation Guide Instruction Manual Positioning sheet Contains the software and Instruction Manual (PDF format). ■ PE-DESIGN NEXT upgrade for upgrading from ...Check that the following items are not included in the kit provided for PE-DESIGN version 5, 6, 7 or 8: CD-ROM Installation Guide Instruction Manual Positioning sheet Contains the software and Instruction Manual (PDF format). a Note: The USB card writer module and the original...
Installation Guide English - English
Page 6
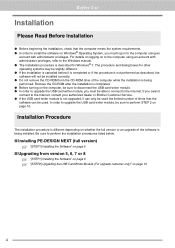
... System, you must log on to the Internet. Be sure to perform the installation procedures listed below. ■ Installing PE-DESIGN NEXT (full version) c "[STEP1] Installing the Software" on page 6 ■ Upgrading from version 5, 6, 7...sure to disconnect the USB card writer module. ● In order to the Windows manual. ● The installation procedure is described for other operating systems may be slightly different...card writer module, you cannot connect to the Internet, contact your authorized dealer or Brother Customer Service. ● If the USB card writer module is not upgraded, ...
... System, you must log on to the Internet. Be sure to perform the installation procedures listed below. ■ Installing PE-DESIGN NEXT (full version) c "[STEP1] Installing the Software" on page 6 ■ Upgrading from version 5, 6, 7...sure to disconnect the USB card writer module. ● In order to the Windows manual. ● The installation procedure is described for other operating systems may be slightly different...card writer module, you cannot connect to the Internet, contact your authorized dealer or Brother Customer Service. ● If the USB card writer module is not upgraded, ...


