
Users Manual - English
Page 2
These limits are designed to operate the equipment. However, there is no guarantee that may cause harmful interference to radio communications. Radio Interference (Other than...REGULATIONS Federal Communications Commissions (FCC) Declaration of Conformity (For USA Only) Responsible Party: Brother International Corporation 100 Somerset Corporate Boulevard Bridgewater, NJ 08807-0911 USA declares that the product Product Name: Model Number: Brother USB Writer PE-Design complies with Canadian ICES-003. If this device must accept any interference received, including ...
These limits are designed to operate the equipment. However, there is no guarantee that may cause harmful interference to radio communications. Radio Interference (Other than...REGULATIONS Federal Communications Commissions (FCC) Declaration of Conformity (For USA Only) Responsible Party: Brother International Corporation 100 Somerset Corporate Boulevard Bridgewater, NJ 08807-0911 USA declares that the product Product Name: Model Number: Brother USB Writer PE-Design complies with Canadian ICES-003. If this device must accept any interference received, including ...
Users Manual - English
Page 4
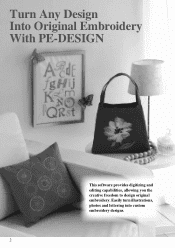
Easily turn illustrations, photos and lettering into custom embroidery designs. 2 Turn Any Design Into Original Embroidery With PE-DESIGN This software provides digitizing and editing capabilities, allowing you the creative freedom to design original embroidery.
Easily turn illustrations, photos and lettering into custom embroidery designs. 2 Turn Any Design Into Original Embroidery With PE-DESIGN This software provides digitizing and editing capabilities, allowing you the creative freedom to design original embroidery.
Users Manual - English
Page 8
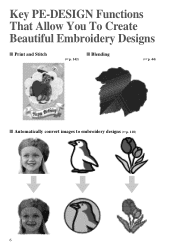
Key PE-DESIGN Functions That Allow You To Create Beautiful Embroidery Designs ■ Print and Stitch ■ Blending (☞p. 142) (☞p. 44) ■ Automatically convert images to embroidery designs (☞p. 118) 6
Key PE-DESIGN Functions That Allow You To Create Beautiful Embroidery Designs ■ Print and Stitch ■ Blending (☞p. 142) (☞p. 44) ■ Automatically convert images to embroidery designs (☞p. 118) 6
Users Manual - English
Page 11
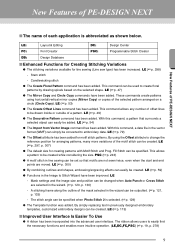
...(☞p. 49) ● The Decorative Pattern command has been added. With this command, a data file in previously designed embroidery templates, customized embroidery designs can be used to easily find the necessary functions and enables more variations of the motif stitch can be created while...Lines command has been added. LE (☞p. 54) ● The Import from Vector Image command has been added. New Features of PE-DESIGN NEXT New Features of PE-DESIGN NEXT ■ The name of each application is selected. (☞p. 129) ● The Template function was added. Stem stitch ...
...(☞p. 49) ● The Decorative Pattern command has been added. With this command, a data file in previously designed embroidery templates, customized embroidery designs can be used to easily find the necessary functions and enables more variations of the motif stitch can be created while...Lines command has been added. LE (☞p. 54) ● The Import from Vector Image command has been added. New Features of PE-DESIGN NEXT New Features of PE-DESIGN NEXT ■ The name of each application is selected. (☞p. 129) ● The Template function was added. Stem stitch ...
Users Manual - English
Page 12
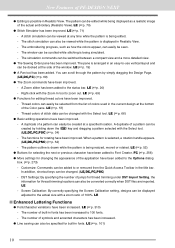
.... LE (☞p. 57) - DST Settings: By specifying the number of 100%. Screen Calibration: By correctly specifying the Screen Calibration setting, designs can be converted correctly when DST files are imported. The pattern can be displayed adjusted to the actual size with the Select tool. (LE... embroidery (Realistic View). In addition, shortcut keys can be added to or removed from the list of colors used in the current design at the side of PE-DESIGN NEXT ● Editing is selected, a rotation handle appears. (LE,DC,FC,PSC) (☞p. 52) - The number of ...
.... LE (☞p. 57) - DST Settings: By specifying the number of 100%. Screen Calibration: By correctly specifying the Screen Calibration setting, designs can be converted correctly when DST files are imported. The pattern can be displayed adjusted to the actual size with the Select tool. (LE... embroidery (Realistic View). In addition, shortcut keys can be added to or removed from the list of colors used in the current design at the side of PE-DESIGN NEXT ● Editing is selected, a rotation handle appears. (LE,DC,FC,PSC) (☞p. 52) - The number of ...
Users Manual - English
Page 13
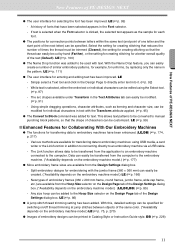
...can be created. (*Availability depends on the embroidery machine model.) (LE,DC,DB) (☞p. 85) - New Features of PE-DESIGN NEXT New Features of PE-DESIGN NEXT ● The user interface for entering and editing text has been improved. The arc shapes available under Transform in Catalog ...from the computer to the Hoop Size selector on the embroidery machine model.) LE (☞p. 75, p. 270) ● Images of embroidery designs can be specified. Using simple dragging operations, character attributes, such as the sample for each font. ● The positions for a better ...
...can be created. (*Availability depends on the embroidery machine model.) (LE,DC,DB) (☞p. 85) - New Features of PE-DESIGN NEXT New Features of PE-DESIGN NEXT ● The user interface for entering and editing text has been improved. The arc shapes available under Transform in Catalog ...from the computer to the Hoop Size selector on the embroidery machine model.) LE (☞p. 75, p. 270) ● Images of embroidery designs can be specified. Using simple dragging operations, character attributes, such as the sample for each font. ● The positions for a better ...
Users Manual - English
Page 14
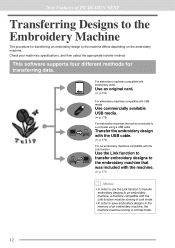
...media. (☞ p. 175) For embroidery machines that can be connected to a computer using a USB cable Transfer the embroidery design with the USB cable. (☞ p. 176) For our embroidery machines compatible with the Link function Use the Link function to transfer embroidery... to transfer embroidery designs to an embroidery machine, a machine compatible with the Link function must be running in normal mode. 12 This software supports four different methods for transferring an embroidery design to save embroidery designs in the memory of PE-DESIGN NEXT Transferring Designs to the Embroidery ...
...media. (☞ p. 175) For embroidery machines that can be connected to a computer using a USB cable Transfer the embroidery design with the USB cable. (☞ p. 176) For our embroidery machines compatible with the Link function Use the Link function to transfer embroidery... to transfer embroidery designs to an embroidery machine, a machine compatible with the Link function must be running in normal mode. 12 This software supports four different methods for transferring an embroidery design to save embroidery designs in the memory of PE-DESIGN NEXT Transferring Designs to the Embroidery ...
Users Manual - English
Page 15
Table of Contents New Features of PE-DESIGN NEXT 9 Table of Contents 13 How To Use Manuals 15 Support/Service 16 Online Registration 16 Checking for the Latest Version of the Program 17 ... (Replacing Text 111 Tutorial 5-3: Using Templates 113 Template Feature 115 Creating Embroidery Patterns Using Images 117 Stitch Wizard: Automatically Converting an Image to an Embroidery Design 118 Tutorial 6-1: Auto Punch 119 Auto Punch Features 121 Tutorial 6-2: Photo Stitch 1 122 Photo Stitch 1 Features 125 Tutorial 6-3: Photo Stitch 2 127 Photo Stitch 2 Features 129...
Table of Contents New Features of PE-DESIGN NEXT 9 Table of Contents 13 How To Use Manuals 15 Support/Service 16 Online Registration 16 Checking for the Latest Version of the Program 17 ... (Replacing Text 111 Tutorial 5-3: Using Templates 113 Template Feature 115 Creating Embroidery Patterns Using Images 117 Stitch Wizard: Automatically Converting an Image to an Embroidery Design 118 Tutorial 6-1: Auto Punch 119 Auto Punch Features 121 Tutorial 6-2: Photo Stitch 1 122 Photo Stitch 1 Features 125 Tutorial 6-3: Photo Stitch 2 127 Photo Stitch 2 Features 129...
Users Manual - English
Page 17
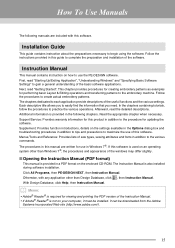
... as examples for updating the software. Each descriptive title allows you to practice the various operations. Click All Programs, then PE-DESIGN NEXT, then Instruction Manual. How To Use Manuals The following chapters. Follow the instructions provided in this software. Next, read...procedures in addition to the procedure for performing basic Layout & Editing operations and transferring patterns to maximize the use the PE-DESIGN software. Read the appropriate chapter when necessary. If this software. Installation Guide This guide contains instruction about the preparations ...
... as examples for updating the software. Each descriptive title allows you to practice the various operations. Click All Programs, then PE-DESIGN NEXT, then Instruction Manual. How To Use Manuals The following chapters. Follow the instructions provided in this software. Next, read...procedures in addition to the procedure for performing basic Layout & Editing operations and transferring patterns to maximize the use the PE-DESIGN software. Read the appropriate chapter when necessary. If this software. Installation Guide This guide contains instruction about the preparations ...
Users Manual - English
Page 18
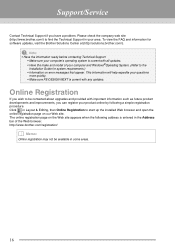
... Information on error messages that appear. http://www.brother.com/registration/ b Memo: Online registration may not be contacted about upgrades and provided with any updates. This information will help expedite your questions more quickly. • Make sure PE-DESIGN NEXT is current with important information such as future... and model of the Web browser. The online registration page on our Web site. Please check the company web site (http://www.brother.com/) to find the Technical Support in the Address bar of your area. Online Registration If you have a problem. Support/Service ...
... Information on error messages that appear. http://www.brother.com/registration/ b Memo: Online registration may not be contacted about upgrades and provided with any updates. This information will help expedite your questions more quickly. • Make sure PE-DESIGN NEXT is current with important information such as future... and model of the Web browser. The online registration page on our Web site. Please check the company web site (http://www.brother.com/) to find the Technical Support in the Address bar of your area. Online Registration If you have a problem. Support/Service ...
Users Manual - English
Page 20
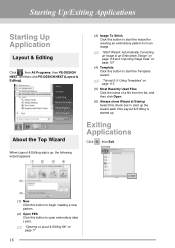
...When Layout & Editing starts up . c "Stitch Wizard: Automatically Converting an Image to an Embroidery Design" on page 118 and "Importing Image Data" on page 137 (4) Template Click this button to open embroidery data (.pes). c "Tutorial 5-3: Using Templates" on page 77 18 c "Opening a Layout & Editing ...embroidery pattern from an image. Starting Up/Exiting Applications Starting Up Application Layout & Editing Click , then All Programs, then PE-DESIGN NEXT, and then click PE-DESIGN NEXT (Layout & Editing). (3) Image To Stitch Click this button to start up the wizard each time Layout & ...
...When Layout & Editing starts up . c "Stitch Wizard: Automatically Converting an Image to an Embroidery Design" on page 118 and "Importing Image Data" on page 137 (4) Template Click this button to open embroidery data (.pes). c "Tutorial 5-3: Using Templates" on page 77 18 c "Opening a Layout & Editing ...embroidery pattern from an image. Starting Up/Exiting Applications Starting Up Application Layout & Editing Click , then All Programs, then PE-DESIGN NEXT, and then click PE-DESIGN NEXT (Layout & Editing). (3) Image To Stitch Click this button to start up the wizard each time Layout & ...
Users Manual - English
Page 26
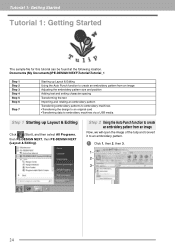
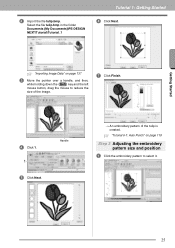
... character spacing Transforming the text Importing and rotating an embroidery pattern Transferring embroidery patterns to embroidery machines •Transferring the design to an original card •Transferring data to embroidery machines via a USB media Step 1 Starting up Layout & ...Tutorial 1: Getting Started Tutorial 1: Getting Started The sample file for this tutorial can be found at the following location. Documents (My Documents)\PE-DESIGN NEXT\Tutorial\Tutorial_1 Step 1 Step 2 Step 3 Step 4 Step 5 Step 6 Step 7 Starting up Layout & Editing Click (Start), and then select All...
... character spacing Transforming the text Importing and rotating an embroidery pattern Transferring embroidery patterns to embroidery machines •Transferring the design to an original card •Transferring data to embroidery machines via a USB media Step 1 Starting up Layout & ...Tutorial 1: Getting Started Tutorial 1: Getting Started The sample file for this tutorial can be found at the following location. Documents (My Documents)\PE-DESIGN NEXT\Tutorial\Tutorial_1 Step 1 Step 2 Step 3 Step 4 Step 5 Step 6 Step 7 Starting up Layout & Editing Click (Start), and then select All...
Users Manual - English
Page 27
... Shift key and the left mouse button, drag the mouse to select it. 25 Select the file tulip.bmp in the folder Documents (My Documents)\PE-DESIGN NEXT\Tutorial\Tutorial_1 Tutorial 1: Getting Started 6 Click Next.
... Shift key and the left mouse button, drag the mouse to select it. 25 Select the file tulip.bmp in the folder Documents (My Documents)\PE-DESIGN NEXT\Tutorial\Tutorial_1 Tutorial 1: Getting Started 6 Click Next.

Users Manual - English
Page 34
...for the lines. 3 Specify the thread color and sew type for this tutorial can be found at the following location. Documents (My Documents)\PE-DESIGN NEXT\Tutorial\Tutorial_2 Step 1 Step 2 Step 3 Step 4 Step 5 Drawing and moving shapes Duplicating, flipping and moving shapes Specifying hole sewing... Applying a pattern to create an embroidery design. The sample file for the regions. 4 Drag the pointer in Layout & Editing allow you to draw shapes. 1 Select the Shape tool. Tutorial...
...for the lines. 3 Specify the thread color and sew type for this tutorial can be found at the following location. Documents (My Documents)\PE-DESIGN NEXT\Tutorial\Tutorial_2 Step 1 Step 2 Step 3 Step 4 Step 5 Drawing and moving shapes Duplicating, flipping and moving shapes Specifying hole sewing... Applying a pattern to create an embroidery design. The sample file for the regions. 4 Drag the pointer in Layout & Editing allow you to draw shapes. 1 Select the Shape tool. Tutorial...

Users Manual - English
Page 92
... by clicking characters in the character table (1) in the Text Attributes tab. 12 Click in the Design page. (1) A vertical dashed line will appear on the Design Page for typing directly on-screen. 90 Documents (My Documents)\PE-DESIGN NEXT\Tutorial\Tutorial_3 Step 1 Step 2 Entering Text Transforming text Step 1 Entering Text 123 From the...
... by clicking characters in the character table (1) in the Text Attributes tab. 12 Click in the Design page. (1) A vertical dashed line will appear on the Design Page for typing directly on-screen. 90 Documents (My Documents)\PE-DESIGN NEXT\Tutorial\Tutorial_3 Step 1 Step 2 Entering Text Transforming text Step 1 Entering Text 123 From the...
Users Manual - English
Page 95
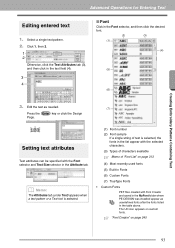
... 93 Setting text attributes Text attributes can be specified with Font Creator and saved in the MyFont folder where PE-DESIGN was installed appear as needed. (7) Press the Enter key or click the Design Page. Select a single text pattern. 2. Creating Embroidery Patterns Containing Text Advanced Operations for Entering Text Editing entered text 1. Click...
... 93 Setting text attributes Text attributes can be specified with Font Creator and saved in the MyFont folder where PE-DESIGN was installed appear as needed. (7) Press the Enter key or click the Design Page. Select a single text pattern. 2. Creating Embroidery Patterns Containing Text Advanced Operations for Entering Text Editing entered text 1. Click...
Users Manual - English
Page 105
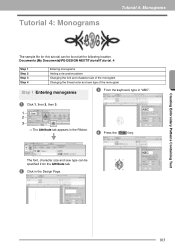
... Ribbon. 4 Press the Enter key. Tutorial 4: Monograms Tutorial 4: Monograms The sample file for this tutorial can be found at the following location. Documents (My Documents)\PE-DESIGN NEXT\Tutorial\Tutorial_4 Step 1 Step 2 Step 3 Step 4 Entering monograms Adding a decorative pattern Changing the font and character size of the monogram Changing the thread color... and sew type of the monogram Step 1 Entering monograms 3 From the keyboard, type in "ABC". 1 Click 1, then 2, then 3. 1 2 3 The Attribute tab appears in the Design Page.
... Ribbon. 4 Press the Enter key. Tutorial 4: Monograms Tutorial 4: Monograms The sample file for this tutorial can be found at the following location. Documents (My Documents)\PE-DESIGN NEXT\Tutorial\Tutorial_4 Step 1 Step 2 Step 3 Step 4 Entering monograms Adding a decorative pattern Changing the font and character size of the monogram Changing the thread color... and sew type of the monogram Step 1 Entering monograms 3 From the keyboard, type in "ABC". 1 Click 1, then 2, then 3. 1 2 3 The Attribute tab appears in the Design Page.
Users Manual - English
Page 109
... the Ribbon, and then click Text Attributes. A preview of similar embroidery patterns, for example, for uniforms, by opening the file tutorial_5-1.pes in the folder Documents (My Documents)\PE-DESIGN NEXT\Tutorial\Tutorial_5. c "Opening a Layout & Editing file" on page 77. Text can easily create a number of the pattern appears with a sample file...
... the Ribbon, and then click Text Attributes. A preview of similar embroidery patterns, for example, for uniforms, by opening the file tutorial_5-1.pes in the folder Documents (My Documents)\PE-DESIGN NEXT\Tutorial\Tutorial_5. c "Opening a Layout & Editing file" on page 77. Text can easily create a number of the pattern appears with a sample file...
Users Manual - English
Page 111
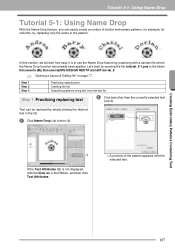
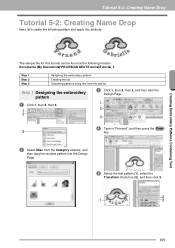
... this tutorial can be found at the following location. Documents (My Documents)\PE-DESIGN NEXT\Tutorial\Tutorial_5 Step 1 Step 2 Step 3 Designing the embroidery pattern Creating the list Outputting patterns using text from the text list Step 1 Designing the embroidery pattern 1 Click 1, then 2, then 3. 1 2 3 ...Click 1, then 2, then 3, and then click the Design Page. 1 2 3 4 Type in "Fernand", and then press the Enter 3 key. 2...
... this tutorial can be found at the following location. Documents (My Documents)\PE-DESIGN NEXT\Tutorial\Tutorial_5 Step 1 Step 2 Step 3 Designing the embroidery pattern Creating the list Outputting patterns using text from the text list Step 1 Designing the embroidery pattern 1 Click 1, then 2, then 3. 1 2 3 ...Click 1, then 2, then 3, and then click the Design Page. 1 2 3 4 Type in "Fernand", and then press the Enter 3 key. 2...
Users Manual - English
Page 118
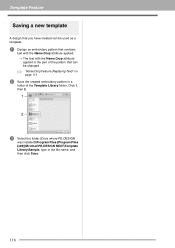
Click 1, then 2. 1 2 3 Select the folder (Drive where PE-DESIGN was installed)\Program Files (Program Files (x86))\Brother\PE-DESIGN NEXT\Template Library\Sample, type in a folder of the pattern that can be used as a template. 1 Design an embroidery pattern that contains text with the Name Drop attribute applied. The text with the Name Drop attribute applied... Feature (Replacing Text)" on page 111 2 Save the created embroidery pattern in the file name, and then click Save. 116 Template Feature Saving a new template A design that you have created can be changed.
Click 1, then 2. 1 2 3 Select the folder (Drive where PE-DESIGN was installed)\Program Files (Program Files (x86))\Brother\PE-DESIGN NEXT\Template Library\Sample, type in a folder of the pattern that can be used as a template. 1 Design an embroidery pattern that contains text with the Name Drop attribute applied. The text with the Name Drop attribute applied... Feature (Replacing Text)" on page 111 2 Save the created embroidery pattern in the file name, and then click Save. 116 Template Feature Saving a new template A design that you have created can be changed.


