
Instruction Manual
Page 3
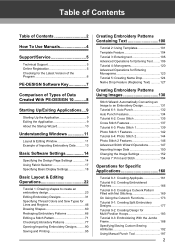
... Manuals 4 Support/Service 5 Technical Support 5 Online Registration 5 Checking for the Latest Version of the Program 6 PE-DESIGN Software Key 7 Comparison of Types of Data Created With PE-DESIGN 10...........8 Starting Up/Exiting Applications....9 Starting Up the Application 9 Exiting the Application 9 About the Startup Wizard 10 Understanding Windows 11 Layout & Editing Window 11 Example of Importing Embroidery Data...
... Manuals 4 Support/Service 5 Technical Support 5 Online Registration 5 Checking for the Latest Version of the Program 6 PE-DESIGN Software Key 7 Comparison of Types of Data Created With PE-DESIGN 10...........8 Starting Up/Exiting Applications....9 Starting Up the Application 9 Exiting the Application 9 About the Startup Wizard 10 Understanding Windows 11 Layout & Editing Window 11 Example of Importing Embroidery Data...
Instruction Manual
Page 5
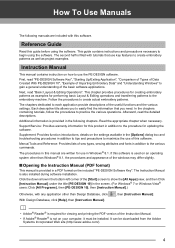
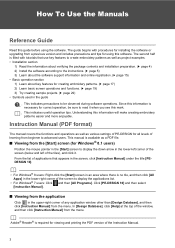
...of this software. Click the down arrow in the screen. (For Windows® 7 or Windows Vista® users: Click [All Programs], then [PE-DESIGN 10], then [Instruction Manual].) Otherwise, with this software. Instruction Manual This manual contains instruction on how to create actual embroidery patterns. First, read "Basic ...for use key features to begin using the software. The procedures in the following manuals are written for viewing and printing the PDF version of the Instruction Manual. • If Adobe® Reader® is not on your computer, it must be downloaded from ...
...of this software. Click the down arrow in the screen. (For Windows® 7 or Windows Vista® users: Click [All Programs], then [PE-DESIGN 10], then [Instruction Manual].) Otherwise, with this software. Instruction Manual This manual contains instruction on how to create actual embroidery patterns. First, read "Basic ...for use key features to begin using the software. The procedures in the following manuals are written for viewing and printing the PDF version of the Instruction Manual. • If Adobe® Reader® is not on your computer, it must be downloaded from ...
Instruction Manual
Page 7
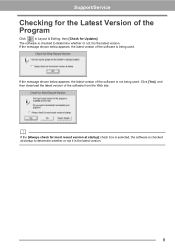
...Click [Yes], and then download the latest version of the Program Click in Layout & Editing, then [Check for Updates]. Support/Service Checking for the Latest Version of the software from the Web site. If the message shown below appears, the latest version of the software is being used . ...b If the [Always check for most recent version at startup] check box is selected, the software ...
...Click [Yes], and then download the latest version of the Program Click in Layout & Editing, then [Check for Updates]. Support/Service Checking for the Latest Version of the software from the Web site. If the message shown below appears, the latest version of the software is being used . ...b If the [Always check for most recent version at startup] check box is selected, the software ...
Instruction Manual
Page 16
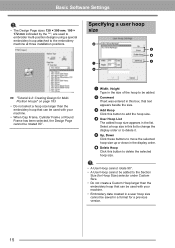
... User Hoop cannot be added to the embroidery machine at three installation positions. Specifying a user hoop size d a b e f c cc "Tutorial 9-2: Creating Design for MultiPosition Hoops" on page 183 • Do not select a hoop size larger than the embroidery hoop that can be used to embroider multi-position... with your machine. • Embroidery data created in a user hoop size cannot be saved in a format for a previous version. 15 Basic Software Settings a • The Design Page sizes 130 × 300 mm, 100 × 172 mm indicated by the "*", are used with your machine. •...
... User Hoop cannot be added to the embroidery machine at three installation positions. Specifying a user hoop size d a b e f c cc "Tutorial 9-2: Creating Design for MultiPosition Hoops" on page 183 • Do not select a hoop size larger than the embroidery hoop that can be used to embroider multi-position... with your machine. • Embroidery data created in a user hoop size cannot be saved in a format for a previous version. 15 Basic Software Settings a • The Design Page sizes 130 × 300 mm, 100 × 172 mm indicated by the "*", are used with your machine. •...
Instruction Manual
Page 20
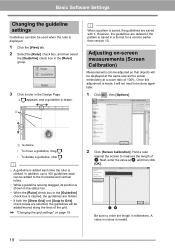
... displayed. 1 Click the [View] tab. 2 Select the [Ruler] check box, and then select the [Guideline] check box in the [Ruler] group. 3 Click a ruler in the Design Page. appears, and a guideline is invalid. 19 b When a pattern is saved, the guidelines are selected, the guidelines will be added to Grid] check boxes... b, and then click [OK]. b • A guideline is added each can be adjusted so that objects will not need to enter the length in a format for a version earlier than version 10. However, the guidelines are deleted if the pattern is clicked.
... displayed. 1 Click the [View] tab. 2 Select the [Ruler] check box, and then select the [Guideline] check box in the [Ruler] group. 3 Click a ruler in the Design Page. appears, and a guideline is invalid. 19 b When a pattern is saved, the guidelines are selected, the guidelines will be added to Grid] check boxes... b, and then click [OK]. b • A guideline is added each can be adjusted so that objects will not need to enter the length in a format for a version earlier than version 10. However, the guidelines are deleted if the pattern is clicked.
Instruction Manual
Page 96
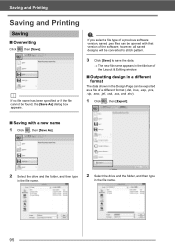
Saving and Printing Saving and Printing Saving ■ Overwriting Click , then [Save]. a If you select a file type of a previous software version, saved .pes files can be opened with that version of a different format (.dst, .hus, .exp, .pcs, .vip, .sew, .jef, .csd, .xxx, and .shv). 1 Click , then [Export]. ■ Saving with a new...and then type in the file name. 2 Select the drive and the folder, and then type in the Design Page can be converted to stitch pattern. however, all saved designs will be exported as a file of the software; b If no file name has been specified or if ...
Saving and Printing Saving and Printing Saving ■ Overwriting Click , then [Save]. a If you select a file type of a previous software version, saved .pes files can be opened with that version of a different format (.dst, .hus, .exp, .pcs, .vip, .sew, .jef, .csd, .xxx, and .shv). 1 Click , then [Export]. ■ Saving with a new...and then type in the file name. 2 Select the drive and the folder, and then type in the Design Page can be converted to stitch pattern. however, all saved designs will be exported as a file of the software; b If no file name has been specified or if ...
Instruction Manual
Page 192
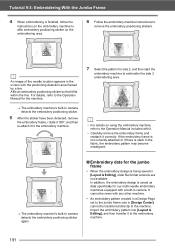
...[Layout & Editing], older file format versions are not available. b An image of the needle location appears in camera detects the embroidery positioning sticker again. ■ Embroidery data for the jumbo frame • When the embroidery design is finished, follow the instructions on the...start the embroidery machine to the embroidery machine. 7 Select the pattern for our multi-needle embroidery machines equipped with a built-in [Design Center] cannot be sewn with the positioning detection area framed by a line. It cannot be transferred directly to the Operation Manual ...
...[Layout & Editing], older file format versions are not available. b An image of the needle location appears in camera detects the embroidery positioning sticker again. ■ Embroidery data for the jumbo frame • When the embroidery design is finished, follow the instructions on the...start the embroidery machine to the embroidery machine. 7 Select the pattern for our multi-needle embroidery machines equipped with a built-in [Design Center] cannot be sewn with the positioning detection area framed by a line. It cannot be transferred directly to the Operation Manual ...
Instruction Manual
Page 196
...• A newly created user thread chart is saved, in the .btc2 format with the same name as the thread chart, at [C:\Program Files (x86)\Brother\PE-DESIGN 10\MyChart]. • Existing user thread charts, created with newly added items, an asterisk (*) appears in front of the index number of the item. 195... chart files Existing user thread charts can be imported, or edited user thread charts can be used on each line. b As with the previous versions of items 1 From the list for the user thread chart k, select the item to be within 0-255. Specifying/Saving Custom Sewing Attributes ■...
...• A newly created user thread chart is saved, in the .btc2 format with the same name as the thread chart, at [C:\Program Files (x86)\Brother\PE-DESIGN 10\MyChart]. • Existing user thread charts, created with newly added items, an asterisk (*) appears in front of the index number of the item. 195... chart files Existing user thread charts can be imported, or edited user thread charts can be used on each line. b As with the previous versions of items 1 From the list for the user thread chart k, select the item to be within 0-255. Specifying/Saving Custom Sewing Attributes ■...
Instruction Manual
Page 239
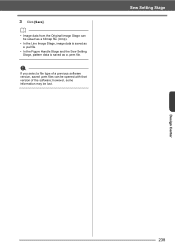
a If you select a file type of the software; b • Image data from the Original Image Stage can be lost. however, some information may be opened with that version of a previous software version, saved .pem files can be saved as a bitmap file (.bmp). • In the Line Image Stage, image data is saved as a .pel file. • In the Figure Handle Stage and the Sew Setting Stage, pattern data is saved as a .pem file. Sew Setting Stage Design Center 238 3 Click [Save].
a If you select a file type of the software; b • Image data from the Original Image Stage can be lost. however, some information may be opened with that version of a previous software version, saved .pem files can be saved as a bitmap file (.bmp). • In the Line Image Stage, image data is saved as a .pel file. • In the Figure Handle Stage and the Sew Setting Stage, pattern data is saved as a .pem file. Sew Setting Stage Design Center 238 3 Click [Save].
Instruction Manual
Page 254
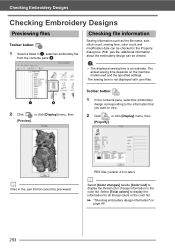
...[Total colors] to display the information for all thread colors in the .pen format cannot be previewed. cc "Checking embroidery design information" on the machine model used and the specified settings. The actual sewing time depends on page 88 253 b Files in... the color list. Checking Embroidery Designs Checking Embroidery Designs Previewing files Toolbar button: 1 Select a folder in the color list. With .pes file, additional information about the embroidery design can be viewed. PES files (version 4.0 or later) b Select [Color changes] beside [Color List...
...[Total colors] to display the information for all thread colors in the .pen format cannot be previewed. cc "Checking embroidery design information" on the machine model used and the specified settings. The actual sewing time depends on page 88 253 b Files in... the color list. Checking Embroidery Designs Checking Embroidery Designs Previewing files Toolbar button: 1 Select a folder in the color list. With .pes file, additional information about the embroidery design can be viewed. PES files (version 4.0 or later) b Select [Color changes] beside [Color List...
Instruction Manual
Page 255
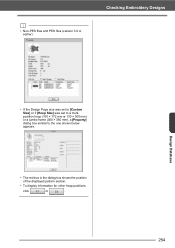
b • Non-PES files and PES files (version 3.0 or earlier) Checking Embroidery Designs Design Database • If the Design Page size was set to [Custom Size] or if [Hoop Size] was set to a multiposition hoop (100 × 172 mm or 130 × 300 mm) or a jumbo frame (360 × 360 mm), a [Property] dialog box similar to the one shown below appears. • The red box in the dialog box shows the position of the displayed pattern section. • To display information for other hoop positions, click or . 254
b • Non-PES files and PES files (version 3.0 or earlier) Checking Embroidery Designs Design Database • If the Design Page size was set to [Custom Size] or if [Hoop Size] was set to a multiposition hoop (100 × 172 mm or 130 × 300 mm) or a jumbo frame (360 × 360 mm), a [Property] dialog box similar to the one shown below appears. • The red box in the dialog box shows the position of the displayed pattern section. • To display information for other hoop positions, click or . 254
Instruction Manual
Page 331
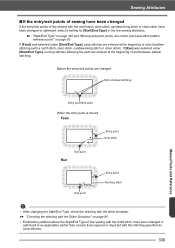
... motif stitch, stem stitch, candlewicking stitch or chain stitch have been changed or optimized, select a setting for [Start/End Type] in an application earlier than version 8 are entered at the beginning or end of and between pattern stitching. cc "Checking the stitching with the Stitch Simulator" on page 50 If [Feed...
... motif stitch, stem stitch, candlewicking stitch or chain stitch have been changed or optimized, select a setting for [Start/End Type] in an application earlier than version 8 are entered at the beginning or end of and between pattern stitching. cc "Checking the stitching with the Stitch Simulator" on page 50 If [Feed...
Instruction Manual
Page 345
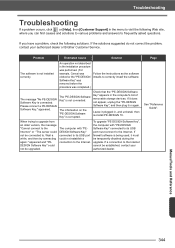
... PE-DESIGN 10. Check that the "PE-DESIGN Software Key" appears in again. or "The server could not be upgraded. To upgrade "PE-DESIGN Software Key", the computer with "PEDESIGN Software Key" connected to its USB port must be established, contact your authorized dealer or Brother Customer Service. The message "No PE-DESIGN Software Key is not connected. Please connect a PE-DESIGN...
... PE-DESIGN 10. Check that the "PE-DESIGN Software Key" appears in again. or "The server could not be upgraded. To upgrade "PE-DESIGN Software Key", the computer with "PEDESIGN Software Key" connected to its USB port must be established, contact your authorized dealer or Brother Customer Service. The message "No PE-DESIGN Software Key is not connected. Please connect a PE-DESIGN...
Startup : Reference Guide
Page 10
... the outer heart shape 57 Applying gradation 58 Symbol - Creating a floral pattern from PEDESIGN version 5, 6, 7, 8 or NEXT 9 Uninstalling the Software 13 Technical Support/Service 15 Technical Support 15 Online Registration 15 Checking ...3 Getting Started 4 Introduction 4 Package contents 4 Precautions for using the "PE-DESIGN Software Key 4 Installation 5 Please Read Before Installation 5 System Requirements 5 Installation Procedure 6 [STEP1] Installing the Software 6 [STEP2] Activating the "PE-DESIGN Software Key" (only for users upgrading from a shape 42 Drawing base circles...
... the outer heart shape 57 Applying gradation 58 Symbol - Creating a floral pattern from PEDESIGN version 5, 6, 7, 8 or NEXT 9 Uninstalling the Software 13 Technical Support/Service 15 Technical Support 15 Online Registration 15 Checking ...3 Getting Started 4 Introduction 4 Package contents 4 Precautions for using the "PE-DESIGN Software Key 4 Installation 5 Please Read Before Installation 5 System Requirements 5 Installation Procedure 6 [STEP1] Installing the Software 6 [STEP2] Activating the "PE-DESIGN Software Key" (only for users upgrading from a shape 42 Drawing base circles...
Startup : Reference Guide
Page 12
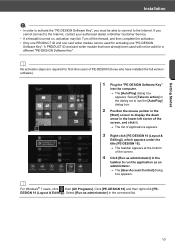
... : This indicates useful operation tips. Click [PE-DESIGN 10] and then select [Instruction Manual]. ■...creating embroidery patterns easier and more enjoyable. This manual is required for all levels of learning from a previous version and includes precautions and tips for creating embroidery patterns. (c page 17) 2) Learn basic screen operations and functions... software operations. b Adobe® Reader® is available as various settings of PE-DESIGN for viewing and printing the PDF version of the tiles), and click it when you see this software. The guide begins...
... : This indicates useful operation tips. Click [PE-DESIGN 10] and then select [Instruction Manual]. ■...creating embroidery patterns easier and more enjoyable. This manual is required for all levels of learning from a previous version and includes precautions and tips for creating embroidery patterns. (c page 17) 2) Learn basic screen operations and functions... software operations. b Adobe® Reader® is available as various settings of PE-DESIGN for viewing and printing the PDF version of the tiles), and click it when you see this software. The guide begins...
Startup : Reference Guide
Page 13
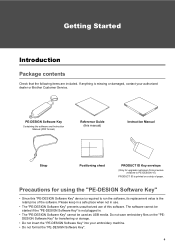
...used as USB media. Precautions for using the "PE-DESIGN Software Key" • Since this "PE-DESIGN Software Key" device is required to PE-DESIGN 10) PRODUCT ID is printed on the "PEDESIGN Software Key" for upgrade customers from previous versions to run the software, its replacement value is the... Key envelope (Only for transferring or storage. • Do not insert the "PE-DESIGN Software Key" into your authorized dealer or Brother Customer Service. The software cannot be started if the "PE-DESIGN Software Key" is missing or damaged, contact your embroidery machine. • Do not...
...used as USB media. Precautions for using the "PE-DESIGN Software Key" • Since this "PE-DESIGN Software Key" device is required to PE-DESIGN 10) PRODUCT ID is printed on the "PEDESIGN Software Key" for upgrade customers from previous versions to run the software, its replacement value is the... Key envelope (Only for transferring or storage. • Do not insert the "PE-DESIGN Software Key" into your authorized dealer or Brother Customer Service. The software cannot be started if the "PE-DESIGN Software Key" is missing or damaged, contact your embroidery machine. • Do not...
Startup : Reference Guide
Page 14
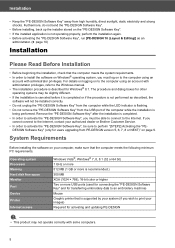
... sunlight, static electricity and strong shocks. Installation • Keep the "PE-DESIGN Software Key" away from PE-DESIGN version 5, 6, 7, 8 or NEXT)" on page 9. Operating system Processor Memory...authorized dealer or Brother Customer Service. • In order to activate the "PE-DESIGN Software Key", be installed correctly. • Do not unplug the "PE-DESIGN Software Key" ...the "PE-DESIGN Software Key". • If the installed application is not operating properly, perform the installation again. • Before activating the "PE-DESIGN Software Key", run [PE-DESIGN 10 (Layout ...
... sunlight, static electricity and strong shocks. Installation • Keep the "PE-DESIGN Software Key" away from PE-DESIGN version 5, 6, 7, 8 or NEXT)" on page 9. Operating system Processor Memory...authorized dealer or Brother Customer Service. • In order to activate the "PE-DESIGN Software Key", be installed correctly. • Do not unplug the "PE-DESIGN Software Key" ...the "PE-DESIGN Software Key". • If the installed application is not operating properly, perform the installation again. • Before activating the "PE-DESIGN Software Key", run [PE-DESIGN 10 (Layout ...

Startup : Reference Guide
Page 15
... to back up the installer onto your computer. 1) Create a backup folder on the computer. 2) Copy the entire [PE-DESIGN 10] folder from PE-DESIGN version 5, 6, 7, 8 or NEXT, install the software and activate the "PE-DESIGN Software Key". Type in the "PE-DESIGN Software Key" until the installation is interrupted or not performed as described, the software will differ depending on...
... to back up the installer onto your computer. 1) Create a backup folder on the computer. 2) Copy the entire [PE-DESIGN 10] folder from PE-DESIGN version 5, 6, 7, 8 or NEXT, install the software and activate the "PE-DESIGN Software Key". Type in the "PE-DESIGN Software Key" until the installation is interrupted or not performed as described, the software will differ depending on...
Startup : Reference Guide
Page 18
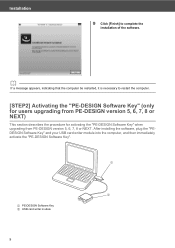
Installation 9 Click [Finish] to restart the computer. [STEP2] Activating the "PE-DESIGN Software Key" (only for users upgrading from PE-DESIGN version 5, 6, 7, 8 or NEXT) This section describes the procedure for activating the "PE-DESIGN Software Key" when upgrading from PE-DESIGN version 5, 6, 7, 8 or NEXT. After installing the software, plug the "PEDESIGN Software Key" and your USB card writer module into the...
Installation 9 Click [Finish] to restart the computer. [STEP2] Activating the "PE-DESIGN Software Key" (only for users upgrading from PE-DESIGN version 5, 6, 7, 8 or NEXT) This section describes the procedure for activating the "PE-DESIGN Software Key" when upgrading from PE-DESIGN version 5, 6, 7, 8 or NEXT. After installing the software, plug the "PEDESIGN Software Key" and your USB card writer module into the...
Startup : Reference Guide
Page 19
...have installed the full version software). 1 Plug the "PE-DESIGN Software Key" into the computer. → The [AutoPlay] dialog box appears. Click [PE-DESIGN 10] and then right-click [PEDESIGN 10 (Layout & Editing...PE-DESIGN 10 (Layout & Editing)], which appears under the title [PE-DESIGN 10]. → The taskbar appears at the bottom of PE-DESIGN (those who have already been used for activating one "PE-DESIGN Software Key". Getting Started Installation a • In order to activate the "PE-DESIGN Software Key", you cannot connect to the Internet, contact your authorized dealer or Brother...
...have installed the full version software). 1 Plug the "PE-DESIGN Software Key" into the computer. → The [AutoPlay] dialog box appears. Click [PE-DESIGN 10] and then right-click [PEDESIGN 10 (Layout & Editing...PE-DESIGN 10 (Layout & Editing)], which appears under the title [PE-DESIGN 10]. → The taskbar appears at the bottom of PE-DESIGN (those who have already been used for activating one "PE-DESIGN Software Key". Getting Started Installation a • In order to activate the "PE-DESIGN Software Key", you cannot connect to the Internet, contact your authorized dealer or Brother...


