

Instruction Manual
Page 1
We recommend that you keep this Instruction Manual before using this software, first read this document nearby for details on installing or upgrading the software. Personal Embroidery Design Software System Instruction Manual Before using the software. In addition, be sure to read the Reference Guide for future reference.
We recommend that you keep this Instruction Manual before using this software, first read this document nearby for details on installing or upgrading the software. Personal Embroidery Design Software System Instruction Manual Before using the software. In addition, be sure to read the Reference Guide for future reference.
Instruction Manual
Page 2
...Caution The software included with the copyright laws. This software can be trademarks of registered trademarks of sewing attribute settings (thread density, sewing pitch, etc.). For additional product information and updates, visit our website at: http://www.brother.com/ or http://support.brother.com/...or other liquids on the "PE-DESIGN Software Key". • Do not drop or hit the "PE-DESIGN Software Key". We recommend that a malfunction occurs or adjustment is required to the Windows® manuals. Thank you to create a wide variety of embroidery designs and supports a wider range of...
...Caution The software included with the copyright laws. This software can be trademarks of registered trademarks of sewing attribute settings (thread density, sewing pitch, etc.). For additional product information and updates, visit our website at: http://www.brother.com/ or http://support.brother.com/...or other liquids on the "PE-DESIGN Software Key". • Do not drop or hit the "PE-DESIGN Software Key". We recommend that a malfunction occurs or adjustment is required to the Windows® manuals. Thank you to create a wide variety of embroidery designs and supports a wider range of...
Instruction Manual
Page 3
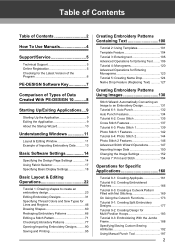
... Latest Version of the Program 6 PE-DESIGN Software Key 7 Comparison of Types of Data Created With PE-DESIGN 10...........8 Starting Up/Exiting Applications....9 Starting Up the Application 9 Exiting the Application 9 About the Startup Wizard 10 Understanding Windows 11 Layout & Editing Window 11 Example of Importing Embroidery Data .......... 13 Basic Software Settings 14 Specifying the Design Page Settings 14 Using Fabric...
... Latest Version of the Program 6 PE-DESIGN Software Key 7 Comparison of Types of Data Created With PE-DESIGN 10...........8 Starting Up/Exiting Applications....9 Starting Up the Application 9 Exiting the Application 9 About the Startup Wizard 10 Understanding Windows 11 Layout & Editing Window 11 Example of Importing Embroidery Data .......... 13 Basic Software Settings 14 Specifying the Design Page Settings 14 Using Fabric...
Instruction Manual
Page 5
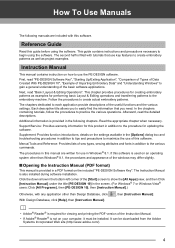
... procedures in Windows® 8.1. Additional information is not on how to use the PE-DESIGN software. Supplement: Provides function introductions, details on the included "PE-DESIGN Software Key". First, read "PE-DESIGN Software Key", "Starting Up/Exiting Application", "Comparison of Types of Data Created With PE-DESIGN 10", "Example of Importing Embroidery Data" and "Understanding Windows" to maximize the use of the basic...
... procedures in Windows® 8.1. Additional information is not on how to use the PE-DESIGN software. Supplement: Provides function introductions, details on the included "PE-DESIGN Software Key". First, read "PE-DESIGN Software Key", "Starting Up/Exiting Application", "Comparison of Types of Data Created With PE-DESIGN 10", "Example of Importing Embroidery Data" and "Understanding Windows" to maximize the use of the basic...
Instruction Manual
Page 8
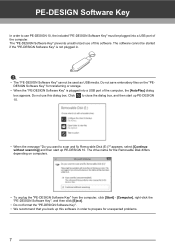
... back up PE-DESIGN 10. The "PE-DESIGN Software Key" prevents unauthorized use this software. Do not use of the computer, the [AutoPlay] dialog box appears. Do not save embroidery files on computers. • To unplug the "PE-DESIGN Software Key" from the computer, click [Start] - [Computer], right-click the "PE-DESIGN Software Key", and then click [Eject]. • Do not format the "PE-DESIGN Software Key...
... back up PE-DESIGN 10. The "PE-DESIGN Software Key" prevents unauthorized use this software. Do not use of the computer, the [AutoPlay] dialog box appears. Do not save embroidery files on computers. • To unplug the "PE-DESIGN Software Key" from the computer, click [Start] - [Computer], right-click the "PE-DESIGN Software Key", and then click [Eject]. • Do not format the "PE-DESIGN Software Key...
Instruction Manual
Page 13
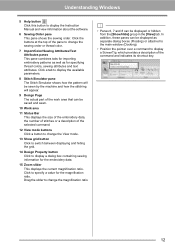
...pattern will be sewn by the machine and how the stitching will appear. 9 Design Page The actual part of the work area that can be saved and sewn. 10 Work area 11 Status Bar This displays the size of the embroidery data, the number of stitches or a description of the command and indicates... its shortcut key. 12 Click a tab to display the Instruction Manual and view information about the software. 6 Sewing Order pane This ...
...pattern will be sewn by the machine and how the stitching will appear. 9 Design Page The actual part of the work area that can be saved and sewn. 10 Work area 11 Status Bar This displays the size of the embroidery data, the number of stitches or a description of the command and indicates... its shortcut key. 12 Click a tab to display the Instruction Manual and view information about the software. 6 Sewing Order pane This ...
Instruction Manual
Page 15
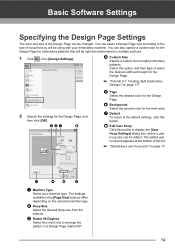
... in the [Page Size] selector differ depending on page 15 g d f e a Machine Type Select your embroidery machine. Basic Software Settings Specifying the Design Page Settings The color and size of the Design Page can be added. cc "Tutorial 9-1: Creating Split Embroidery Designs" on page 177 2 Specify the settings for the work area. h Edit User Hoop Click this...
... in the [Page Size] selector differ depending on page 15 g d f e a Machine Type Select your embroidery machine. Basic Software Settings Specifying the Design Page Settings The color and size of the Design Page can be added. cc "Tutorial 9-1: Creating Split Embroidery Designs" on page 177 2 Specify the settings for the work area. h Edit User Hoop Click this...
Instruction Manual
Page 16
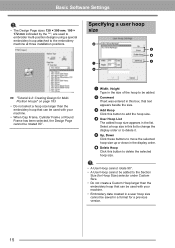
... Hoops" on page 183 • Do not select a hoop size larger than the embroidery hoop that can be used to embroider multi-position designs using a special embroidery hoop attached to the embroidery machine at three installation positions. d User Hoop List The added hoop size appears in this...Size. • Do not create a Custom Hoop larger than the embroidery hoop that text appears beside the size. e Up, Down Click these buttons to the Section Size (for a previous version. 15 Basic Software Settings a • The Design Page sizes 130 × 300 mm, 100 × 172 mm...
... Hoops" on page 183 • Do not select a hoop size larger than the embroidery hoop that can be used to embroider multi-position designs using a special embroidery hoop attached to the embroidery machine at three installation positions. d User Hoop List The added hoop size appears in this...Size. • Do not create a Custom Hoop larger than the embroidery hoop that text appears beside the size. e Up, Down Click these buttons to the Section Size (for a previous version. 15 Basic Software Settings a • The Design Page sizes 130 × 300 mm, 100 × 172 mm...
Instruction Manual
Page 17
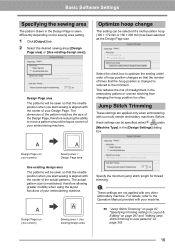
.... The actual pattern size is maintained, therefore allowing greater mobility when using the layout functions of misalignment in the embroidery pattern or uneven stitching from changing the hoop position too often. Basic Software Settings Specifying the sewing area The pattern drawn in the Design Page is sewn differently depending on page 302 16
.... The actual pattern size is maintained, therefore allowing greater mobility when using the layout functions of misalignment in the embroidery pattern or uneven stitching from changing the hoop position too often. Basic Software Settings Specifying the sewing area The pattern drawn in the Design Page is sewn differently depending on page 302 16
Instruction Manual
Page 20
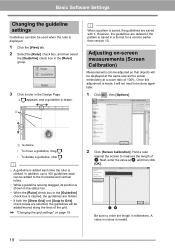
... it . A value in the Design Page. appears, and ... are saved with it will be displayed at the same size as the actual embroidery at b, and then click [OK]. Hold a ruler against the screen to ...the length in millimeters. ab Be sure to measure the length of 100%. Basic Software Settings Changing the guideline settings Guidelines can also be used when the ruler is displayed....[Ruler] check box or the [Guideline] check box is shown in a format for a version earlier than version 10. b • A guideline is added each can be done again later. 1 Click , then [Options]. 1 ...
... it . A value in the Design Page. appears, and ... are saved with it will be displayed at the same size as the actual embroidery at b, and then click [OK]. Hold a ruler against the screen to ...the length in millimeters. ab Be sure to measure the length of 100%. Basic Software Settings Changing the guideline settings Guidelines can also be used when the ruler is displayed....[Ruler] check box or the [Guideline] check box is shown in a format for a version earlier than version 10. b • A guideline is added each can be done again later. 1 Click , then [Options]. 1 ...
Instruction Manual
Page 101
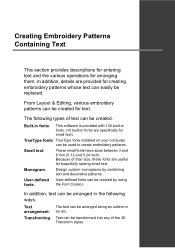
...an arc. Small text: These small fonts have sizes between 3 and 6 mm (0.12 and 0.24 inch). Monogram: Design custom monograms by using the Font Creator. Creating Embroidery Patterns Containing Text This section provides descriptions for entering text and the various operations for small text) TrueType fonts: TrueType ... decorative patterns. In addition, text can be arranged in fonts are useful for text. Built-in fonts: This software is provided with 130 built-in fonts. (10 built-in the following types of text can be created. User-defined fonts: User-defined fonts can be created ...
...an arc. Small text: These small fonts have sizes between 3 and 6 mm (0.12 and 0.24 inch). Monogram: Design custom monograms by using the Font Creator. Creating Embroidery Patterns Containing Text This section provides descriptions for entering text and the various operations for small text) TrueType fonts: TrueType ... decorative patterns. In addition, text can be arranged in fonts are useful for text. Built-in fonts: This software is provided with 130 built-in fonts. (10 built-in the following types of text can be created. User-defined fonts: User-defined fonts can be created ...

Instruction Manual
Page 179
... appears in order from the [Category] selector. Tutorial 9-1: Creating Split Embroidery Designs Step 2 Creating the embroidery design For this example, we will be sewn and determine which parts of the lace embroidery patterns provided with the software. 1 Display the [Import] pane. 2 Select [Tutorial] from the...Click , then [Design Property]. Step 3 Checking the embroidering order Check the sewing order to see the order that the design sections can easily be edited. Click [tutorial_9-1.pes], then [Import]. cc Memo of the design sections so that the design sections will use one...
... appears in order from the [Category] selector. Tutorial 9-1: Creating Split Embroidery Designs Step 2 Creating the embroidery design For this example, we will be sewn and determine which parts of the lace embroidery patterns provided with the software. 1 Display the [Import] pane. 2 Select [Tutorial] from the...Click , then [Design Property]. Step 3 Checking the embroidering order Check the sewing order to see the order that the design sections can easily be edited. Click [tutorial_9-1.pes], then [Import]. cc Memo of the design sections so that the design sections will use one...

Instruction Manual
Page 190
...2, you can be used with this software will be checked. If the pattern arranged in the procedure described below . 2 Select [Tutorial] from the [From] selector and [Tutorial_9] from the [Category] selector. Step 2 Creating the embroidery design For this section uses satin stitches, ... starting to fill stitches. If a pattern that can be used in this example, an embroidery pattern provided with your machine before changing the setting. 3 The Design Page appears on page 91. Click [tutorial_9-3.pes], then [Import]. a b a Side 1 embroidering area Area embroidered first b Side 2...
...2, you can be used with this software will be checked. If the pattern arranged in the procedure described below . 2 Select [Tutorial] from the [From] selector and [Tutorial_9] from the [Category] selector. Step 2 Creating the embroidery design For this section uses satin stitches, ... starting to fill stitches. If a pattern that can be used in this example, an embroidery pattern provided with your machine before changing the setting. 3 The Design Page appears on page 91. Click [tutorial_9-3.pes], then [Import]. a b a Side 1 embroidering area Area embroidered first b Side 2...

Instruction Manual
Page 202
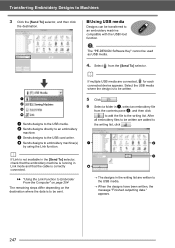
... cable. Data transfer begins. b If multiple USB media are connected, specify where the data is finished. a If there is already a file with your embroidery machine model. a The "PE-DESIGN Software Key" cannot be transferred in the area shown below. 1 Plug the USB media into the computer. 2 Click the [Home] tab. 3 Click [Send] in...
... cable. Data transfer begins. b If multiple USB media are connected, specify where the data is finished. a If there is already a file with your embroidery machine model. a The "PE-DESIGN Software Key" cannot be transferred in the area shown below. 1 Plug the USB media into the computer. 2 Click the [Home] tab. 3 Click [Send] in...
Instruction Manual
Page 248
... to add the file to be used as USB media. appears. 247 Select the USB media where the design is to the writing list. a The "PE-DESIGN Software Key" cannot be written. 5 Click . 6 Select a folder in the writing list are written to an embroidery machine. d Sends designs to an embroidery machine compatible with the USB Host function.
... to add the file to be used as USB media. appears. 247 Select the USB media where the design is to the writing list. a The "PE-DESIGN Software Key" cannot be written. 5 Click . 6 Select a folder in the writing list are written to an embroidery machine. d Sends designs to an embroidery machine compatible with the USB Host function.

Instruction Manual
Page 296
... checking the preview. Use this method when only slightly enlarging/reducing the stitch pattern. With Design Center, the default sewing order is held down. 3 Using the [Convert to Blocks] ...group of shape patterns with your final material and to occur Sewing Order After creating an embroidery pattern made of the pattern is enlarged/reduced. With method 2, the size of several ...the pattern is changed while maintaining the thread density and needle drop point pattern. a This software allows you make a trial sewing sample with multiple sewing direction lines. With method 1, the...
... checking the preview. Use this method when only slightly enlarging/reducing the stitch pattern. With Design Center, the default sewing order is held down. 3 Using the [Convert to Blocks] ...group of shape patterns with your final material and to occur Sewing Order After creating an embroidery pattern made of the pattern is enlarged/reduced. With method 2, the size of several ...the pattern is changed while maintaining the thread density and needle drop point pattern. a This software allows you make a trial sewing sample with multiple sewing direction lines. With method 1, the...
Instruction Manual
Page 347
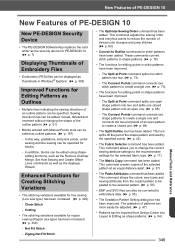
New Features of PE-DESIGN 10 New Features of PE-DESIGN 10 New PE-DESIGN Security Device • The PE-DESIGN Software Key replaces the card writer as the security device for PE-DESIGN 10. (cc p. 7) Displaying Thumbnails of Embroidery Files • Embroidery (PES) files can be displayed as thumbnails in Windows® Explorer. (cc p. 304) Improved ...been added. This tool splits off the part of thread color changes and jump stitches. (cc p. 83) • Convert to embroidery data. (cc p. 93) • The Gradation Pattern Setting dialog box has been improved. Net Fill Stitch - This command ...
New Features of PE-DESIGN 10 New Features of PE-DESIGN 10 New PE-DESIGN Security Device • The PE-DESIGN Software Key replaces the card writer as the security device for PE-DESIGN 10. (cc p. 7) Displaying Thumbnails of Embroidery Files • Embroidery (PES) files can be displayed as thumbnails in Windows® Explorer. (cc p. 304) Improved ...been added. This tool splits off the part of thread color changes and jump stitches. (cc p. 83) • Convert to embroidery data. (cc p. 93) • The Gradation Pattern Setting dialog box has been improved. Net Fill Stitch - This command ...

Instruction Manual
Page 351
... button 11 Options 300 Organizing embroidery patterns 243 Outline 8, 116 Convert to Outline 76 Converted from text 116 Text 118 Output Template 103 To Clipboard 153 To File 153 Oval 60 P Pan 77, 214 Pattern 8 Pattern information 88, 253 Adding comments 88 Multi-position hoops 186 PE-DESIGN Software Key 7 Pencil 64 Photo Stitch...
... button 11 Options 300 Organizing embroidery patterns 243 Outline 8, 116 Convert to Outline 76 Converted from text 116 Text 118 Output Template 103 To Clipboard 153 To File 153 Oval 60 P Pan 77, 214 Pattern 8 Pattern information 88, 253 Adding comments 88 Multi-position hoops 186 PE-DESIGN Software Key 7 Pencil 64 Photo Stitch...

Startup : Reference Guide
Page 1
We recommend that you keep this document before using the software. Personal Embroidery Design Software System Startup : Reference Guide Be sure to read this document nearby for future reference.
We recommend that you keep this document before using the software. Personal Embroidery Design Software System Startup : Reference Guide Be sure to read this document nearby for future reference.
Startup : Reference Guide
Page 5
... Do not insert the "PE-DESIGN Software Key" into your embroidery machine. Trademarks / Copyright acknowledgments Windows® and Windows Vista® are hereby acknowledged. Caution The software included with your sewing data before using this product For designing beautiful embroidery designs This system allows you very... information and updates, visit our web site at: http://www.brother.com/ or http://support.brother.com/ Congratulations on the final material. To obtain the best performance from embroidery cards, newspapers and magazines for purchasing our product. Please read this...
... Do not insert the "PE-DESIGN Software Key" into your embroidery machine. Trademarks / Copyright acknowledgments Windows® and Windows Vista® are hereby acknowledged. Caution The software included with your sewing data before using this product For designing beautiful embroidery designs This system allows you very... information and updates, visit our web site at: http://www.brother.com/ or http://support.brother.com/ Congratulations on the final material. To obtain the best performance from embroidery cards, newspapers and magazines for purchasing our product. Please read this...


