
Accessory Catalog
Page 34
..., PC and ULT series machines and the PE-400D and Innov-is also recommended for details.) www.brother.com All 61 exclusive Brother palette colors are strong, soft and smooth, and perfectly balanced to create machine embroidery as well as preventing fabric slippage and puckering. Brother Embroidery Accessories PacesetterTM Polyester Threads 65 Brother Country Yarn Embroidery Threads Metallic Threads For...
..., PC and ULT series machines and the PE-400D and Innov-is also recommended for details.) www.brother.com All 61 exclusive Brother palette colors are strong, soft and smooth, and perfectly balanced to create machine embroidery as well as preventing fabric slippage and puckering. Brother Embroidery Accessories PacesetterTM Polyester Threads 65 Brother Country Yarn Embroidery Threads Metallic Threads For...

Users Manual - English
Page 1
GETTING READY EMBROIDERY APPENDIX Computerized Embroidery Machine Operation Manual
GETTING READY EMBROIDERY APPENDIX Computerized Embroidery Machine Operation Manual

Users Manual - English
Page 3
... product information and updates, visit our web site at www.brother.com FOR USERS IN THE UK, EIRE, MALTA AND CYPRUS ONLY IMPORTANT • In the event of this manual. FOR USERS IN AUSTRALIA AND NEW ZEALAND This embroidery machine is not intended to be used by young children, and ...assistance may be used by the manufacturer as contained in the manual. Use this machine only for the plug supplied with this machine, avoid direct sunlight and...
... product information and updates, visit our web site at www.brother.com FOR USERS IN THE UK, EIRE, MALTA AND CYPRUS ONLY IMPORTANT • In the event of this manual. FOR USERS IN AUSTRALIA AND NEW ZEALAND This embroidery machine is not intended to be used by young children, and ...assistance may be used by the manufacturer as contained in the manual. Use this machine only for the plug supplied with this machine, avoid direct sunlight and...
Users Manual - English
Page 4
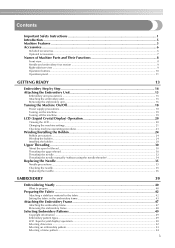
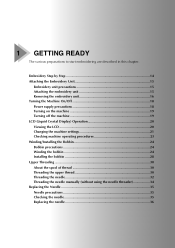
...GETTING READY 13 Embroidery Step by Step 14 Attaching the Embroidery Unit 15 Embroidery unit precautions ...15 Attaching the embroidery unit ...15 Removing the embroidery unit ...16 Turning the Machine On/Off 18 Power supply precautions ...18 Turning on the machine ...19 Turning off the machine ...19 LCD ... thread ...30 Threading the needle ...32 Threading the needle manually (without using the needle threader 34 Replacing the Needle ...35 Needle precautions ...35 Checking the needle ...35 Replacing the needle...36 EMBROIDERY 39 Embroidering Neatly ...40 What to prepare ...40 Preparing ...
...GETTING READY 13 Embroidery Step by Step 14 Attaching the Embroidery Unit 15 Embroidery unit precautions ...15 Attaching the embroidery unit ...15 Removing the embroidery unit ...16 Turning the Machine On/Off 18 Power supply precautions ...18 Turning on the machine ...19 Turning off the machine ...19 LCD ... thread ...30 Threading the needle ...32 Threading the needle manually (without using the needle threader 34 Replacing the Needle ...35 Needle precautions ...35 Checking the needle ...35 Replacing the needle...36 EMBROIDERY 39 Embroidering Neatly ...40 What to prepare ...40 Preparing ...

Users Manual - English
Page 6
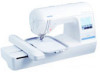
c Automatic thread cutting The thread can be cut automatically after you for purchasing this embroidery machine. Machine Features 1 23 4 a Simple bobbin-winding The bobbin can start embroiderying without pulling up the bobbin thread (page 28). Introduction Thank you have finished reading this manual, store it where it can quickly be accessed for future reference. b Quick-set...
c Automatic thread cutting The thread can be cut automatically after you for purchasing this embroidery machine. Machine Features 1 23 4 a Simple bobbin-winding The bobbin can start embroiderying without pulling up the bobbin thread (page 28). Introduction Thank you have finished reading this manual, store it where it can quickly be accessed for future reference. b Quick-set...
Users Manual - English
Page 7
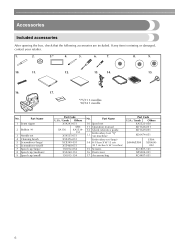
... XD1629-051 XD0474-051 SA444/EF84 EF84: XD0600- 002 XC1807-121 XZ5004-021 XC4487-051 6 Part Name 10 Spool net 11 Operation manual 12 Quick reference guide 13 Embroidery foot "Q" (on machine) Embroidery set 4 Cleaning brush 5 Screwdriver (large) 6 Screwdriver (small) 7 Spool cap (large) 8 Spool cap (medium) 9 Spool cap (small) Part Code U.S.A. / Canada Others X54243...
... XD1629-051 XD0474-051 SA444/EF84 EF84: XD0600- 002 XC1807-121 XZ5004-021 XC4487-051 6 Part Name 10 Spool net 11 Operation manual 12 Quick reference guide 13 Embroidery foot "Q" (on machine) Embroidery set 4 Cleaning brush 5 Screwdriver (large) 6 Screwdriver (small) 7 Spool cap (large) 8 Spool cap (medium) 9 Spool cap (small) Part Code U.S.A. / Canada Others X54243...
Users Manual - English
Page 14
... 14 Attaching the Embroidery Unit 15 Embroidery unit precautions 15 Attaching the embroidery unit 15 Removing the embroidery unit 16 Turning the Machine On/Off 18 Power supply precautions 18 Turning on the machine 19 Turning off the machine 19 LCD (Liquid Crystal Display) Operation 20 Viewing the LCD 20 Changing the machine settings 21 Checking machine operating procedures...
... 14 Attaching the Embroidery Unit 15 Embroidery unit precautions 15 Attaching the embroidery unit 15 Removing the embroidery unit 16 Turning the Machine On/Off 18 Power supply precautions 18 Turning on the machine 19 Turning off the machine 19 LCD (Liquid Crystal Display) Operation 20 Viewing the LCD 20 Changing the machine settings 21 Checking machine operating procedures...

Users Manual - English
Page 24
... page. procedures Press (Previous page key) to return to the corresponding page in this Operation Manual. Press the item to the item selection screen. Press b (Help key) on the machine. a Upper threading b Bobbin winding c Bobbin installation d Embroidery unit attachment e Embroidery frame attachment f Needle replacement X The first screen describing the procedure for the selected topic...
... page. procedures Press (Previous page key) to return to the corresponding page in this Operation Manual. Press the item to the item selection screen. Press b (Help key) on the machine. a Upper threading b Bobbin winding c Bobbin installation d Embroidery unit attachment e Embroidery frame attachment f Needle replacement X The first screen describing the procedure for the selected topic...

Users Manual - English
Page 33
... window and check that allows you to the left hand, then feeding the thread with sewing machine needles 75/11 through the take -up lever. Pull the end of the thread passed through... the needle. Memo z The needle threader can easily be used , refer to "Threading the needle manually (without using your left , and then pass the thread through the thread guide disk from the front... thread guide by holding the thread in the order shown below. 1 a Shutter Note z If the embroidery foot has been lowered and the shutter is correctly fed through 100/16. The thread can be threaded...
... window and check that allows you to the left hand, then feeding the thread with sewing machine needles 75/11 through the take -up lever. Pull the end of the thread passed through... the needle. Memo z The needle threader can easily be used , refer to "Threading the needle manually (without using your left , and then pass the thread through the thread guide disk from the front... thread guide by holding the thread in the order shown below. 1 a Shutter Note z If the embroidery foot has been lowered and the shutter is correctly fed through 100/16. The thread can be threaded...

Users Manual - English
Page 35
Thread the machine to the needle bar thread a guide. • For details, refer to start embroidering. b ...as described below. Raise the presser foot lever, pass the end of the e thread through the embroidery foot hole. Threading the needle manually (without using the needle threader) X The upper threading is not raised, the needle threader cannot... thread" (page 30). GETTING READY Raise the presser foot lever, pass the end of the d thread through the embroidery foot hole. 34 Be sure to press (Needle position button) to raise the needle before using special thread, thread...
Thread the machine to the needle bar thread a guide. • For details, refer to start embroidering. b ...as described below. Raise the presser foot lever, pass the end of the e thread through the embroidery foot hole. Threading the needle manually (without using the needle threader) X The upper threading is not raised, the needle threader cannot... thread" (page 30). GETTING READY Raise the presser foot lever, pass the end of the d thread through the embroidery foot hole. 34 Be sure to press (Needle position button) to raise the needle before using special thread, thread...

Users Manual - English
Page 84
... 8 M Brother poly #90 bobbin thread 7 buzzer 82 machine settings 21 , main power switch 9 19 C characters 52 maintenance 70 manual needle threading 34 , memory key 11 63 cleaning 70 cleaning brush 6 N D dust cover 6 E , embroidery card 7 55 embroidery card slot 9 , Embroidery foot "Q 6 9 embroidery foot attachment 72 embroidery frame 43 embroidery frame attachment 47 embroidery frame removal 48 embroidery key 11 embroidery pattern 53 embroidery pattern...
... 8 M Brother poly #90 bobbin thread 7 buzzer 82 machine settings 21 , main power switch 9 19 C characters 52 maintenance 70 manual needle threading 34 , memory key 11 63 cleaning 70 cleaning brush 6 N D dust cover 6 E , embroidery card 7 55 embroidery card slot 9 , Embroidery foot "Q 6 9 embroidery foot attachment 72 embroidery frame 43 embroidery frame attachment 47 embroidery frame removal 48 embroidery key 11 embroidery pattern 53 embroidery pattern...

Quick Setup Guide USB - English
Page 4
...may cause the embroidery machine to its proprietary programs. All other brands and product names mentioned in this manual are registered trademarks of their respective companies. Download the driver from our web site (www.brother.com).) ■ Precautions on a computer. If embroidery data is stored...13 cm (W) is a registered trademark or a trademark of International Business Machines Corporation. • Microsoft and Windows are not clearly described within the 18 cm (H) × 13 cm (W) design field size.) • .pes files saved with this occurs, change the thread colors as ...
...may cause the embroidery machine to its proprietary programs. All other brands and product names mentioned in this manual are registered trademarks of their respective companies. Download the driver from our web site (www.brother.com).) ■ Precautions on a computer. If embroidery data is stored...13 cm (W) is a registered trademark or a trademark of International Business Machines Corporation. • Microsoft and Windows are not clearly described within the 18 cm (H) × 13 cm (W) design field size.) • .pes files saved with this occurs, change the thread colors as ...

Quick Setup Guide USB - English
Page 6
Press . When the message "Reduce the number of the Operation Manual. Only up to the "Removable Disk" in the connected computer or data is turned off the machine. When 13 or more patterns are needed, save the data in reverse highlighting. b a c Adjust the pattern as desired, and then begin ...from the "Removable Disk". Error Message Probable Cause While embroidering, data is written to 12 patterns can embroider the retrieved pattern. X The embroidery screen appears, and you wish to "Removable Disk" are 13 or more than 12 patterns. z If patterns copied to retrieve. For ...
Press . When the message "Reduce the number of the Operation Manual. Only up to the "Removable Disk" in the connected computer or data is turned off the machine. When 13 or more patterns are needed, save the data in reverse highlighting. b a c Adjust the pattern as desired, and then begin ...from the "Removable Disk". Error Message Probable Cause While embroidering, data is written to 12 patterns can embroider the retrieved pattern. X The embroidery screen appears, and you wish to "Removable Disk" are 13 or more than 12 patterns. z If patterns copied to retrieve. For ...


