

Users Manual - English
Page 5
...stabilizer material 18 Embroidering different types of fabric 18 Setting the fabric in the embroidery frame 20 Fitting the embroidery frame to the machine 22 Removing the embroidery frame ...... 22 THREAD TENSION ADJUSTMENT....... 23 ADJUSTING THE LCD SCREEN CONTRAST 24 If the LCD is hard...the characters input .......... 34 Changing the color of single characters 34 Selecting frame patterns 35 Selecting one-point patterns 37 Displaying the embroidery time for one-point patterns 39 Displaying the color names for one-point patterns 39 Selecting patterns from a memory card 40 2 MEMORY ...
...stabilizer material 18 Embroidering different types of fabric 18 Setting the fabric in the embroidery frame 20 Fitting the embroidery frame to the machine 22 Removing the embroidery frame ...... 22 THREAD TENSION ADJUSTMENT....... 23 ADJUSTING THE LCD SCREEN CONTRAST 24 If the LCD is hard...the characters input .......... 34 Changing the color of single characters 34 Selecting frame patterns 35 Selecting one-point patterns 37 Displaying the embroidery time for one-point patterns 39 Displaying the color names for one-point patterns 39 Selecting patterns from a memory card 40 2 MEMORY ...

Users Manual - English
Page 17
Holding the thread end, press the "START/STOP" button. The machine will stop at any time or when the bobbin has stopped moving and the motor is still running. 1 "START/STOP" button 7. TROUBLESHOOTING PATTERNS EMBROIDERING USING A SMALL FRAME (...thread end, push the bobbin winder shaft to right. * Match the groove of the bobbin after the machine stops. * It is full. Remove the bobbin and continue sewing. 8. CONTENTS MACHINE KNOWLEDGE EMBROIDERING MAINTENANCE ERROR MESSAGE 2 3 3. Wind the thread a few times around the bobbin and press the "START/STOP" button again.
Holding the thread end, press the "START/STOP" button. The machine will stop at any time or when the bobbin has stopped moving and the motor is still running. 1 "START/STOP" button 7. TROUBLESHOOTING PATTERNS EMBROIDERING USING A SMALL FRAME (...thread end, push the bobbin winder shaft to right. * Match the groove of the bobbin after the machine stops. * It is full. Remove the bobbin and continue sewing. 8. CONTENTS MACHINE KNOWLEDGE EMBROIDERING MAINTENANCE ERROR MESSAGE 2 3 3. Wind the thread a few times around the bobbin and press the "START/STOP" button again.

Users Manual - English
Page 27
CONTENTS MACHINE KNOWLEDGE ADJUSTING THE LCD SCREEN CONTRAST To adjust the brightness of these keys is touched. If the LCD is hard to see when the power ... off and then on again once more. 24 EMBROIDERING USING A EXTRA-SMALL FRAME (OPTIONAL) EMBROIDERING USING A LARGE FRAME (OPTIONAL) The LCD will become darker each time one of the LCD screen 1 "Dull" Touch this key to make contrast less (lighter). 2 "Sharp" Touch this key to make contrast greater (darker). 3 Touch "END...
CONTENTS MACHINE KNOWLEDGE ADJUSTING THE LCD SCREEN CONTRAST To adjust the brightness of these keys is touched. If the LCD is hard to see when the power ... off and then on again once more. 24 EMBROIDERING USING A EXTRA-SMALL FRAME (OPTIONAL) EMBROIDERING USING A LARGE FRAME (OPTIONAL) The LCD will become darker each time one of the LCD screen 1 "Dull" Touch this key to make contrast less (lighter). 2 "Sharp" Touch this key to make contrast greater (darker). 3 Touch "END...
Users Manual - English
Page 35
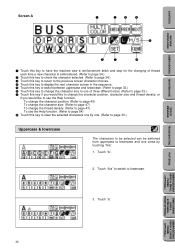
...) EMBROIDERING USING A EXTRA-SMALL FRAME (OPTIONAL) EMBROIDERING USING A LARGE FRAME (OPTIONAL) 32 CONTENTS MACHINE KNOWLEDGE EMBROIDERING MAINTENANCE ERROR MESSAGE Screen A 1 2 3 4 6 5 7 8 1 Touch this key to have the machine sew a reinforcement stitch and stop for the changing of thread each time a new character is embroidered. (Refer to page 34.) 2 Touch this key to check the...
...) EMBROIDERING USING A EXTRA-SMALL FRAME (OPTIONAL) EMBROIDERING USING A LARGE FRAME (OPTIONAL) 32 CONTENTS MACHINE KNOWLEDGE EMBROIDERING MAINTENANCE ERROR MESSAGE Screen A 1 2 3 4 6 5 7 8 1 Touch this key to have the machine sew a reinforcement stitch and stop for the changing of thread each time a new character is embroidered. (Refer to page 34.) 2 Touch this key to check the...

Users Manual - English
Page 36
...Large (L) 2 Medium (M) 3 Small (S) ERROR MESSAGE TROUBLESHOOTING Correcting characters One character can be changed by touching the "L/M/S" key. CONTENTS MACHINE KNOWLEDGE EMBROIDERING MAINTENANCE Changing the character size to the last character size selected. PATTERNS EMBROIDERING USING A SMALL FRAME (OPTIONAL) EMBROIDERING USING ...(OPTIONAL) Example: If "Giel" has been entered instead of the characters can be cleared with a backspace each time "CLEAR" is pressed it is touched. Each time it changes as shown below. (L → M → S → L ..) The size of all...
...Large (L) 2 Medium (M) 3 Small (S) ERROR MESSAGE TROUBLESHOOTING Correcting characters One character can be changed by touching the "L/M/S" key. CONTENTS MACHINE KNOWLEDGE EMBROIDERING MAINTENANCE Changing the character size to the last character size selected. PATTERNS EMBROIDERING USING A SMALL FRAME (OPTIONAL) EMBROIDERING USING ...(OPTIONAL) Example: If "Giel" has been entered instead of the characters can be cleared with a backspace each time "CLEAR" is pressed it is touched. Each time it changes as shown below. (L → M → S → L ..) The size of all...

Users Manual - English
Page 41
... ERROR MESSAGE TROUBLESHOOTING PATTERNS EMBROIDERING USING A SMALL FRAME (OPTIONAL) EMBROIDERING USING A EXTRA-SMALL FRAME (OPTIONAL) EMBROIDERING USING A LARGE FRAME (OPTIONAL) 38 CONTENTS MACHINE KNOWLEDGE EMBROIDERING MAINTENANCE Screen A 2 3 4 5 1 6 7 8 1 This indicates the order of the color currently being sewn will be displayed. 8 Touch...of color changes. 2 Touch this key to change the pattern position: (Refer to page 43) To use the Help function. The time taken to change the threads is not included in 1 to the color name (reference). (Refer to page 39.) ( It is...
... ERROR MESSAGE TROUBLESHOOTING PATTERNS EMBROIDERING USING A SMALL FRAME (OPTIONAL) EMBROIDERING USING A EXTRA-SMALL FRAME (OPTIONAL) EMBROIDERING USING A LARGE FRAME (OPTIONAL) 38 CONTENTS MACHINE KNOWLEDGE EMBROIDERING MAINTENANCE Screen A 2 3 4 5 1 6 7 8 1 This indicates the order of the color currently being sewn will be displayed. 8 Touch...of color changes. 2 Touch this key to change the pattern position: (Refer to page 43) To use the Help function. The time taken to change the threads is not included in 1 to the color name (reference). (Refer to page 39.) ( It is...
Users Manual - English
Page 42
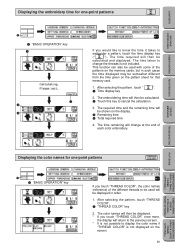
...the end of the different threads to be calculated and displayed. The time remaining will then be displayed in such cases the time displayed may be somewhat different from the time given on the pattern sheet for one -point patterns 1 1 "...1 Time display key 2. The embroidering time will change the threads is not displayed on the display. 3 Remaining time 4 Total required time 4. After selecting the pattern, touch "THREAD COLOR". 1 "THREAD COLOR" key 2. CONTENTS MACHINE KNOWLEDGE EMBROIDERING MAINTENANCE Displaying the embroidery time for that memory card. 1. The time taken...
...the end of the different threads to be calculated and displayed. The time remaining will then be displayed in such cases the time displayed may be somewhat different from the time given on the pattern sheet for one -point patterns 1 1 "...1 Time display key 2. The embroidering time will change the threads is not displayed on the display. 3 Remaining time 4 Total required time 4. After selecting the pattern, touch "THREAD COLOR". 1 "THREAD COLOR" key 2. CONTENTS MACHINE KNOWLEDGE EMBROIDERING MAINTENANCE Displaying the embroidery time for that memory card. 1. The time taken...
Users Manual - English
Page 48
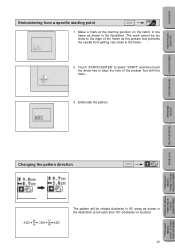
... the needle from a specific starting position on the fabric in the illustration. Embroider the pattern. Make a mark at left each time "90˚ clockwise" is touched. 45 EMBROIDERING USING A LARGE FRAME (OPTIONAL) CONTENTS MACHINE KNOWLEDGE EMBROIDERING MAINTENANCE Embroidering from getting very close to the edge of the presser foot with the mark.
... the needle from a specific starting position on the fabric in the illustration. Embroider the pattern. Make a mark at left each time "90˚ clockwise" is touched. 45 EMBROIDERING USING A LARGE FRAME (OPTIONAL) CONTENTS MACHINE KNOWLEDGE EMBROIDERING MAINTENANCE Embroidering from getting very close to the edge of the presser foot with the mark.
Users Manual - English
Page 50
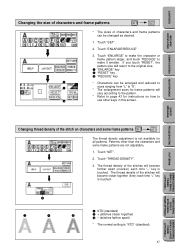
...vary according to the pattern. * Refer to make it smaller. Touch "SET". 2. The thread density of the stitches will become farther apart (coarser) each time "+" key is touched. 1 1 STD (standard) 2 + (stitches closer together) 3 - (stitches farther apart) * The normal setting is not available ... to page 43 for instructions on characters and some frame patterns are not adjustable. 1. Touch "THREAD DENSITY". 3. CONTENTS MACHINE KNOWLEDGE EMBROIDERING MAINTENANCE Changing the size of characters and frame patterns * The sizes of characters and frame patterns can be changed as desired...
...vary according to the pattern. * Refer to make it smaller. Touch "SET". 2. The thread density of the stitches will become farther apart (coarser) each time "+" key is touched. 1 1 STD (standard) 2 + (stitches closer together) 3 - (stitches farther apart) * The normal setting is not available ... to page 43 for instructions on characters and some frame patterns are not adjustable. 1. Touch "THREAD DENSITY". 3. CONTENTS MACHINE KNOWLEDGE EMBROIDERING MAINTENANCE Changing the size of characters and frame patterns * The sizes of characters and frame patterns can be changed as desired...
Users Manual - English
Page 69
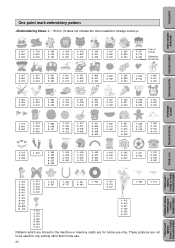
These patterns are for any activity other than home use only. CONTENTS One point mark embroidery pattern MACHINE KNOWLEDGE EMBROIDERING MAINTENANCE 1...001 2...800 3...900 1...704 2...800 3...900 1...205 2...339 3...900 1...339 2...205 3...900 1...339 2...800 3...900 1...205 2...... 2...900 1...900 1...001 2...515 3...507 1...515 2...513 3...001 4...208 5...205 6...513 1...086 1...614 Patterns which are stored in the machine or memory cards are not to be used for home use . 66 EMBROIDERING USING A EXTRA-SMALL FRAME (OPTIONAL) EMBROIDERING USING A LARGE FRAME (OPTIONAL)
These patterns are for any activity other than home use only. CONTENTS One point mark embroidery pattern MACHINE KNOWLEDGE EMBROIDERING MAINTENANCE 1...001 2...800 3...900 1...704 2...800 3...900 1...205 2...339 3...900 1...339 2...205 3...900 1...339 2...800 3...900 1...205 2...... 2...900 1...900 1...001 2...515 3...507 1...515 2...513 3...001 4...208 5...205 6...513 1...086 1...614 Patterns which are stored in the machine or memory cards are not to be used for home use . 66 EMBROIDERING USING A EXTRA-SMALL FRAME (OPTIONAL) EMBROIDERING USING A LARGE FRAME (OPTIONAL)


